

Introduction and Background
My friend received a Samsung mobile phone few month ago. She liked it yet one thing that it doesn't have is the toolbox for fundamental utilities. One of them is the spotlight application that triggers the gadget to enact or deactivate the electric lamp as required. Android supports you having the Camera API devoured in your application (an electric lamp is given to photographs or recordings and not as a floodlight). Anyway, I was thinking that I ought to get an application from Play Store, correct? No! Despite the fact that it would give me an answer for my spotlight issue, shouldn't something be said about the barrage of ads I had to experience, or the hazy UI of the application? So I figured I should manufacture an application for her to have the capacity to trigger the spotlight on or off.
Since I made it for her, why not show you all as well, so you can utilize a similar application, or expand it and share it with me so I can likewise utilize your abilities.
In this article I will talk about Xamarin.Android for Camera API. In spite of the fact that this sort of use is exceptionally essential and straight-forward, at any rate it will furnish you with an extremely fundamental way of utilizing Camera API.
Pre-requisites
You are not required to have a an advanced understanding of Android APIs or how Linux functions, later authorizations and the rest will be discussed in the article. Be that as it may, I will attempt to ensure that I am as clear as an apprentice in this idea would need me to be.
Step 1
Create/ open your Android solution in Visual Studio or Xamarin Studio. Select Android and from list choose Android Blank App.
Step 2
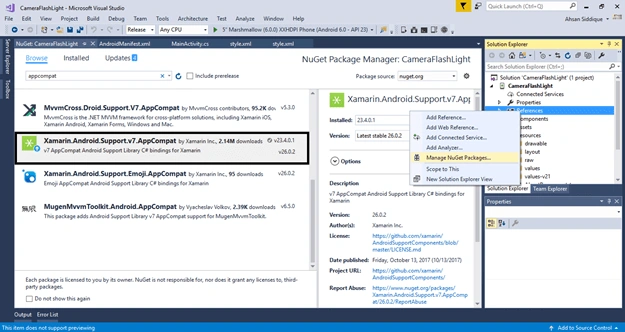
First of all, in References add a reference Xamarin.Android.Support.v7. AppCompat using NuGet Package Manager, as shown below.
Step 3
After Successful Installation of AppCompat, add an XML File in values Folder with name style. In this file add some Code Theme Colors, as shown below.
(Folder Name: values, File Name: style.xml)
XML Code
- <?xml version="1.0" encoding="utf-8" ?>
- <resources>
- <style name="MyTheme" parent="MyTheme.Base">
- </style>
- <!--Base theme applied no matter what API-->
- <style name="MyTheme.Base" parent="Theme.AppCompat.Light.DarkActionBar">
- <item name="windowNoTitle">true</item>
- <!--We will be using the toolbar so no need to show ActionBar-->
- <item name="windowActionBar">false</item>
- <!--Set theme color from http://www.google.com/design/spec/style/color.html#color-co-->
- <!--Color Primary is used for default action bar backround-->
- <item name="colorPrimary">#009688</item>
- <!--Color Primary Dark is use for status bar-->
- <item name="colorPrimaryDark">#1976D2</item>
- <!--ColorAccent is used as the default value for
- ColorControlActivated which is used to tint widgts-->
- <item name="colorAccent">#FF4081</item>
- <item name="colorControlHighlight">#FF4081</item>
- <!--You can also set ColorControlNormal ColorControlActivated
- ColorControlHihglight colorSwitchThumbNormal.-->
- </style>
- </resources>
Step 4
Now, add a new Folder in Resources Folder with name values-v21. In values-v21 Folder Add a new XML file with name style and insert some Code for Theme Properties, as shown below.
(Folder Name: values-v21, File Name: style.xml)
XML Code
- <?xml version="1.0" encoding="utf-8" ?>
- <resources>
- <!--
- Base Application theme for API 21+. this theme
- replaces MyTheme from res/style.xml on API 21+ devices-->
- <style name="MyTheme" parent="MyTheme.Base">
- <item name="android:windowContentTransitions">true</item>
- <item name="android:windowAllowEnterTransitionOverlap">true</item>
- <item name="android:windowAllowReturnTransitionOverlap">true</item>
- <item name="android:windowSharedElementEnterTransition">@android:transition/move</item>
- <item name="android:windowSharedElementExitTransition">@android:transition/move</item>
- <item name="android:windowTranslucentStatus">true</item>
- </style>
- </resources>
Step 5
In drawable Folder add Two Images with Name light_off and light_on that I attached with article files with name Images.zip.
(Folder Name: drawable)
(Files Name: light_off, light_on)


Step 6
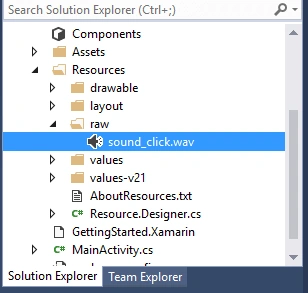
Now add another Folder in Resources Folder with the name raw, and in this Folder Click Button Sound with name sound_click that I attached. With name sound_click.zip you can download from this article files.
(Folder Name: raw)
(Files Name: sound_click)
Step 7
In Main,axml add this Code for ImageView and Toolbar, as shown below.
(Files Name: Main.axml)
XML Code
- <?xml version="1.0" encoding="utf-8"?>
- <LinearLayout xmlns:android="http://schemas.android.com/apk/res/android"
- xmlns:local="http://schemas.android.com/apk/res-auto"
- android:orientation="vertical"
- android:layout_width="match_parent"
- android:layout_height="match_parent">
- <android.support.v7.widget.Toolbar
- android:layout_margin="10dp"
- android:id="@+id/toolbar"
- android:layout_width="match_parent"
- android:layout_height="wrap_content"
- android:minHeight="?attr/actionBarSize"
- android:background="?attr/colorPrimary"
- android:theme="@style/ThemeOverlay.AppCompat.Dark.ActionBar"
- local:popupTheme="@style/ThemeOverlay.AppCompat.Light"/>
- <LinearLayout
- android:layout_width="match_parent"
- android:layout_height="match_parent"
- android:layout_gravity="center">
- <ImageView
- android:id="@+id/imageView"
- android:layout_gravity="center"
- android:layout_width="match_parent"
- android:layout_height="wrap_content"
- android:src="@drawable/power_off" />
- </LinearLayout>
- </LinearLayout>
Step 8
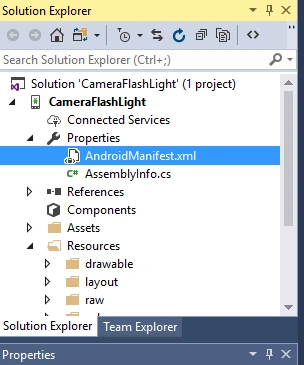
In Solution Explorer Click on Properties and Open AndroidManifest.xml file. Add this Code for Permissions, as shown below.
Setting the permissions for our application
Like every single different process in a Linux situation, we initially need to set up the consents for our application to have the capacity to utilize. Without authorizations, our application will wind up having Runtime Exceptions. In this way, before going any further, open your application's show and compose the accompanying authorizations to it.
XML Code
- <?xml version="1.0" encoding="utf-8"?>
- <manifest xmlns:android="http://schemas.android.com/apk/res/android" package="CameraFlashLight.CameraFlashLight" android:versionCode="1" android:versionName="1.0">
- <uses-sdk android:minSdkVersion="16" />
- <uses-permission android:name="android.permission.CAMERA" />
- <uses-permission android:name="android.hardware.CAMERA" />
- <application android:label="CameraFlashLight"></application>
- </manifest>
The above code is the arrangement of consents required. We additionally need to be ready to utilize the blaze, in this manner we set them up independently. One thing to note is that in spite of the fact that everything that accompanies a camera is controlled by the camera, in any case, our application needs authorization to utilize every single segment including spotlight. Camera won't enable your application to locally speak with the parts if your show does not share the authorizations points of interest; consequently, a Runtime Exception.
The <uses-feature> component enables us to demonstrate that our application requires these highlights and is of no use without them. Obviously our application would be of no use, if there is no spotlight found in the gadget. The ascribe android:required enables us to set a condition for our application to be introduced, or overlook contingent upon the presence of that equipment highlight. You can set it to either obvious or false, indicating that the component is required.
That is, it for authorizations, we simply need to utilize the Camera protest and after that request that it turn on the electric lamp for us, as long as we need.
Step 9
In this step we write some functions and initialize some component of controls. Copy and Paste Code in to MainActivity.cs, as Shown below.
(Files Name: MainActivity.cs)
Code
- using Android.App;
- using Android.Widget;
- using Android.OS;
- using Android.Support.V7.App;
- using Android.Hardware;
- using System;
- using static Android.Hardware.Camera;
- using Java.Lang;
- using Android.Util;
- using Android.Media;
- namespace CameraFlashLight
- {
- [Activity(Label = "CameraFlashLight", MainLauncher = true,
- Icon = "@drawable/icon",Theme ="@style/MyTheme")]
- public class MainActivity : AppCompatActivity
- {
- //Initializing
- private Camera camera;
- private Parameters mParams;
- private bool isFlashLight;
- private ImageView btnFlash;
- private MediaPlayer player;
- protected override void OnCreate(Bundle bundle)
- {
- base.OnCreate(bundle);
- // Set our view from the "main" layout resource
- SetContentView (Resource.Layout.Main);
- //Set Title of App
- var toolbar = FindViewById<Android.Support.V7.Widget.Toolbar>(Resource.Id.toolbar);
- SetSupportActionBar(toolbar);
- SupportActionBar.Title = "Flash Light";
- //FindView
- btnFlash = FindViewById<ImageView>(Resource.Id.imageView);
- player = MediaPlayer.Create(this, Resource.Raw.sound_click);
- //On Click delegate
- btnFlash.Click += delegate
- {
- FlashLight();
- };
- //Has Flash Function For Checking
- bool hasflash = ApplicationContext.PackageManager.HasSystemFeature
- (Android.Content.PM.PackageManager.FeatureCameraFlash);
- if (!hasflash)
- {
- Android.App.AlertDialog alert = new Android.App.AlertDialog.Builder(this).Create();
- alert.SetTitle("Error!");
- alert.SetMessage("Sorry, your device doesn't support flash light");
- alert.SetButton("OK", (s, e) => { return; });
- alert.Show();
- }
- getCamera();
- }
- private void getCamera()
- {
- if(camera == null)
- {
- try
- {
- camera = Camera.Open();
- mParams = camera.GetParameters();
- }
- catch (RuntimeException ex)
- {
- Log.Info("Error", ex.Message);
- }
- }
- }
- //FlashLight Function
- private void FlashLight()
- {
- if (camera == null || mParams == null)
- return;
- if (!isFlashLight)
- {
- player.Start();
- mParams = camera.GetParameters();
- mParams.FlashMode = Parameters.FlashModeTorch;
- camera.SetParameters(mParams);
- camera.StartPreview();
- isFlashLight = true;
- btnFlash.SetImageResource(Resource.Drawable.power_on);
- }
- else
- {
- player.Start();
- mParams = camera.GetParameters();
- mParams.FlashMode = Parameters.FlashModeOff;
- camera.SetParameters(mParams);
- camera.StartPreview();
- isFlashLight = false;
- btnFlash.SetImageResource(Resource.Drawable.power_off);
- }
- }
- }
- }
Output
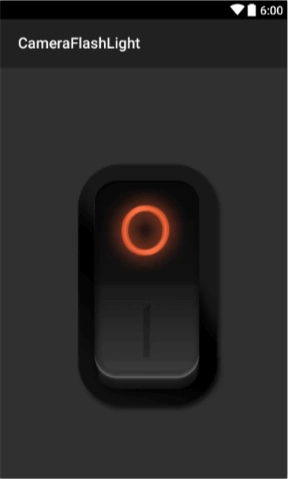
Now, run the Application and you will see the output given below
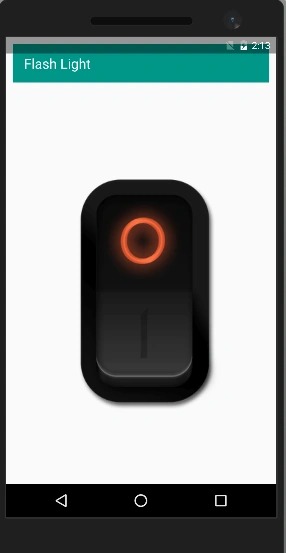
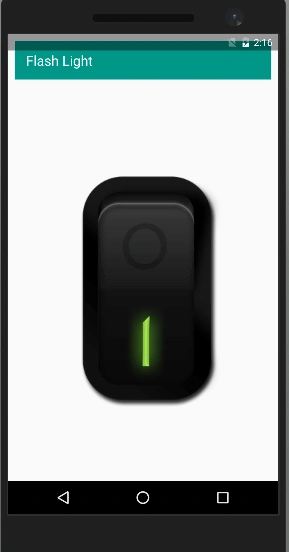
Summary
This is a very basic and easy method to create a flashlight app in Xamarin.Android using Visual Studio. Please share your comments and feedback.
Tan JuiPosted Mar 10, 2018, 1:50 AM
Hi, I have this error consistently when i try to do step 2. I am running Visual Studio 2017 v15.6.1 Error Could not install package 'Xamarin.Android.Support.v4 21.0.0'. You are trying to install this package into a project that targets 'native,Version=v0.0', but the package does not contain any assembly references or content files that are compatible with that framework. For more information, contact the package author. 0