

Introduction
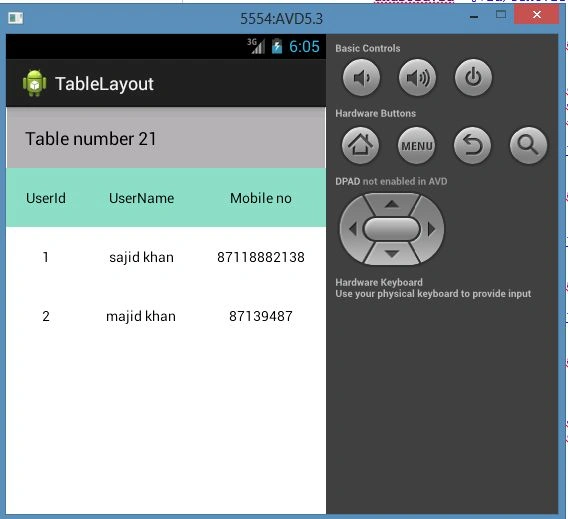
In this article, I explain the table layout. Actually table layout is nothing but a view as a grid view. In Android, table layout works the same as an HTML table layout. A Table layout divides data into rows and columns, but we define only a row for the table and the column will be automatically created depending on the required fields in the row. You will see the table layout in the output image.
Now use the following procedure to learn how to create a table layout and how to use it.
Step 1
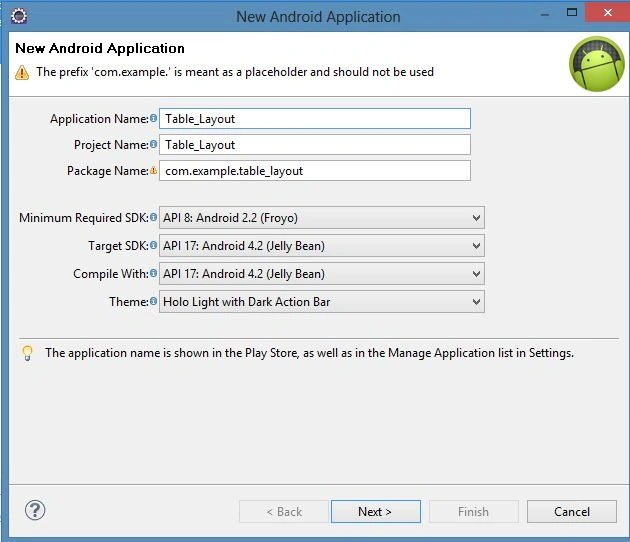
Create a new Android project as "File" -> "New" -> "Android Application Project" as shown in the following image"
Step 2
Now open the XML file "res/layout/activity_main.xml" and update it using the following code:
- <TableLayout
- xmlns:android="http://schemas.android.com/apk/res/android"
- android:layout_width="match_parent"
- android:layout_height="match_parent"
- android:shrinkColumns="*" android:stretchColumns="*" android:background="#ffffff">
- <!-- Row 1 with single column -->
- <TableRow
- android:layout_height="wrap_content"
- android:layout_width="fill_parent"
- android:gravity="center_horizontal">
- <TextView
- android:layout_width="match_parent" android:layout_height="wrap_content"
- android:textSize="18dp" android:text="Table number 21" android:layout_span="3"
- android:padding="18dip" android:background="#b0b0b0"
- android:textColor="#000"/>
- </TableRow>
- <!-- Row 2 with 3 columns -->
- <TableRow
- android:id="@+id/tableRow1"
- android:layout_height="wrap_content"
- android:layout_width="match_parent"
- android:baselineAligned="true" android:background="#8adec7">
- <TextView
- android:id="@+id/TextView04" android:text="UserId"
- android:layout_weight="1"
- android:textColor="#000000"
- android:padding="20dip" android:gravity="center"/>
- <TextView
- android:id="@+id/TextView04" android:text="UserName"
- android:layout_weight="1"
- android:textColor="#000000"
- android:padding="20dip" android:gravity="center"/>
- <TextView
- android:id="@+id/TextView04" android:text="Mobile no"
- android:layout_weight="1"
- android:textColor="#000000"
- android:padding="20dip" android:gravity="center"/>
- </TableRow>
- <!-- Row 3 with 2 columns -->
- <TableRow
- android:layout_height="wrap_content"
- android:layout_width="fill_parent"
- android:gravity="center_horizontal">
- <TextView
- android:id="@+id/TextView04" android:text="1"
- android:layout_weight="1"
- android:textColor="#000000"
- android:padding="20dip" android:gravity="center"/>
- <TextView
- android:id="@+id/TextView04" android:text="sajid khan"
- android:layout_weight="1"
- android:textColor="#000000"
- android:padding="20dip" android:gravity="center"/>
- <TextView
- android:id="@+id/TextView05" android:text="87118882138"
- android:layout_weight="1"
- android:textColor="#000000"
- android:padding="20dip" android:gravity="center"/>
- </TableRow>
- <TableRow
- android:layout_height="wrap_content"
- android:layout_width="fill_parent"
- android:gravity="center_horizontal">
- <TextView
- android:id="@+id/TextView04" android:text="2"
- android:layout_weight="1"
- android:textColor="#000000"
- android:padding="20dip" android:gravity="center"/>
- <TextView
- android:id="@+id/TextView04" android:text="majid khan"
- android:layout_weight="1"
- android:textColor="#000000"
- android:padding="20dip" android:gravity="center"/>
- <TextView
- android:id="@+id/TextView05" android:text="87139487"
- android:layout_weight="1"
- android:textColor="#000000"
- android:padding="20dip" android:gravity="center"/>
- </TableRow>
- <ListView
- android:id="@+id/list_view"
- android:layout_width="fill_parent"
- android:layout_height="wrap_content" />
- </TableLayout>
Step 3
Open the Java file "MainActivity.java" and update it with the following code:
- package com.example.tablelayout;
- import java.util.ArrayList;
- import java.util.HashMap;
- import android.app.Activity;
- import android.os.Bundle;
- import android.view.Menu;
- import android.widget.ArrayAdapter;
- import android.widget.ListView;
- public class MainActivity extends Activity {
- private ListView lv;
- ArrayAdapter<String> adapter;
- ArrayList<HashMap<String, String>> productList;
- @Override
- protected void onCreate(Bundle savedInstanceState) {
- super.onCreate(savedInstanceState);
- setContentView(R.layout.activity_main);
- }
- @Override
- public boolean onCreateOptionsMenu(Menu menu) {
- // Inflate the menu; this adds items to the action bar if it is present.
- getMenuInflater().inflate(R.menu.main, menu);
- return true;
- }
- }
Step 4
Open the "strings.xml" file and update it with your string resources, whatever you want to add with strings.
- <?xml version="1.0" encoding="utf-8"?>
- <resources>
- <string name="app_name">TableLayout</string>
- <string name="action_settings">Settings</string>
- <string name="hello_world">Hello world!</string>
- </resources>
Step 5
Table Layout:
Join the conversation! Your thoughts help the community grow.