Introduction
In this post, we will see all the steps to create an Alexa clone voice assistant using Azure AI Speech and Conversational language understanding (CLU) workload in Azure AI Language.
Azure AI Speech
Azure AI Speech is a cloud-based service provided by Microsoft as part of its Azure Cognitive services. It enables developers to integrate speech processing capabilities into their applications, services, and devices. The Azure AI Speech service offers various speech capabilities including speech recognition, text-to-speech, speech translation, and speaker recognition.
Here’s an overview of the key features of Azure AI Speech service:
1. Speech-to-Text (STT)
- Real-Time Speech Recognition: Converts spoken audio into text in real-time. Useful for applications like voice assistants, transcription services, and more.
- Batch Transcription: Allows for the processing of pre-recorded audio files in batch mode.
- Customization: Enables customization of the speech recognition models to better understand domain-specific terminology.
- Different Languages and Dialects: Supports a wide range of languages and dialects.
2. Text-to-Speech (TTS)
- Realistic Voices: Converts text into lifelike spoken audio in various languages.
- Custom Voice: Allows for the creation of a unique voice font for your brand.
- Style Control: Adjusts the speaking style of the voice to suit different scenarios or emotions.
3. Speech Translation
- Real-Time Translation: Supplies real-time translation of spoken language into another spoken language.
- Wide Range of Languages: Supports many languages and dialects.
4. Speaker Recognition
- Speaker Verification: Confirms whether a given piece of audio matches a specific speaker's voice.
- Speaker Identification: Shows who is speaking from a group of known speakers.
- Voice Enrollment: Process of registering a user's voice for later recognition.
5. Speech Analytics
- Sentiment Analysis: Analyzes spoken language to figure out the speaker's sentiment.
- Keyword Spotting: Shows specific words or phrases in spoken language.
Use Cases
- Voice Assistants and Bots: Enhance customer service with voice-enabled assistants.
- Transcription Services: Automatically transcribe audio from meetings, lectures, or interviews.
- Accessibility: Make applications more accessible with voice interfaces.
- Language Learning: Help in language learning with speech recognition and translation.
- Security: Use speaker recognition for biometric authentication.
Azure AI Language
Azure AI Language is a cloud-based service that supplies Natural Language Processing (NLP) features for analyzing and understanding text. We can use this service to help build intelligent applications using the web-based Language Studio, REST APIs, and client libraries.
The Language service also supplies several new features as well, which can either be:
- Preconfigured, which means the AI models that the feature uses are not customizable. You can just send your data and use the feature's output in your applications.
- Customizable, which means you'll train an AI model using our tools to fit your data specifically.
Language Studio is a set of UI-based tools that lets you explore, build, and integrate features from Azure AI Language into your applications.
Language Studio enables you to use the service features below without needing to write code.
- Named Entity Recognition (NER)
- Personally identifying (PII) and health (PHI) information detection
- Language detection
- Sentiment Analysis and opinion mining
- Summarization
- Key phrase extraction
- Entity linking
- Text analytics for health
- Custom text classification
- Custom Named Entity Recognition (Custom NER)
- Conversational language understanding
- Orchestration workflow
- Question answering
- Custom text analytics for health
Conversational language understanding (CLU) enables users to build custom natural language understanding models to predict the overall intention of an incoming utterance and extract essential information from it.
CLU refers to the technology and methods used to enable computers to understand, interpret, and respond to human language in a natural and intuitive manner, particularly within the context of a conversation.
We can create one .NET 6 Web API application and use Azure AI Speech SDK and Azure AI Language SDK. We will also create an Angular 16 application. Angular will record the audio from the user and send it to .NET Core Web API as webm format. In .NET Core, we will convert webm to wav format and this wav format will send to Azure Cognitive service and convert to text. This converted text will be sent to Azure CLU service and predict the top intent and entity from input text. This predicted intent and entity will be passed to Angular application and there it will control the logic to show or hide the images. In Conversational language understanding (CLU), we will mainly create two intents switch_on and switch_off. We will also create an entity device. We will create many utterances and train the CLU model. After that we will deploy the model.
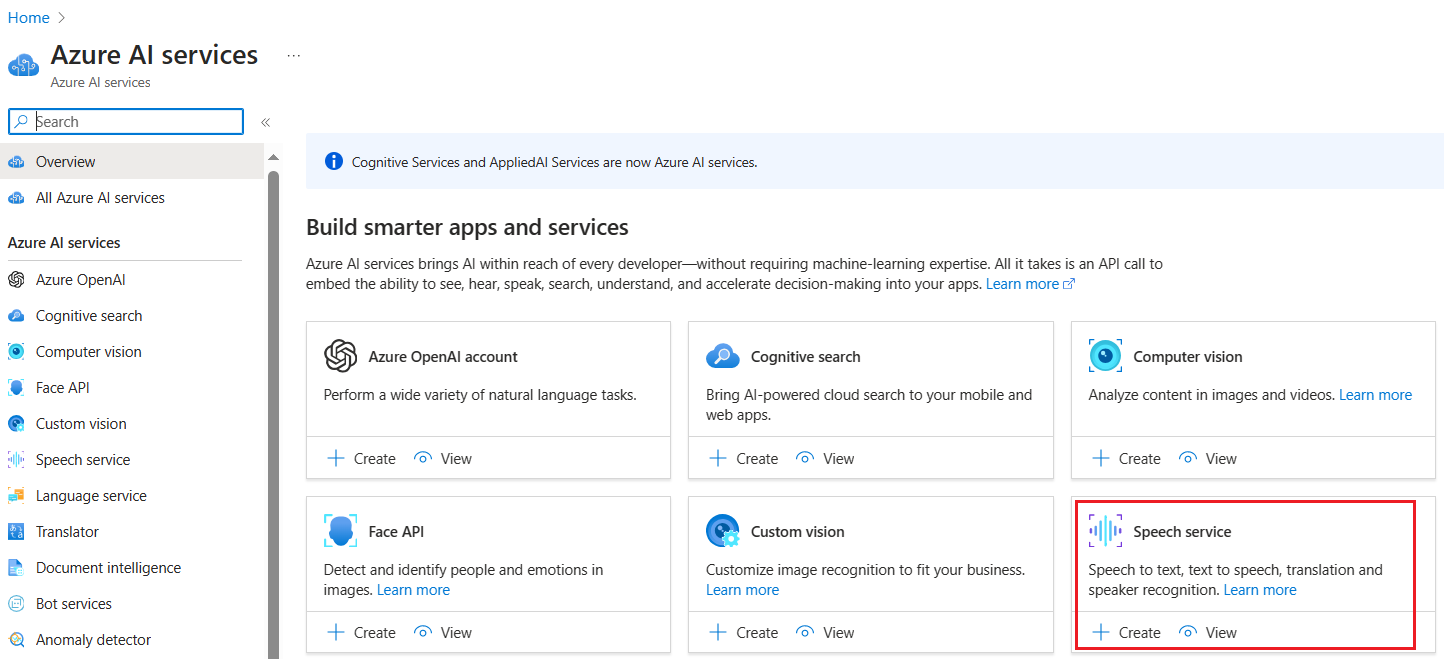
Create an Azure AI Speech in Azure portal
We can choose Azure AI services blade and select Speech service in Azure portal.
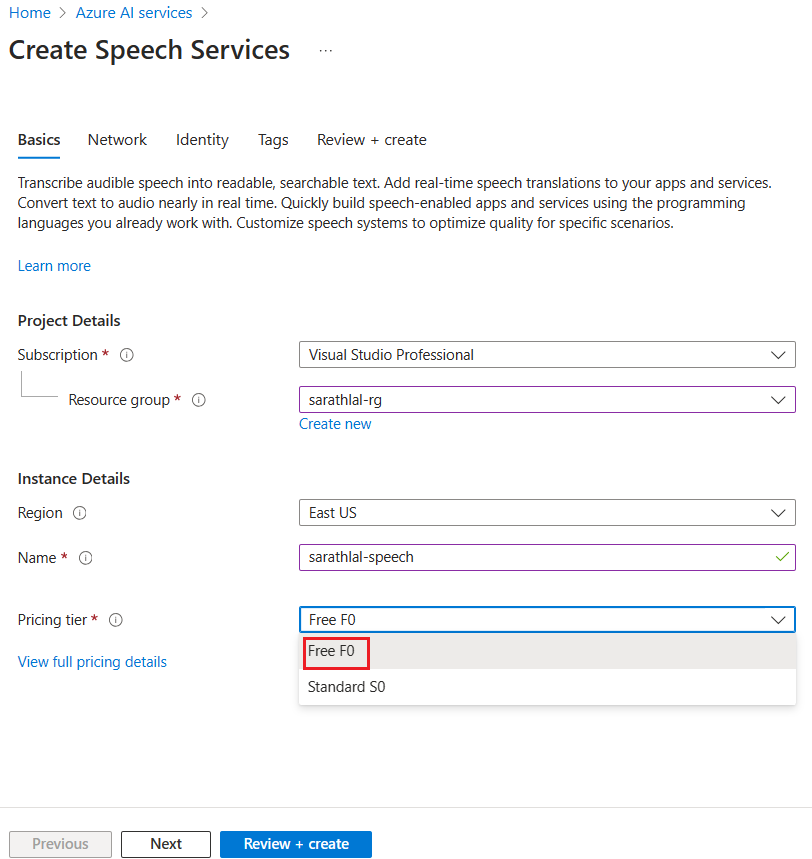
Please choose an existing resource group / create a new resource group. We can choose the Free F0 plan for testing purposes. Please note that, per subscription, only one free tier plan is available.
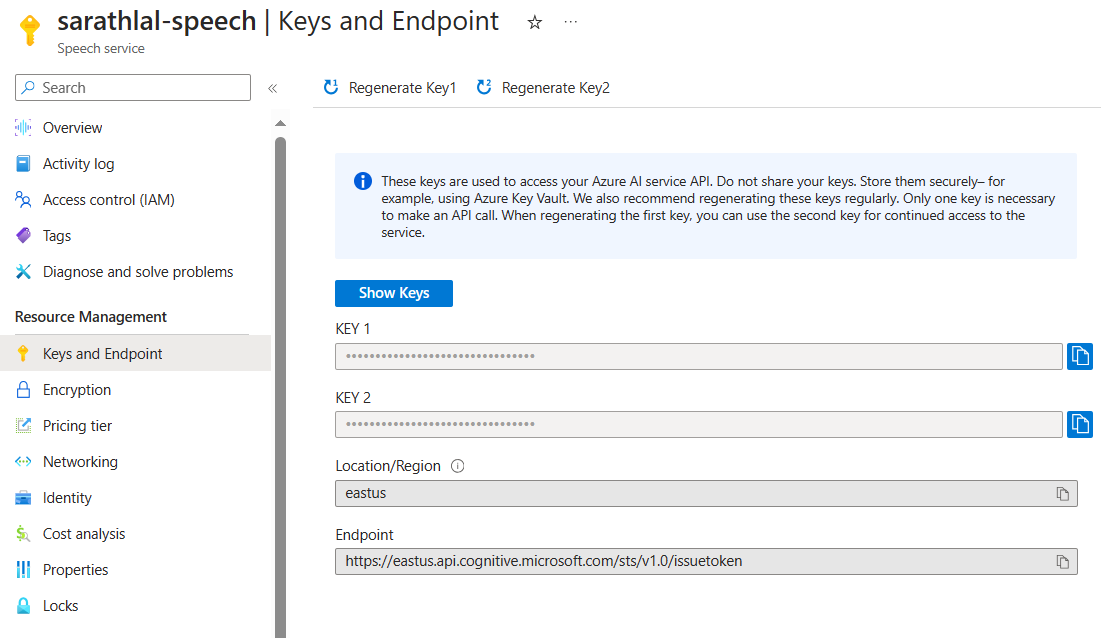
After creating the speech resource, we can go to the Keys and Endpoint tab and get the key. We will be using this key later in our .NET 6 Web API project.
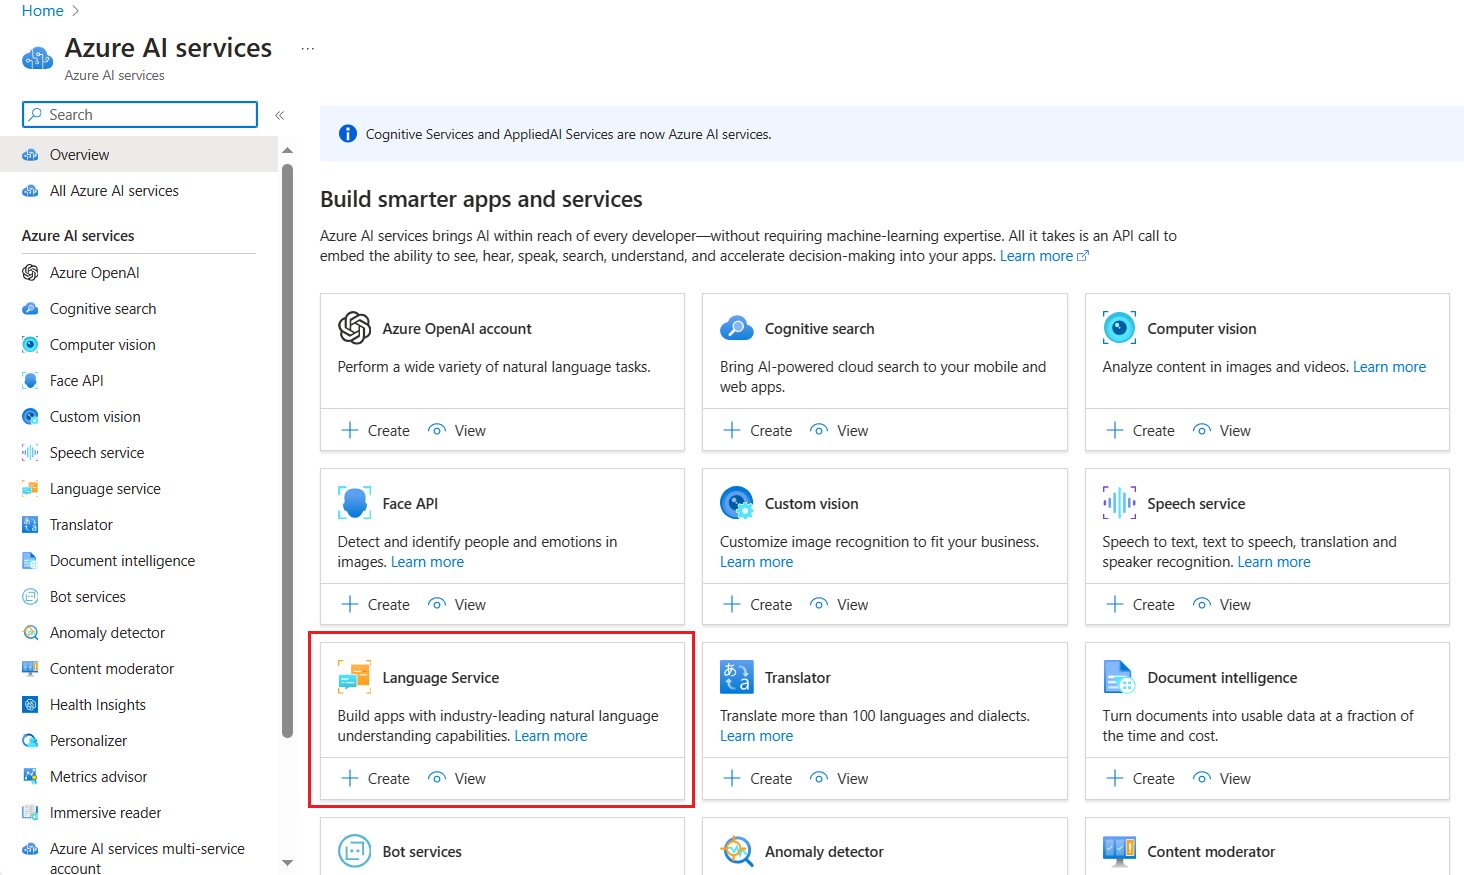
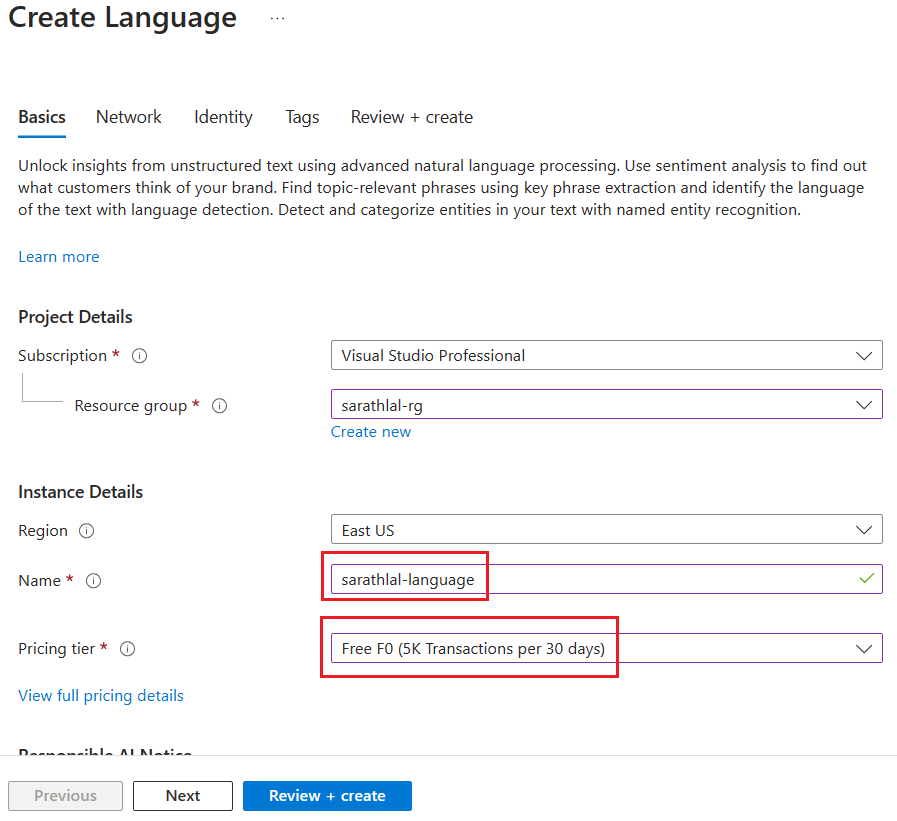
Create Language Service in Azure portal
Choose Azure AI services blade and Language Service from below listed Azure AI services and click Create button.
We can create/choose the existing resource group and select a valid instance name for your language service.
Currently Azure gives one free tier plan for Language service per subscription. The free tier allows 5K transactions per 30 days.
After creating the language resource, we can get the Keys and Endpoints. We will use these keys and endpoints in our .NET 6 Web API.
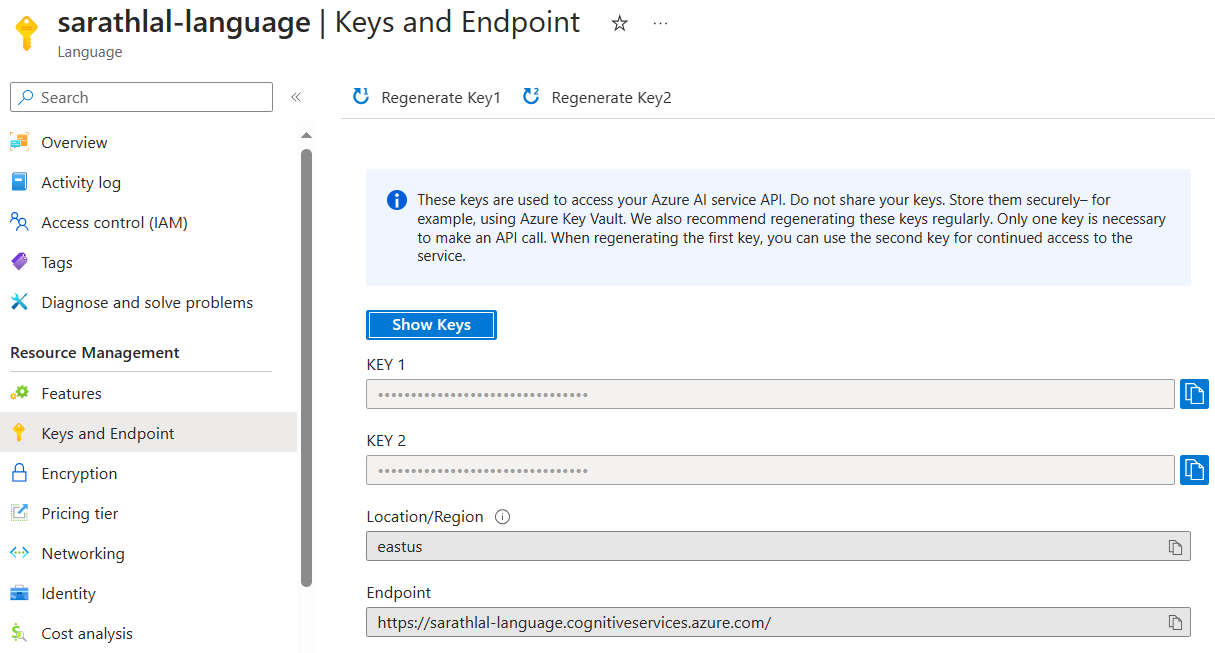
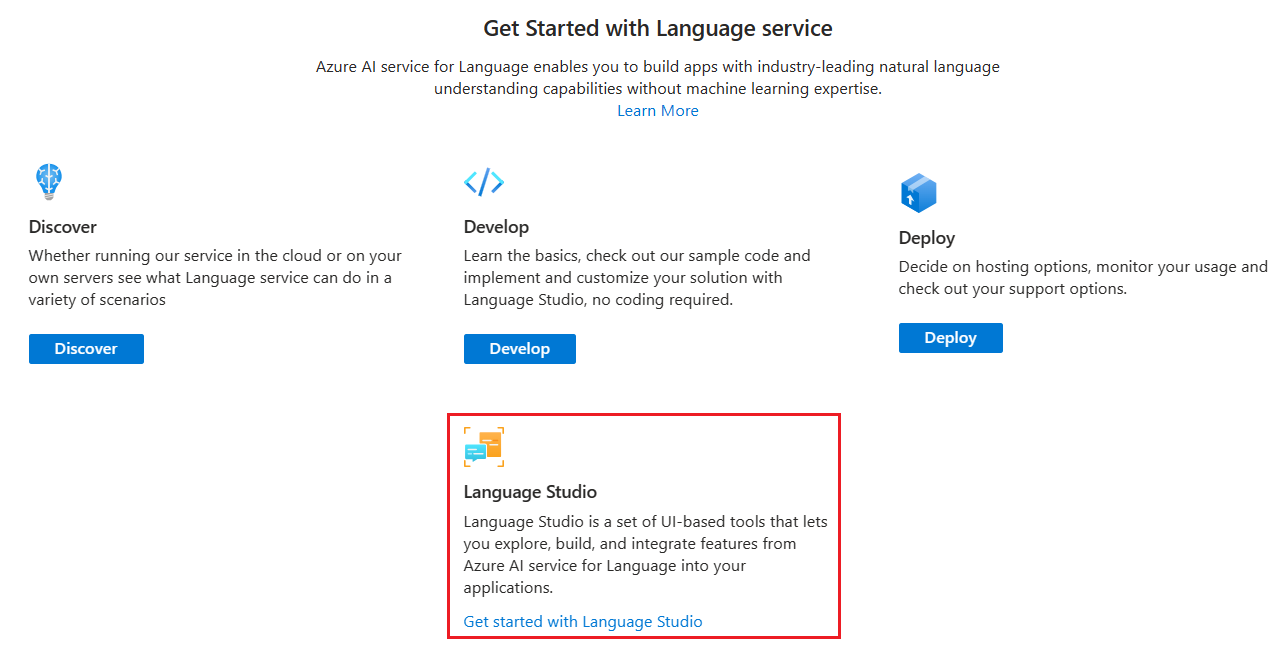
Open the Language resource Overview blade and click the Language Studio link.
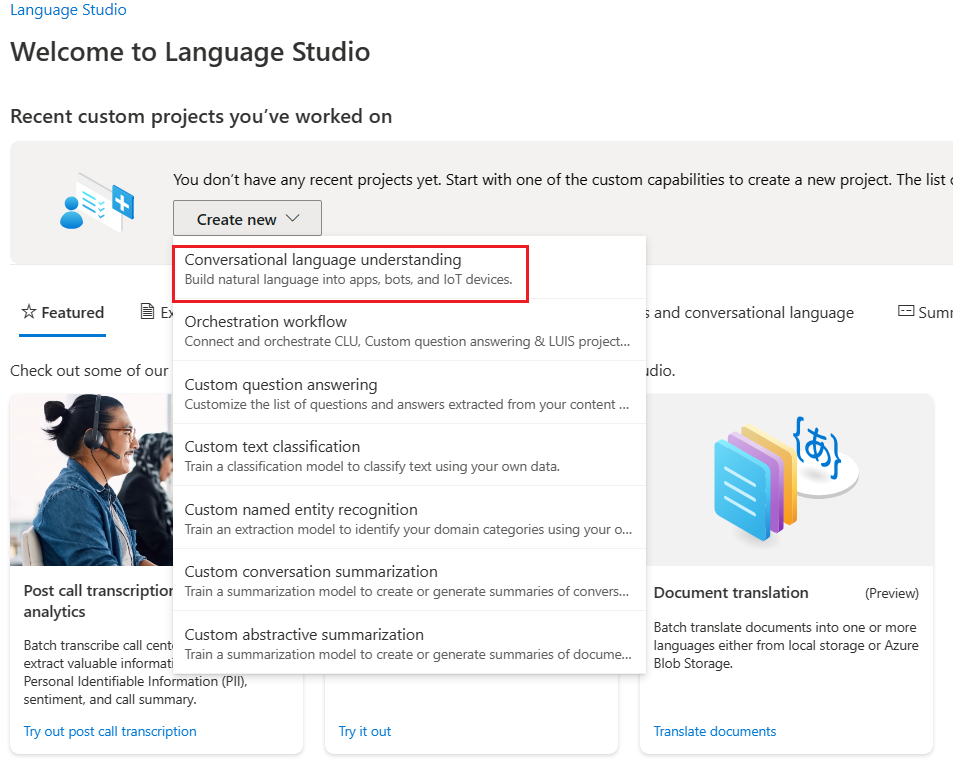
You must login again with the same credentials.
You can choose the Conversational language understanding choice under Create new dropdown.
We can give basic information for the project and create a new project.
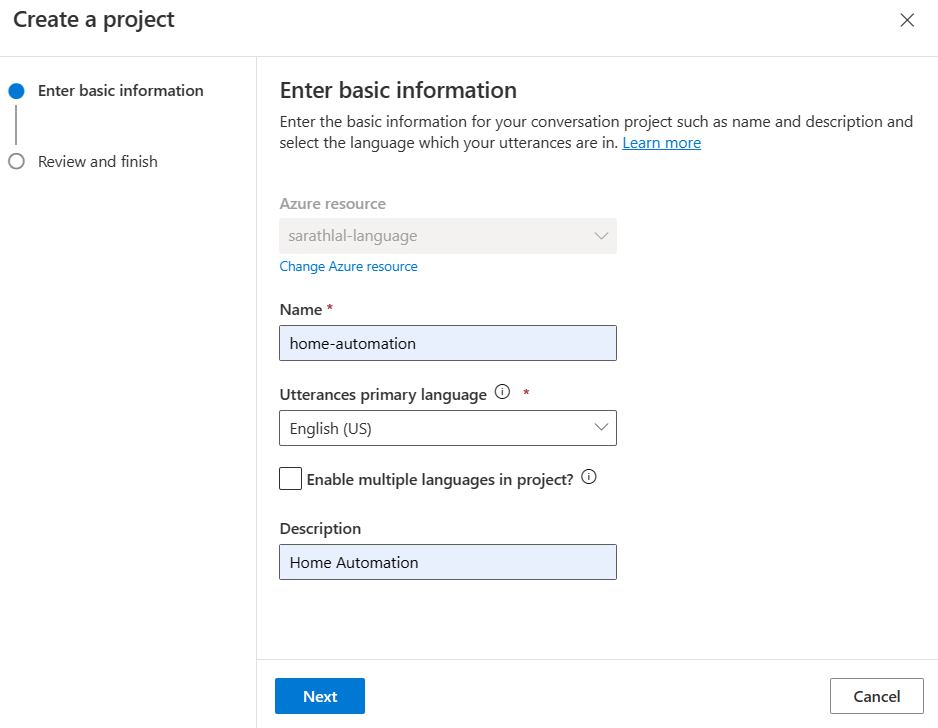
We are going to create a simple Home Automation project. This project will get input from the user to switch on / switch off light, fan and cooler. Conversational Language Understanding will be analyzing the user input and returning correct intents and entities. For that, we must train the model by giving more utterances and labeling the entities.
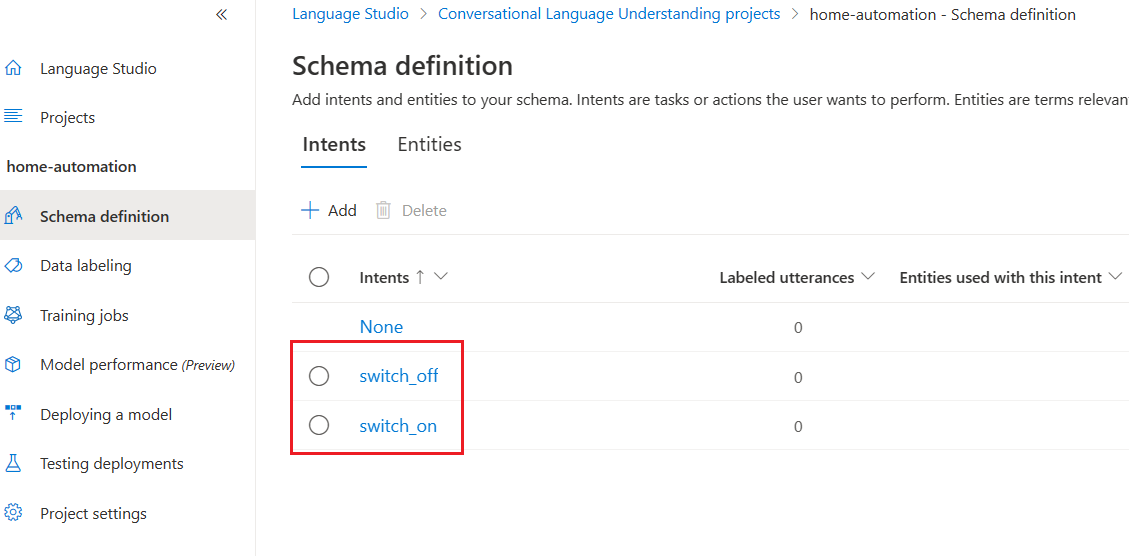
We can create two intents switch_on and swich_off for our testing purpose. We can create any number of intents.
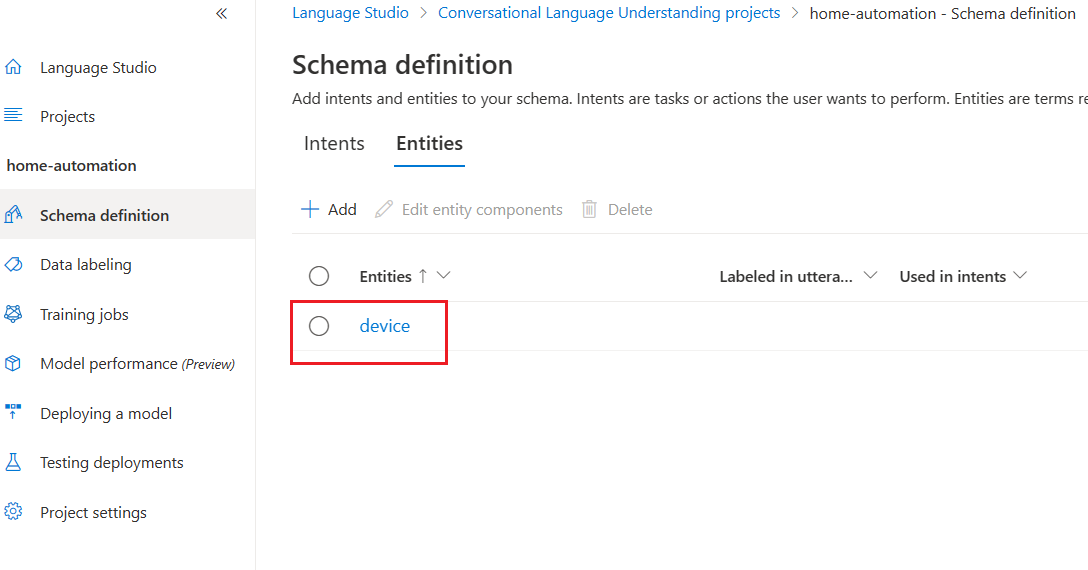
Create an entity. We have created only one entity for testing purposes.
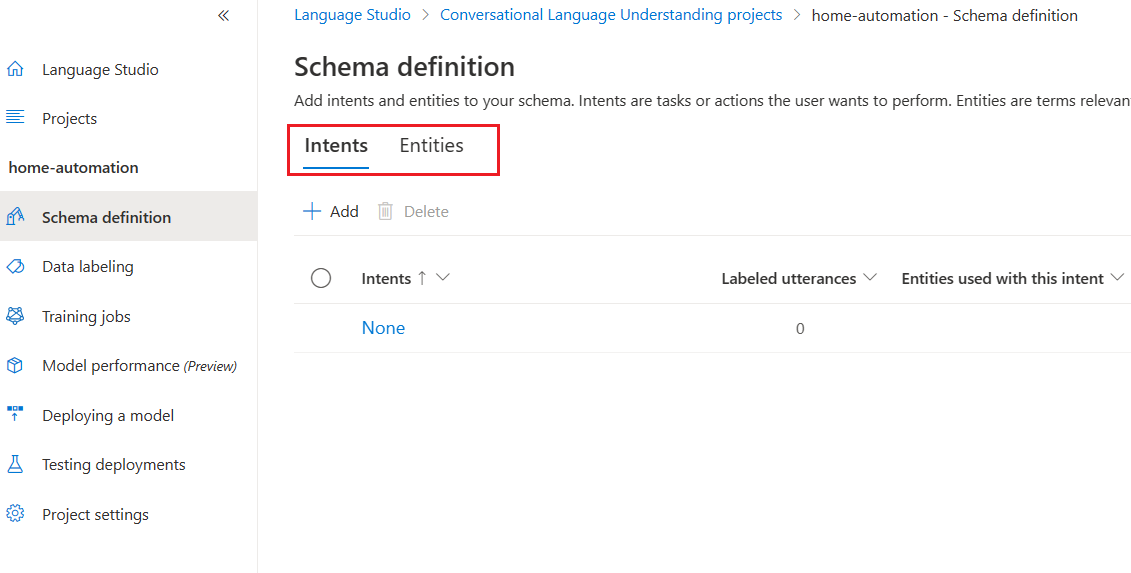
We can now go to the crucial step training the model. It is called Data labeling.
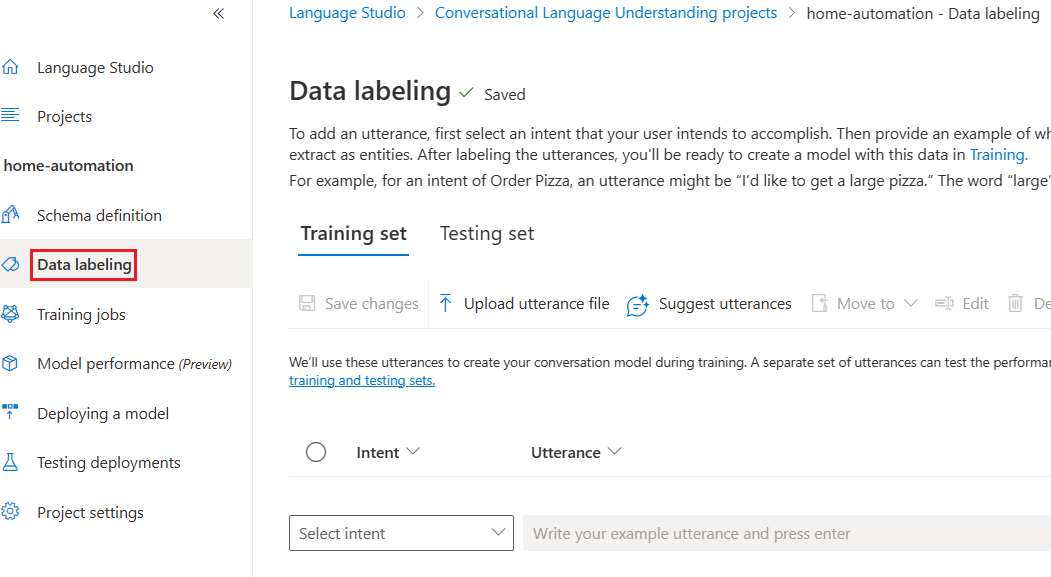
We can add our first utterance.

After creating the first utterance we can choose the utterance and add a label with the entity “device”.
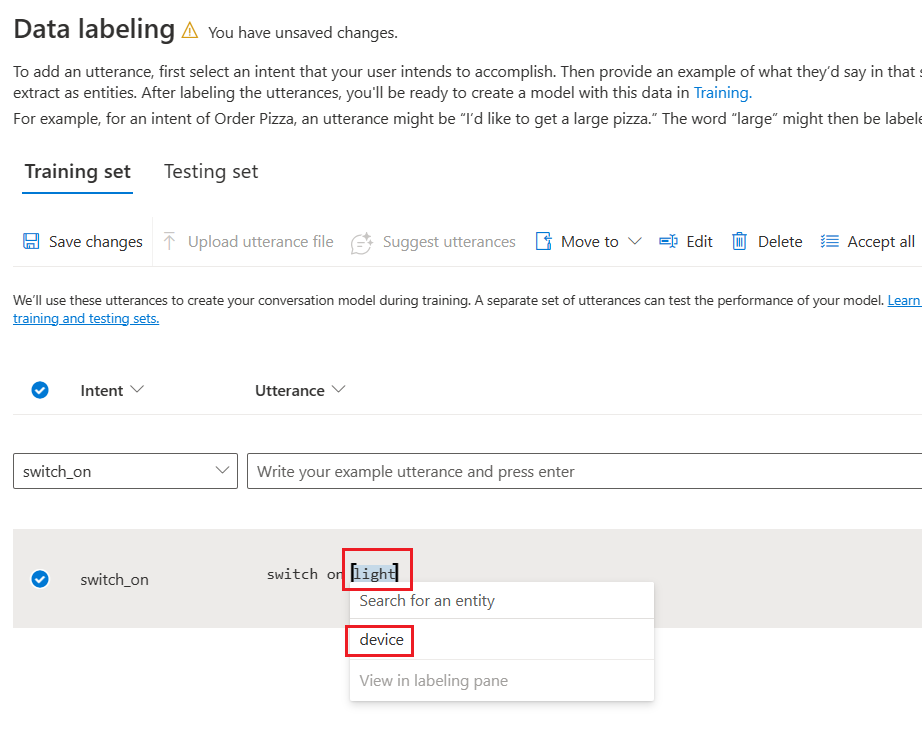
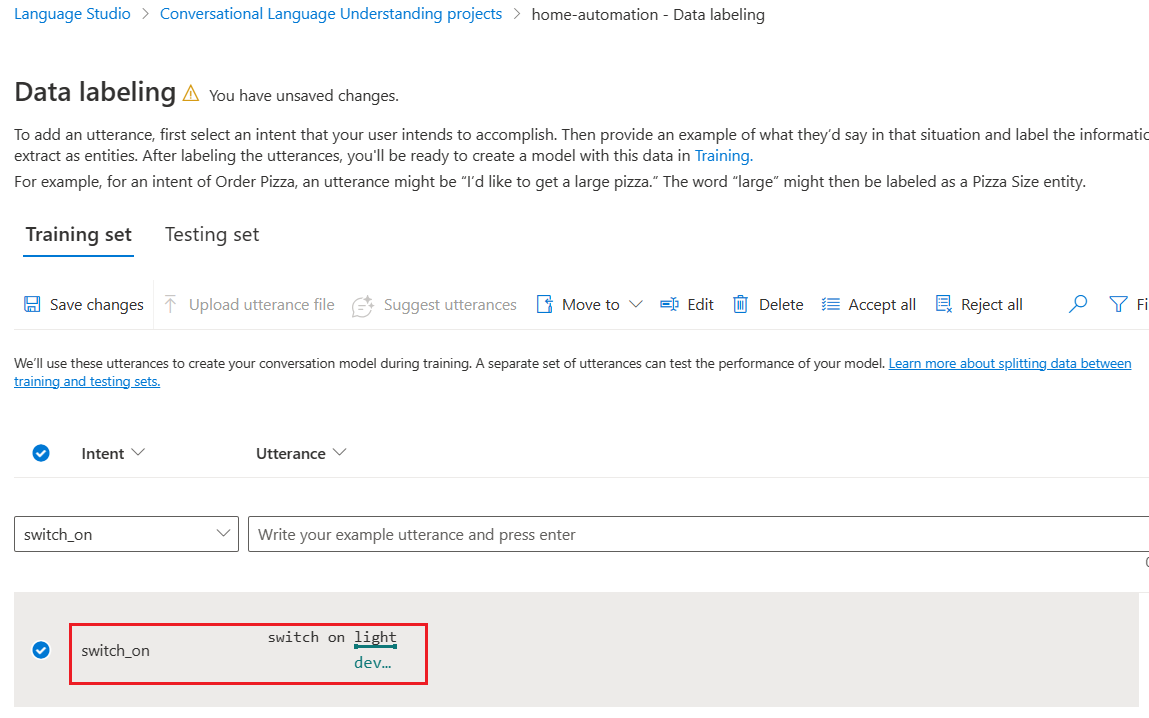
The saved entity in utterance looks like below.
We can add a few more utterances for intent swich_on and tag entity labels.
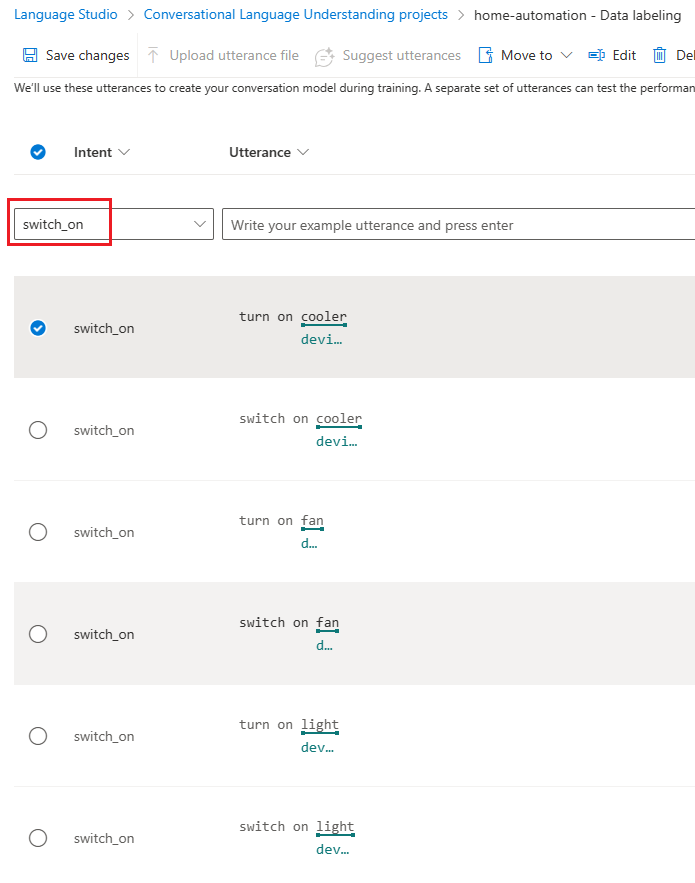
We have added two distinct types of utterances switch on and turn on for intent switch_on along with entity label “device”.
We can create six more utterances for switch_off intent as well.

Click the Save changes button to save all utterances and labels.
We can start training for the job now.
We must give a valid and unique name for our model.
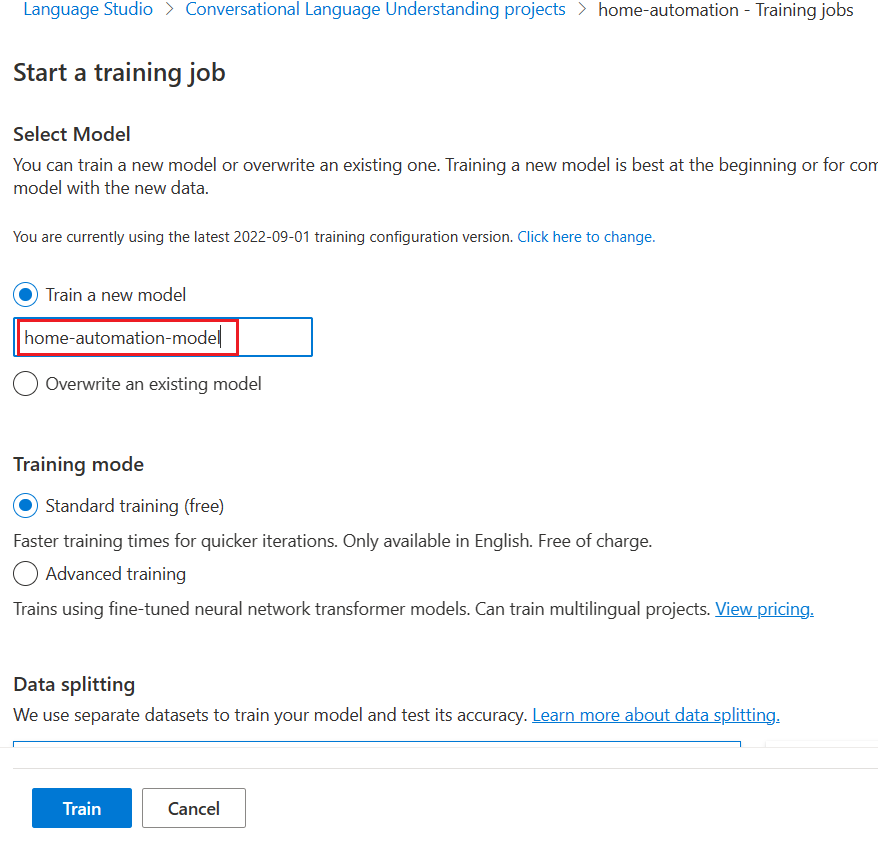
It will take a few moments to finish the training of model.
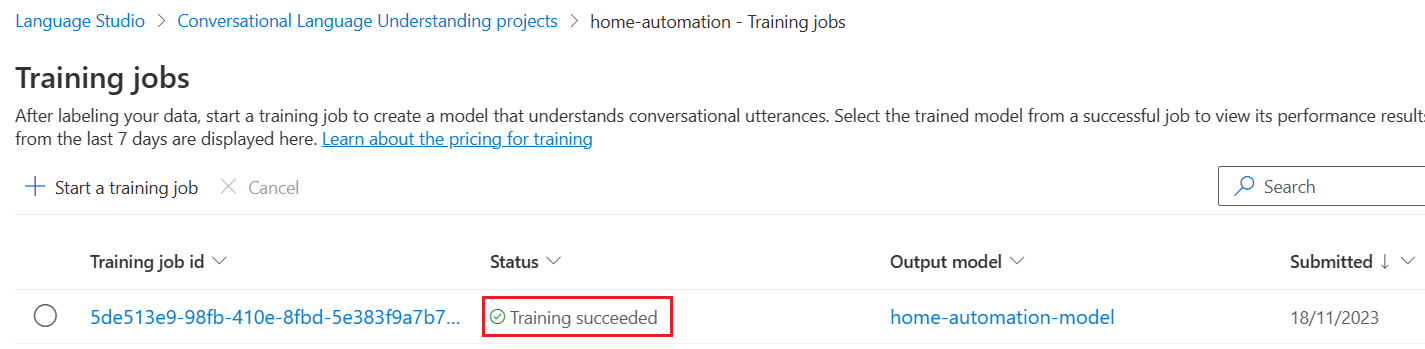
Every time we are training the same model, it will create a new training job id.
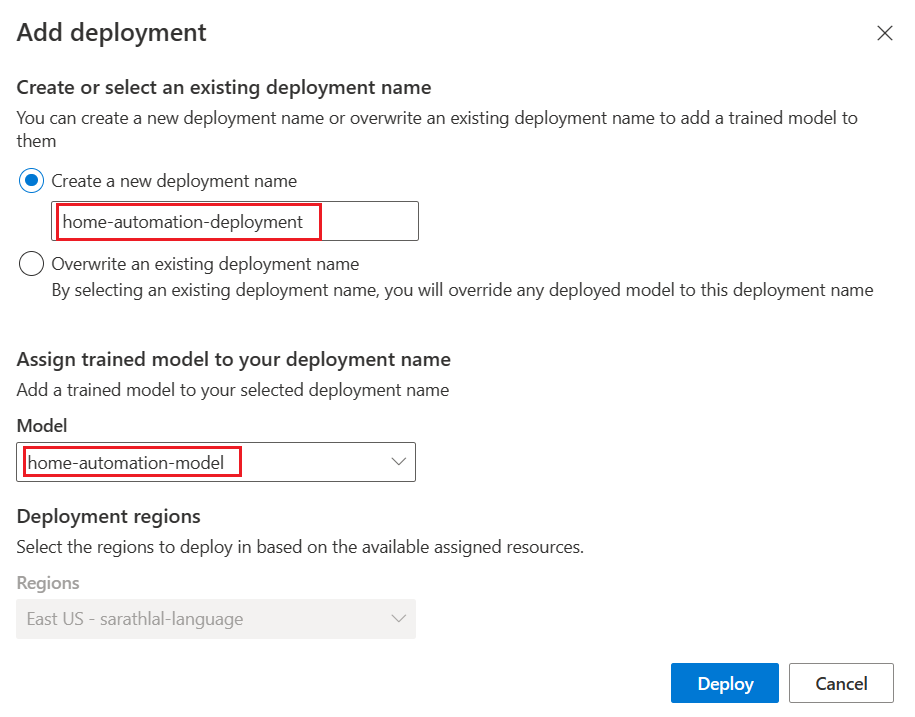
We can deploy our training model with a unique name.
We can give a name for the deployment and select the existing training model.
We can test the deployment now.
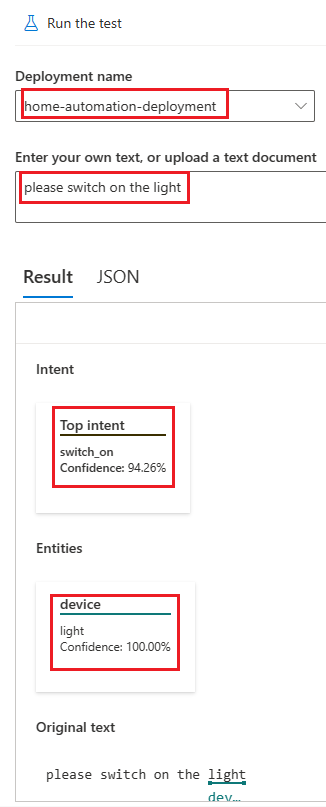
We have given the input text as “please switch on the light”. Please note that we have already given similar utterance and labeled light as entity “device”. Hence both intent and device come with more confidence.
We can create .NET 6 Web API first.
Create .NET 6 Web API with Visual Studio 2022
Create a new Web API project with .NET 6 SDK and add NuGet packages below.
-
Azure.AI.Language.Conversations
-
Microsoft.CognitiveServices.Speech
-
NAudio
-
Newtonsoft.Json
We can create a Models class now.
Models.cs
namespace VoiceAssistant.NET6;
public class Entity
{
    public string? Category { get; set; }
    public string? Text { get; set; }
    public decimal ConfidenceScore { get; set; }
}

public class CLUOutput
{
    public string? ConvertedText { get; set; }
    public string? TopIntent { get; set; }
    public List<Entity>? Entities { get; set; }
}
When user gives an audio input from Angular, audio byte array will be passed to .NET Web API. By default, audio will be in webm format. We use NAudio library to convert webm to wav format. Because currently, Microsoft Cognitive Speech recognizes only wav files, not webm format.
We can create a Helper class.
Helper.cs
using Azure.AI.Language.Conversations;
using Azure.Core.Serialization;
using Azure.Core;
using Azure;
using Microsoft.CognitiveServices.Speech.Audio;
using Microsoft.CognitiveServices.Speech;
using NAudio.Wave;
using Newtonsoft.Json;
using System.Diagnostics;
using System.Text.Json;

namespace VoiceAssistant.NET6;

public static class Helper
{
    private static readonly string subscriptionKey = "cba2bb8f8fb546429524810fbfb015d9";
    private static readonly string serviceRegion = "eastus";

    public static async Task<string> ConvertAudioToTextAsync(string audioFilePath, string lang)
    {
        var config = SpeechConfig.FromSubscription(subscriptionKey, serviceRegion);
        var audioConfig = AudioConfig.FromWavFileInput(audioFilePath);
        if (lang != null)
        {
            config.SpeechRecognitionLanguage = lang;
        }
        try
        {
            using var recognizer = new SpeechRecognizer(config, audioConfig);
            var result = await recognizer.RecognizeOnceAsync();

            if (result.Reason == ResultReason.RecognizedSpeech)
            {
                return result.Text;
            }
            else if (result.Reason == ResultReason.NoMatch)
            {
                return "No speech could be recognized.";
            }
            else if (result.Reason == ResultReason.Canceled)
            {
                var cancellation = CancellationDetails.FromResult(result);
                return $"CANCELED: Reason={cancellation.Reason}";

                // Handle cancellation reasons like CancellationReason.Error
            }
            else
            {
                return "Recognition failed.";
            }
        }
        catch (Exception ex)
        {
            return ex.Message;
        }

    }
    public static void ConvertWebmToWav(string webmInput, string wavOutput)
    {
        string rawOutput = "temp.raw";

        // Step 1: Convert webm to raw PCM
        var processStartInfo = new ProcessStartInfo
        {
            FileName = "ffmpeg",
            Arguments = $"-i {webmInput} -f s16le -ac 2 -ar 44100 -y {rawOutput}",
            RedirectStandardOutput = true,
            UseShellExecute = false,
            CreateNoWindow = true
        };

        using (var process = Process.Start(processStartInfo))
        {
            process.WaitForExit();
        }

        // Step 2: Convert raw PCM to wav using NAudio
        var waveFormat = new WaveFormat(44100, 2);

        using (var fileStream = File.OpenRead(rawOutput))
        using (var reader = new RawSourceWaveStream(fileStream, waveFormat))
        using (var writer = new WaveFileWriter(wavOutput, reader.WaveFormat))
        {
            byte[] buffer = new byte[1024];
            int bytesRead;
            while ((bytesRead = reader.Read(buffer, 0, buffer.Length)) > 0)
            {
                writer.Write(buffer, 0, bytesRead);
            }
        }

        // Cleanup
        try
        {
            System.IO.File.Delete(rawOutput);
        }
        catch (Exception ex)
        {
            Console.WriteLine($"Failed to delete {rawOutput}. Reason: {ex.Message}");
        }
    }

    public static CLUOutput GetPrediction(string input)
    {
        Uri endpoint = new("https://sarathlal-language.cognitiveservices.azure.com/");
        AzureKeyCredential credential = new("39c05d31dd704bf3944e594825f6806d");

        ConversationAnalysisClient client = new(endpoint, credential);

        string projectName = "home-automation";
        string deploymentName = "home-automation-deployment";

        var data = new
        {
            AnalysisInput = new
            {
                ConversationItem = new
                {
                    Text = input,
                    Id = "1",
                    ParticipantId = "1",
                }
            },
            Parameters = new
            {
                ProjectName = projectName,
                DeploymentName = deploymentName,

                // Use Utf16CodeUnit for strings in .NET.
                StringIndexType = "Utf16CodeUnit",
            },
            Kind = "Conversation",
        };

        // Configure JsonSerializerOptions for camelCase
        var options = new JsonSerializerOptions
        {
            PropertyNamingPolicy = JsonNamingPolicy.CamelCase
        };

        var serializer = new JsonObjectSerializer(options);

        Response response = client.AnalyzeConversation(RequestContent.Create(serializer.Serialize(data)));

        dynamic outData = JsonConvert.DeserializeObject<dynamic>(response.Content.ToString());

        dynamic conversationPrediction = outData.result.prediction;

        CLUOutput output = new()
        {
            TopIntent = conversationPrediction.topIntent,
            ConvertedText = input
        };

        output.TopIntent = output.TopIntent.Trim().ToLowerInvariant();

        List<Entity> entities = new();
        foreach (dynamic entity in conversationPrediction.entities)
        {
            entities.Add(new Entity { Category = entity.category, Text = entity.text, ConfidenceScore = entity.confidenceScore });
        }
        output.Entities = entities;


        return output;
    }
}
We have added two static methods inside this class.ConvertWebmToWav and ConvertAudioToTextAsync.
Inside ConvertWebmToWav method, we are using NAduio library and ffmpeg.exe file to convert webm file to wav format.
FFmpegis a powerful and versatile open-source software suitable for handling multimedia files and streams. It supplies a wide range of tools and libraries for converting audio and video formats, processing multimedia content, and streaming. FFmpeg is popular for its high performance, compatibility with many formats, and extensive feature set.
You can download FFmpeg.exe from the site below.
https://www.videohelp.com/software/ffmpeg
Inside ConvertAudioToTextAsync method, audio file path is passed to AudioConfig.FromWavFileInput method and covert audio to a text.
We have created another static method GetPrediction and this method will get input string value and using CLU SDK it will predict the top intent and entity from input text. We will return this top intent and entity to Angular application and there we will show or hide the images according to the value.
Create the PredictionController now.
PredictionController.cs
using Microsoft.AspNetCore.Mvc;

namespace VoiceAssistant.NET6.Controllers;

[Route("api/[controller]")]
[ApiController]
public class PredictionController : ControllerBase
{
    private readonly string _audioSavePath = Path.Combine(Directory.GetCurrentDirectory(), "AudioFiles");
    [HttpPost("Predict")]
    public async Task<ActionResult<CLUOutput>> Predict()
    {
        var audio = Request.Form.Files[0];
        if (audio == null || audio.Length == 0)
            return BadRequest("No audio file provided.");

        var sourcefilePath = Path.Combine(_audioSavePath, audio.FileName);
        var destFilePath = Path.Combine(_audioSavePath, "converted-audio" + ".wav");

        if (!Directory.Exists(_audioSavePath))
        {
            Directory.CreateDirectory(_audioSavePath);
        }

        using (var stream = new FileStream(sourcefilePath, FileMode.Create))
        {
            audio.CopyTo(stream);
        }

        Helper.ConvertWebmToWav(sourcefilePath, destFilePath);

        string text = await Helper.ConvertAudioToTextAsync(Path.Combine(_audioSavePath, destFilePath), "en-US");

        CLUOutput output = Helper.GetPrediction(text);
        return new JsonResult(output);

    }
}
We are passing audio file as FormData from Angular. In the Predict method of the controller, we have locally saved this file and calling Helper.ConvertWebmToWav method. We are also calling Helper. ConvertAudioToTextAsync in this Predict method. After converting speech to text, we will be calling Helper.GetPrediction method and get the prediction value. This predicted top intent and entity will be passed to Angular application.
We can change the Program.cs file by adding CORS entries. So that our Angular application can consume Web API endpoints.
Program.cs
builder.Services.AddCors(options =>
{
    options.AddDefaultPolicy(
        builder =>
        {
            builder.WithOrigins("https://localhost:4200")
                   .AllowAnyHeader()

                   .AllowAnyMethod();
        });
});

.....

app.UseAuthorization();
app.UseCors()
We have completed the .NET 6 Web API coding part. We can create an Angular 16 application now.
ng new VoiceAssistantAngular16
Choose default routing and styling options and continue.
After few minutes, Angular application will be created.
Create a models class.
models.ts
export class CLUOutput {
    convertedText!: string;
    topIntent!: string;
    entities!: Entity[];
  }

  export class Entity {
    category!: string;
    text!: string;
    confidenceScore!: number;
  }
Create a loader service.
ng g s loading
loading.service.ts
import { Injectable } from '@angular/core';
import { BehaviorSubject } from 'rxjs';

@Injectable({
  providedIn: 'root'
})
export class LoadingService {
  private _isLoading = new BehaviorSubject<boolean>(false);

  get isLoading$() {
    return this._isLoading.asObservable();
  }

  showLoader() {
    this._isLoading.next(true);
  }

  hideLoader() {
    this._isLoading.next(false);
  }
}
We can create a loader component. This component will be used to show the loader while there is some background processing going on.
ng g c loading
Replace component files with the code below.
loading.component.ts
import { Component } from '@angular/core';
import { LoadingService } from '../loading.service';

@Component({
  selector: 'app-loading',
  templateUrl: './loading.component.html',
  styleUrls: ['./loading.component.css']
})
export class LoadingComponent {
  isLoading$ = this.loadingService.isLoading$;

  constructor(private loadingService: LoadingService) { }
}
loading.component.html
<div *ngIf="isLoading$ | async" class="loader-overlay">
    <div class="small progress">
        <div></div>
    </div>
</div>
loading.component.css
.loader-overlay {
    position: fixed;
    top: 0;
    left: 0;
    right: 0;
    bottom: 0;
    display: flex;
    align-items: center;
    justify-content: center;
  }

  .progress {
      position: relative;
      width: 5em;
      height: 5em;
      margin: 0 0.5em;
      font-size: 12px;
      text-indent: 999em;
      overflow: hidden;
      -webkit-animation: progress_ani 1s infinite steps(8);
      animation: progress_ani 1s infinite steps(8);
    background: none;
  }

  .small.progress {
      font-size: 8px;
  }

  .progress:after,
  .progress:before,
  .progress > div:after,
  .progress > div:before {
      content: "";
      position: absolute;
      top: 0;
      left: 2.25em;
      width: 0.5em;
      height: 1.5em;
      border-radius: 0.2em;
      background: #eee;
      box-shadow: 0 3.5em #eee;
      -webkit-transform-origin: 50% 2.5em;
      transform-origin: 50% 2.5em;
  }

  .progress:before {
      background: #555;
  }

  .progress:after {
      -webkit-transform: rotate(-45deg);
      transform: rotate(-45deg);
      background: #777;
  }

  .progress > div:before {
      -webkit-transform: rotate(-90deg);
      transform: rotate(-90deg);
      background: #999;
  }

  .progress > div:after {
      -webkit-transform: rotate(-135deg);
      transform: rotate(-135deg);
      background: #bbb;
  }

  @-webkit-keyframes progress_ani {
      to {
          -webkit-transform: rotate(1turn);
          transform: rotate(1turn);
      }
  }

  @keyframes progress_ani {
      to {
          -webkit-transform: rotate(1turn);
          transform: rotate(1turn);
      }
  }
ImportFormsModuleandHttpClientModulein App Module.
app.module.ts
import { NgModule } from '@angular/core';
import { BrowserModule } from '@angular/platform-browser';

import { AppComponent } from './app.component';
import { LoadingComponent } from './loading/loading.component';
import { HttpClientModule } from '@angular/common/http';
import { FormsModule } from '@angular/forms';

@NgModule({
  declarations: [
    AppComponent,
    LoadingComponent
  ],
  imports: [
    BrowserModule,
    HttpClientModule,
    FormsModule,
  ],
  providers: [],
  bootstrap: [AppComponent]
})
export class AppModule { }
Modify our main app component class and html file with the code given below.
app.component.ts
import { Component } from '@angular/core';
import { HttpClient } from '@angular/common/http';
import { ChangeDetectorRef } from '@angular/core';
import { LoadingService } from './loading.service';
import { CLUOutput } from './models';

@Component({
  selector: 'app-root',
  templateUrl: './app.component.html',
  styleUrls: ['./app.component.css']
})
export class AppComponent {
  constructor(private http: HttpClient, private cd: ChangeDetectorRef, private loadingService: LoadingService) {
  }

  mediaRecorder?: MediaRecorder;
  audioChunks: Blob[] = [];
  downloadLink?: string;
  showMicrophone?: boolean;
  showStop?: boolean;
  convertedMessage?: string;
  showMessage!: boolean;

  showLight!: boolean;
  showLightOn!: boolean;
  showFan!: boolean;
  showFanOn!: boolean;
  showCooler!: boolean;
  showCoolerOn!: boolean;

  async startRecording() {
    this.showMicrophone = false;
    this.showStop = true;
    this.convertedMessage = "";

    try {
      this.downloadLink = "";
      const stream = await navigator.mediaDevices.getUserMedia({ audio: true });

      this.mediaRecorder = new MediaRecorder(stream);
      this.audioChunks = [];

      this.mediaRecorder.ondataavailable = (event: BlobEvent) => {
        this.audioChunks.push(event.data);
      };

      this.mediaRecorder.onstop = () => {
        this.onRecordingStopped();
      };

      this.mediaRecorder.start();
    } catch (error) {
      console.error("Error accessing the microphone:", error);
    }
  }

  onRecordingStopped() {
    const audioBlob = new Blob(this.audioChunks, { type: 'audio/webm;codecs=opus' });
    const audioUrl = URL.createObjectURL(audioBlob);
    this.downloadLink = audioUrl; // set download link after recording stops
    this.uploadAudio();
    this.cd.detectChanges();
  }

  stopRecording() {
    if (this.mediaRecorder) {
      this.showStop = false;
      this.showMicrophone = true;
      this.mediaRecorder.stop();
    }
  }

  uploadAudio() {
    if (!this.downloadLink) {
      console.error("No audio data available to upload.");
      return;
    }
    this.loadingService.showLoader();
    const audioBlob = new Blob(this.audioChunks, { type: 'audio/webm;codecs=opus' });
    const formData = new FormData();
    formData.append('audio', audioBlob, 'recorded-audio.webm');
    this.http.post<CLUOutput>('https://localhost:5000/api/prediction/predict', formData)
      .subscribe({
        next: (result) => {
          console.log('Upload successful', result);
          this.convertedMessage = result.convertedText;
          let category: string = '';
          let text: string = '';
          if (result.entities.length > 0) {
            category = result.entities[0].category;
            text = result.entities[0].text;
          }
          switch (result.topIntent) {
            case "switch_on":
              if (category == 'device') {
                switch (text) {
                  case "cooler":
                    this.showCooler = true;
                    this.showCoolerOn = true;
                    break;
                  case "fan":
                    this.showFan = true;
                    this.showFanOn = true;
                    break;
                  case "light":
                    this.showLight = true;
                    this.showLightOn = true;
                    break;
                  default:
                    alert("Sorry, we couldn't find any match with speech");
                }
              }
              break;
            case "switch_off":
              if (category == 'device') {
                switch (text) {
                  case "cooler":
                    this.showCoolerOn = false;
                    break;
                  case "fan":
                    this.showFanOn = false;
                    break;
                  case "light":
                    this.showLightOn = false
                    break;
                  default:
                    alert("Sorry, we couldn't find any match with speech");
                }
              }
              break;
            default:
              alert("Sorry, we couldn't find any match with speech");
          }
          this.loadingService.hideLoader();
          this.cd.detectChanges();
        },
        error: (err) => {
          console.error('Upload error:', err);
          this.loadingService.hideLoader();
          this.convertedMessage = err;
          this.cd.detectChanges();
        },
        complete: () => console.info('Request completed')
      });
  }

  ngOnInit(): void {
    this.showMicrophone = true;
  }

  showHideButtons() {
    this.showMessage = false;
  }

}
app.component.html
<div class="content" role="main">
  <div class="row justify-content-center pt-2 pb-2">
    <button title="Click here to start recording action" class="btn-mic w-auto" (click)="startRecording()"
      *ngIf="showMicrophone" style="margin-right: 10px;">
      <img src="../../assets/mic.png" />
    </button>
    <button title="Click here to stop recording" class="btn-stop w-auto" (click)="stopRecording()" *ngIf="showStop"
      style="margin-right: 10px;">
      <img src="../../assets/stop.png" />
    </button>
  </div>
  <div class="row">
    <p class="coverted-text">Converted Speech :</p>
    <input [(ngModel)]="convertedMessage" [disabled]="true" class="textbox" />
  </div>
  <div class="row">
    <div class="column std-height">
      <img src="../assets/light-on.png" height="160px" *ngIf="showLight && showLightOn">
      <img src="../assets/light-off.png" height="160px" *ngIf="showLight && !showLightOn">
    </div>
    <div class="column std-height">
      <img src="../assets/fan_on.gif" height="160px" *ngIf="showFan && showFanOn">
      <img src="../assets/fan_off.png" height="160px" *ngIf="showFan && !showFanOn">
    </div>
    <div class="column std-height">
      <img src="../assets/cooler_on.gif" height="160px" *ngIf="showCooler && showCoolerOn">
      <img src="../assets/cooler_off.png" height="160px" *ngIf="showCooler && !showCoolerOn">
    </div>
  </div>
</div>

<div class="container mt-3" style="max-width:1330px;padding-top:30px;" role="main">
  <app-loading></app-loading>
</div>
app.component.css
.content {
    display: flex;
    margin: 10px auto 10px;
    padding: 0 16px;
    max-width: 960px;
    flex-direction: column;
    align-items: center;
}

.btn-mic,
.btn-stop {
    background: none;
    border: none;
    padding: 0;
    cursor: pointer;
}

.btn-mic img,
.btn-stop img {
    width: 30px;
    opacity: 0.5;
}

.dropdown {
    height: 30px;
    margin: 10px;
    width: 120px;
}

.textbox {
    width: 500px;
    margin: -10px;
    height: 30px;
    text-align: center;
    padding: 0px;
}

.coverted-text{
    padding-right: 20px;
    font-family: sans-serif;
    font-size: small;
}

.row {
    display: flex;
    justify-content: space-between;
    /* Distribute columns evenly */
    align-items: center;
    /* Center vertically within the row */
}

.column {
    flex: 1; /* Each column takes an equal portion of the space */
    /* border: 1px solid #ccc; */
    padding: 10px;
    text-align: center;
    width: 250px;
}
.std-height{
    height: 250px;
}
.small-height{
    height: 50px;
}
We have completed the entire coding for Angular as well. We can run both Web API and Angular.
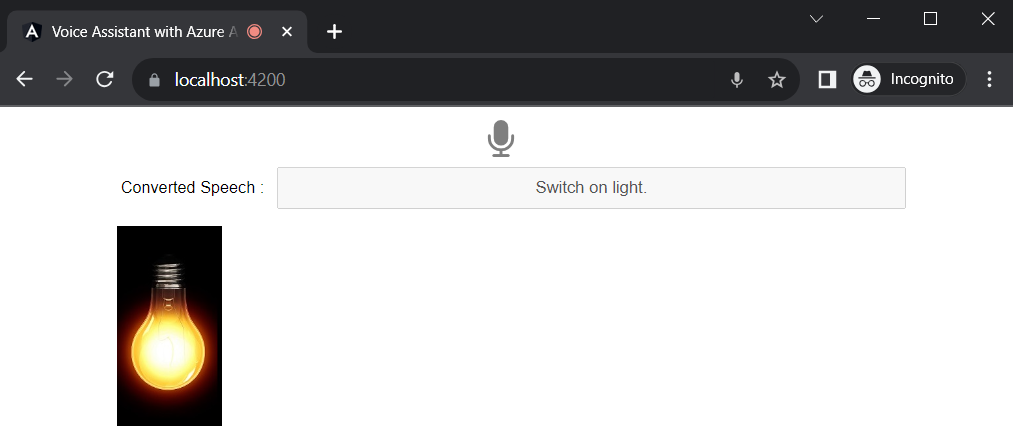
Click on the microphone icon and say “Switch on Light”
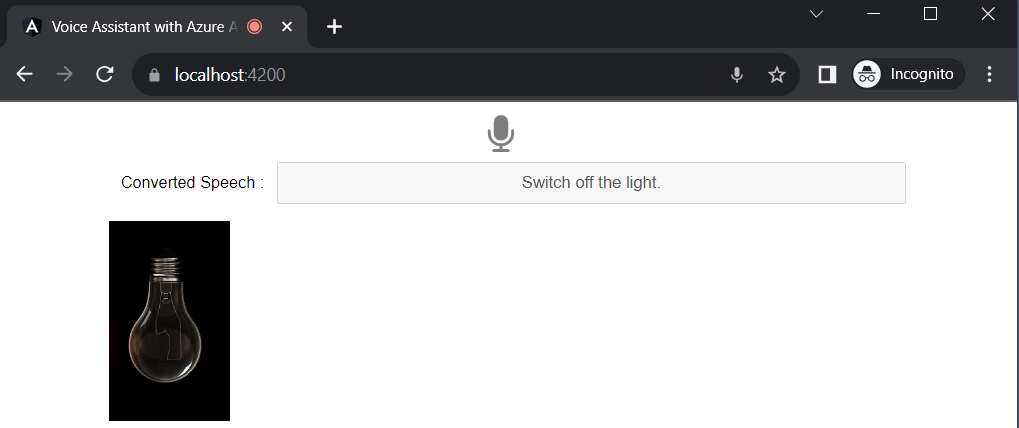
We can say another command “Switch off the light”
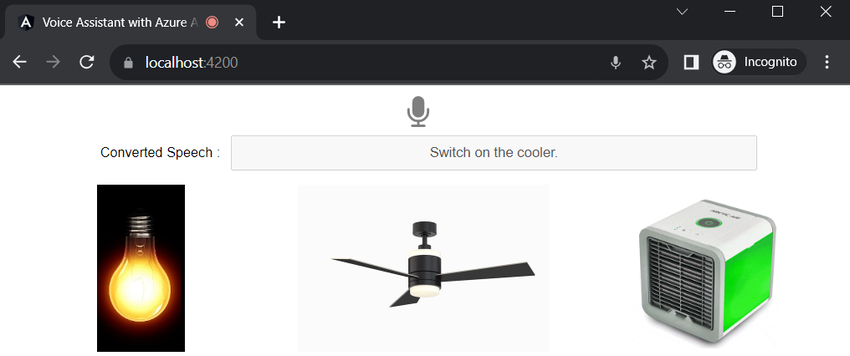
We have already trained the various utterances in our Conversational language understanding.
Switch on/off light, on/off fan and on/off cooler. These are remarkably simple examples of voice assistant. We can build complex types of voice assistant using Azure AI Language.
Conclusion
In this post, we have seen all the steps to create Azure AI Speech and Azure AI Language. In AI Language studio we have created a Conversational language understanding workload and trained a model with various utterances like switch on/off light, on/off fan and on/off cooler. Later we created a .NET 6 Web API and created a controller to predict the top intent from input audio. By default, audio format is in webm and we have used NAduio library to convert webm to wav with the help of ffmpeg.exe. After converting to wav file, we have used Microsoft Cognitive Services Speech library to convert audio to text. After that we sent converted text to Azure AI Language SDK and predicted the top intent and entity from given input. We passed this predicted intent and entity to Angular application and in the app component we show/hide the images of light, fan and cooler with some logic.