

Introduction
Xamarin is a platform to develop cross-platform and multi-platform apps (for example, Windows Phone, Android, iOS). In Xamarin platform, the code sharing concept is used. In Xamarin Studio, Visual Studio is also available.
Prerequisites
Xamarin is a platform to develop cross-platform and multi-platform apps (for example, Windows Phone, Android, iOS). In Xamarin platform, the code sharing concept is used. In Xamarin Studio, Visual Studio is also available.
Prerequisites
- Visual Studio 2017
The steps given below are required to be followed in order to create a Signature Pad in Xamarin.Forms, using Visual Studio.
Step 1
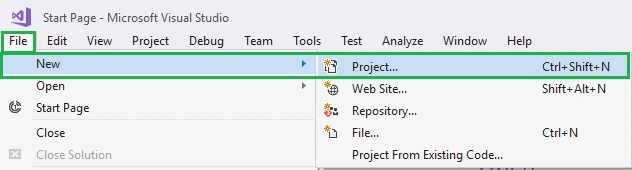
Click File--> New--> Project. The project needs to be clicked after opening all the types of the projects in Visual Studio or click (Ctrl+Shift+N).
Step 2
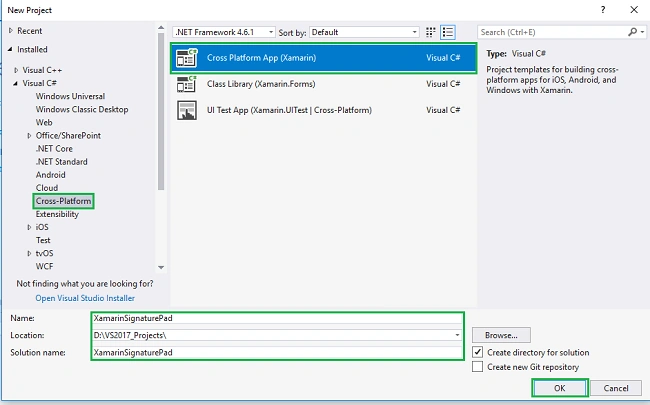
After opening the New Project, select Installed-->Templates-->Visual C#-->Cross-Platform-->choose Cross-Platform App. Now, give your Xamarin.Forms app a name (Ex: sample) and give the path of your project. Afterwards, click OK.
Step 3
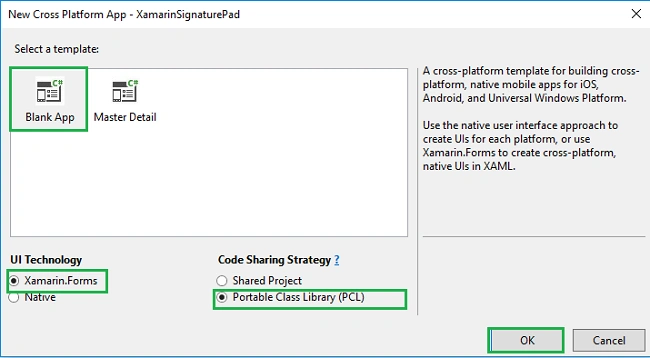
Choose Blank App and select Xamarin.forms and PCL (sharing) as shown in below screenshot. Afterwards, click OK.
Step 4
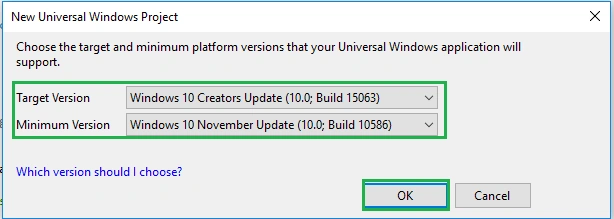
Now, select the target version and minimum version.for UWP.
Step 5
In this step, add the following Signature Pad NuGet Package for your project.
Step 1
Click File--> New--> Project. The project needs to be clicked after opening all the types of the projects in Visual Studio or click (Ctrl+Shift+N).
Step 2
After opening the New Project, select Installed-->Templates-->Visual C#-->Cross-Platform-->choose Cross-Platform App. Now, give your Xamarin.Forms app a name (Ex: sample) and give the path of your project. Afterwards, click OK.
Step 3
Choose Blank App and select Xamarin.forms and PCL (sharing) as shown in below screenshot. Afterwards, click OK.
Step 4
Now, select the target version and minimum version.for UWP.
Step 5
In this step, add the following Signature Pad NuGet Package for your project.
- Xamarin.Controls.SignaturePad.Forms
Go to Solution Explorer and select your solution. Right-click and select "Manage NuGet Packages for Solution".

Step 6
Now, select the following NuGet package and install it.
Step 6
Now, select the following NuGet package and install it.
- Xamarin.Controls.SignaturePad.Forms.
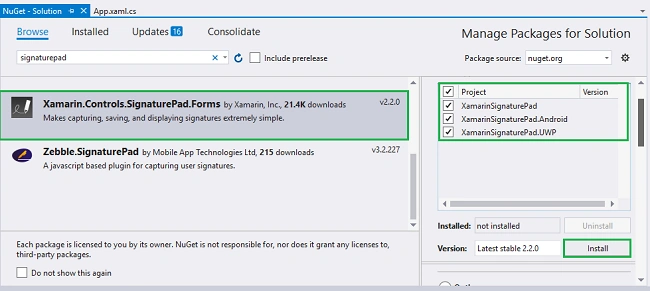
Step 7
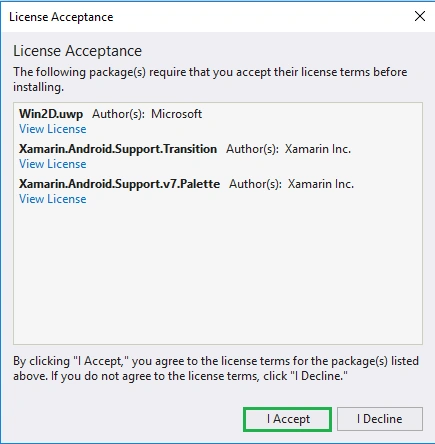
In this step, read and agree to the license and agreement. Select "I Accept".
Step 8
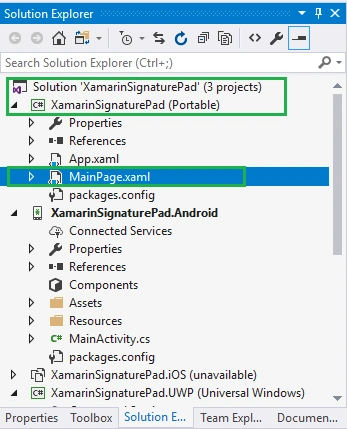
In this step, add a Signature Pad control to your app. Go to Solution Explorer and double click on MainPage.xaml.
After opening this, you can add signature pad control to your app.
Step 9
In this step, add a signature pad assembly to your project.
MainPage.xaml
In this step, read and agree to the license and agreement. Select "I Accept".
Step 8
In this step, add a Signature Pad control to your app. Go to Solution Explorer and double click on MainPage.xaml.
After opening this, you can add signature pad control to your app.
Step 9
In this step, add a signature pad assembly to your project.
MainPage.xaml
- <ContentPage xmlns="http://xamarin.com/schemas/2014/forms" xmlns:x="http://schemas.microsoft.com/winfx/2009/xaml" xmlns:forms="clr-namespace:SignaturePad.Forms;assembly=SignaturePad.Forms" x:Class="XamarinSignaturePad.MainPage">
- </ContentPage>
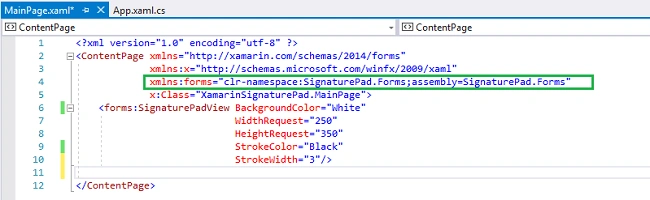
Step 10
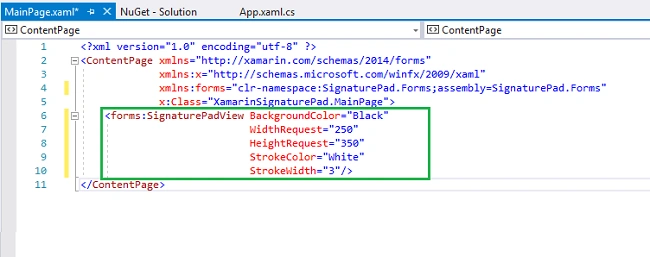
Go to the MainPage.xaml page and write the code given below.
MainPage.xaml
- <?xml version="1.0" encoding="utf-8" ?>
- <ContentPage xmlns="http://xamarin.com/schemas/2014/forms" xmlns:x="http://schemas.microsoft.com/winfx/2009/xaml" xmlns:forms="clr-namespace:SignaturePad.Forms;assembly=SignaturePad.Forms" x:Class="XamarinSignaturePad.MainPage">
- <forms:SignaturePadView BackgroundColor="White" WidthRequest="250" HeightRequest="350" StrokeColor="Black" StrokeWidth="3" />
- </ContentPage>
Step 11
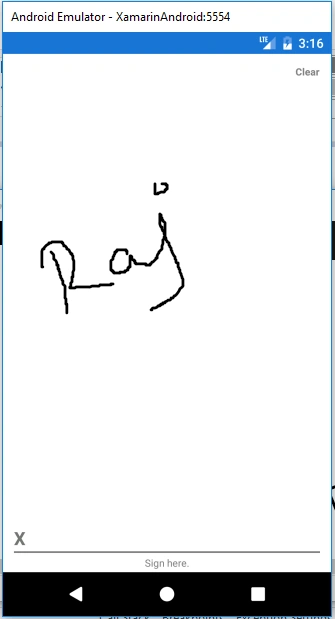
If you have Android Emulator, you can run it. If you don't have it, simply run UWP on Local Machine.

Output
After a few seconds, the app will start running on your Android Emulator or Local machine. You can put a signature in your app. It will work successfully.

For Android Emulator.
Summary
This was the process of creating a Signature Pad in Xamarin.Forms, using Visual Studio. Please share your comments and feedback.
Yasin GUNDOGDUPosted Jul 26, 2019, 4:11 AM
How can i do this with mvvm?
Frank CharronPosted Oct 23, 2018, 2:06 PM
This is not working for me when I test the signature pad on my physical android devices nothing happens it stays blank. But it works when I test with android emulators