

Introduction
Android is one of the most popular operating systems for the mobile. The maximum number of Applications contains the Custom List View module. It shows our information or the data with the images in the ListView. I will show you how to create Custom ListView in an Android Application, using Android Studio. Android is the kernel-based operating system. It allows the user to modify the GUI components and the source code.
Requirements
- Android Studio
- Little bit XML and Java knowledge.
- Android emulator (or) Android mobile.
- Download link (Android Studio)
Steps to be followed are given below
Follow the steps given below to create Custom ListView in your Android Application, using an Android Studio.
Step 1
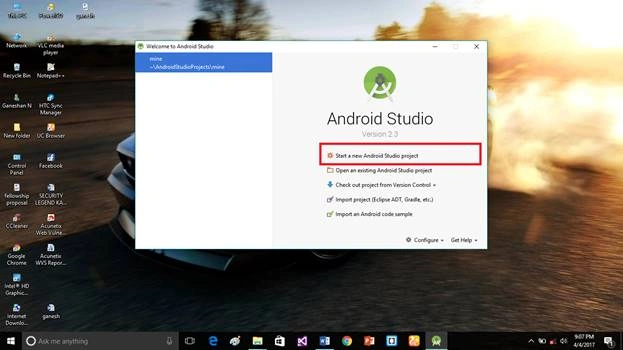
Open Android Studio and start the new project.
Step 2
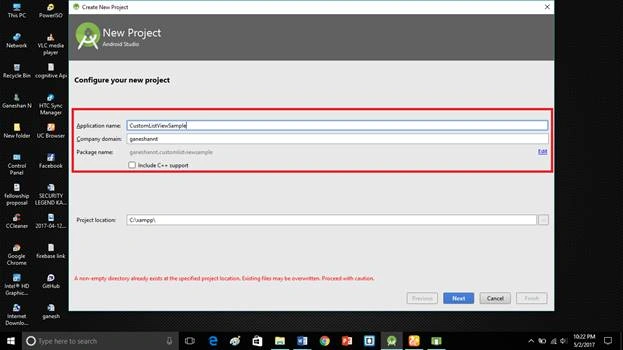
Put the Application name and the company domain. If you wish to use C++ to code the project, include C++ support, followed by clicking Next.
Step 3
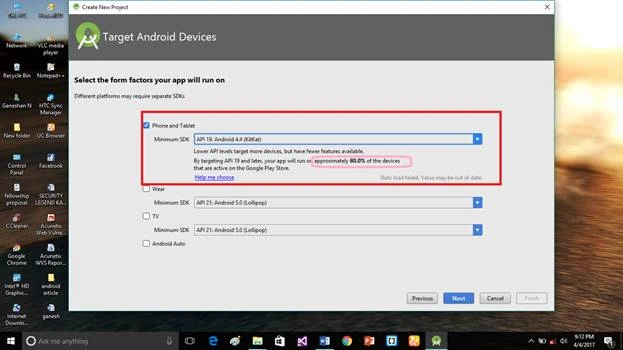
Select the Android minimum SDK. Afterward, you need to choose the minimum SDK. It will show an approximate percentage of the people using the SDK, followed by clicking Next.
Step 4
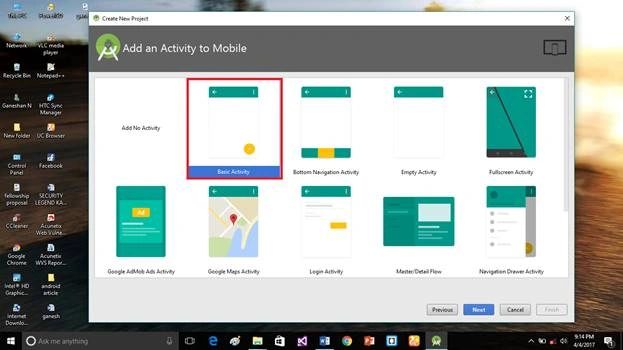
Choose the basic activity, followed by clicking Next.
Step 5
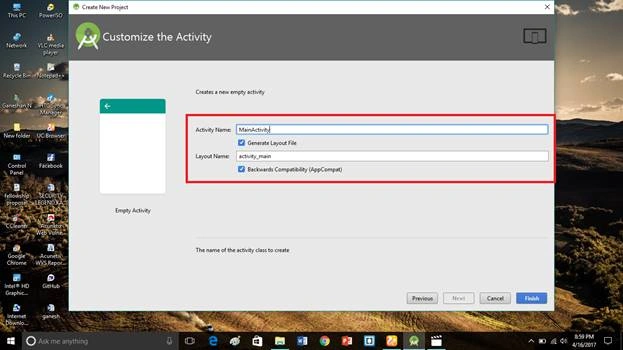
Put the activity name and the layout name. Android Studio basically takes the Java class name, which you provided in the activity name and click Finish.
Step 6
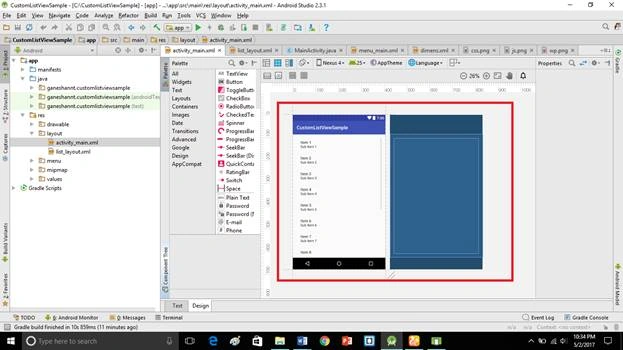
First, you need to design the Application. Thus, go to activity_main.xml, followed by clicking the text bottom. This XML file contains designing the code for an Android app. In the activity_main.xml, copy and paste the code given below.
Activity_main.xml code
- <LinearLayout xmlns:android="http://schemas.android.com/apk/res/android"
- xmlns:tools="http://schemas.android.com/tools" android:layout_width="match_parent"
- android:layout_height="match_parent" android:paddingLeft="@dimen/activity_horizontal_margin"
- android:paddingRight="@dimen/activity_horizontal_margin"
- android:orientation="vertical"
- android:paddingTop="@dimen/activity_vertical_margin"
- android:paddingBottom="@dimen/activity_vertical_margin" tools:context=".MainActivity">
- <ListView
- android:layout_width="match_parent"
- android:layout_height="wrap_content"
- android:id="@+id/listView" />
- </LinearLayout>
The code given above is to create the ListView in Activity_main.xml page.
Step 7
Create a new list_layout.xml file (File ⇒ New ⇒Activity⇒Empty_activity).
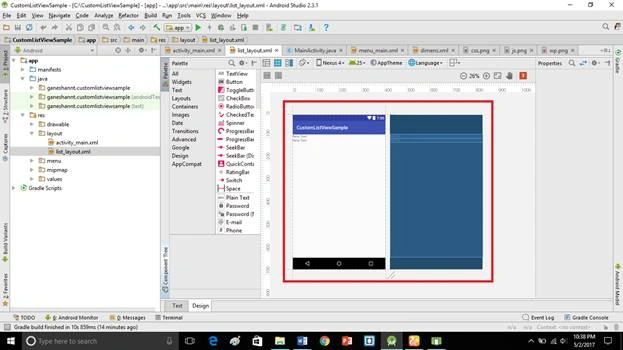
Go to list_layout.xml, followed by clicking the text bottom. This XML file contains the designing code for an Android app. In the list_layout.xml, copy and paste the code given below.
list_layout.xml code
- <?xml version="1.0" encoding="utf-8"?>
- <GridLayout xmlns:android="http://schemas.android.com/apk/res/android"
- android:layout_width="match_parent"
- android:layout_height="match_parent" >
- <ImageView
- android:layout_width="wrap_content"
- android:layout_height="wrap_content"
- android:layout_rowSpan="2"
- android:id="@+id/imageView"
- android:layout_row="0"
- android:layout_column="0" />
- <TextView
- android:layout_width="wrap_content"
- android:layout_height="wrap_content"
- android:text="New Text"
- android:layout_columnWeight="1"
- android:id="@+id/textViewName"
- android:layout_row="0"
- android:layout_column="1" />
- <TextView
- android:layout_width="wrap_content"
- android:layout_height="wrap_content"
- android:text="New Text"
- android:layout_columnWeight="1"
- android:id="@+id/textViewDesc"
- android:layout_row="1"
- android:layout_column="1" />
- </GridLayout>
The code given above is used to assign List View text messages and the images. Add your images into the drawable folder.
Step 8
In MainActivity.java, copy and paste the code given below. Java programming is the backend language for Android. Do not replace your package name, else an app will not run.
MainActivity.java code
- package ganeshannt.customlistviewsample;
- import android.os.Bundle;
- import android.support.v7.app.AppCompatActivity;
- import android.view.Menu;
- import android.view.MenuItem;
- import android.view.View;
- import android.widget.AdapterView;
- import android.widget.ListView;
- import android.widget.Toast;
- public class MainActivity extends AppCompatActivity {
- private ListView listView;
- private String names[] = {
- "HTML",
- "CSS",
- "Java Script",
- "Wordpress"
- };
- private String desc[] = {
- "The Powerful Hypter Text Markup Language 5",
- "Cascading Style Sheets",
- "Code with Java Script",
- "Manage your content with Wordpress"
- };
- private Integer imageid[] = {
- R.drawable.html,
- R.drawable.css,
- R.drawable.js,
- R.drawable.wp
- };
- @Override
- protected void onCreate(Bundle savedInstanceState) {
- super.onCreate(savedInstanceState);
- setContentView(R.layout.activity_main);
- CustomList customList = new CustomList(this, names, desc, imageid);
- listView = (ListView) findViewById(R.id.listView);
- listView.setAdapter(customList);
- listView.setOnItemClickListener(new AdapterView.OnItemClickListener() {
- @Override
- public void onItemClick(AdapterView<?> adapterView, View view, int i, long l) {
- Toast.makeText(getApplicationContext(),"You Clicked "+names[i],Toast.LENGTH_SHORT).show();
- }
- });
- }
- @Override
- public boolean onCreateOptionsMenu(Menu menu) {
- // Inflate the menu; this adds items to the action bar if it is present.
- getMenuInflater().inflate(R.menu.menu_main, menu);
- return true;
- }
- @Override
- public boolean onOptionsItemSelected(MenuItem item) {
- // Handle action bar item clicks here. The action bar will
- // automatically handle clicks on the Home/Up button, so long
- // as you specify a parent activity in AndroidManifest.xml.
- int id = item.getItemId();
- //noinspection SimplifiableIfStatement
- if (id == R.id.action_settings) {
- return true;
- }
- return super.onOptionsItemSelected(item);
- }
- }
Step 9
Create a new CustomList.java file (File ⇒ New ⇒Java class).
In the CustomList.java, copy and paste the code given below. Java programming is the backend language for Android. Do not replace your package name, else an app will not run.
CustomList.java code
- package ganeshannt.customlistviewsample;
- import android.app.Activity;
- import android.view.LayoutInflater;
- import android.view.View;
- import android.view.ViewGroup;
- import android.widget.ArrayAdapter;
- import android.widget.ImageView;
- import android.widget.TextView;
- public class CustomList extends ArrayAdapter<String> {
- private String[] names;
- private String[] desc;
- private Integer[] imageid;
- private Activity context;
- public CustomList(Activity context, String[] names, String[] desc, Integer[] imageid) {
- super(context, R.layout.list_layout, names);
- this.context = context;
- this.names = names;
- this.desc = desc;
- this.imageid = imageid;
- }
- @Override
- public View getView(int position, View convertView, ViewGroup parent) {
- LayoutInflater inflater = context.getLayoutInflater();
- View listViewItem = inflater.inflate(R.layout.list_layout, null, true);
- TextView textViewName = (TextView) listViewItem.findViewById(R.id.textViewName);
- TextView textViewDesc = (TextView) listViewItem.findViewById(R.id.textViewDesc);
- ImageView image = (ImageView) listViewItem.findViewById(R.id.imageView);
- textViewName.setText(names[position]);
- textViewDesc.setText(desc[position]);
- image.setImageResource(imageid[position]);
- return listViewItem;
- }
- }
Step 10
In Strings.xml, add the code given below. In this string, provide the app settings bar.
Strings.xml code
- <resources>
- <string name="app_name">CustomListViewSample</string>
- <string name="hello_world">Hello world!</string>
- <string name="action_settings">Settings</string>
- </resources>
Step 11
Create a new dimens.xml file into the values folder (File ⇒ New ⇒Activity⇒values resource file).
Go to dimens.xml, followed by clicking the text bottom. This XML file contains the designing code for an Android app. In the dimens.xml, copy and paste the code given below.
dimens.xml code
- <resources>
- <!-- Default screen margins, per the Android Design guidelines. -->
- <dimen name="activity_horizontal_margin">16dp</dimen>
- <dimen name="activity_vertical_margin">16dp</dimen>
- </resources>
Step 12
Create the menu folder into the resource folder.
Create a new menu_main.xml file into the values folder (File ⇒ New ⇒Activity⇒values resource file).
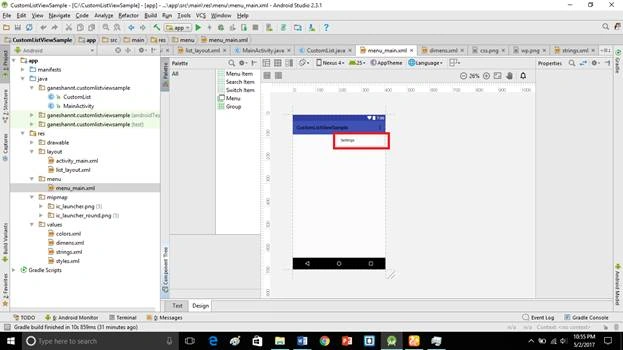
Go to menu_main.xml, followed by clicking the text bottom. This XML file contains the designing code for an android app. In the menu_main.xml, copy and paste the code given below.
menu_main.xml
- <menu xmlns:android="http://schemas.android.com/apk/res/android"
- xmlns:app="http://schemas.android.com/apk/res-auto"
- xmlns:tools="http://schemas.android.com/tools" tools:context=".MainActivity">
- <item android:id="@+id/action_settings" android:title="@string/action_settings"
- android:orderInCategory="100" app:showAsAction="never" />
- </menu>
The code given above provides the settings functionality to our Application.
Step 13
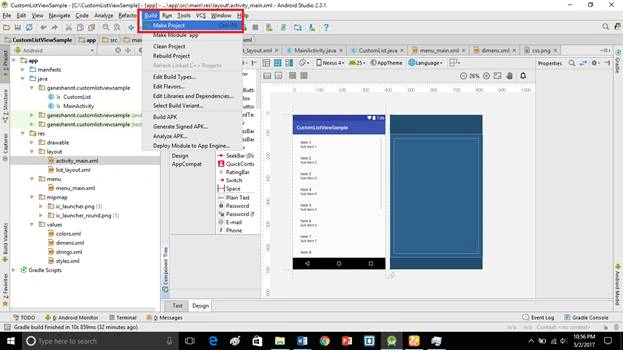
This is our user interface of the Application. Click Make project option.
Step 14
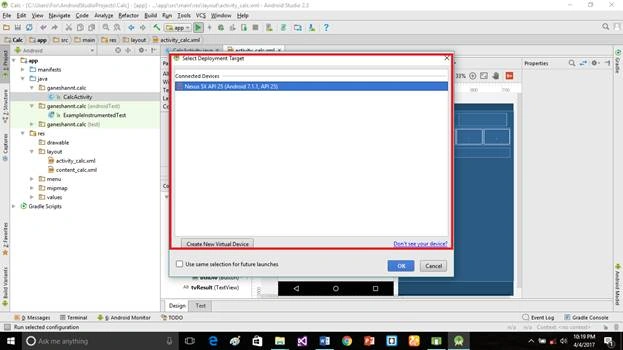
Run the Application, followed by choosing the virtual machine. Click OK.
Deliverables
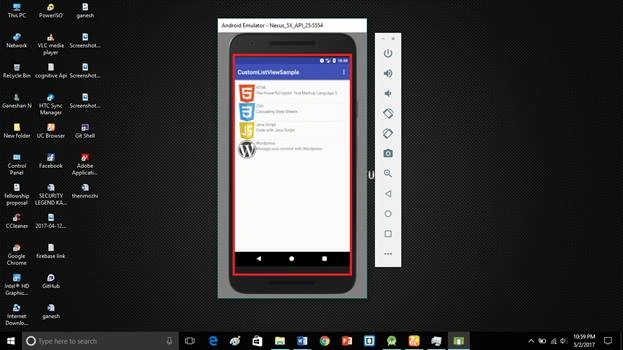
Here, we successfully created Custom ListView in an Android Application and is executed.
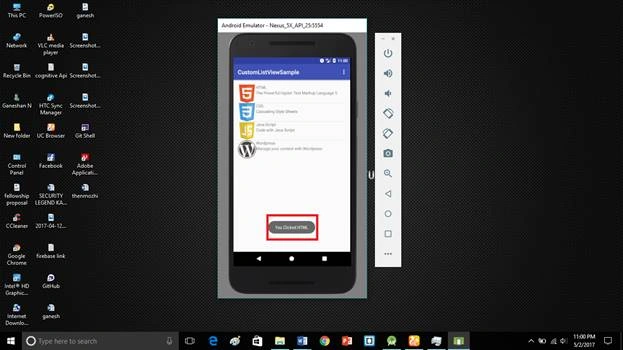
If you click any one of the ListView, I will show you the toast notification in the Application given below.
If you have any doubts, just comment below.
Alice WinstonPosted Feb 17, 2019, 5:54 AM
Great work, thank you. But I have a question : When I tried to change the name of the textview I got a nullpointerexception at textViewName.setText(names[position]); . Can you please explain why ?
Joe WilsonPosted May 4, 2017, 5:14 AM
Thank you for sharing it.