

In this article I will shows how to create a ListView that allows multiple items to be selected, in other words users can select more than one item, just like adding mulitple items to a shopping cart.
Here I use a ListView control and bind data to it. When the user selects the items it allows them to select more than one item at a time.
Here is the procedure to be followed.
Step 1
Create a Blank Windows Store App using XAML and C#.
Step 2
Here is the XAML markup of creating the Listview:
<Page
x:Class="MasterDetailViewUsingListView.MainPage"
xmlns="http://schemas.microsoft.com/winfx/2006/xaml/presentation"
xmlns:x="http://schemas.microsoft.com/winfx/2006/xaml"
xmlns:local="using:MasterDetailViewUsingListView"
xmlns:d="http://schemas.microsoft.com/expression/blend/2008"
xmlns:mc="http://schemas.openxmlformats.org/markup-compatibility/2006"
mc:Ignorable="d">
<Grid Background="{StaticResource ApplicationPageBackgroundThemeBrush}">
<Grid Height="500">
<Grid.ColumnDefinitions>
<ColumnDefinition Width="Auto"/>
<ColumnDefinition Width="*"/>
</Grid.ColumnDefinitions>
<ListView x:Name="ItemListView" Margin="0,0,0,8" Width="Auto" Height="Auto" BorderThickness="0" VerticalAlignment="Stretch" HorizontalAlignment="Left"
ScrollViewer.VerticalScrollBarVisibility="Auto" ScrollViewer.HorizontalScrollBarVisibility="Disabled" SelectionMode="Multiple">
<ListView.ItemsPanel>
<ItemsPanelTemplate >
<StackPanel Margin="0,0,0,0" Width="Auto"/>
</ItemsPanelTemplate>
</ListView.ItemsPanel>
<ListView.ItemTemplate>
<DataTemplate>
<Grid HorizontalAlignment="Stretch" Width="Auto" Height="Auto" Margin="20,0,0,0">
<Grid.ColumnDefinitions>
<ColumnDefinition Width="Auto"/>
<ColumnDefinition Width="*"/>
</Grid.ColumnDefinitions>
<Border Margin="0,8,0,8" Width="50" Height="50" HorizontalAlignment="Left" VerticalAlignment="Center">
<Image Source="{Binding Image}" Margin="0" Stretch="Fill"/>
</Border>
<StackPanel Grid.Column="1" HorizontalAlignment="Left" Margin="10,8,0,0">
<TextBlock Text="{Binding Title}" FontSize="25" Width="400"/>
</StackPanel>
</Grid>
</DataTemplate>
</ListView.ItemTemplate>
</ListView>
<StackPanel Orientation="Horizontal" Grid.Column="1">
<StackPanel Orientation="Horizontal" Margin="0,10,0,0">
<Button x:Name="AddToCart" Content="Add to cart" Click="AddToCart_Click"/>
</StackPanel>
<TextBlock x:Name="ShoppingCart" Text="" Width="300" FontSize="20" TextWrapping="Wrap" Margin="0,10,0,0"/>
</StackPanel>
</Grid>
</Grid>
</Page>
Step 3
For selecting multiple items, set the selectionMode property to Multiple, as in:
SelectionMode="Multiple"
Step 4
In this article I use custom classes to create the data source. The following is the code:
using System;
using System.Collections.Generic;
using System.Linq;
using System.Text;
using System.Threading.Tasks;
using Windows.UI.Xaml.Media;
using Windows.UI.Xaml.Media.Imaging;
namespace MasterDetailViewUsingListView
{
public class ItemDetails
{
public ItemDetails()
{
Item item;
Uri _baseUri = new Uri("ms-appx:///");
item = new Item();
item.Title = "Acer Aspire S3-391 Laptop";
item.Price = "Rs. 66,754";
item.SetImage(_baseUri, "Images/1.jpg");
item.Content = "Core i7 (3G), 13.3 Inch4, GB RAM, 500 GB HD, Win 7";
item = new Item();
item.Title = "Acer Aspire S3 Aspire S Laptop";
item.Price = "Rs. 54,500";
item.SetImage(_baseUri, "Images/2.jpg");
item.Content = "Core i5 (2G), 13.3 Inch, 4 GB RAM, 320 GB HD, Win 7";
Collection.Add(item);
item = new Item();
item.Title = "Acer Aspire One 725 Laptop";
item.Price = "Rs. 19,499";
item.SetImage(_baseUri, "Images/3.jpg");
item.Content = "AMD APU Dual Core, 11.6 Inch, 2 GB RAM, 320 GB HD, Win 7";
Collection.Add(item);
item = new Item();
item.Title = "Acer Aspire One AOD 270 NU.SGASI.003 Netbook";
item.Price = "Rs. 16,560";
item.SetImage(_baseUri, "Images/4.jpg");
item.Content = "Atom Dual Core (2G), 10.1 Inch, 2 GB RAM, 320 GB HD, Linux";
Collection.Add(item);
item = new Item();
item.Title = "Acer Aspire V3-571G Laptop";
item.Price = "Rs. 38,455";
item.SetImage(_baseUri, "Images/6.jpg");
item.Content = "Core i3 (2G), 15.6 Inch, 4 GB RAM, 500 GB HD, Win 7";
Collection.Add(item);
}
List<Item> collection = new List<Item>();
public List<Item> Collection
{
get
{
return this.collection;
}
}
}
}
public class Item
{
private string _Title = string.Empty;
public string Title
{
get
{
return this._Title;
}
set
{
this._Title = value;
}
}
private string _Price = string.Empty;
public string Price
{
get
{
return this._Price;
}
set
{
this._Price = value;
}
}
private ImageSource _Image = null;
public ImageSource Image
{
get
{
return this._Image;
}
set
{
this._Image = value;
}
}
public void SetImage(Uri baseUri, String path)
{
Image = new BitmapImage(new Uri(baseUri, path));
}
private string _Link = string.Empty;
public string Link
{
get
{
return this._Link;
}
set
{
this._Link = value;
}
}
private string _Category = string.Empty;
public string Category
{
get
{
return this._Category;
}
set
{
this._Category = value;
}
}
private string _Description = string.Empty;
public string Description
{
get
{
return this._Description;
}
set
{
this._Description = value;
}
}
private string _Content = string.Empty;
public string Content
{
get
{
return this._Content;
}
set
{
this._Content = value;
}
}
}
Here is the code to set the data source to the ListView:
protected override void OnNavigatedTo(NavigationEventArgs e)
{
ItemDetails messageData = new ItemDetails();
ItemListView.ItemsSource = messageData.Collection;
ItemListView.SelectedIndex = 0;
}
Step 5
The code of the Button's Click when multiple items are selected is as follows:
void AddToCart_Click(object sender, RoutedEventArgs e)
{
char[] charsToTrim = { ',', ' ' };
if (ItemListView.SelectedItems.Count != 0)
{
foreach (Item item in ItemListView.SelectedItems)
{
ShoppingCart.Text += item.Title + ", ";
}
ShoppingCart.Text = ShoppingCart.Text.TrimEnd(charsToTrim);
ShoppingCart.Text += " added to cart";
}
}
Step 6
Now, run the application to see the output. Select the multiple items from the ListView and click on the Add to Cart button.
Output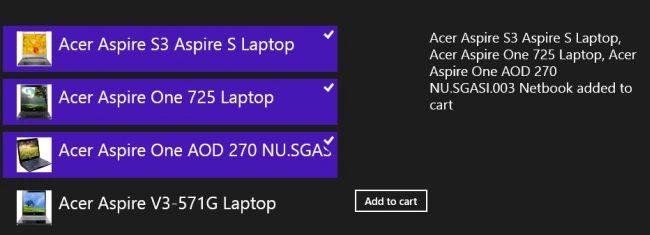
Anil KumarPosted Jun 23, 2015, 8:24 AM
Thank you.