

Introduction
Let us understand how to create an OpenGL application for Android phones from Visual Studio 2010.
System Requirement
- Android SDK
- Mono
- Visual Studio 2010
Step 1: First open the Visual Studio 2010
Step 2: Click New Project
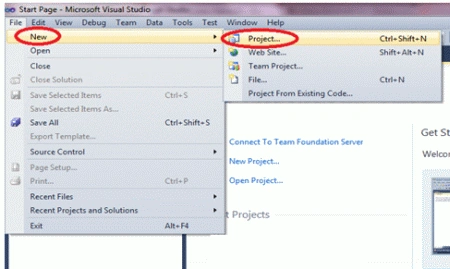 If all the required software is properly installed then you are able to see Mono for Android in your Visual Studio, else install it.
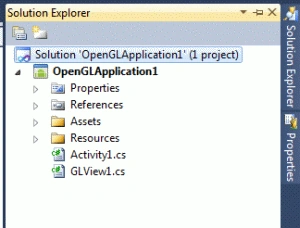
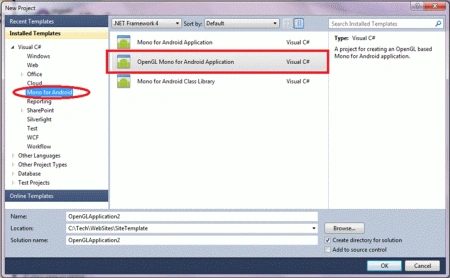 Step 2: For creating an OpenGL Android application first select the project OpenGL Mono for Android Application. Then in Solution Explorer, you are able to see the following folders and files.
Please see below to understand the use of each and every file.
Step 2: For creating an OpenGL Android application first select the project OpenGL Mono for Android Application. Then in Solution Explorer, you are able to see the following folders and files.
Please see below to understand the use of each and every file.
 Main.axml
You need to add controls in the following format to get it to display on your screen.
Main.axml
You need to add controls in the following format to get it to display on your screen.
- <?xml version="1.0" encoding="utf-8"?>
- <LinearLayout xmlns:android="http://schemas.android.com/apk/res/android"
- android:orientation="vertical"
- android:layout_width="fill_parent"
- android:layout_height="fill_parent">
- </LinearLayout>
Strings.xml
We need to add a string with a unique name and value.
- <?xml version="1.0" encoding="utf-8"?>
- <resources>
- <string name="Hello">Hello World, Click Me!</string>
- <string name="ApplicationName">OpenGLApplication1</string>
- </resources>
Resource.Designer.cs
For every control and string variable, there is a corresponding unique resource and for every resource, there is a unique id created.
- namespace OpenGLApplication1
- {
- public partial class Resource
- {
- public partial class Attribute
- {
- private Attribute()
- {
- }
- }
- public partial class Drawable
- {
- // aapt resource value: 0x7f020000
- public const int Icon = 2130837504;
- private Drawable()
- {
- }
- }
- public partial class Layout
- {
- // aapt resource value: 0x7f030000
- public const int Main = 2130903040;
- private Layout()
- {
- }
- }
- public partial class String
- {
- // aapt resource value: 0x7f040001
- public const int ApplicationName = 2130968577;
- // aapt resource value: 0x7f040000
- public const int Hello = 2130968576;
- private String()
- {
- }
- }
- }
- }
Activity1.cs
This class is standing First in the hierarchy of execution. It is because of the attribute.
And from this call, the event is executed.
- using System;
- using Android.App;
- using Android.Content;
- using Android.Runtime;
- using Android.Views;
- using Android.Widget;
- using Android.OS;
- namespace OpenGLApplication1
- {
- [Activity(Label = "OpenGLApplication1", MainLauncher = true, Icon = "@drawable/icon")]
- public class Activity1 : Activity
- {
- protected override void OnCreate(Bundle bundle)
- {
- base.OnCreate(bundle);
- // Create our OpenGL view, and display it
- GLView1 view = new GLView1(this);
- SetContentView(view);
- }
- }
- }
GLView1.cs

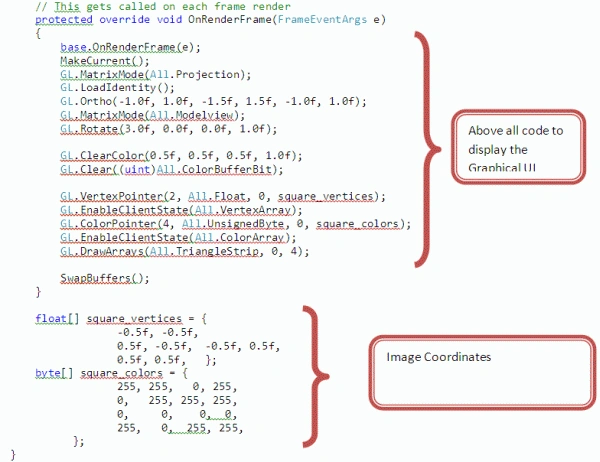 As you finish the coding then build the application. And then execute the application.
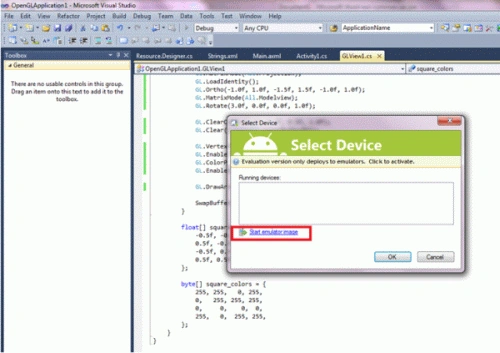 When you are able to see the above screen then press Start emulator Image then you are able to see the following screen.
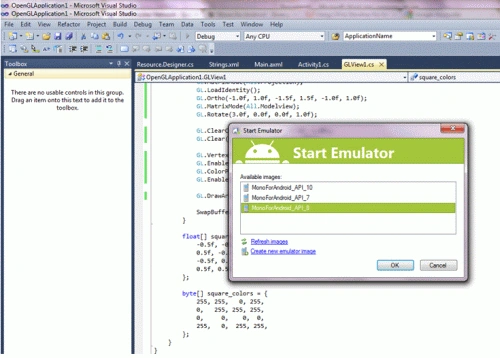 Then Select any emulator and press ok.
 Then execution begins and the package is created. As the process of execution finishes you are able to see the screen of the Android phone with a rotating rectangle as per the code.
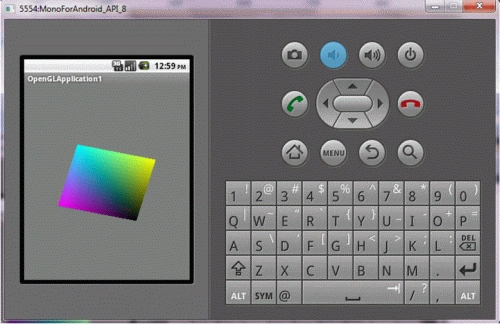 This way you can create any graphical application.
Gowtham RajamanickamPosted Apr 12, 2016, 1:22 AM
Good One, Thanks for sharing
Alok PandeyPosted Feb 5, 2012, 11:36 PM
Very useful article. Thanks for sharing.
Akash AhlawatPosted Feb 5, 2012, 11:12 PM
This article will help many android application developer
Dinesh BeniwalPosted Feb 5, 2012, 11:01 PM
Good start, Welcome to the C# Corner.
Monika AroraPosted Feb 5, 2012, 10:55 PM
Its a very useful and good article. Thanks.
Arjun PanwarPosted Feb 5, 2012, 10:47 PM
Really very valuable article thanks for sharing