
Introduction
The focus of the article is to show the developers how to generate a dynamic Excel sheet from HTML. This article includes some sample programs to show how to implement various Excel functionalities with the help of HTML.
The prerequisite of these programs is, you should have Microsoft Office Excel installed in your PC. This article expects you to have the basic concepts HTML and Excel programming for better understanding. Before starting you need to know about Namespaces/Uniform Resource Name and Meta Tag used for Microsoft Office Excel Application.
Meta Tag
HTML includes the meta element that goes inside the head element. The purpose of the meta element is to provide meta-information about the document. To generate an Excel sheet in HTML, the following meta information should be included under the Header Section:
<meta http-equiv=Content-Type content="text/html; charset=windows-1252">

<meta name=ProgId content=Excel.Sheet>

<meta name=Generator content="Microsoft Excel 11">
Here is an example to generate a simple Excel sheet:
<html >
    <head>
        <meta http-equiv=Content-Type content="text/html; charset=windows-1252">
        <meta name=ProgId content=Excel.Sheet>
        <meta name=Generator content="Microsoft Excel 11">
    </head>
</html>
Namespace/Uniform Resource Name
In the above section we see how to generate an Excel sheet. Here we will see how to define Office objects. There is no specific HTML tag for Microsoft Office Objects, we need to use custom tags to define Office and Microsoft Excel Objects. Custom tags should have a unique Namespace or Uniform Resource Name. The following code snippet shows the required xmlns [XML Namespace] for Office and Excel:
<html xmlns:v="urn:schemas-microsoft-com:vml"xmlns:o="urn:schemas-microsoft-com:office:office" xmlns:x="urn:schemas-microsoft-com:office:excel" xmlns="http://www.w3.org/TR/REC-html40">
</html>
We will see more detailed usage of the namespace in the subsequent sections.
Custom Document Property
The Custom document property allows you to define your own property. In the following example we will see how to define Office custom properties in HTML:
<html xmlns:v="urn:schemas-microsoft-com:vml"xmlns:o="urn:schemas-microsoft-com:office:office" xmlns:x="urn:schemas-microsoft-com:office:excel" xmlns="http://www.w3.org/TR/REC-html40">
<head>
    <meta http-equiv=Content-Type content="text/html; charset=windows-1252">
    <meta name=ProgId content=Excel.Sheet>
    <meta name=Generator content="Microsoft Excel 11">
    <title>Document and Custom Property </title>
    <!--[if gte mso 9]><xml>
    <o:CustomDocumentProperties>
    <o:BUSINESSGROUP dt:dt="string">CHANNELA</o:BUSINESSGROUP>
    <o:BUSINESSGROUPID dt:dt="string">2</o:BUSINESSGROUPID>
    </o:CustomDocumentProperties>
    </xml><![endif]-->
</head>
</html>
If you look closely at the preceding code you will notice an IF block like the following:
<!--[if gte mso 9]>
   <xml></xml>
<![endif]-->
This piece of code is checking the availability of Microsoft Office. It is good practice to add this piece of code before defining a property. If you save the preceding code as HTML and open as Excel then it will have the following custom property:
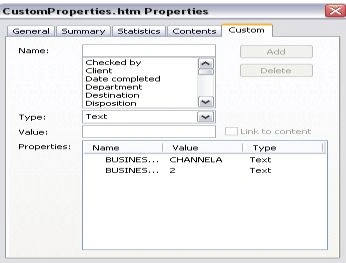
Figure 1
Data Validation
Special custom tags are also available for data validation.
For example: The following tags are used to represent various properties of data validation.
<x:DataValidation>
    <x:Range></x:Range>
    <x:Type> </x:Type>
    <x:Qualifier> </x:Qualifier>
    <x:Value></x:Value>
    <x:ErrorMessage> </x:ErrorMessage>
    <x:ErrorTitle> </x:ErrorTitle>
</x:DataValidation>
The following table explains the preceding tags:
| Tags | Descriptions |
| <x:Range></x:Range> | Defines the range where validation is applied. |
| <x:Type> </x:Type> | Tells about Validation Type like Whole, Decimal, TextLength,Custom ect |
| <x:Qualifier> </x:Qualifier> | Defines comparison parameters like Greater, Equal, NotEqual, Less, GreaterOrEqual, LessOrEqual ect |
| <x:Value></x:Value> | Defines an expression or value for validation |
| <x:ErrorMessage> </x:ErrorMessage> | Defines customized Error Message. |
| <x:ErrorTitle></x:ErrorTitle> | Title of the error message. |
The following example will help you to understand the above syntax better:
<html xmlns:v="urn:schemas-microsoft-com:vml"xmlns:o="urn:schemas-microsoft-com:office:office" xmlns:x="urn:schemas-microsoft-com:office:excel"
xmlns="http://www.w3.org/TR/REC-html40">
<head>
    <meta http-equiv=Content-Type content="text/html; charset=windows-1252">
    <meta name=ProgId content=Excel.Sheet>
    <meta name=Generator content="Microsoft Excel 11">
   <!--[if gte mso 9]><xml>
   <x:ExcelWorkbook>
   <x:ExcelWorksheets>
   <x:ExcelWorksheet>
   <x:Name>CustomValidation</x:Name>
   <x:WorksheetOptions>
   <x:Selected/>
   <x:DoNotDisplayGridlines/>
   <x:ProtectContents>False</x:ProtectContents>
   <x:ProtectObjects>False</x:ProtectObjects>
   <x:ProtectScenarios>False</x:ProtectScenarios>
   </x:WorksheetOptions>
   <x:DataValidation>
   <x:Range>$A$2</x:Range>
   <x:Type>Whole</x:Type>
   <x:Min>1</x:Min>
   <x:Max>10</x:Max>
   <x:ErrorMessage>Please enter between ! and 10</x:ErrorMessage>
   <x:ErrorTitle>Test Application</x:ErrorTitle>
   </x:DataValidation>
   <x:DataValidation>
   <x:Range>$A$3</x:Range>
   <x:Type>Whole</x:Type>
   <x:Qualifier>GreaterOrEqual</x:Qualifier>
   <x:Value>12</x:Value>
   <x:ErrorMessage>Please enter greater than equal to 12</x:ErrorMessage>
  <x:ErrorTitle>Test Application</x:ErrorTitle>
  </x:DataValidation>
  <x:DataValidation>
  <x:Range>$A$4</x:Range>
  <x:Type>Whole</x:Type>
  <x:Qualifier>LessOrEqual</x:Qualifier>
  <x:Value>13</x:Value>
  <x:ErrorMessage>Please enter less than equal to 13</x:ErrorMessage>
  <x:ErrorTitle>Test Application</x:ErrorTitle>
  </x:DataValidation>
  <x:DataValidation>
  <x:Range>$A$5</x:Range>
  <x:Type>Custom</x:Type>
  <x:Qualifier>Equal</x:Qualifier>
  <x:Value>AND(MOD(A5,5)=0,A5>=0)</x:Value>
  <x:ErrorMessage>Please enter in multiples of Five</x:ErrorMessage>
  <x:ErrorTitle>Test Application</x:ErrorTitle>
  </x:DataValidation>
  </x:ExcelWorksheet>
  </x:ExcelWorksheets>
  <x:WindowHeight>9210</x:WindowHeight>
  <x:WindowWidth>19035</x:WindowWidth>
  <x:WindowTopX>0</x:WindowTopX>
  <x:WindowTopY>75</x:WindowTopY>
  <x:ProtectStructure>False</x:ProtectStructure>
  <x:ProtectWindows>False</x:ProtectWindows>
  </x:ExcelWorkbook>
  </xml><![endif]-->
</head>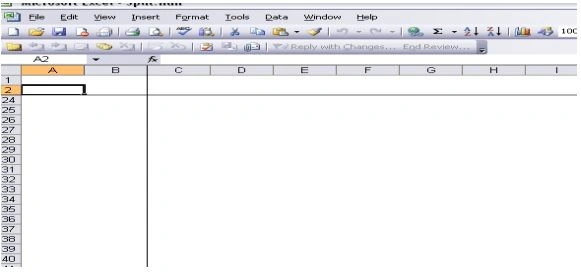
Thyago RomeiroPosted Apr 30, 2020, 8:39 AM
Good MorningI can create more than one sheet, but I cannot insert content on it. When I insert a new table, it appears on Sheet1 and not on Sheet2 as I would like. How to proceed?
Mykola DolynskyiPosted Oct 17, 2018, 2:30 PM
How to do if 2 or more sheets required ?
Genilton CavalcantePosted Sep 29, 2011, 3:40 PM
Hello, Using the article "Creating a dynamic Excel using HTML" it's possible create a sheet with autofilter columns? Greetings, Genilton [email protected]
Krystsina ProellPosted Sep 2, 2011, 3:41 AM
When I try to open the hrml code with Excel 2010, I get the error to the tag <x:DataValidation>. With Excel 2003/2007 it works fine. Any ideas? Thanks in advance.
BA rumplemintzPosted May 16, 2011, 11:26 AM
Instead of using data validation you can also set the CSS style of the cells you want protected. eg: style="mso-protection: locked hidden" OR style="mso-protection: unlocked visible"
BA rumplemintzeditedPosted May 12, 2011, 12:31 PMEdited May 12, 2011, 12:49 PM
Great article, and here's a tip: Make sure you only have 1 table on the page. I was getting an error: Html import errors, problems came up in the following areas during load: "data validation", until I removed a second table that was inside my page.
SunilPosted Jan 28, 2011, 10:15 PM
How would I make the columns have their autofilters turned on when file is opened in Excel? Thanks Sunil
ryan liePosted Oct 20, 2009, 12:12 AM
IS IT when im generating the excel a pop up will be shown but it will close when the excel is opened? the problem the pop up can not close when i use ie 6? do u have any idea to close that? regards Lie