

Microsoft Fabric makes capacity management easier with the ability to create a new capacity directly from the Manage Capacities page in the Monitor hub. This provides administrators with a more centralised experience, allowing them to initiate capacity creation without first navigating to the Azure portal.
In this article, we will walk through the steps to create a new Fabric capacity using the Fabric Capacity Monitoring experience.
Step 1: Open Fabric Capacity Monitoring
Sign in to the Microsoft Fabric portal.
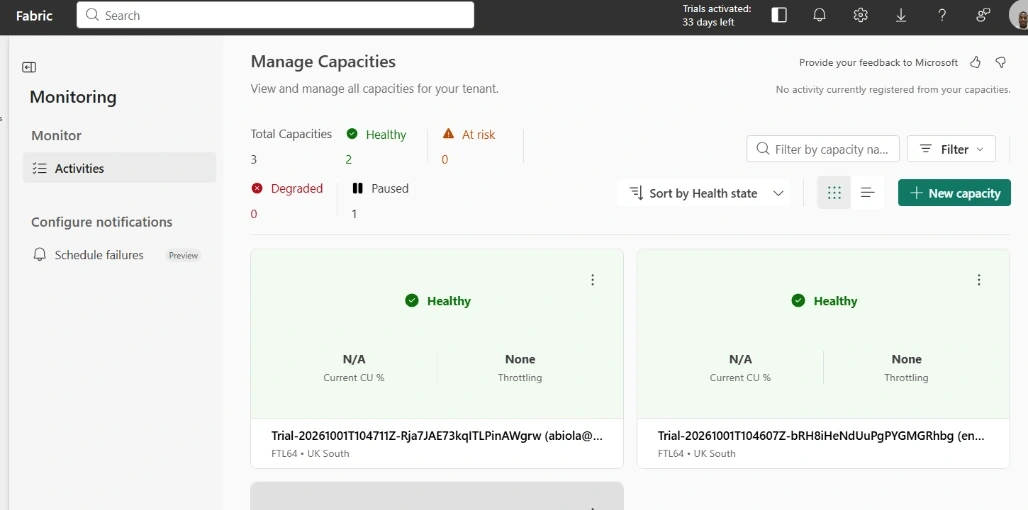
From the left navigation pane, select Monitor, then navigate to Capacities to open the Manage Capacities page.
This page provides an overview of your existing capacities, including their health status, current capacity unit (CU) utilisation, and throttling information. <Cite refs={["turn330472search0"]}/>
Step 2: Select New Capacity
On the Manage Capacities page, locate and select the + New capacity button in the upper-right corner.
This opens the capacity creation experience directly within Microsoft Fabric, allowing you to configure the new capacity without starting the process from the Azure portal.
Step 3: Configure the New Capacity
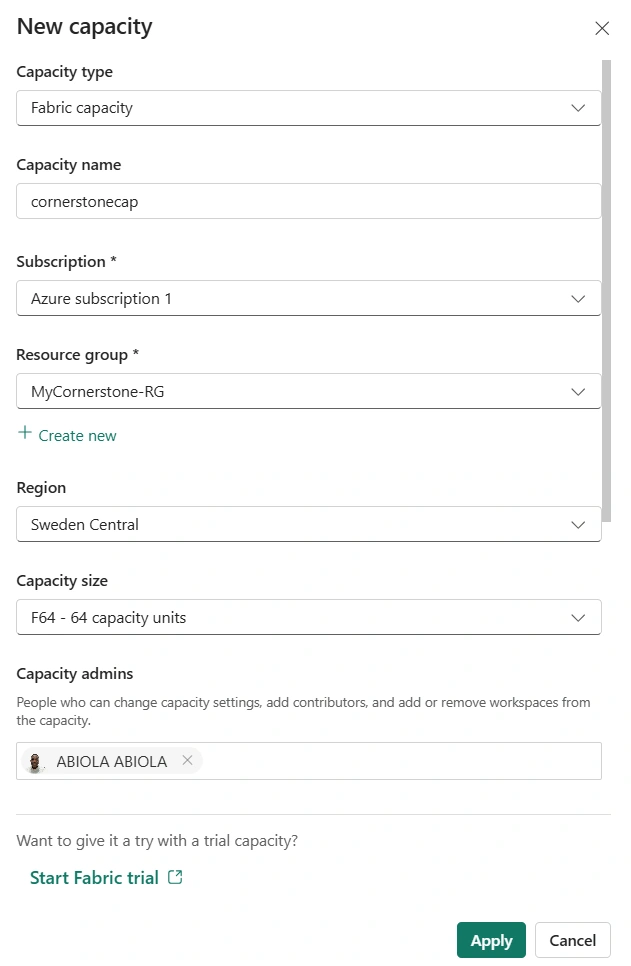
On the New Capacity page, provide the required configuration details.
Capacity type: Select the type of capacity you want to create.
Capacity name: Enter a meaningful name to identify the capacity.
Subscription: Select the Azure subscription to use.
Resource group: Choose the resource group in which the capacity will be created.
Region: Select the appropriate Azure region.
Capacity size: Choose the required capacity SKU, based on your expected workload and resource requirements.
Capacity admins: Select the users who will administer the capacity.
Depending on the available options, you can also expand Additional settings to configure settings such as resource tags.
Step 4: Create the Capacity
After completing the required fields, review your configuration to ensure that the capacity name, subscription, resource group, region, size, and administrators are correct.
Select Apply to submit the configuration and initiate capacity creation.
Once the capacity has been provisioned, you can return to the Manage Capacities page to monitor it alongside your existing capacities.
Before creating a capacity, ensure that you have the necessary permissions. You need Fabric administrator access, along with the relevant Azure permissions to create capacity resources in the selected subscription. Capacity creation is also subject to the applicable subscription and purchasing requirements.
To conclude, the ability to create a Fabric capacity directly from the Fabric Capacity Monitoring experience is a useful improvement to the capacity management workflow. Instead of starting from the Azure portal, administrators can initiate the process from the same Fabric environment they use to monitor capacity health and utilisation.
This more centralised approach helps simplify administration and makes it easier to manage the capacity resources that power Microsoft Fabric workloads.
Join the conversation! Your thoughts help the community grow.