

Welcome to an article about creating a Virtual Network and adding a Windows Server Machine on it!
Note
Please go back to my previous articles to know about Virtual Networks in details.
Requirements
- An active Azure account, click here to get a free trial Azure account.
Exercise 1 – Creating a Virtual Network
Follow the below step by step procedure.
Step 1
Login to the Azure Portal using the link here.
Step 2
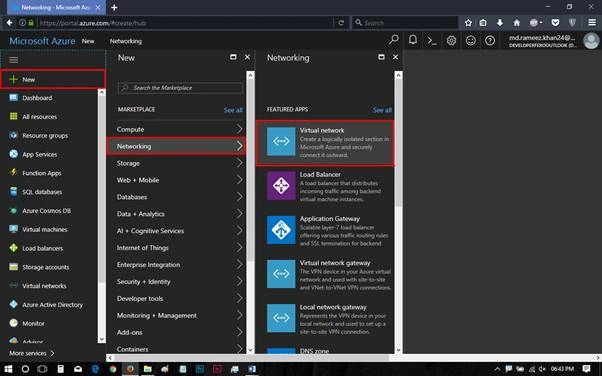
Click on New - Networking - Virtual Network.
Step 3
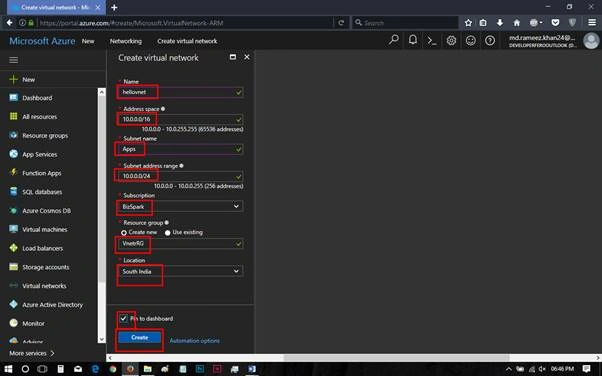
Configure the Virtual Network by providing the below details.
- Name of the V-Net
- Address Space for V-Net
- Subnet Name for V-Net
- Subnet Address Range for V-Net
- Subscription for V-Net
- Resource Group of where the V-Net is located.
- Location for the V-Net.
Click on "Create" to create this Virtual Network.
Exercise 2 Creating a Server Machine on the Virtual Network
Step 4
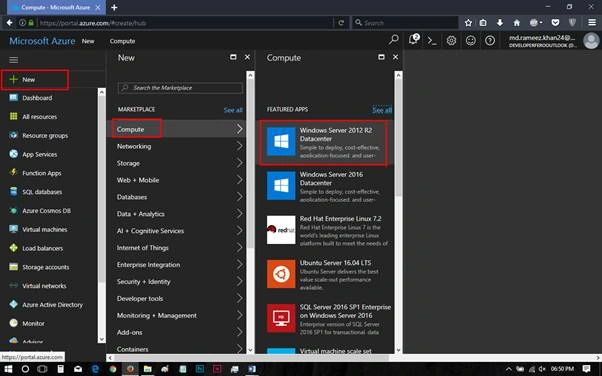
Now, create a server machine by clicking on New - Compute - Windows Server 2012 R2 Datacentre.
Step 5
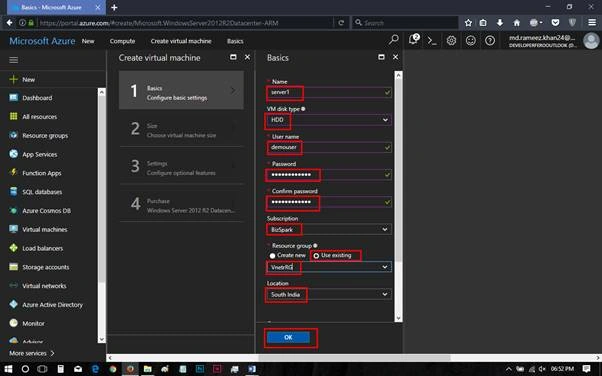
Fill in the basics blade with the below configuration.
- Name of the server machine.
- Virtual Machine Disk type – Solid State Drive / Hard Disk Drive.
- Username – username for the Virtual Machine.
- Password – password for the Virtual Machine.
- Confirm the password of the same again.
- Subscription – Subscription for the Virtual Machine to be created.
- Resource Group – either create a new resource group or tag the new instance for the Resource Group which has been already created.
- Location – location of the server machine where it has to be created.
Click on "OK" to pass for the next size blade.
Step 6
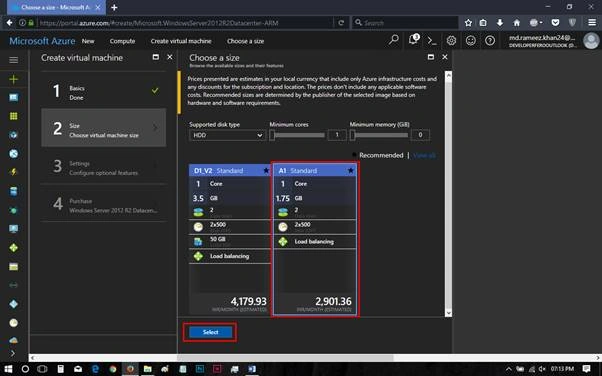
Select the size of the Virtual Machine. Here, we will be having two blades- Recommended and View all, to get stuck on towards the Virtual Machine. After selecting the Virtual Machine size, click on “Select” to pass for the next blade of Settings.
Step 7
In this Settings blade, configure the below things,
- Storage
Storage accounts are Azure region specific and have very strict naming rules, they hold different segments like Blob, Files, Tables and Queue. Virtual Machines in Azure use disks just like typical VMs and behave just as they would under other circumstances, All Disks that are connected to a VM will be talking to Azure Storage using the Blob Service via Page Blobs. Block Blobs are not supported for VMs. On All VMs, with the exception of the DS and GS series, the D:\ Drive is a Non-persistent local storage. Data on this drive will be lost under certain circumstances which are out of the administrator’s control. Don’t put data here for better if you aren’t willing to lose. - Managed Disk in Storage
A relatively new feature in Azure is Managed Disks. Managed disks reduces management overhead of traditional storage accounts by automatically managing distribution across storage scale units. This ensures that customers do not run into the scale limitations of traditional storage accounts, and it also ensures that a failure of a storage scale set cannot impact all VMs provisioned in Availability Sets. Other benefits include a more robust support for RBAC. For example, if you wanted a group to be able to copy a managed disk to a storage account, you can only grant them the ‘export’ operation. Managed disks also support the creation of full-disk snapshots, and the use Azure Backup to protect your VMs. - Storage Account
Select the Storage Account of which has to be used for the Virtual Machine has to use. - Virtual Network
Select the Virtual Network of which we create in the previous exercise.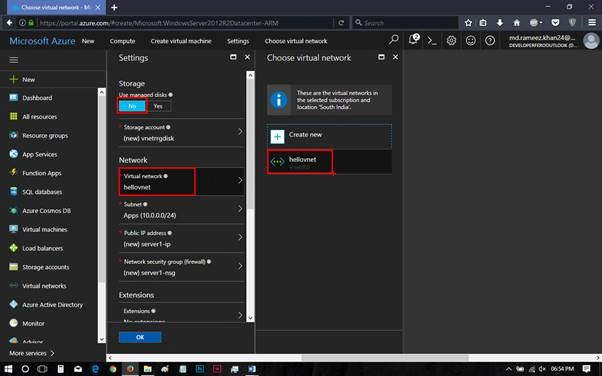
- Network Security Group (NSG)
NSG allows us to configure the firewall settings, add an Inbound Rule. Network Security Groups are essentially firewall rules that can be applied to virtual machines and Virtual Network subnets. Only one Network Security Group can be associated with a Virtual Machine or Virtual Network subnet. When we create a Network Security Group, it is created in a specific Microsoft Azure Region. Each Network Security Group can support up to 200 rules, and each rule specifies properties such as: Inbound or outbound traffic, Priority (lower numbers are processed first), Source and Destination IP addresses, Source and Destination Ports, Protocol: TCP or UDP, Allow or Deny.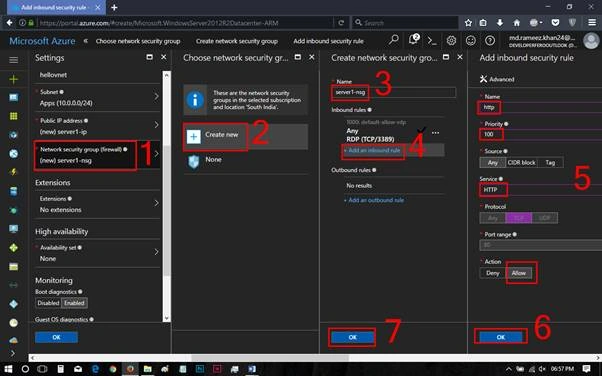
- Availability Set
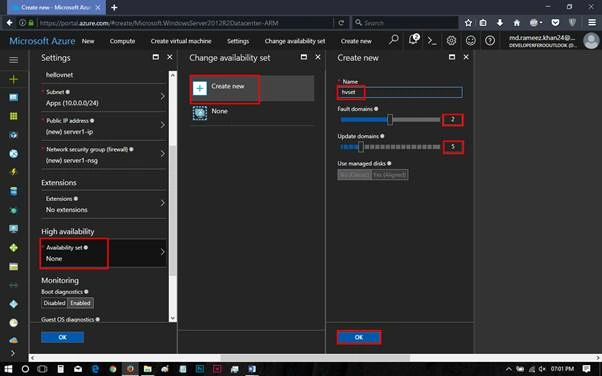
There two types of downtime that must be planned for when using Azure IaaS. Planned Downtime is when Microsoft is doing patches or upgrades. Unplanned Downtime could happen if there is a physical failure in the datacenter. This type of failure would be an issue impacting the rack where the VM is located on physical machines. By using Availability Sets you will always ensure that if a single point of failure happens in an Azure Data center that your service won’t completely go down.
Create a new availability set with Fault Domain and Update Domain.
Step 8
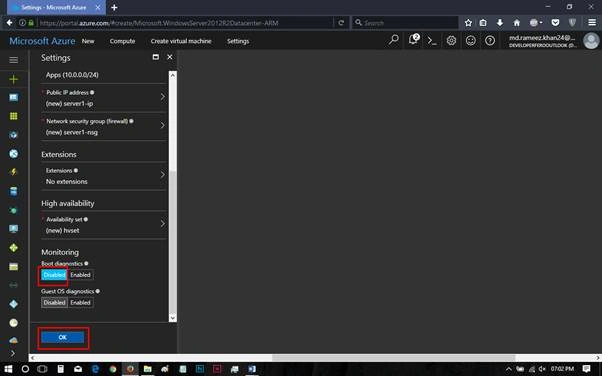
Enable the monitoring for Boot Diagnostics and guest OS monitoring. Click on OK to move for the summary blade.
Step 9
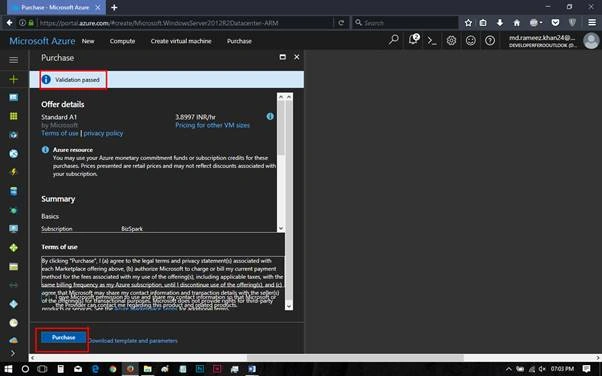
Click on Purchase to create the Virtual Machine on the Virtual Network which has been created.
Note
Keep following for my updates for the next article on Load Balancer which is a continuation of this one.
Tushar SharmaPosted Jul 31, 2017, 11:31 AM
Great Article Thanks for sharing :)