


Introduction
In this article, let’s see how to create a shopping cart using ASP.NET Core, Angular 2, Entity Framework 1.0.1, and Web API with Template pack .
Note
Kindly read my previous articles which explain in-depth about getting started with ASP.NET Core Template Pack.
- Getting Started With ASP.NET Core Template Pack
- ASP.NET Core Angular 2 EF 1.0.1 Web API Using Template Pack
- ASP.NET Core And Angular 2 Master Detail HTML Grid Using Web API And EF 1.0.1
In this article, we will learn about:.
- Creating sample database and ItemDetails table in SQL Server to display in our web application.
- Creating ASP.NET Core Angular 2 Starter Application (.NET Core) using Template pack.
- Creating EF, DBContext Class, and Model Class.
- Creating WEB API.
- Creating Component TypeScript file to get Web API JSON result using HTTP Module.
- Filtering Items by Item Name. From Item textbox, keyup event displays the items by search name.
- Selecting and adding items to shopping cart.
- Displaying Total Price, Total Qty, and Grand Price Total in shopping cart.
- Displaying shopping cart details.
This article will explain how to create a simple shopping cart using ASP.NET Core, Angular 2, Web API and EF with Template Pack.
In this shopping cart demo application, we have 3 parts.
- Display all items and filter items in HTML Table using Angular 2 from Web API.
- Display the selected items in details before adding to shopping cart.
- Add the selected item to shopping cart. Show Price, Quantity, and Grand Total of all items in shopping cart.
- Display All Items and Filter Items


First, we display all item details in the shopping page using Angular 2. All the item details will be loaded from Web API. User can also filter the items by "Item Name". When users enter any character in the "Item Name" Filter textbox, the related item details will be loaded dynamically from the database to the shopping page.
- Display the Selected Items in details

When user clicks on "Image name", we display the item details at the top, to add the selected item to shopping cart. When user clicks on the “Add to cart” button, the selected item will be added to the shopping cart.
- Shopping Cart Details

Before adding to cart, we need to check if the item is already added to the cart. If the item is already added to the cart, then we will increase the quantity in Shopping Cart. If the item is not added, then newly selected items will be added to Shopping Cart.
In the Shopping Cart, we also display the number of items that have been added. We can also calculate the Total Quantity, Total Price, and Grand Price of total items, which will be displayed at the end of Shopping Item details.
Prerequisites
Make sure you have installed all the prerequisites on your computer. If not, then download and install all of them, one by one.
- First, download and install Visual Studio 2015 with Update 3 from this link.
- If you have Visual Studio 2015 and have not yet updated with update 3, download and install the Visual Studio 2015 Update 3 from this link.
- Download and install .NET Core 1.0.1
- Download and install TypeScript 2.0
- Download and install Node.js v4.0 or above. I have installed V6.9.1 (Download link).
- Download and install Download ASP.NET Core Template Pack visz file from this link.
Code Part
Step 1 Create a Database and Table
We will create "ItemDetails" table to be used for the Shopping Cart Grid data binding. The following is the script to create a database, table, and sample insert query.
Run this script in your SQL Server. I have used SQL Server 2014.
- USE MASTER
- GO
- -- 1) Check for the Database Exists .If the database is exist then drop and create new DB
- IF EXISTS (SELECT [name] FROM sys.databases WHERE [name] = 'ShoppingDB' )
- DROP DATABASE ShoppingDB
- GO
- CREATE DATABASE ShoppingDB
- GO
- USE ShoppingDB
- GO
- -- 1) //////////// ItemDetails table
- -- Create Table ItemDetails,This table will be used to store the details like Item Information
- IF EXISTS ( SELECT [name] FROM sys.tables WHERE [name] = 'ItemDetails' )
- DROP TABLE ItemDetails
- GO
- CREATE TABLE ItemDetails
- (
- Item_ID int identity(1,1),
- Item_Name VARCHAR(100) NOT NULL,
- Item_Price int NOT NULL,
- Image_Name VARCHAR(100) NOT NULL,
- Description VARCHAR(100) NOT NULL,
- AddedBy VARCHAR(100) NOT NULL,
- CONSTRAINT [PK_ItemDetails] PRIMARY KEY CLUSTERED
- (
- [Item_ID] ASC
- )WITH (PAD_INDEX = OFF, STATISTICS_NORECOMPUTE = OFF, IGNORE_DUP_KEY = OFF, ALLOW_ROW_LOCKS = ON, ALLOW_PAGE_LOCKS = ON) ON [PRIMARY]
- ) ON [PRIMARY]
- GO
- -- Insert the sample records to the ItemDetails Table
- Insert into ItemDetails(Item_Name,Item_Price,Image_Name,Description,AddedBy) values('Access Point',950,'AccessPoint.png','Access Point for Wifi use','Shanu')
- Insert into ItemDetails(Item_Name,Item_Price,Image_Name,Description,AddedBy) values('CD',350,'CD.png','Compact Disk','Afraz')
- Insert into ItemDetails(Item_Name,Item_Price,Image_Name,Description,AddedBy) values('Desktop Computer',1400,'DesktopComputer.png','Desktop Computer','Shanu')
- Insert into ItemDetails(Item_Name,Item_Price,Image_Name,Description,AddedBy) values('DVD',1390,'DVD.png','Digital Versatile Disc','Raj')
- Insert into ItemDetails(Item_Name,Item_Price,Image_Name,Description,AddedBy) values('DVD Player',450,'DVDPlayer.png','DVD Player','Afraz')
- Insert into ItemDetails(Item_Name,Item_Price,Image_Name,Description,AddedBy) values('Floppy',1250,'Floppy.png','Floppy','Mak')
- Insert into ItemDetails(Item_Name,Item_Price,Image_Name,Description,AddedBy) values('HDD',950,'HDD.png','Hard Disk','Albert')
- Insert into ItemDetails(Item_Name,Item_Price,Image_Name,Description,AddedBy) values('MobilePhone',1150,'MobilePhone.png','Mobile Phone','Gowri')
- Insert into ItemDetails(Item_Name,Item_Price,Image_Name,Description,AddedBy) values('Mouse',399,'Mouse.png','Mouse','Afraz')
- Insert into ItemDetails(Item_Name,Item_Price,Image_Name,Description,AddedBy) values('MP3 Player ',897,'MultimediaPlayer.png','Multi MediaPlayer','Shanu')
- Insert into ItemDetails(Item_Name,Item_Price,Image_Name,Description,AddedBy) values('Notebook',750,'Notebook.png','Notebook','Shanu')
- Insert into ItemDetails(Item_Name,Item_Price,Image_Name,Description,AddedBy) values('Printer',675,'Printer.png','Printer','Kim')
- Insert into ItemDetails(Item_Name,Item_Price,Image_Name,Description,AddedBy) values('RAM',1950,'RAM.png','Random Access Memory','Jack')
- Insert into ItemDetails(Item_Name,Item_Price,Image_Name,Description,AddedBy) values('Smart Phone',679,'SmartPhone.png','Smart Phone','Lee')
- Insert into ItemDetails(Item_Name,Item_Price,Image_Name,Description,AddedBy) values('USB',950,'USB.png','USB','Shanu')
- select * from ItemDetails
Step 2- Create ASP.NET Core Angular 2 application
- After installing all the prerequisites listed above and ASP.NET Core Template, click Start >> Programs >> Visual Studio 2015 >> Visual Studio 2015, on your desktop.
- Click New >> Project. Select Web >> ASP.NET Core Angular 2 Starter.
- Enter your project name and click OK.
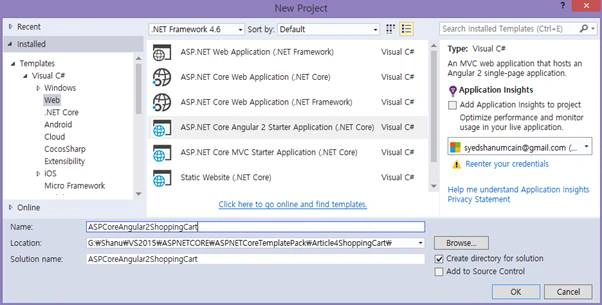
After creating ASP.NET Core Angular 2 application, wait for a few seconds. You will see that all the dependencies are automatically restored.
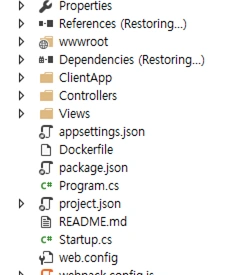
We will be using all these in our project to create, build, and run our Angular 2 with ASP.NET Core Template Pack, Web API, and EF 1.0.1.
Step 3 Creating Entity Framework
Add Entity Framework Packages
To add our Entity Framework Packages in our ASP.NET Core application, open the Project.JSON file and in dependencies add the below line.
Note
Here, we have used EF version 1.0.1.
- "Microsoft.EntityFrameworkCore.SqlServer": "1.0.1",
- "Microsoft.EntityFrameworkCore.Tools": "1.0.0-preview2-final"
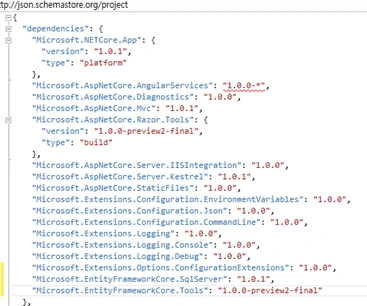
When we save the project,.json file, we can see that the Reference has been restored.
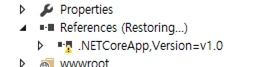
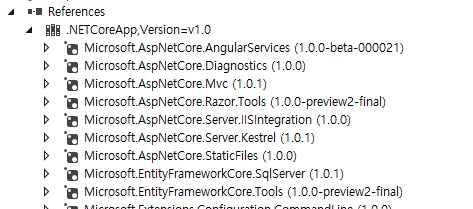
After a few seconds, we can see Entity Framework package has been restored and all references have been added.
Adding Connection String
To add the connection string with our SQL connection, open the “appsettings.json” file .Yes, this is a JSON file and this file looks like the below image by default.
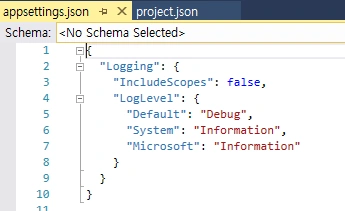
In this appsettings.json file, add the connection string.
- "ConnectionStrings": {
- "DefaultConnection": "Server=YOURDBSERVER;Database=StudentsDB;user id=SQLID;password=SQLPWD;Trusted_Connection=True;MultipleActiveResultSets=true;"
- },
Note - change the SQL connection string as per your local connection.
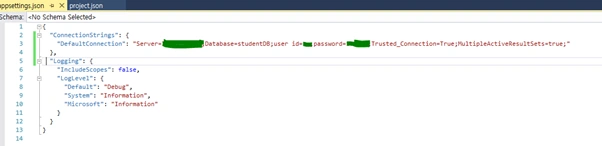
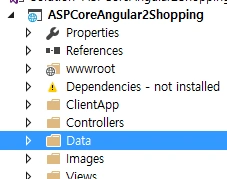
The next step is to create a folder named “Data” to create our model and DBContext class.
Creating Model Class for Student Master
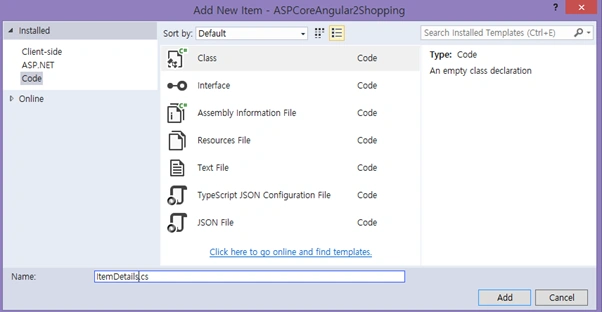
We can create a model by adding a new class file in our "Data" folder. Right click "Data" folder and click Add >> Class. Enter the class name as itemDetails and click "Add".
Now, in this class, we first create property variable, add ItemDetails. We will be using this in our Web API Controller.
- using System;
- using System.Collections.Generic;
- using System.Linq;
- using System.Threading.Tasks;
- using System.ComponentModel.DataAnnotations;
- namespace Angular2ASPCORE.Data
- {
- public class ItemDetails
- {
- [Key]
- public int Item_ID { get; set; }
- [Required]
- [Display(Name = "Item_Name")]
- public string Item_Name { get; set; }
- [Required]
- [Display(Name = "Item_Price")]
- public int Item_Price { get; set; }
- [Required]
- [Display(Name = "Image_Name")]
- public string Image_Name { get; set; }
- [Required]
- [Display(Name = "Description")]
- public string Description { get; set; }
- [Required]
- [Display(Name = "AddedBy")]
- public string AddedBy { get; set; }
- }
- }
Creating Database Context
DBContext is Entity Framework Class for establishing connection to database.
We can create a DBContext class by adding a new class file in our Data folder. Right click Data folder and click Add >> Class. Enter the class name as ItemContext and click "Add".
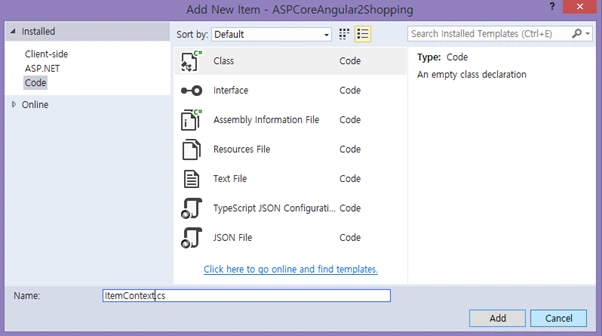
In this class, we inherit DbContext and create Dbset for our ItemDetails table.
- using System;
- using System.Collections.Generic;
- using System.Linq;
- using System.Threading.Tasks;
- using Microsoft.EntityFrameworkCore;
- namespace Angular2ASPCORE.Data
- {
- public class ItemContext : DbContext
- {
- public ItemContext(DbContextOptions<ItemContext> options)
- : base(options) { }
- public ItemContext() { }
- public DbSet<ItemDetails> ItemDetails { get; set; }
- }
- }
Startup.CS
Now, we need to add our database connection string and provider as SQL SERVER.To add this, we add the below code in Startup.cs file under ConfigureServices method.
- // Add Entity framework .
- services.AddDbContext<studentContext>(options =>
- options.UseSqlServer(Configuration.GetConnectionString("DefaultConnection")));
Step 4 Creating Web API
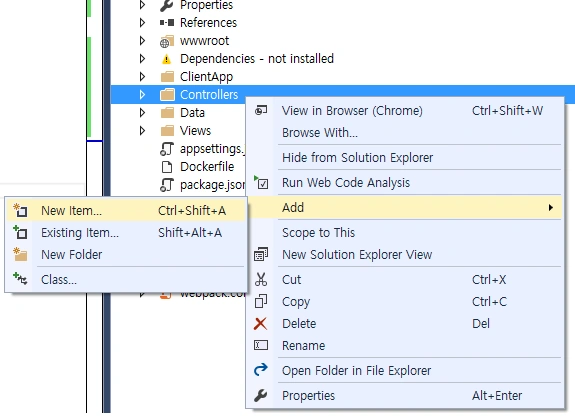
To create our Web API Controller, right click "Controllers" folder. Click Add >> New Item.
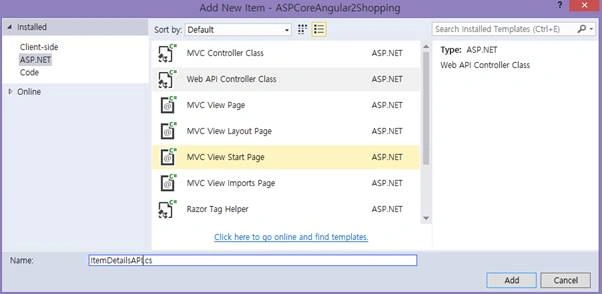
Click ASP.NET in right side >> Click Web API Controller Class. Enter the name as “itemDetailsAPI.cs” and click "Add".
In this, we are using only Get method to get all the ItemDetails result from database and binding the final result using Angular 2 to HTML file.
Here, in this Web API, we get all ItemDetails and ItemDetails loaded by condition ItemName.
- [Produces("application/json")]
- [Route("api/ItemDetailsAPI")]
- public class ItemDetailsAPI : Controller
- {
- private readonly ItemContext _context;
- public ItemDetailsAPI(ItemContext context)
- {
- _context = context;
- }
- // GET: api/values
- [HttpGet]
- [Route("Details")]
- public IEnumerable<ItemDetails> GetItemDetails()
- {
- return _context.ItemDetails;
- }
- // GET api/values/5
- [HttpGet]
- [Route("Details/{ItemName}")]
- public IEnumerable<ItemDetails> GetItemDetails(string ItemName)
- {
- //return _context.ItemDetails.Where(i => i.Item_ID == id).ToList(); ;
- return _context.ItemDetails.Where(i => i.Item_Name.Contains(ItemName)).ToList();
- }
To test it, we can run our project and copy the get method API path. Here, we can see that our API path for get is /api/ItemDetailsAPI/Details
Run the program and paste the above API path to test our output.
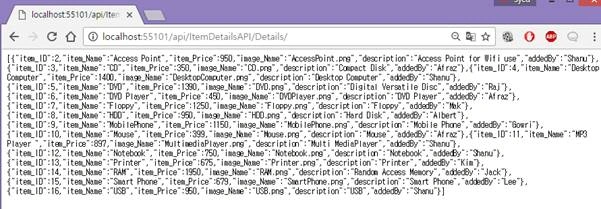
To get the Item Details by ItemName. Here, we can see all the ItemDetails which start from ItemName “DVD” has been loaded.
/api/ItemDetailsAPI/Details/DVD

Working with Angular 2
Create all Angular 2 related Apps, Modules, Services, Components, and HTML templates under ClientApp/App folder.
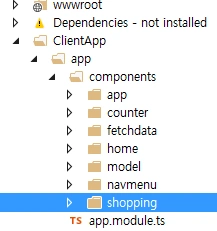
We need to create “model” folder adding our models and create “shopping” folder under app folder to create our TypeScript and HTML file for displaying Item details.
Note - Images Folder
First create a folder called “Images” inside the "Shopping" folder. I have used this folder to display all shopping cart images. If you store shopping image in some other path in your code, change accordingly.

Step 5 Creating our First Component TypeScript
Right click on Shopping folder and click on add new Item. Select client-side from left side and select TypeScript file and name the file as “shopping.component.ts” and click "Add".
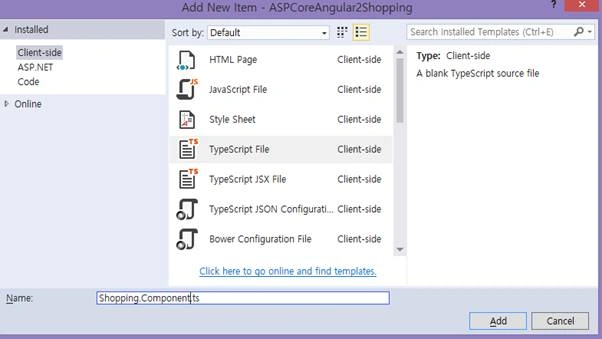
In students.component.ts file, we have three parts -
- import part
- component part
- class for writing our business logic.
First, import Angular files to be used in our component; here, we import HTTP for using HTTP client in our Angular 2 component.
In component, we have selector and template. Selector is to give a name for this app and in our HTML file, we can use this selector name to display in our HTML page.
In template.give your output html file name. Here, we will create one HTML file as “students.component.html”.
Export Class is the main class where we perform all our business logic and variable declaration to be used in our component template. In this class, we get the API method result and bind the result to the student array.
Here, in the code part, I have commented each section for easy understanding.
- import { Component, Injectable, Inject, EventEmitter, Input, OnInit, Output, NgModule } from '@angular/core';
- import { FormsModule } from '@angular/forms';
- import { ActivatedRoute, Router } from '@angular/router';
- import { BrowserModule } from '@angular/platform-browser';
- import { Http,Headers, Response, Request, RequestMethod, URLSearchParams, RequestOptions } from "@angular/http";
- import { ItemDetails } from '../model/ItemDetails';
- import { CartItemDetails } from '../model/CartItemDetails';
- @Component({
- selector: 'shopping',
- template: require('./shopping.component.html')
- })
- export class shoppingComponent {
- //Declare Variables to be used
- //To get the WEb api Item details to be displayed for shopping
- public ShoppingDetails: ItemDetails[] = [];
- myName: string;
- //Show the Table row for Items,Cart and Cart Items.
- showDetailsTable: Boolean = true;
- AddItemsTable: Boolean = false;
- CartDetailsTable: Boolean = false;
- public cartDetails: CartItemDetails[] = [];
- public ImageUrl = require("./Images/CD.png");
- public cartImageUrl = require("./Images/shopping_cart64.png");
- //For display Item details and Cart Detail items
- public ItemID: number;
- public ItemName: string = "";
- public ItemPrice: number = 0;
- public Imagename: string = "";
- public ImagePath: string = "";
- public Descrip: string = "";
- public txtAddedBy: string = "";
- public Qty: number = 0;
- //For calculate Total Price,Qty and Grand Total price
- public totalPrice: number = 0;
- public totalQty: number = 0;
- public GrandtotalPrice: number = 0;
- public totalItem: number = 0;
- //Inital Load
- constructor(public http: Http) {
- this.myName = "Shanu";
- this.showDetailsTable = true;
- this.AddItemsTable = false;
- this.CartDetailsTable = false;
- this.getShoppingDetails('');
- }
- //Get all the Item Details and Item Details by Item name
- getShoppingDetails(newItemName) {
- if (newItemName == "") {
- this.http.get('/api/ItemDetailsAPI/Details').subscribe(result => {
- this.ShoppingDetails = result.json();
- });
- }
- else {
- this.http.get('/api/ItemDetailsAPI/Details/' + newItemName).subscribe(result => {
- this.ShoppingDetails = result.json();
- });
- }
- }
- //Get Image Name to bind
- getImagename(newImage) {
- this.ImageUrl = require("./Images/" + newImage);
- }
- // Show the Selected Item to Cart for add to my cart Items.
- showToCart(Id, Name, Price, IMGNM, Desc,user)
- {
- this.showDetailsTable = true;
- this.AddItemsTable = true;
- this.CartDetailsTable = false;
- this.ItemID = Id;
- this.ItemName = Name;
- this.ItemPrice = Price;
- this.Imagename = require("./Images/" + IMGNM);
- this.ImagePath = IMGNM
- this.Descrip = Desc;
- this.txtAddedBy = user;
- }
- // to Show Items to be added in cart
- showCart() {
- this.showDetailsTable = false;
- this.AddItemsTable = true;
- this.CartDetailsTable = true;
- this.addItemstoCart();
- }
- // to show all item details
- showItems() {
- this.showDetailsTable = true;
- this.AddItemsTable = false;
- this.CartDetailsTable = false;
- }
- //to Show our Shopping Items details
- showShoppingItems() {
- if (this.cartDetails.length <= 0)
- {
- alert("Ther is no Items In your Cart.Add Items to view your Cart Details !")
- return;
- }
- this.showDetailsTable = false;
- this.AddItemsTable = false;
- this.CartDetailsTable = true;
- }
- //Check the Item already exists in Cart,If the Item is exist then add only the quantity else add selected item to cart.
- addItemstoCart() {
- var count: number = 0;
- var ItemCountExist: number = 0;
- this.totalItem = this.cartDetails.length;
- if (this.cartDetails.length > 0) {
- for (count = 0; count < this.cartDetails.length; count++) {
- if (this.cartDetails[count].CItem_Name == this.ItemName) {
- ItemCountExist = this.cartDetails[count].CQty + 1;
- this.cartDetails[count].CQty = ItemCountExist;
- }
- }
- }
- if (ItemCountExist <= 0)
- {
- this.cartDetails.push(
- new CartItemDetails(this.ItemID, this.ItemName, this.ImagePath, this.Descrip, this.txtAddedBy, this.ItemPrice, 1, this.ItemPrice));
- }
- this.getItemTotalresult();
- }
- //to calculate and display the total price information in Shopping cart.
- getItemTotalresult() {
- this.totalPrice = 0;
- this.totalQty = 0;
- this.GrandtotalPrice = 0;
- var count: number = 0;
- this.totalItem = this.cartDetails.length;
- for (count = 0; count < this.cartDetails.length; count++) {
- this.totalPrice += this.cartDetails[count].CItem_Price;
- this.totalQty += (this.cartDetails[count].CQty);
- this.GrandtotalPrice += this.cartDetails[count].CItem_Price * this.cartDetails[count].CQty;
- }
- }
- //remove the selected item from the cart.
- removeFromCart(removeIndex) {
- alert(removeIndex);
- this.cartDetails.splice(removeIndex, 1);
- this.getItemTotalresult();
- }
- }
Step 6 Creating our First Component HTML File
Right click on shopping folder and click on "Add New Item". Select client-side from left side and select HTML file and name the file as “shopping.component.html” and click "Add".
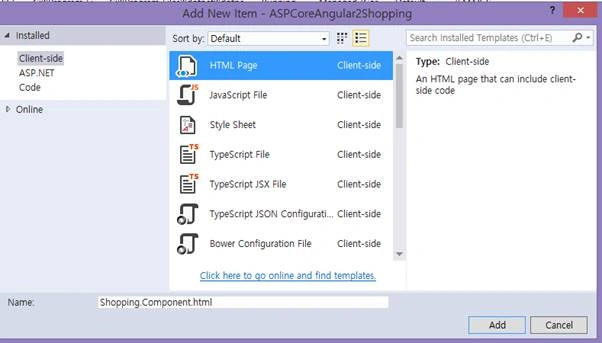
Write the below HTML code to bind the result in the HTML page to display all the "Shopping Items" and "Shopping Cart" details.
- <h1>{{myName}} ASP.NET Core , Angular2 Shopping Cart using Web API and EF 1.0.1 </h1>
- <hr style="height: 1px;color: #123455;background-color: #d55500;border: none;color: #d55500;" />
- <p *ngIf="!ShoppingDetails"><em>Loading Student Details please Wait ! ...</em></p>
- <!--<pre>{{ ShoppingDetails | json }}</pre>-->
- <table id="tblContainer" style='width: 99%;table-layout:fixed;'>
- <tr *ngIf="AddItemsTable">
- <td>
- <table style="background-color:#FFFFFF; border: dashed 3px #6D7B8D; padding: 5px;width: 99%;table-layout:fixed;" cellpadding="2"
- cellspacing="2">
- <tr style="height: 30px; color:#ff0000 ;border: solid 1px #659EC7;">
- <td width="40px"> </td>
- <td>
- <h2> <strong>Add Items to Cart</strong></h2>
- </td>
- </tr>
- <tr>
- <td width="40px"> </td>
- <td>
- <table>
- <tr>
- <td>
- <img src="{{Imagename}}" width="150" height="150" />
- </td>
- <td width="30"></td>
- <td valign="top">
- <table style="color:#9F000F;font-size:large" cellpadding="4" cellspacing="6">
- <tr>
- <td>
- <b>Item code </b>
- </td>
- <td>
- : {{ItemID}}
- </td>
- </tr>
- <tr>
- <td>
- <b> Item Name</b>
- </td>
- <td>
- : {{ItemName}}
- </td>
- </tr>
- <tr>
- <td>
- <b> Price </b>
- </td>
- <td>
- : {{ItemPrice}}
- </td>
- </tr>
- <tr>
- <td>
- <b> Description </b>
- </td>
- <td>
- : {{Descrip}}
- </td>
- </tr>
- <tr>
- <td align="center" colspan="2">
- <table>
- <tr>
- <td>
- <button (click)=showCart() style="background-color:#4c792d;color:#FFFFFF;font-size:large;width:200px">
- Add to Cart
- </button>
- </td>
- <td rowspan="2"><img src="{{cartImageUrl}}" /></td>
- </tr>
- </table>
- </td>
- </tr>
- </table>
- </td>
- </tr>
- </table>
- </td>
- </tr>
- </table>
- </td>
- </tr>
- <tr>
- <td><hr style="height: 1px;color: #123455;background-color: #d55500;border: none;color: #d55500;" /></td>
- </tr>
- <tr *ngIf="CartDetailsTable">
- <td>
- <table width="100%">
- <tr>
- <td>
- <table style="background-color:#FFFFFF; border: dashed 3px #6D7B8D; padding: 5px;width: 100%;table-layout:fixed;" cellpadding="2"
- cellspacing="2">
- <tr style="height: 30px; color:#123455 ;border: solid 1px #659EC7;">
- <td width="40px"> </td>
- <td width="60%">
- <h1> My Recent Orders Items <strong style="color:#0094ff"> ({{totalItem}})</strong></h1>
- </td>
- <td align="right">
- <button (click)=showItems() style="background-color:#0094ff;color:#FFFFFF;font-size:large;width:300px;height:50px;
- border-color:#a2aabe;border-style:dashed;border-width:2px;">
- Add More Items
- </button>
- </td>
- </tr>
- </table>
- </td>
- </tr>
- <tr>
- <td>
- <table style="background-color:#FFFFFF; border:solid 2px #6D7B8D;padding: 5px;width: 100%;table-layout:fixed;" cellpadding="2" cellspacing="2">
- <tr style="height: 30px; background-color:#336699 ; color:#FFFFFF ;border: solid 1px #659EC7;">
- <td width="30" align="center">No</td>
- <td width="80" align="center">
- <b>Image</b>
- </td>
- <td width="90" align="center" style="border: solid 1px #FFFFFF; padding: 5px;table-layout:fixed;cursor: pointer;">
- <b>Item Code</b>
- </td>
- <td width="140" align="center" style="border: solid 1px #FFFFFF; padding: 5px;table-layout:fixed;cursor: pointer;">
- <b>Item Name</b>
- </td>
- <td width="160" align="center" style="border: solid 1px #FFFFFF; padding: 5px;table-layout:fixed;cursor: pointer;">
- <b>Decription</b>
- </td>
- <td width="90" align="center" style="border: solid 1px #FFFFFF; padding: 5px;table-layout:fixed;cursor: pointer;">
- <b>Price</b>
- </td>
- <td width="90" align="center" style="border: solid 1px #FFFFFF; padding: 5px;table-layout:fixed;cursor: pointer;">
- <b>Quantity</b>
- </td>
- <td width="90" align="center" style="border: solid 1px #FFFFFF; padding: 5px;table-layout:fixed;cursor: pointer;">
- <b>Total Price</b>
- </td>
- <td></td>
- </tr>
- <tbody *ngFor="let detail of cartDetails ; let i = index">
- <tr>
- <td style="border: solid 1px #659EC7; padding: 5px;table-layout:fixed;" align="center">
- {{i+1}}
- </td>
- <td align="center" style="border: solid 1px #659EC7; padding: 5px;table-layout:fixed;">
- <span style="color:#9F000F" *ngIf!="getImagename(detail.CImage_Name)">
- <img src="{{ImageUrl}}" style="height:56px;width:56px">
- </span>
- </td>
- <td style="border: solid 1px #659EC7; padding: 5px;table-layout:fixed;">
- <span style="color:#9F000F">
- {{detail.CItem_ID}}
- </span>
- </td>
- <td style="border: solid 1px #659EC7; padding: 5px;table-layout:fixed;">
- <span style="color:#9F000F">
- {{detail.CItem_Name}}
- </span>
- </td>
- <td style="border: solid 1px #659EC7; padding: 5px;table-layout:fixed;">
- <span style="color:#9F000F">
- {{detail.CDescription}}
- </span>
- </td>
- <td align="right" style="border: solid 1px #659EC7; padding: 5px;table-layout:fixed;">
- <span style="color:#9F000F">
- {{detail.CItem_Price | number}}
- </span>
- </td>
- <td style="border: solid 1px #659EC7; padding: 5px;table-layout:fixed;" align="right">
- <span style="color:#9F000F">
- {{detail.CQty}}
- </span>
- </td>
- <td style="border: solid 1px #659EC7; padding: 5px;table-layout:fixed;" align="right">
- <span style="color:#9F000F">
- {{detail.CTotalPrice*detail.CQty | number}}
- </span>
- </td>
- <td align="center" style="border: solid 1px #659EC7; padding: 5px;table-layout:fixed;">
- <button (click)=removeFromCart(i) style="background-color:#e11919;color:#FFFFFF;font-size:large;width:220px;height:40px;">
- Remove Item from Cart
- </button>
- </td>
- </tr>
- </tbody>
- <tr>
- <td colspan="5" height="40" align="right" > <strong>Total </strong></td>
- <td align="right" height="40"><strong>Price: {{ totalPrice | number}}</strong></td>
- <td align="right" height="40"><strong>Qty : {{ totalQty | number}}</strong></td>
- <td align="right" height="40"><strong>Sum: {{ GrandtotalPrice | number}}</strong></td>
- <td></td>
- </tr>
- </table>
- </td>
- </tr>
- </table>
- </td>
- </tr>
- <tr *ngIf="showDetailsTable">
- <td>
- <table width="100%" style="background-color:#FFFFFF; border: dashed 3px #6D7B8D; padding: 5px;width: 100%;table-layout:fixed;" cellpadding="2"
- cellspacing="2">
- <tr>
- <td>
- <table style="background-color:#FFFFFF; border: dashed 3px #6D7B8D; padding: 5px;width: 100%;table-layout:fixed;" cellpadding="2"
- cellspacing="2">
- <tr style="height: 30px; color:#134018 ;border: solid 1px #659EC7;">
- <td width="40px"> </td>
- <td width="60%">
- <h2> <strong>Item Details</strong></h2>
- </td>
- <td align="right">
- <button (click)=showShoppingItems() style="background-color:#d55500;color:#FFFFFF;font-size:large;width:300px;height:50px;
- border-color:#a2aabe;border-style:dashed;border-width:2px;">
- Show My Cart Items
- </button>
- </td>
- </tr>
- </table>
- </td>
- </tr>
- <tr>
- <td>
- <table style="background-color:#FFFFFF; border: solid 2px #6D7B8D; padding: 5px;width: 100%;table-layout:fixed;" cellpadding="2" cellspacing="2" *ngIf="ShoppingDetails">
- <tr style="height: 30px; background-color:#336699 ; color:#FFFFFF ;border: solid 1px #659EC7;">
- <td width="40" align="center">
- <b>Image</b>
- </td>
- <td width="40" align="center" style="border: solid 1px #FFFFFF; padding: 5px;table-layout:fixed;cursor: pointer;">
- <b>Item Code</b>
- </td>
- <td width="120" align="center" style="border: solid 1px #FFFFFF; padding: 5px;table-layout:fixed;cursor: pointer;">
- <b>Item Name</b>
- </td>
- <td width="120" align="center" style="border: solid 1px #FFFFFF; padding: 5px;table-layout:fixed;cursor: pointer;">
- <b>Decription</b>
- </td>
- <td width="40" align="center" style="border: solid 1px #FFFFFF; padding: 5px;table-layout:fixed;cursor: pointer;">
- <b>Price</b>
- </td>
- <td width="90" align="center" style="border: solid 1px #FFFFFF; padding: 5px;table-layout:fixed;cursor: pointer;">
- <b>User Name</b>
- </td>
- </tr>
- <tr style="height: 30px; background-color:#336699 ; color:#FFFFFF ;border: solid 1px #659EC7;">
- <td width="40" align="center">
- Filter By ->
- </td>
- <td width="200" colspan="5" style="border: solid 1px #FFFFFF; padding: 5px;table-layout:fixed;">
- Item Name :
- <input type="text" (ngModel)="ItemName" (keyup)="getShoppingDetails(myInput.value)" #myInput style="background-color:#fefcfc;color:#334668;font-size:large;
- border-color:#a2aabe;border-style:dashed;border-width:2px;" />
- </td>
- </tr>
- <tbody *ngFor="let detail of ShoppingDetails">
- <tr>
- <td align="center" style="border: solid 1px #659EC7; padding: 5px;table-layout:fixed;">
- <span style="color:#9F000F" *ngIf!="getImagename(detail.image_Name)">
- <img src="{{ImageUrl}}" style="height:56px;width:56px" (click)=showToCart(detail.item_ID,detail.item_Name,detail.item_Price,detail.image_Name,detail.description,detail.addedBy)>
- </span>
- </td>
- <td style="border: solid 1px #659EC7; padding: 5px;table-layout:fixed;">
- <span style="color:#9F000F">
- {{detail.item_ID}}
- </span>
- </td>
- <td style="border: solid 1px #659EC7; padding: 5px;table-layout:fixed;">
- <span style="color:#9F000F">
- {{detail.item_Name}}
- </span>
- </td>
- <td style="border: solid 1px #659EC7; padding: 5px;table-layout:fixed;">
- <span style="color:#9F000F">
- {{detail.description}}
- </span>
- </td>
- <td align="right" style="border: solid 1px #659EC7; padding: 5px;table-layout:fixed;">
- <span style="color:#9F000F">
- {{detail.item_Price}}
- </span>
- </td>
- <td style="border: solid 1px #659EC7; padding: 5px;table-layout:fixed;">
- <span style="color:#9F000F">
- {{detail.addedBy}}
- </span>
- </td>
- </tr>
- </table>
- </td>
- </tr>
- </table>
- </td>
- </tr>
- </table>
Step 7 Adding Students Navigation menu
We can add our newly created Student details menu in existing menu. To add our new Navigation menu, open the “navmenu.component.html” under navmenu menu.Write the below code to add our navigation menu link for students. Here, we have removed the existing Count and Fetch menu.
- <li [routerLinkActive]="['link-active']">
- <a [routerLink]="['/shopping]">
- <span class='glyphicon glyphicon-th-list'></span> Shopping
- </a>
- </li>
Step 8 App Module
App Module is root for all files and we can find the app.module.ts under ClientApp\ app.
- Import our students component
- import { shoppingComponent } from './components/shopping/shopping.component';
Next in @NGModule add import { shoppingComponent } from '.
In routing, add your students path. The code will look like this.
- import { NgModule } from '@angular/core';
- import { FormsModule } from '@angular/forms';
- import { BrowserModule } from '@angular/platform-browser';
- import { RouterModule } from '@angular/router';
- import { UniversalModule } from 'angular2-universal';
- import { AppComponent } from './components/app/app.component'
- import { NavMenuComponent } from './components/navmenu/navmenu.component';
- import { HomeComponent } from './components/home/home.component';
- import { FetchDataComponent } from './components/fetchdata/fetchdata.component';
- import { CounterComponent } from './components/counter/counter.component';
- import { shoppingComponent } from './components/shopping/shopping.component';
- @NgModule({
- bootstrap: [ AppComponent ],
- declarations: [
- AppComponent,
- NavMenuComponent,
- CounterComponent,
- FetchDataComponent,
- HomeComponent,
- shoppingComponent
- ],
- imports: [
- UniversalModule, // Must be first import. This automatically imports BrowserModule, HttpModule, and JsonpModule too.
- RouterModule.forRoot([
- { path: '', redirectTo: 'home', pathMatch: 'full' },
- { path: 'home', component: HomeComponent },
- { path: 'counter', component: CounterComponent },
- { path: 'fetch-data', component: FetchDataComponent },
- { path: 'shopping', component: shoppingComponent },
- { path: '**', redirectTo: 'home' }
- ])
- ]
- })
- export class AppModule {
- }
Step 9 Build and run the application
Build and run the application and you can see that our Students Master/Detail page will be loaded with all Student Master and Detail information.
Note
First, create the Database and Table in your SQL Server. You can run the SQL Script from this article to create ShoppingDB database and ItemDetails Table. Also, don’t forget to change the connection string from “appsettings.json”.
Jenny BPosted May 7, 2018, 11:40 PM
Thanks for sharing this article..can u share same project with Angular4 please?
Dato GogshelidzePosted Mar 26, 2017, 6:06 AM
It's great, thanks. can you give advise how to implement filtering of several columns? Thanks again
M S Mithun ManoharPosted Mar 3, 2017, 4:07 AM
Hi, i'm having a Doubt in shopping.component.ts - "import { ItemDetails } from '../model/ItemDetails';import { CartItemDetails } from '../model/CartItemDetails';" there is error show in this line.
Humayun Kabir MamunPosted Feb 23, 2017, 2:45 AM
Thanks Shanu Bhai for this nice article...
Anu VPosted Feb 4, 2017, 5:46 AM
Nice article.. Thanks for sharing..