

Introduction
In this article we will learn about how to create Custom HotSpots in ASP.NET as well as the usage of JavaScript to highlight the hotspot area on mouseover and mouseleave event.
In the previous article Creating HotSpots in ASP.NET, I had explained about the different ways to create HotSpots. So if you're not aware about the term 'HotSpots' in ASP.NET, you may read more about it from here.
In the previous article Creating HotSpots in ASP.NET, I had explained about the different ways to create HotSpots. So if you're not aware about the term 'HotSpots' in ASP.NET, you may read more about it from here.
Part 1
RECAP
Basically, HotSpot is a part of a single image which may produce some actions when anyone click or move the mouse pointer over that hotspot (area). It's the part of graphics design which is used for complex web page design.
We can create any numbers of hotspots on a image by using HotSpot object inside the ImageMap control. ASP.NET has the following three basic types of HotSpot that correspond to the <area> tag defined by HTML.
We can create any numbers of hotspots on a image by using HotSpot object inside the ImageMap control. ASP.NET has the following three basic types of HotSpot that correspond to the <area> tag defined by HTML.
- RectangleHotSpot
- CircleHotSpot
- PolygonHotSpot
Custom Hotspots
Now we're going to learn about Custom HotSpots. As we have read in the recap paragraph, we can create any type of clickable region by using RectangleHotSpot, CircleHotSpot and PolygonHotSpot. In this article we will create a custom hotspot for the following images.
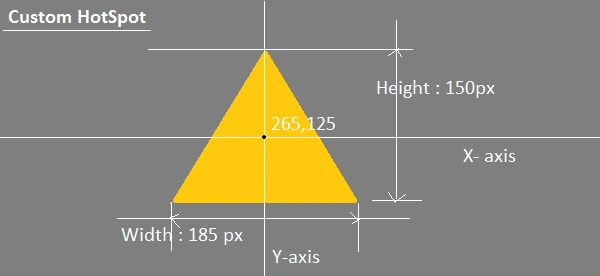
Figure 1 : HotSpot over triangular area

Figure 2 : HotSpot over polygon area (2016)
Note:
Further, we will read how can we create a custom hotspot for triangular and polygon shapes. So I will create custom hotspots to make the triangular area of first image clickable as well the number 2016 as clickable.
Basically these are the three derived class in ASP.NET which derives from HotSpot base class. We can create a variety of complex multi-sided shapes, such as triangular, octagons, diamonds and so on.
Note
Basically these are the three derived class in ASP.NET which derives from HotSpot base class. We can create a variety of complex multi-sided shapes, such as triangular, octagons, diamonds and so on.
Note
ImageMap control supports any HotSpot- derived class but we cannot do anything that falls outside the HTML standard.
Important Points
When creating a custom HotSpot
1. Our class must be derived from HotSpot.
Example
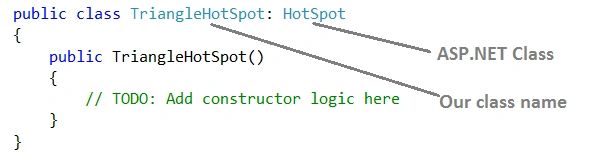
Example
2. Override MarkupName.
We must override the 'MarkupName' property to return the type of shape we are creating. We can use circle, rectangle or polygon as a return value. This information is place into 'shape' attribute of <area> tag.
Example:
We must override the 'MarkupName' property to return the type of shape we are creating. We can use circle, rectangle or polygon as a return value. This information is place into 'shape' attribute of <area> tag.
Example:
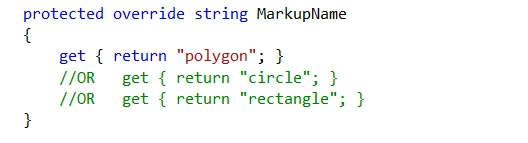
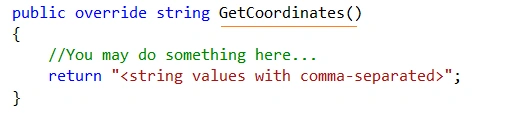
3. GetCoordinates()
We need to override the GetCoordinates() method which return the coordinates of hotspot with comma separated. For a polygon, it must be a comma-separated series of points in X,Y pairs.
Example
We need to override the GetCoordinates() method which return the coordinates of hotspot with comma separated. For a polygon, it must be a comma-separated series of points in X,Y pairs.
Example
4. Before using our custom hotspot, we must register it's namespace at page or config file as common custom control of ASP.NET.
Example
Example

5. After following these 4 steps our custom HotSpot will be ready to use with ImageMap control. Now let's see the practical implementation in a website.
Steps to create Custom Hotspots
Step 1: Open your Visual Studio and create a new website. For this article I am using Visual Studio 2012 and going to create an 'Empty Website'.
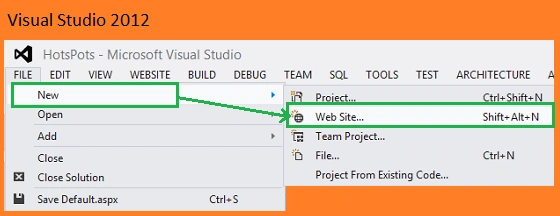
Step 2: Now add App_Code folder in your application.
Step 3: Now add a class inside the App_code folder and do the name of class for your custom hotspot and use the ASP.NET HotSpot class as its base class.
Note: It's not mandatory to create your class inside the App_Code.
Firstly, I am going to create a custom hotspot for triangular shape. Let's see the following code snippet.
Code Snippet
- namespace MyCustomHotSpot
- {
- public class TriangleHotSpot : HotSpot
- {
- // ...
- }
- }
- HotSpot is the class provided by ASP.NET.
- TrinagelHotSpot is our custom hotspot class name.
- MyCustomHotSpot is the name of namespace which I am using for this article.
Note: We need to add the namespace System.Web.UI.WebControls;
Step 4: Now we need to define some properties which are necessary to draw a triangle. Let's see the following code snippet in which I have used X, Y, Height and Width properties to get or set the values of X,Y coordinates and height & width.
Code Snippet
Code Snippet
- public TriangleHotSpot()
- {
- X = 0;
- Y = 0;
- Height = 0;
- Width = 0;
- }
- public string CssClass { get; set; }
- public int X
- {
- get { return (int)ViewState["X"]; }
- set { ViewState["X"] = value; }
- }
- public int Y
- {
- get { return (int)ViewState["Y"]; }
- set { ViewState["Y"] = value; }
- }
- public int Height
- {
- get { return (int)ViewState["Height"]; }
- set { ViewState["Height"] = value; }
- }
- public int Width
- {
- get { return (int)ViewState["Width"]; }
- set { ViewState["Width"] = value; }
- }
Step 5: Now we need to override the 'MarkupName' property and GetCoordinates() method in this class.
Code Snippet
- protected override string MarkupName
- {
- get { return "polygon"; }
- }
- public override string GetCoordinates()
- {
- //Top coordinates
- int topXvalue = X;
- int topYvalue = Y - Height / 2;
- //Bottom-Left Cordinates
- int bottomLeftXvalue = X - Width / 2;
- int bottomLeftYvalue = Y + Height / 2;
- //Bottom-Right coordinates
- int bottomRightXvalue = X + Width / 2;
- int bottomRightYvalue = Y + Height / 2;
- var coordinateValues = @"" + topXvalue + "," + topYvalue + "," +
- bottomLeftXvalue + "," + bottomLeftYvalue + "," +
- bottomRightXvalue + "," + bottomRightYvalue;
- return coordinateValues;
The following is the complete code snippet for custom hotspot class "TriangleHotSpot".
- using System;
- using System.Collections.Generic;
- using System.Linq;
- using System.Web;
- using System.Web.UI.WebControls;
- namespace MyCustomHotSpots
- {
- public class TriangleHotSpot: HotSpot
- {
- public TriangleHotSpot()
- {
- X = 0;
- Y = 0;
- Height = 0;
- Width = 0;
- }
- public string CssClass { get; set; }
- public int X
- {
- get { return (int)ViewState["X"]; }
- set { ViewState["X"] = value; }
- }
- public int Y
- {
- get { return (int)ViewState["Y"]; }
- set { ViewState["Y"] = value; }
- }
- public int Height
- {
- get { return (int)ViewState["Height"]; }
- set { ViewState["Height"] = value; }
- }
- public int Width
- {
- get { return (int)ViewState["Width"]; }
- set { ViewState["Width"] = value; }
- }
- protected override string MarkupName
- {
- get { return "polygon"; }
- }
- public override string GetCoordinates()
- {
- //Top coordinates
- int topXvalue = X;
- int topYvalue = Y - Height / 2;
- //Bottom-Left Cordinates
- int bottomLeftXvalue = X - Width / 2;
- int bottomLeftYvalue = Y + Height / 2;
- //Bottom-Right coordinates
- int bottomRightXvalue = X + Width / 2;
- int bottomRightYvalue = Y + Height / 2;
- var coordinateValues = @"" + topXvalue + "," + topYvalue + "," +
- bottomLeftXvalue + "," + bottomLeftYvalue + "," +
- bottomRightXvalue + "," + bottomRightYvalue;
- return coordinateValues;
- }
- }
- }
Step 7: Now we need to register the namespace of custom hotspot 'TriangleHotSpot'. We can register it on TRiangle.aspx page or configuration file web.config). For this article I am going to register on page directly.
- <%@ Register Namespace="MyCustomHotSpot" TagPrefix="myHotSpot" %>
Step 8: Now add an ImageMap control on this page and refer the image on which you want to create hotspots. (For this article I am going to refer an image which has a shape of triangle. Here we will create a hotspot over triangular area only.)
Triangle.aspx
- <asp:ImageMap ID="ImageMap1" runat="server" ImageUrl="~/Images/Triangle.png">
- <myHotSpot:TriangleHotSpot X="265" Y="125" Height="155" Width="185"
- AlternateText="triangle" />
- </asp:ImageMap>
In this article I am going to use JavaScript to change the image state on mouseover, but if you want use click event then you may use HotSpotMode="PostBack" with PostBackValue="your value" Click here to know about HotSpotMode.
Step 9: Now add JQuery file in your solution, For this article I am going to create a folder with name JavaScript where I will put the jQuery
file jquery-1.7.1.js.

Now add the reference of this jQuery file on Triangle.aspx page and write the following JavaScript code snippet inside the <head> tag of web page like the following,
file jquery-1.7.1.js.
Now add the reference of this jQuery file on Triangle.aspx page and write the following JavaScript code snippet inside the <head> tag of web page like the following,
- <script src="JavaScript/jquery-1.7.1.js"></script>
- <script type="text/javascript">
- jQuery(document).ready(function () {
- //On mouseover : change the image
- jQuery("area[shape='polygon']").mouseover(function () {
- jQuery("img").attr('src', 'Images/HoverImages/TriangleHover.png');
- });
- // On mouseleave set the default image
- jQuery("area[shape='polygon']").mouseleave(function () {
- jQuery("img").attr('src', 'Images/Triangle.png');
- });
- });
- </script>
Now execute / run the Triangle.aspx page to see the output.
Output
Output

Similarly, I am going to create another HotSpot for the Figure 2 image (2016), Add another class inside the App_Code with name CustomPolygon.cs.
Code Snippet
- using System;
- using System.Collections.Generic;
- using System.Linq;
- using System.Web;
- using System.Web.UI.WebControls;
- namespace MyCustomHotSpots
- {
- public class CustomPolygon : HotSpot
- {
- public CustomPolygon()
- {
- //Do here
- }
- //Property
- public string CoordinateValues
- {
- get { return (string)ViewState["value"]; }
- set { ViewState["value"] = value; }
- }
- //Overridden Property
- protected override string MarkupName
- {
- get { return "Polygon"; }
- }
- //Overridden Method
- public override string GetCoordinates()
- {
- return CoordinateValues;
- }
- }
- }
Now add another web page with name "Polygon.aspx" and register the control.
- <%@ Register Namespace="MyCustomHotSpots" TagPrefix="myHotSpot" %>
- <form id="form1" runat="server">
- <asp:ImageMap ID="ImageMap1" runat="server" ImageUrl="~/Images/2016.png">
- <myHotSpot:CustomPolygon AlternateText="Two"
- CoordinateValues="51,102;52,55;57,47,129,45;137,53;138,100;81,204;137,204;137,226;49,226;49,216;111,102;110,66;77,68;77,100;51,102" />
- <myHotSpot:CustomPolygon AlternateText="Zero"
- CoordinateValues="218,225;206,217;206,57;217,46;287,46;295,57;295,215;285,226;218,225;231,204;231,68;268,68;268,204;232,204" />
- <myHotSpot:CustomPolygon AlternateText="One"
- CoordinateValues="375,228;401,228;401,46;378,46;363,96;375,96;375,228" />
- <myHotSpot:CustomPolygon AlternateText="Six"
- CoordinateValues="473,217;473,56;482,46;549,45;560,57;560,99;535,99;535,68;499,68;499,123;552,124;560,131;560,219;548,226;484,227;473,219;498,205;500,146;535,146;535,204;499,205" />
- </asp:ImageMap>
- /form>
In the above code snippet I have used four CustomPolygon object for the numbers 2 ,0, 1 and 6.
Now add the following JavaScript code inside the <head> of Polygon.aspx.
Now add the following JavaScript code inside the <head> of Polygon.aspx.
- <script src="JavaScript/jquery-1.7.1.js"></script>
- <script type="text/javascript">
- jQuery(document).ready(function () {
- //Set Hover image for 2 as highlighted
- jQuery("area[title='Two']").mouseover(function () {
- jQuery("img").attr('src', 'Images/HoverImages/Two.png');
- });
- //Set Hover image for 0 as highlighted
- jQuery("area[title='Zero']").mouseover(function () {
- jQuery("img").attr('src', 'Images/HoverImages/Zero.png');
- });
- //Set Hover image for 1 as highlighted
- jQuery("area[title='One']").mouseover(function () {
- jQuery("img").attr('src', 'Images/HoverImages/One.png');
- });
- //Set Hover image for 6 as highlighted
- jQuery("area[title='Six']").mouseover(function () {
- jQuery("img").attr('src', 'Images/HoverImages/Six.png');
- });
- //To Set Default Image
- jQuery("area").mouseleave(function () {
- jQuery("img").attr('src', 'Images/2016.png');
- });
- });
- </script>

Summary
I this article we read about how to create custom HotSpots as well as how to use JavaScript to set some actions over the hotspot areas.
In the previous article I had explained about the HotSpotMode to make the HotSpot area as clickable so if you're not aware about it visit here.
Sourabh SomaniPosted Feb 14, 2017, 1:54 AM
Good one. Keep sharing :)\
Ram KumarPosted Aug 1, 2016, 8:58 AM
Nice read!
Praveen KumarPosted Jan 13, 2016, 11:58 AM
Thanks Ehsan! Sure....
Ehsan SajjadPosted Jan 13, 2016, 10:39 AM
Very good work, keep sharing things like these
Joe WilsonPosted Jan 6, 2016, 5:01 AM
Thank you for sharing.
Santhakumar MunuswamyPosted Jan 5, 2016, 11:37 PM
Thanks for nice article
Muhammad Aqib ShehzadPosted Jan 4, 2016, 11:47 AM
fantastic one
Sabyasachi MishraPosted Jan 4, 2016, 7:43 AM
Well explained
Raja TPosted Jan 3, 2016, 11:50 PM
Nice, Thanks for sharing
Pankaj Kumar ChoudharyPosted Jan 3, 2016, 12:56 PM
Nice Explain Sir..........