

Introduction
In this article I am going to create HotSpots in ASP.NET Web Application by using an ImageMap control. As we know some web pages commonly include complex graphics, where different actions are taken depending on what part of the graphic is clicked. We're .NET Developers so we have several tricks to implement the required design.
Before going to create HotSpots, we should know about the term "HotSpots" in ASP.NET web development.
What is HotSpot
In ASP.NET, HotSpot is a small area of an Image which may produce some actions when anyone click or move over that hotspot (area). Basically it's the part of graphics design which is used for complex web page design. ASP.NET have several tricks to implement those type of graphics design. Let's see the following three tricks which are commonly used to complete our tasks related to hotspots.
- Stacked Image
- ImageButton Control
- ImageMap Control
Let's see the following image which shows four rectangular hotspots on a single image.
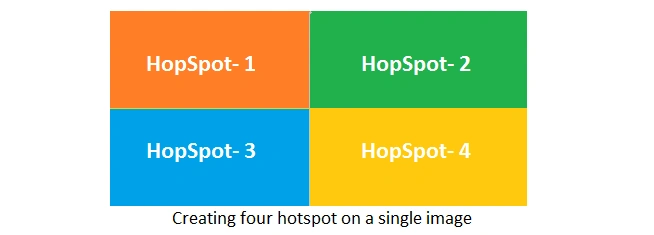
We may see in Figure 1 where a single image is divided into four hotspot areas, ie. HotSpot 1, 2,3 and 4, even it's a single image but if we click on the area of HopSpot-1 the others three areas will not be affected. It means if we click on HotSpot-1 it produce the result for HotSpot-1 only similarly if we click on HotSpot-2 it produce the result for HotSpot-2 only.
As we read above we have three ways to create hotspot in ASP.NET but in this article I am going to explain more about the third one, that is by using ImageMap Control. But before going to start it, let us do a quick recap about Stacked Image and ImageButton.
Stacked Image
Creating a single image by using a collection of various images together and positioned the particular part of image with different controls carefully which looks like one graphics where we can handle the click event of each control separately.
Stacked Image
Creating a single image by using a collection of various images together and positioned the particular part of image with different controls carefully which looks like one graphics where we can handle the click event of each control separately.
Example:
Using SpriteImage is the best example of stacked images.
ImageButton Control
When a ImageButton control is clicked, it provides the coordinates where the click was made. We can find out this co-ordinate on our server side code to determine what region was clicked. I will explain more about it in upcoming article.
Example:

Note:
This is a single image which looks like three buttons. If we put this image as a background of a ImageButton so on click event we can identify that the clicked area is the part of "Home", "About" or "Venue". This technique is flexible but tedious and error-prone. Now let's see about the ImageMap Control.
This is a single image which looks like three buttons. If we put this image as a background of a ImageButton so on click event we can identify that the clicked area is the part of "Home", "About" or "Venue". This technique is flexible but tedious and error-prone. Now let's see about the ImageMap Control.
Creating HotSpots using ImageMap Control
By using ImageMap control, we can define separate regions and give each one a unique name. This approach is good either for small hotspots or large. The following are the advantages of using ImageMap to create hotspots.
Advantages
- When user moves the mouse pointer over the images, it changes to hand only when the user positioned over a defined region.
- The region of image which is not the part of any HotSpots, is not clickable as well as the mouse pointer shows as default.
- It works well for the smallest hotspots as well.
Let's see the following code snippet for ImageMap,
- <asp:ImageMap ID="ImageMapDemo" runat="server" HotSpotMode="PostBack"
- OnClick="ImageMapDemo_Click" ImageUrl="~/Images/RectangleHotSpot.png">
- <asp:RectangleHotSpot Left="27" Top="24" Right="219" Bottom="100"
- AlternateText="Facebook"
- PostBackValue="facebook"
- HotSpotMode="PostBack" />
- </asp:ImageMap>
But to define the clickable regions, we need to add HotSpots object to the ImageMap. HotSpots property ASP.NET provides three types of HotSpots.
- RectangleHotSpot
- CircleHotSpot and
- PolygonHotSpot
Note:
We can create a hotspot in any shape by using these three objects according to our requirement. But the main challenges are to know the exact coordinates of hotspot.
Example:
Suppose we need to create a hotspot in rectangular shape, we must know the four coordinates: Left, Top, Right and Bottom. See the following image in which I have created a hotspot of an image in rectangular shape.
We can create a hotspot in any shape by using these three objects according to our requirement. But the main challenges are to know the exact coordinates of hotspot.
Example:
Suppose we need to create a hotspot in rectangular shape, we must know the four coordinates: Left, Top, Right and Bottom. See the following image in which I have created a hotspot of an image in rectangular shape.
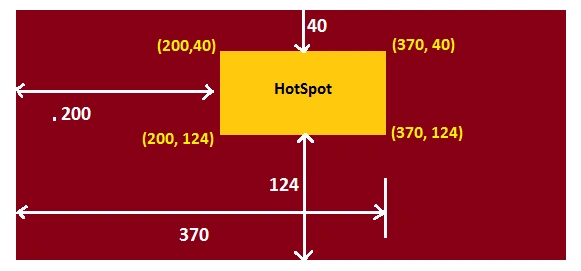
We can see in the above figure, there a small rectangular area is showing so if we want to create a hotspot over this rectangular area only, we need to define its four coordinates Top-Left, Bottom-Left, Top-Right and Bottom-Right. So there is a big challenge to find out the exact coordinate while creating a hotspot.
How to Calculate Coordinates
We have several tools to find out the exact coordinates of a hotspot. But I know about these only.
How to Calculate Coordinates
We have several tools to find out the exact coordinates of a hotspot. But I know about these only.
- Expression Web
- Visual Studio ImageMap Designer
- Microsoft Paint
If you're using Expression Web, once you tweaked the hotspots to perfection, you can see the exact coordinate value in the source code. but if you're using Visual Studio ImageMap Designer, it doesn't let you define regions visually. I am going to use MS Paint for this article. Further we will see how to use MS Paint to find coordinates.
[Attention]
(If you know some other tools to find out the exact coordinate value, kindly mention in the comments section.
RectangularHotSpot
(If you know some other tools to find out the exact coordinate value, kindly mention in the comments section.
RectangularHotSpot
If we define a hotspot in rectangular shape then we can use "RectangleHotSpot" which accepts four coordinates as top-left and bottom-right corners but there order of coordinates must be left, top, right and bottom. Let's see the following code snippet in which I am using a RectangleHotSpot inside the ImageMap control.
[Code Snippet]
- <asp:ImageMap ID="ImageMapDemo" runat="server" HotSpotMode="PostBack"
- OnClick="ImageMapDemo_Click" ImageUrl="~/Images/CoverPhoto.png"
- Width="500px">
- <asp:RectangleHotSpot Left="0" Top="0" Right="233" Bottom="138"
- AlternateText="Rectangular HotSpot"
- PostBackValue="My Rectangle"
- HotSpotMode="PostBack" />
- </asp:ImageMap>
Rendered HTML Code
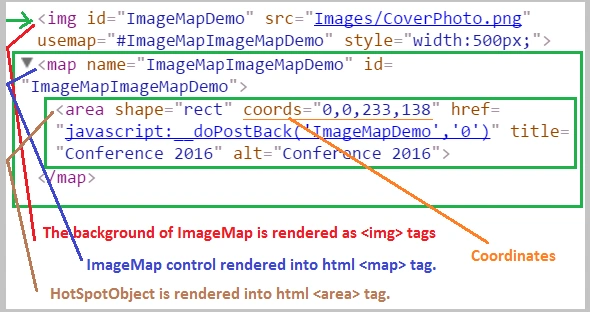
ASP.NET provides a class "RectangleHotSpot" which is a derived class of HotSpot class. The following are the properties of RectangleHotSpot.
Properties of RectangleHotSpot
- PostBackValue: It is used to get or set name of the HotSpot object to pass the event data when it is clicked.
- NavigateUrl: Gets or sets the URL to navigate when it is clicked.
- AlternateText
Gets or sets the alternate text to display for a HotSpot object in an ImageMap control when the image is unavailable or renders to a browser that does not support images. - HotSpotMode: To get or set the behavior of a HotSpot object in an ImageMap control when the HotSpot is clicked.Note: This property can be set by using the following four enumeration values.1. NotSet: HotSpotMode="NotSet"The HotSpot uses the behavior set by the ImageMap control's HotSpotMode property. If the ImageMap control does not define the behavior, the HotSpot objects navigate to a URL.2. Inactive: HotSpotMode="Inactive"
The HotSpot does not have any behavior.
3. Navigate- HotSpotMode="Navigate"
The HotSpot navigates to a URL.
4. PostBack -HotSpotMode="PostBack"
The HotSpot generates a postback to the server. - Left
Gets or sets the x-coordinate of the left side of the rectangular region defined by this RectangleHotSpot object. - Top
Gets or sets the y-coordinate of the top side of the rectangular region defined by this RectangleHotSpot object. - Right
Gets or sets the y-coordinate of the top side of the rectangular region defined by this RectangleHotSpot object. - Bottom
Gets or sets the y-coordinate of the bottom side of the rectangular region defined by this RectangleHotSpot object.
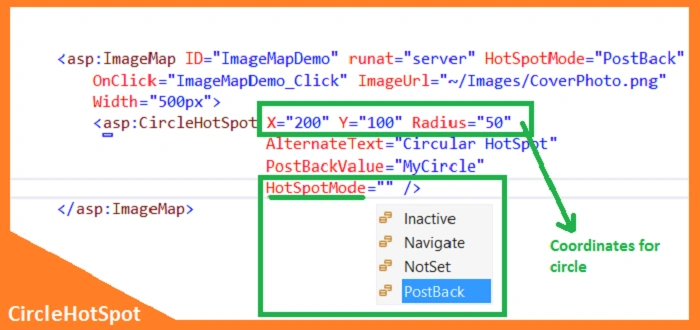
If we need to define a hotspot in circular shape then we can use "CircleHotSpot" which accepts three coordinates values as X-coordinate, Y-coordinate and the radius value. Let's see the following code snippet in which I am using a CircleHotSpot inside the ImageMap control.
PolygonHotSpot
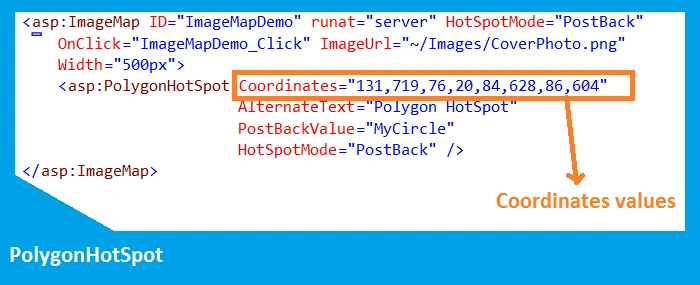
In the case of PolygonHotSpot, we can use X and Y coordinates value in pairs into the Coordinates property like the following:
OR
Now I am going to create a demo application to show the real implementation of HotSpots. For this article I am using Visual Studio 2012 as development tool and Microsoft Paint to calculate the coordinates of hotspot.
Note: It's supportable from .NET Framework 2.0
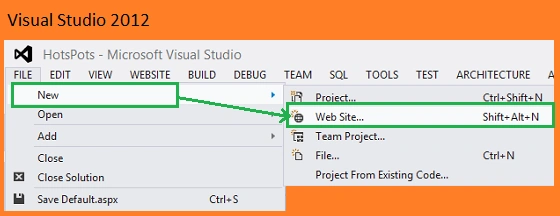
Step 1: Start your Visual Studio and create a new website. For this article I going to create an Empty Website.
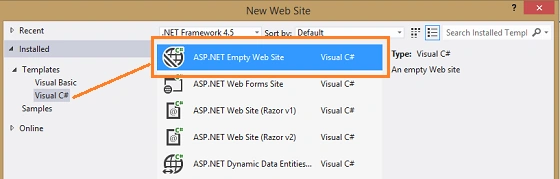
Now select a project template as "ASP.NET Empty Web Site".
Basically we use this HotSpot when we need to define several points. Suppose we need to create a hotspot for the map of India or other than we can’t do well by using RectangleHotSpot or CircleHotSpot. When we define a polygon, we can mention many coordinate points as we like.
In the case of PolygonHotSpot, we can use X and Y coordinates value in pairs into the Coordinates property like the following:
Cordinates ="x1,y1 ; x2,y2 ; x3,y3 ; x4,y4 ; x5,y5 ; x6,y6"
OR
Cordinates ="x1,y1 , x2,y2, x3,y3 , x4,y4 , x5,y5, x6,y6"
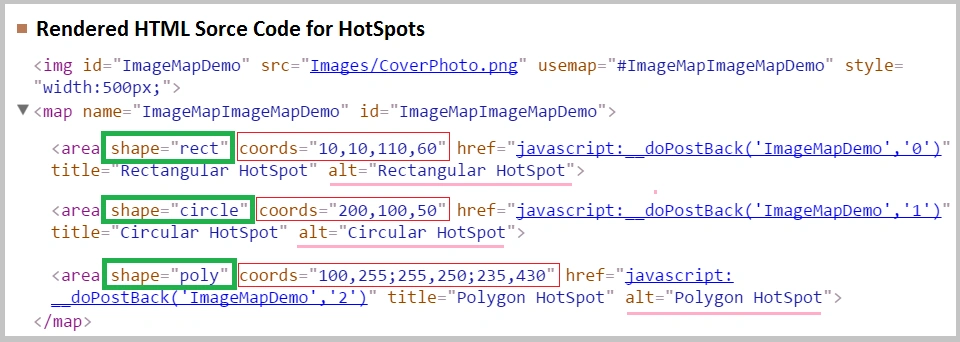
Let us see the following picture which shows how the rendered HTML looks for these three HotSpots.
HotSpots Implementation in Web Application
Now I am going to create a demo application to show the real implementation of HotSpots. For this article I am using Visual Studio 2012 as development tool and Microsoft Paint to calculate the coordinates of hotspot.
Note: It's supportable from .NET Framework 2.0
Step 1: Start your Visual Studio and create a new website. For this article I going to create an Empty Website.
Now select a project template as "ASP.NET Empty Web Site".
Step 2: Now create three Web Pages, for this article I am going to create the pages whose names are the following,
- RectangleHotSpot.aspx
- CircleHotSpot.aspx and
- PolygonHotSpot.aspx
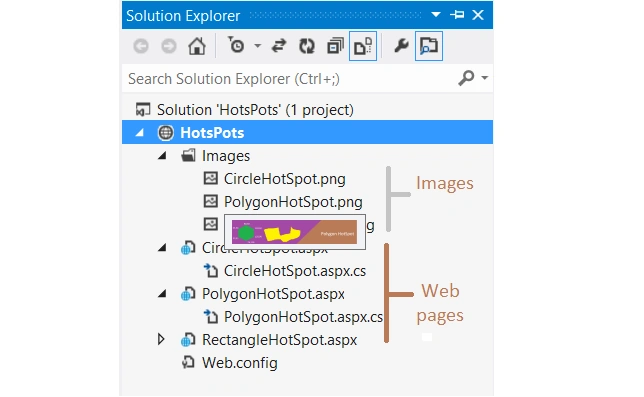
Because we are going create hotspot on images shown we should have some image on which we will create hotspots. So for this article, I have taken three images inside the images folder. Now our Solution Explorer will look like the following snapshot.
Step 3:
Creating RectangleHotSpot
- <div>
- <asp:ImageMap ID="ImageMapDemo" runat="server" HotSpotMode="PostBack"
- OnClick="ImageMapDemo_Click" ImageUrl="~/Images/RectangleHotSpot.png">
- <asp:RectangleHotSpot Left="27" Top="24" Right="219" Bottom="100"
- AlternateText="Facebook"
- PostBackValue="facebook"
- HotSpotMode="PostBack" />
- <asp:RectangleHotSpot Left="225" Top="22" Right="416" Bottom="100"
- AlternateText="Twitter"
- PostBackValue="twitter"
- HotSpotMode="PostBack" />
- </asp:ImageMap>
- <br />
- <div id="divMessage" runat="server" style=></div>
- </div>
If we click on hotspot, it will display some information related to that hotspot. So I have written the following line of codes to perform some action when it is clicked.
- protected void ImageMapDemo_Click(object sender, ImageMapEventArgs e)
- {
- var hostspotValue = e.PostBackValue;
- var messageText = string.Empty;
- switch (hostspotValue.ToLower())
- {
- case "facebook":
- messageText = "You clicked on : " + "<span style='color:#3842CB'>Facebook</span>";
- break;
- case "twitter":
- messageText = "You clicked on : "+"<span style='color:#22B2C7'>Twitter</span>";;
- break;
- }
- divMessage.InnerHtml = messageText;
- }

Now execute this page to see the output, and it will look like the following snapshot.
Creating CircleHotSpot
Now we're going to create "CircleHotSpot". So paste the following code inside the form tag of "CircleHotSpot.aspx" page,
- <div>
- <asp:ImageMap ID="ImageMapDemo" runat="server" HotSpotMode="PostBack"
- OnClick="ImageMapDemo_Click" ImageUrl="~/Images/CircleHotSpot.png">
- <asp:CircleHotSpot x="62" Y="68" Radius="40"
- AlternateText="Facebook"
- PostBackValue="facebook"
- HotSpotMode="PostBack" />
- <asp:CircleHotSpot x="183" Y="68" Radius="40"
- AlternateText="Twitter"
- PostBackValue="twitter"
- HotSpotMode="PostBack" />
- </asp:ImageMap>
- <br />
- <div id="divMessage" runat="server" style=></div>
- </div>

I have written the above code to create the circular hotspots. In this code I have taken two CircleHotSpots, first for facebook and second for twitter button, So if we move the mouse over hotspot area, it show the name of area in tooltip.
If we click on hotspot, it will display some information related to that hotspot. So I have written the following lines of code to perform some action when it is clicked.
- protected void ImageMapDemo_Click(object sender, ImageMapEventArgs e)
- {
- var hostspotValue = e.PostBackValue;
- var messageText = string.Empty;
- switch (hostspotValue.ToLower())
- {
- case "facebook":
- messageText = "You clicked on : " + "<span style='color:#3842CB'>Facebook</span>";
- break;
- case "twitter":
- messageText = "You clicked on : " + "<span style='color:#22B2C7'>Twitter</span>"; ;
- break;
- }
- divMessage.InnerHtml = messageText;
- }
Creating PolygonHotSpot
- <div>
- <asp:ImageMap ID="ImageMapDemo" runat="server" HotSpotMode="PostBack"
- OnClick="ImageMapDemo_Click" ImageUrl="~/Images/PolygonHotSpot.png">
- <asp:PolygonHotSpot AlternateText="Green"
- PostBackValue="green"
- HotSpotMode="PostBack"

- Coordinates="35,91;35,50;80,30;118,50;120,90;76,116;35,89" />
- <asp:PolygonHotSpot AlternateText="Yellow Area"
- PostBackValue="yellow"
- HotSpotMode="PostBack"
- Coordinates="198,111,181,54,178,56,250,45,262,86,318,76,330,51,343,54,372,60,370,80,366,86,327,103,322,103,298,115,282,116,267,102,235,102,201,112,198,111" />
- </asp:ImageMap>
- <br />
- <div id="divMessage" runat="server" style=></div>
- </div>

I have written the above code to create the polygon hotspots. In this code I have taken two PolygonHotSpots, first for green and second for yellow button, So if we move the mouse over hotspot area, it will show the name of area in tooltip.
If we click on hotspot, it will display some information related to that hotspot. So I have written the following line of code to perform some action when it is clicked.
- protected void ImageMapDemo_Click(object sender, ImageMapEventArgs e)
- {
- var hostspotValue = e.PostBackValue;
- var messageText = string.Empty;
- switch (hostspotValue.ToLower())
- {
- case "green":
- messageText = "You clicked on : " + "<span style='color:#22B14C'>Green Polygon</span>";
- break;
- case "yellow":
- messageText = "You clicked on : " + "<span style='color:#DD8605'>Yellow Polygon</span>"; ;
- break;
- }
- divMessage.InnerHtml = messageText;
- }
Note:
I have used Microsoft Paint to find out the coordinates of region either rectangle, circular or polygon shapes. Let us see a glimpse how we can find out the coordinates using MS Paint.
Summary
I have used Microsoft Paint to find out the coordinates of region either rectangle, circular or polygon shapes. Let us see a glimpse how we can find out the coordinates using MS Paint.
Summary
In this article we read about the different ways to create HotSpots in ASP.NET application as well as what are the available tools to calculate the coordinate points of a region. In the upcoming article I will explain about how to create custom HotSpots in ASP.NET.
Monica SuriyaarachchiPosted Aug 9, 2018, 3:53 AM
Struggled a lot to get coordinates of a hotspot. Your tip to use MS Paint for this helped me. Thanks a lot!!!
Guest UserPosted Aug 28, 2016, 7:20 AM
Nice one
Lalit KumarPosted Feb 21, 2016, 9:20 AM
Nice P K Yadav
Gowtham KPosted Dec 28, 2015, 10:44 AM
Good One, Thanks for sharing
Sridhar SharmaPosted Dec 28, 2015, 8:12 AM
Nice Share :)
Kiranteja JallepalliPosted Dec 28, 2015, 8:12 AM
good work Praveen
Lalit KumarPosted Dec 28, 2015, 7:35 AM
Good. its really helpful.
Santhakumar MunuswamyPosted Dec 28, 2015, 6:24 AM
Thanks for good article. keep it up
Humayun Kabir MamunPosted Dec 28, 2015, 6:11 AM
Nice...
Praveen KumarPosted Dec 28, 2015, 6:09 AM
Thanks Sibeesh Venu and Gowtham Rajamanickam
Sibeesh VenuPosted Dec 28, 2015, 5:17 AM
Nice Share
Gowtham RajamanickamPosted Dec 28, 2015, 5:12 AM
Good One
Ehsan SajjadPosted Dec 28, 2015, 4:57 AM
That's really informative, never knew about hotspot concept
Joe WilsonPosted Dec 28, 2015, 1:59 AM
Well, it was so great.