Introduction
I have designed a login form in Visual Studio 2015 using Windows Form Application with C# code, wherein the username and password get validated at the entry-level and would deny entry for users who have unauthenticated credentials. The objective is to be more precise for the user with his/her username and password created by the administrator and hence, could not be changed under any circumstance without prior permission from the administrator. Also, to overcome numerous attempts, the validation stops the user from not more than three attempts. If all three attempts are proven wrong, access is denied for the user and he/she has to communicate with the administrator for login. To make the login form more creative, I have added a picture box that would display a picture for the login and whether access has been granted or not for that particular user. It can be altered with the user's photo to look more attractive whenever he/she logs into the application.
Prerequisites
- Visual Studio 2015
- System configuration with Windows 8.1 or Windows 10
Steps to create a login page.
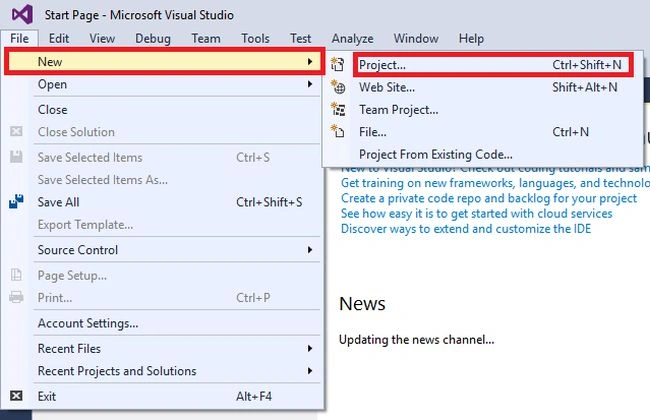
Step 1. Open Visual Studio 2015, navigate to File >> New and choose Project to open a new project.
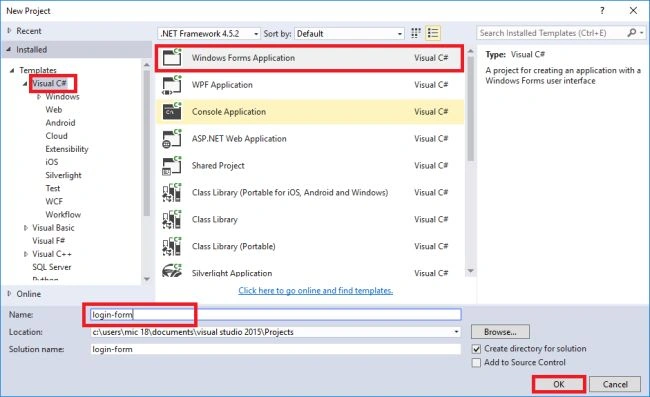
Step 2. After completing Step 1, a new window opens up with templates for which the application can be chosen. The login form is developed using Visual C# and selecting the corresponding Windows Forms Application. The selected work area could be saved in this stage by giving desired form name in Name text area. The form name and the solution name will be the same as the user types. After completing this, click OK.
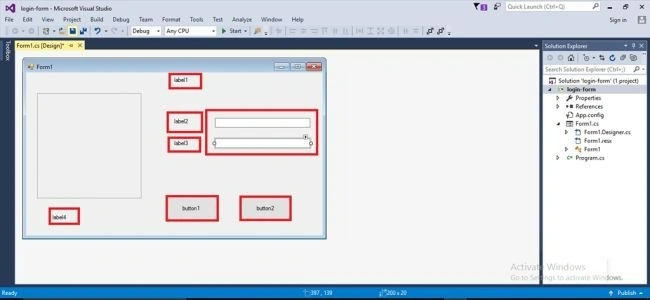
Step 3. Windows Form creates a workspace by displaying an empty form. The user can select Toolbox from the left-top corner to bring the desired tools required for designing. I have brought the following tools inside my form - label (4 nos), textbox (2 nos), button (2 nos), and picturebox (1). Picturebox is included in the login form to add creativity and it displays the corresponding pictures for users who will be logging into the system.
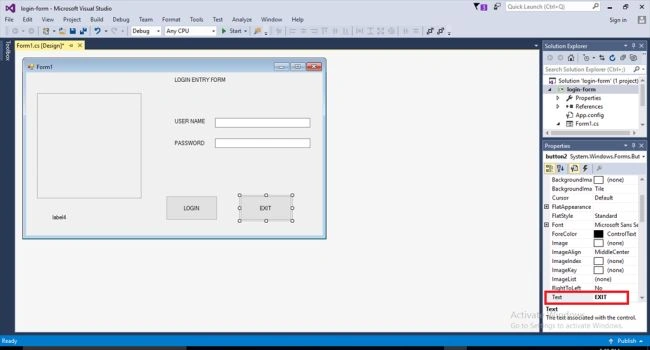
Step 4. The next stage is to convert the tools brought inside the form into meaningful interactives. Tools are named according to their usage by right-clicking on any tool and then selecting Properties. This displays a window on the right side of the screen. Select the Text option and type the tool name. Label 4 is left empty to display the validating message which is inside the coding.
Step 5. In the Solution Explorer, select Form1.cs which is the workspace for our creation. Start to code inside the Main method. This is my code in which I have included how the tools will be reacting when the project is run.
using System;
using System.Collections.Generic;
using System.ComponentModel;
using System.Data;
using System.Drawing;
using System.Linq;
using System.Text;
using System.Threading.Tasks;
using System.Windows.Forms;
namespace login_form
{
    public partial class Form1 : Form
    {
        static int attempt = 3;
        public Form1()
        {
            InitializeComponent();
        }
        private void button2_Click(object sender, EventArgs e)
        {
            this.Close();
        }
        private void button1_Click(object sender, EventArgs e)
        {
            string username = textBox1.Text;
            string password = textBox2.Text;
            if ((this.textBox1.Text == "Admin") && (this.textBox2.Text == "admin"))
            {
                attempt = 0;
                pictureBox1.Image = new Bitmap(@"C:\Users\Mic 18\Desktop\granted.jpg");
                MessageBox.Show("you are granted with access");
            }
            else if ((attempt == 3) && (attempt > 0))
            {
                pictureBox1.Image = new Bitmap(@"C:\Users\Mic 18\Desktop\images1.jpg");
                label4.Text = ("You Have Only " + Convert.ToString(attempt) + " Attempt Left To Try");
                --attempt;
            }
            else
            {
                pictureBox1.Image = new Bitmap(@"C:\Users\Mic 18\Desktop\denied.jpg");
                MessageBox.Show("you are not granted with access");
            }
        }
    }
}
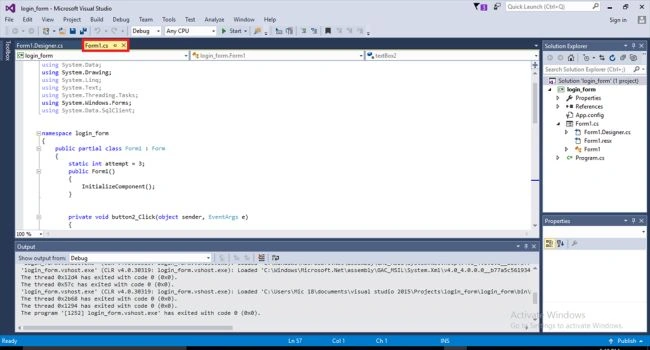
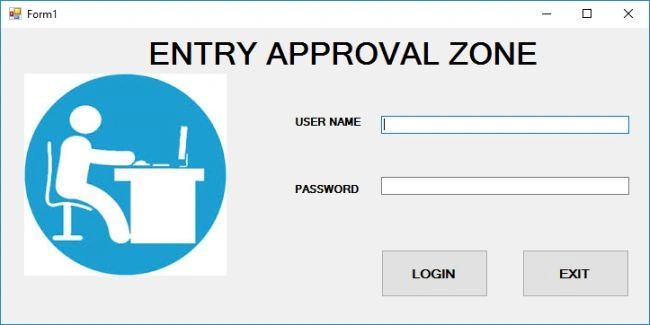
Step 6. The completed form looks like this and it is now running. To start the application, press F5. The user who uses this form will type the username and desired password to enter into the next level.
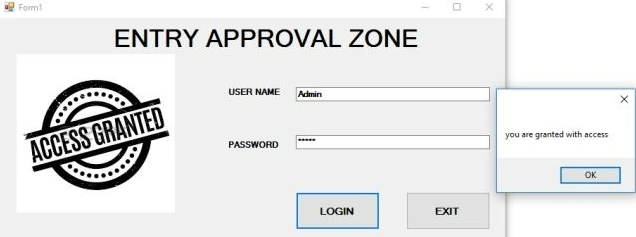
Step 7. By typing the correct username and password and clicking the LOGIN button, the picture box changes the default picture with a different picture, and a message box is prompted telling about the code validation so that the user can start accessing the application further.
Step 8. If the user types the wrong username or password, the label under the picture box displays a message with the number of attempts left out for the user to try.
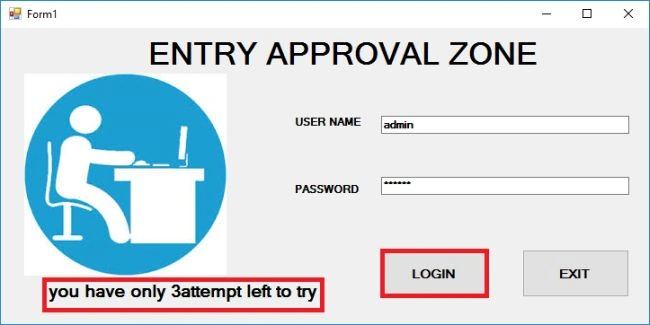
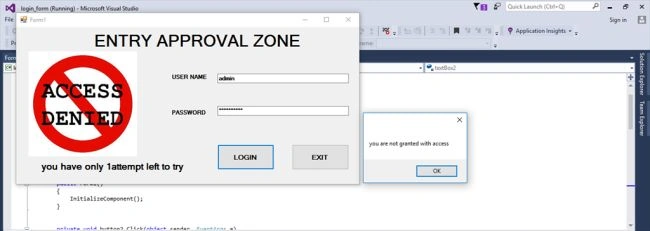
Step 9. I have limited the user entry to only three attempts. The code checks for the correct entry in username and password. If all three attempts contain either the wrong username or wrong password, the user will not be allowed to continue his/her process with the application. This is shown in the below picture.
Summary
In the above steps, I have explained how to create a simple login form using C# in the Windows Form Application and validating the username and password with limited attempts as well as changing the pictures according to the type of user. I have explained a scenario with only one user login. Future enhancements will be including a database with usernames and passwords where we can add any number of users and respective passwords.


David CrawleyPosted May 7, 2024, 1:24 AM
You are currently out performing the Microsoft Team, sir!
David CrawleyPosted May 7, 2024, 1:23 AM
Https://learn.microsoft.com/en-us/training/modules/csharp-evaluate-boolean-expressions/6-challenge-2
David CrawleyPosted May 7, 2024, 1:23 AM
Thank you so very much!
saife khanPosted Oct 9, 2019, 5:39 AM
Hi sir how are you i want help from you
Mark RomanaPosted Mar 19, 2019, 7:41 PM
Https://youtu.be/WNp_15lHQCs i hope dis will help
Anwar BashaPosted Jun 21, 2018, 12:28 AM
Thank u krutika..ur comments are valuable to me..
Krutika KarekarPosted Jun 20, 2018, 7:51 AM
Useful article...
Yutaro NakayamaPosted May 17, 2018, 7:14 AM
Nice report. Beginners can smoothly programming through this.
Rathrola Prem KumarPosted Mar 2, 2018, 3:02 AM
Nice share Mr.Anwar....
Γιωργος ΓκαβρανηςPosted Dec 21, 2017, 4:00 PM
Whatever the lever still should show proper code. You didn't even bother proper naming, a matter not to be taken lightly. Unused assemblies and empty rows. This code is so wrong in so many ways.
Can UrekPosted Dec 18, 2017, 8:46 AM
This article is Intermediate? Really?
Md ilyasPosted Oct 28, 2017, 7:18 AM
Hi friends this ilyas I need your help
Manav PandyaPosted Aug 25, 2017, 2:29 AM
Nice share ...............
Vidyadharran GPosted Aug 16, 2017, 7:29 AM
Nice article sir;)
Gokhul VarmanPosted Aug 13, 2017, 12:03 AM
Super sir..very nice article.......keeping going
Siva KumarPosted Aug 12, 2017, 4:39 PM
Simple one, and you can modify the line "else if ((attempt == 3) && (attempt > 0))" as if the attempt equal to 3 then it must be greater than 0. So, you can remove the second condition (>0). Can you tell me what happens when attempt is 2?
Logesh PalaniPosted Aug 11, 2017, 11:34 PM
Super sir,,,,,,,,Nice article...
Ravishankar VelladuraiPosted Aug 10, 2017, 12:13 PM
Nice Article sir!!!...
Manikandan MurugesanPosted Aug 9, 2017, 9:51 PM
Nice Article sir.....