

Introduction
In this article, we perform CRUD Operations in a windows form application. For this CRUD operation, we are using the Entity framework. We perform all operations, such as create, update, delete and select using the entity framework.
What is Entity Framework?
Official Definition: “Entity Framework is an object-relational mapper (O/RM) that enables .NET developers to work with a database using .NET objects. It eliminates the need for most of the data-access code that developers usually need to write.”
Perform CRUD Operations Using Entity Framework
Step 1
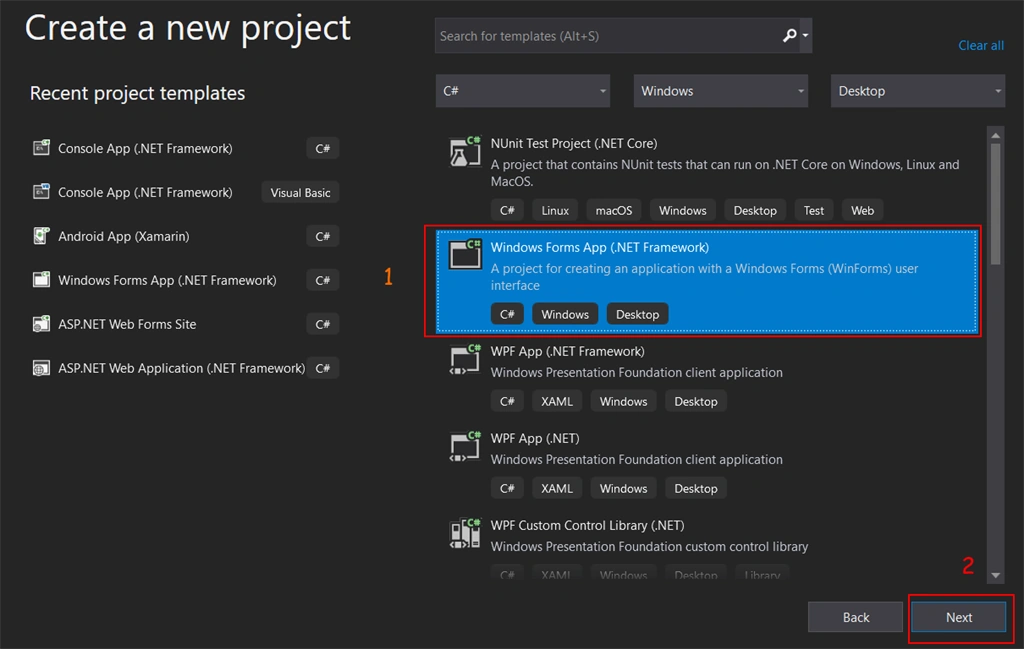
First of all, create a Windows Forms App. To create a new app click on file menu > New > New project and select Windows Forms App then click on Next button.
Step 2
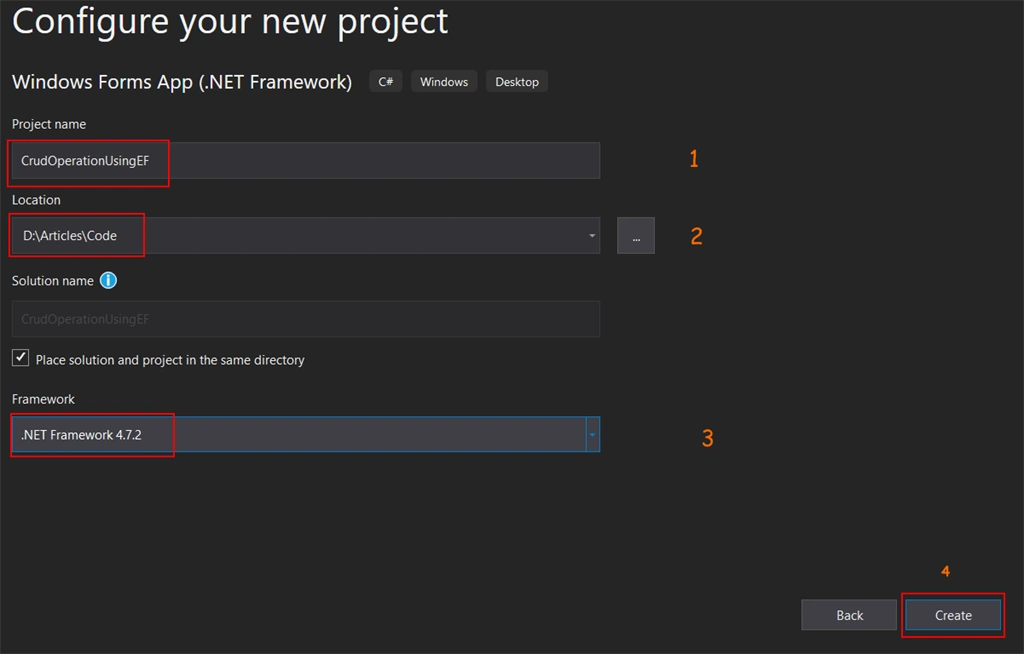
In the next screen, you need to enter the following details, then click on the Create button
- ProjectName - Enter your project name in this field. This is also your solution name.
- Location - Path of where you want to store this project.
- Framework - Select .Net framework version which you want to use in this project.
Step 3
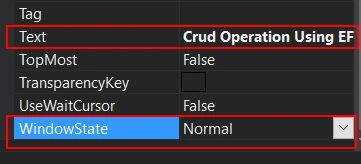
Now your project is ready and you can see a new form open in your visual studio called Form1. Change some properties if you want like Text, which is the title shown on your form, color, background color, Windows state, etc. Here, I only change windows state and Text properties.
Step 4
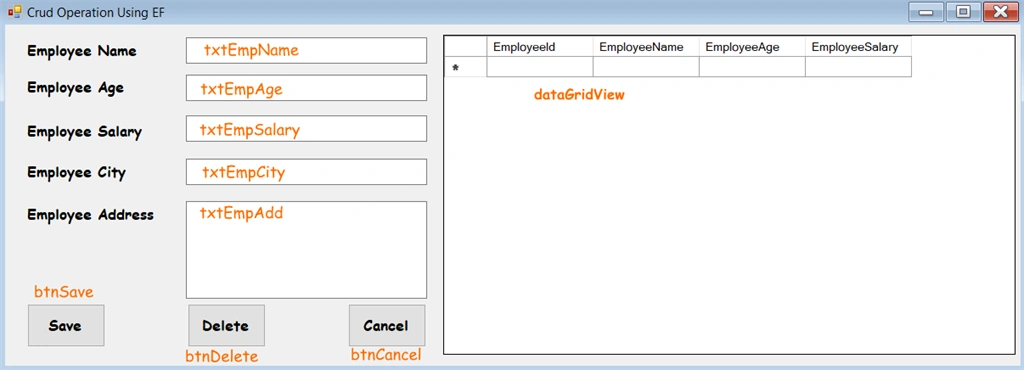

Now create your design as your requirement. You can see in the below image that I added some controls in my form.
Step 5
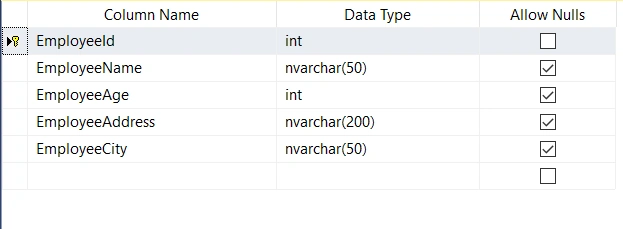
Now we create our table in database. You can see in the below image I create a table with five columns where EmployeeId is the primary key and also auto increment.
- CREATE TABLE [dbo].[Employee](
- [EmployeeId] [int] IDENTITY(1,1) NOT NULL,
- [EmployeeName] [nvarchar](50) NULL,
- [EmployeeAge] [int] NULL,
- [EmployeeAddress] [nvarchar](200) NULL,
- [EmployeeCity] [nvarchar](50) NULL,
- [EmployeeSalary] [int] NULL,
- CONSTRAINT [PK_Employee] PRIMARY KEY CLUSTERED
- (
- [EmployeeId] ASC
- )
- )
Step 6
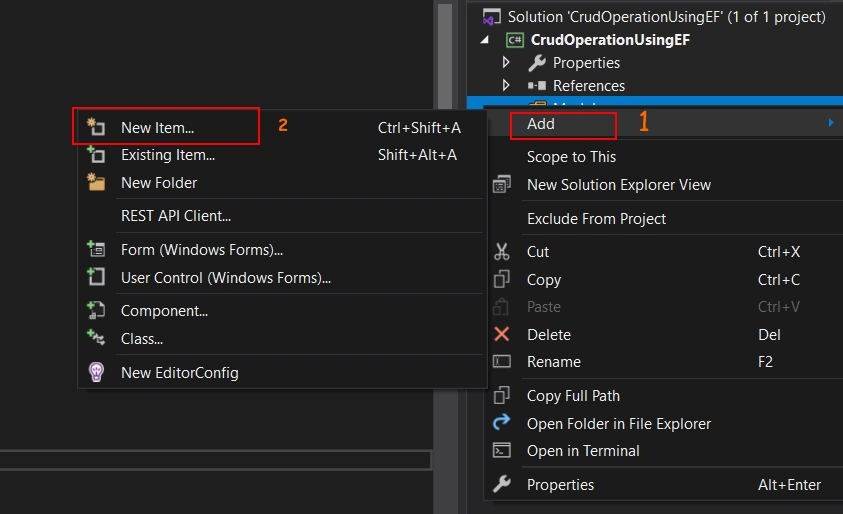
Now we add Entity Data Model in our project for that I create a new folder in solution called Model. Then right-click in this folder. You see a context menu click on Add, then New Item.
Step 7
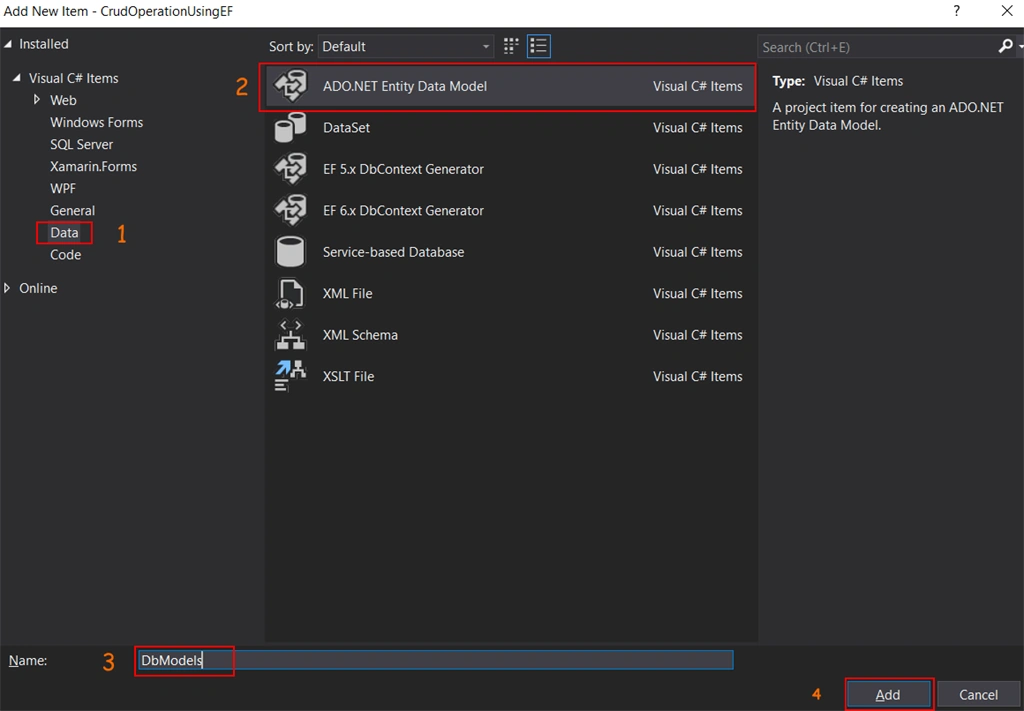
Now click on Data from left sidebar for see item related to database and then select ADO.NET Entity Data Model, give appropriate name and click on the Add button.
Step 8
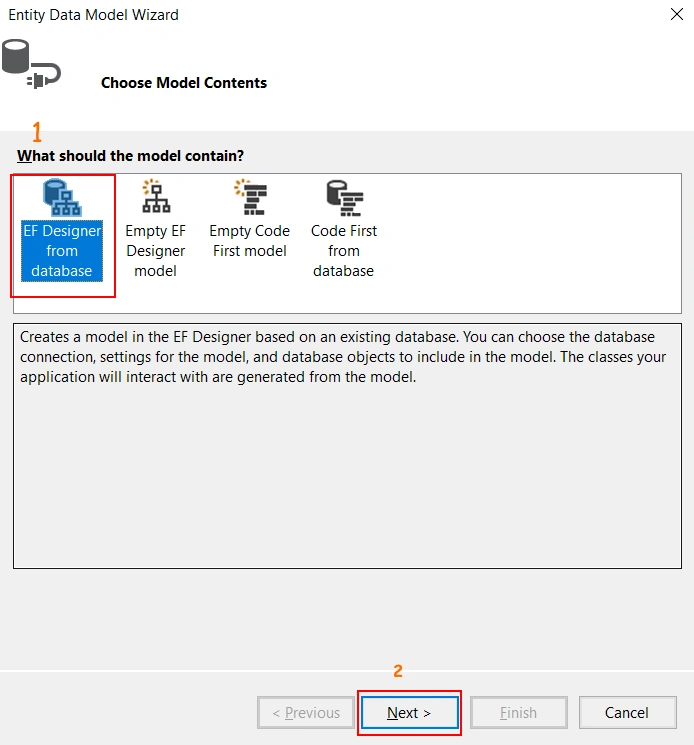
Now you see the wizard for Entity Data Model. In this wizard, there are four options EF Designer from database, Empty EF Designer Model, Empty Code first model, Code first from database. Here, we have a database table, so we create first option and click on next button.
Step 9
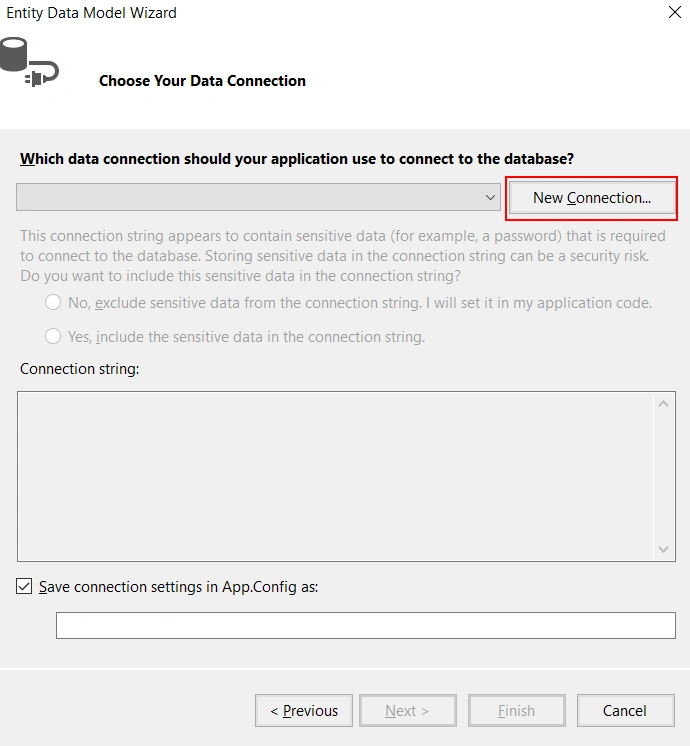
In next step you need to connect with your SQL server. Click on New Connection it will open a new popup window.
Step 10
In this popup window, you need to perform the following operations.
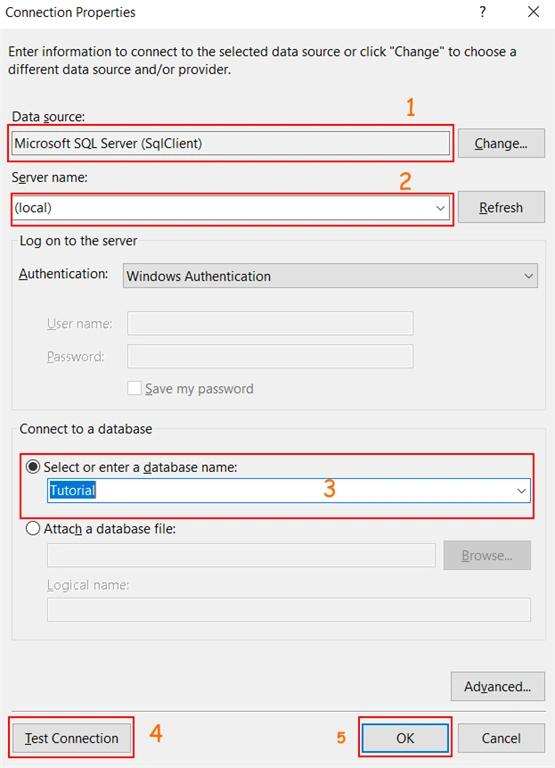
- Select Your Data source. Here I use SQL Server so automatically here Microsoft SQL Server is selected, you can change it if you use another.
- Server Name: here enter your server name. In my case I have SQL Server on same PC so I just enter (local) then it get all database from your server.
- Select Database: Select database from drop-down list which you want to use for this project.
- Then click on Test Connection button for check connection established successfully or not and then click on Ok button.
Step 11
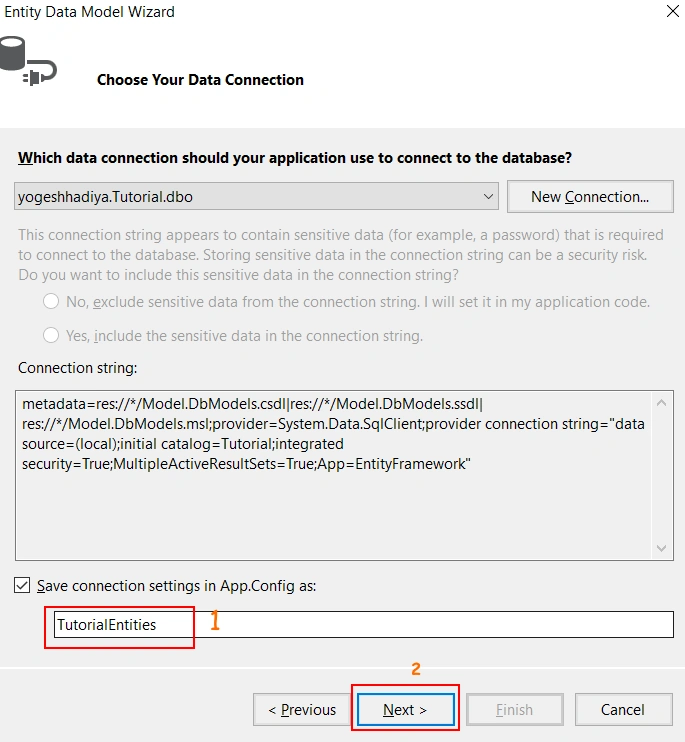
Now you get a connection string. If you want to store the connection string in App.Config file, then check that checkbox and give your connection string name. Then click on the Next Button.
Step 12
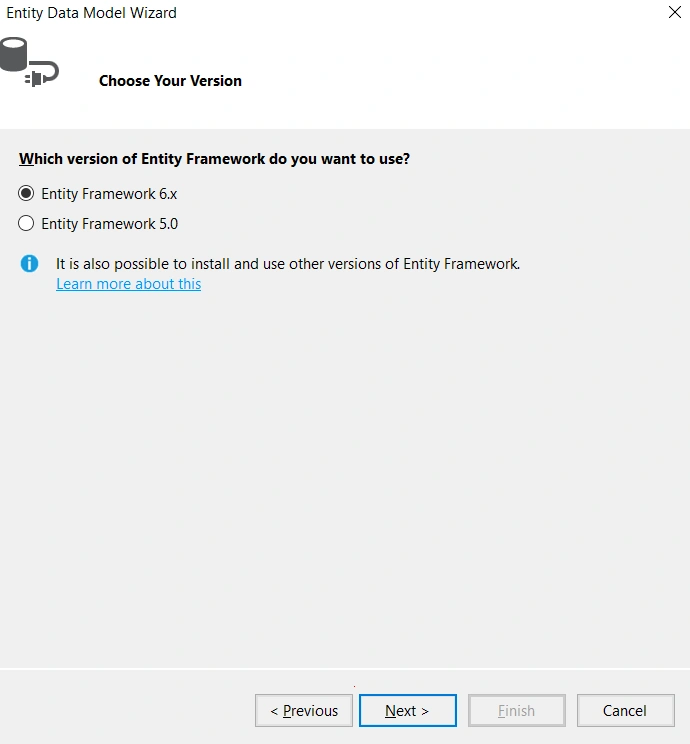
In this step, it will ask you to choose entity framework version which include in this project. Select your version and click on the Next Button.
Step 13
In this step you see all tables, views and store procedures list which you have in your database select tables, views and store procedures as your requirement. Give name of Model Namespace and click on the finish button.
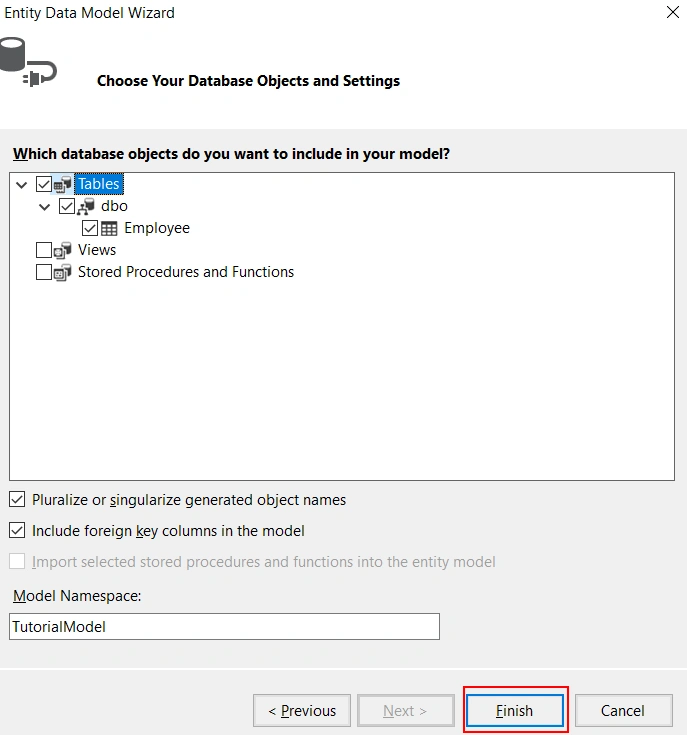
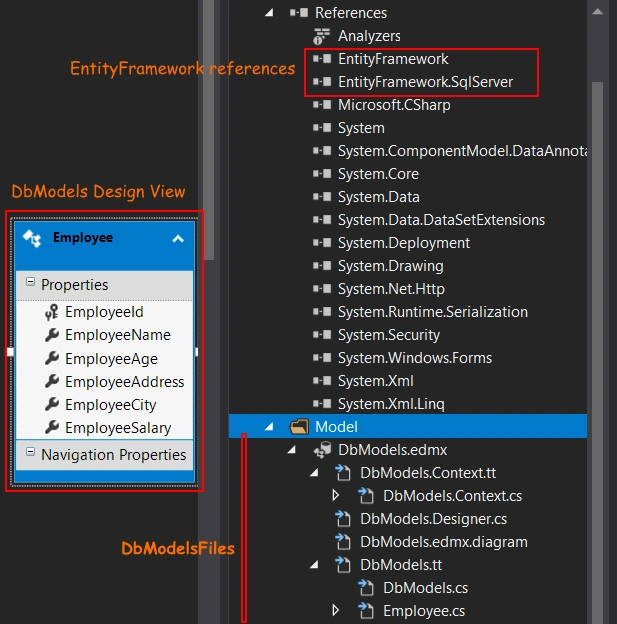
Now you can see in the below image that we have Entity Framework references in our project. Also, DbModels is created in our folder.
Step 14
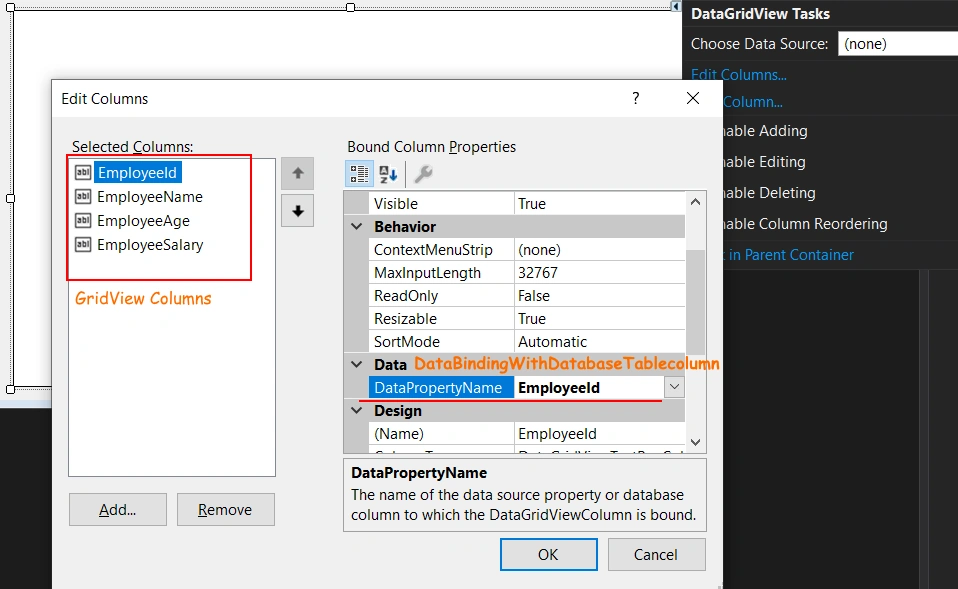
Now we add columns in Data Grid View. If you want to show all columns from you table then you does not need to perform this step. Add columns you want to show and bind Data property with the Database column name.
Step 15
Now we are finished with the back end code. First of all, generate a Form_Load event by double-clicking on your form and add code, as shown below. Also, create an instance of your Entity Model class and a database table class.
Form Load Method
- //create object of contex and table model
- TutorialEntities db = new TutorialEntities();
- Employee Employee = new Employee();
- int EmpId = 0;
- /// <summary>
- /// form load event
- /// </summary>
- /// <param name="sender"></param>
- /// <param name="e"></param>
- private void Form1_Load(object sender, EventArgs e)
- {
- ClearData();
- SetDataInGridView();
- }
Clear Data function
- /// <summary>
- /// reset all fields
- /// </summary>
- public void ClearData() {
- txtEmpAdd.Text = txtEmpAge.Text = txtEmpCity.Text = txtEmpName.Text = txtEmpSalary.Text = string.Empty;
- btnDelete.Enabled = false;
- btnSave.Text = "Save";
- EmpId = 0;
- }
In the above code, we set all textbox values to an empty string. Disable the delete button and set the save button text to save. And also set EmpId’s value 0 (zero) which we declare on top.
Set Data In Grid View Function
- /// <summary>
- /// set data in grid view
- /// </summary>
- public void SetDataInGridView()
- {
- dataGridView.AutoGenerateColumns = false;
- dataGridView.DataSource = db.Employees.ToList<Employee>();
- }
In this function, first, we set auto-generated the column false because we define our custom column and next get data from the Employee table and set it in the grid view data source.
Step 16
Now we add code for insert new record and update existing record. For this add button, click event on your form by double clicking on your save button. Add the following code in your button click event.
- /// <summary>
- /// insert update data
- /// </summary>
- /// <param name="sender"></param>
- /// <param name="e"></param>
- private void btnSave_Click(object sender, EventArgs e)
- {
- Employee.EmployeeName = txtEmpName.Text.Trim();
- Employee.EmployeeAge = Convert.ToInt32(txtEmpAge.Text.Trim());
- Employee.EmployeeAddress = txtEmpAdd.Text.Trim();
- Employee.EmployeeCity = txtEmpCity.Text.Trim();
- Employee.EmployeeSalary = Convert.ToInt32(txtEmpSalary.Text.Trim());
- if (EmpId > 0)
- db.Entry(Employee).State = EntityState.Modified;
- else
- {
- db.Employees.Add(Employee);
- }
- db.SaveChanges();
- ClearData();
- SetDataInGridView();
- MessageBox.Show("Record Save Successfully");
- }
Code Explanation
- In this above code, you can see we set data in the Employee Model object from textbox.
- Next we check if EmpId’s value is greater than 0 which means we need to perform update operation. If value is greater than 0 then set state of Employee Entity modified else add this employee entity to employee collection.
- Then save changes by calling the saveChanges() method of the DB object.
- Then clear textbox data and refresh grid view data by calling set data in grid view method again.
- Show message in last that data is saved.
Output
Step 17

Now we get data in the textbox when the user double-clicks on grid view. For this, add double click event in grid view from event tab.
Add the following code in your double click event.
- /// <summary>
- /// set data in textbox on grid view click
- /// </summary>
- /// <param name="sender"></param>
- /// <param name="e"></param>
- private void dataGridView_DoubleClick(object sender, EventArgs e)
- {
- if (dataGridView.CurrentCell.RowIndex != -1)
- {
- EmpId = Convert.ToInt32(dataGridView.CurrentRow.Cells["EmployeeId"].Value);
- Employee = db.Employees.Where(x => x.EmployeeId == EmpId).FirstOrDefault();
- txtEmpName.Text = Employee.EmployeeName;
- txtEmpAdd.Text = Employee.EmployeeAddress;
- txtEmpAge.Text = Employee.EmployeeAge.ToString();
- txtEmpSalary.Text = Employee.EmployeeSalary.ToString();
- txtEmpAge.Text = Employee.EmployeeAge.ToString();
- txtEmpCity.Text = Employee.EmployeeCity;
- }
- btnSave.Text = "Update";
- btnDelete.Enabled = true;
- }
Code Explanation
- First, we check that the row index is not less than zero because we don’t want to do anything when the user clicks on the grid view header.
- Then get the employee id by passing column name which we give in step 14.
- Then get data from employee table by add where condition and assign this data to Employee object.
- Then pass data from the Employee object to the textbox.
- At last, enable the delete button and set the save button text to Update.
Output
Step 18
Now we perform a delete operation. Add a button click event and add following code:
- /// <summary>
- /// delete record
- /// </summary>
- /// <param name="sender"></param>
- /// <param name="e"></param>
- private void btnDelete_Click(object sender, EventArgs e)
- {
- if (MessageBox.Show("Are you sure you want to delete this record ?", "Delete ?", MessageBoxButtons.YesNo, MessageBoxIcon.Question) == DialogResult.Yes)
- {
- db.Employees.Remove(Employee);
- db.SaveChanges();
- ClearData();
- SetDataInGridView();
- MessageBox.Show("Record Deleted Successfully");
- }
- }
Code Explanation
- In the above code, first we show confirmation dialog to user if user want to delete record. If the user clicks yes then we perform the next step.
- Then remove Employee entity from db.Employee. We already have data in the Employee object from step 17.

- Call Save changes, clear data and set grid view data method and show message that record delete successfully.
Output
Step 19
Call the clear data function on a cancel button click event.
I hope you find this article useful. If so, then please share with your friends. If you have any doubts, comment below. You can also download the zip file of this project. Thank you.
Nikunj SatasiyaPosted Feb 3, 2021, 4:54 AM
Nice Explanation, Thank you for this article, Can you please write an article on an editable grid in Windows Form App and save records from the grid on row change.