

In this article, I am going to explain how to create an MVC web application in ASP.NET Core 2.0 using ADO.NET. We will be creating a sample Employee Record Management System and performing CRUD operations on it.
We will be using Visual Studio 2017 (Version 15.3.5 or above) and SQL Server.
Prerequisites
- Install .NET Core 2.0.0 or above SDK from here
- Install Visual Studio 2017 Community Edition (Version 15.3.5 or above) from here
Now, we are ready to proceed with the creation of our MVC web application.
Creating Table and Stored Procedures
We will be using a DB table to store all the records of employees.
Open SQL Server and use the following script to create tblEmployee table.- Create table tblEmployee(
- EmployeeId int IDENTITY(1,1) NOT NULL,
- Name varchar(20) NULL,
- City varchar(20) NULL,
- Department varchar(20) NULL,
- Gender varchar(6) NULL
- )
Now, we will create stored procedures to add, delete, update, and get employee data.
- Create procedure spAddEmployee
- (
- @Name VARCHAR(20),
- @City VARCHAR(20),
- @Department VARCHAR(20),
- @Gender VARCHAR(6)
- )
- as
- Begin
- Insert into tblEmployee (Name,City,Department, Gender)
- Values (@Name,@City,@Department, @Gender)
- End
- Create procedure spUpdateEmployee
- (
- @EmpId INTEGER ,
- @Name VARCHAR(20),
- @City VARCHAR(20),
- @Department VARCHAR(20),
- @Gender VARCHAR(6)
- )
- as
- begin
- Update tblEmployee
- set Name=@Name,
- City=@City,
- Department=@Department,
- Gender=@Gender
- where EmployeeId=@EmpId
- End
To delete an Employee Record
- Create procedure spDeleteEmployee
- (
- @EmpId int
- )
- as
- begin
- Delete from tblEmployee where EmployeeId=@EmpId
- End
To view all Employee Records
- Create procedure spGetAllEmployees
- as
- Begin
- select *
- from tblEmployee
- End
Now, our Database part has been completed. So, we will proceed to create the MVC application using Visual Studio.
Create MVC Web Application
Open Visual Studio and select File >> New >> Project.

Then, select “ASP.NET Core Web Application” from available project types. Put the name of the project as MVCDemoApp and press OK. Refer to this image.

After clicking on OK, a new dialog will open asking to select the project template. You can observe two drop-down menus at the top left of the template window. Select “.NET Core” and “ASP.NET Core 2.0” from these dropdowns. Then, select “Web application(Model-View-Controller)” template and press OK.

Now our project will open. You can observe that we have Models, Views and Controllers folders already created. We will be adding our files to these folders only.

Right click on Controllers folder and select Add >> New Item

An “Add New Item” dialog box will open. Select Web from the left panel, then select “MVC Controller Class” from templates panel, and put the name as EmployeeController.cs. Press OK.

Now our EmployeeController has been created. We will put all our business logic in this controller.
Adding the Model to the Application
Right click on Models folder and select Add >> Class. Name your class Employee.cs. This class will contain our Employee model properties.
Add one more class file to Models folder. Name it as EmployeeDataAccessLayer.cs . This class will contain our Database related operations.
Now, the Models folder has the following structure.

Open Employee.cs and put the following code in it. Since we are adding the required validators to the fields of Employee class, so we need to use System.ComponentModel.DataAnnotations at the top.
- using System;
- using System.Collections.Generic;
- using System.ComponentModel.DataAnnotations;
- using System.Linq;
- using System.Threading.Tasks;
- namespace MVCDemoApp.Models
- {
- public class Employee
- {
- public int ID { get; set; }
- [Required]
- public string Name { get; set; }
- [Required]
- public string Gender { get; set; }
- [Required]
- public string Department { get; set; }
- [Required]
- public string City { get; set; }
- }
- }
Open EmployeeDataAccessLayer.cs and put the following code to handle database operations. Make sure to put your connection string.
- using System;
- using System.Collections.Generic;
- using System.Data;
- using System.Data.SqlClient;
- using System.Linq;
- using System.Threading.Tasks;
- namespace MVCDemoApp.Models
- {
- public class EmployeeDataAccessLayer
- {
- string connectionString = "Put Your Connection string here";
- //To View all employees details
- public IEnumerable<Employee> GetAllEmployees()
- {
- List<Employee> lstemployee = new List<Employee>();
- using (SqlConnection con = new SqlConnection(connectionString))
- {
- SqlCommand cmd = new SqlCommand("spGetAllEmployees", con);
- cmd.CommandType = CommandType.StoredProcedure;
- con.Open();
- SqlDataReader rdr = cmd.ExecuteReader();
- while (rdr.Read())
- {
- Employee employee = new Employee();
- employee.ID = Convert.ToInt32(rdr["EmployeeID"]);
- employee.Name = rdr["Name"].ToString();
- employee.Gender = rdr["Gender"].ToString();
- employee.Department = rdr["Department"].ToString();
- employee.City = rdr["City"].ToString();
- lstemployee.Add(employee);
- }
- con.Close();
- }
- return lstemployee;
- }
- //To Add new employee record
- public void AddEmployee(Employee employee)
- {
- using (SqlConnection con = new SqlConnection(connectionString))
- {
- SqlCommand cmd = new SqlCommand("spAddEmployee", con);
- cmd.CommandType = CommandType.StoredProcedure;
- cmd.Parameters.AddWithValue("@Name", employee.Name);
- cmd.Parameters.AddWithValue("@Gender", employee.Gender);
- cmd.Parameters.AddWithValue("@Department", employee.Department);
- cmd.Parameters.AddWithValue("@City", employee.City);
- con.Open();
- cmd.ExecuteNonQuery();
- con.Close();
- }
- }
- //To Update the records of a particluar employee
- public void UpdateEmployee(Employee employee)
- {
- using (SqlConnection con = new SqlConnection(connectionString))
- {
- SqlCommand cmd = new SqlCommand("spUpdateEmployee", con);
- cmd.CommandType = CommandType.StoredProcedure;
- cmd.Parameters.AddWithValue("@EmpId", employee.ID);
- cmd.Parameters.AddWithValue("@Name", employee.Name);
- cmd.Parameters.AddWithValue("@Gender", employee.Gender);
- cmd.Parameters.AddWithValue("@Department", employee.Department);
- cmd.Parameters.AddWithValue("@City", employee.City);
- con.Open();
- cmd.ExecuteNonQuery();
- con.Close();
- }
- }
- //Get the details of a particular employee
- public Employee GetEmployeeData(int? id)
- {
- Employee employee = new Employee();
- using (SqlConnection con = new SqlConnection(connectionString))
- {
- string sqlQuery = "SELECT * FROM tblEmployee WHERE EmployeeID= " + id;
- SqlCommand cmd = new SqlCommand(sqlQuery, con);
- con.Open();
- SqlDataReader rdr = cmd.ExecuteReader();
- while (rdr.Read())
- {
- employee.ID = Convert.ToInt32(rdr["EmployeeID"]);
- employee.Name = rdr["Name"].ToString();
- employee.Gender = rdr["Gender"].ToString();
- employee.Department = rdr["Department"].ToString();
- employee.City = rdr["City"].ToString();
- }
- }
- return employee;
- }
- //To Delete the record on a particular employee
- public void DeleteEmployee(int? id)
- {
- using (SqlConnection con = new SqlConnection(connectionString))
- {
- SqlCommand cmd = new SqlCommand("spDeleteEmployee", con);
- cmd.CommandType = CommandType.StoredProcedure;
- cmd.Parameters.AddWithValue("@EmpId", id);
- con.Open();
- cmd.ExecuteNonQuery();
- con.Close();
- }
- }
- }
- }
Now, we will proceed to create our Views.
Adding Views to the Application
To add views for our controller class, we need to create a folder inside Views folder with the same name as our controller and then add our views to that folder.
Right-click on the Views folder, and then Add >> New Folder and name the folder as Employee.


An “Add New Item” dialog box will open. Select Web from the left panel, then select “MVC View Page” from templates panel, and put the name as Index.cshtml. Press OK.

Thus we have created our first view. Similarly add 4 more views in Views/Employee folder, Create.cshtml, Delete.cshtml, Details.cshtml, and Edit.cshtml.
Now, our Views folder will look like this

Create View
This view will be used to Add new employee data to the database.
Open Create.cshtml and put following code into it.
- @model MVCDemoApp.Models.Employee
- @{
- ViewData["Title"] = "Create";
- }
- <h2>Create</h2>
- <h4>Employees</h4>
- <hr />
- <div class="row">
- <div class="col-md-4">
- <form asp-action="Create">
- <div asp-validation-summary="ModelOnly" class="text-danger"></div>
- <div class="form-group">
- <label asp-for="Name" class="control-label"></label>
- <input asp-for="Name" class="form-control" />
- <span asp-validation-for="Name" class="text-danger"></span>
- </div>
- <div class="form-group">
- <label asp-for="Gender" class="control-label"></label>
- <select asp-for="Gender" class="form-control">
- <option value="">-- Select Gender --</option>
- <option value="Male">Male</option>
- <option value="Female">Female</option>
- </select>
- <span asp-validation-for="Gender" class="text-danger"></span>
- </div>
- <div class="form-group">
- <label asp-for="Department" class="control-label"></label>
- <input asp-for="Department" class="form-control" />
- <span asp-validation-for="Department" class="text-danger"></span>
- </div>
- <div class="form-group">
- <label asp-for="City" class="control-label"></label>
- <input asp-for="City" class="form-control" />
- <span asp-validation-for="City" class="text-danger"></span>
- </div>
- <div class="form-group">
- <input type="submit" value="Create" class="btn btn-default" />
- </div>
- </form>
- </div>
- </div>
- <div>
- <a asp-action="Index">Back to List</a>
- </div>
- @section Scripts {
- @{await Html.RenderPartialAsync("_ValidationScriptsPartial");}
- }
- public class EmployeeController : Controller
- {
- EmployeeDataAccessLayer objemployee = new EmployeeDataAccessLayer();
- // GET: /<controller>/
- public IActionResult Index()
- {
- }
- }
- [HttpGet]
- public IActionResult Create()
- {
- return View();
- }
- [HttpPost]
- [ValidateAntiForgeryToken]
- public IActionResult Create([Bind] Employee employee)
- {
- if (ModelState.IsValid)
- {
- objemployee.AddEmployee(employee);
- return RedirectToAction("Index");
- }
- return View(employee);
- }
The [Bind] attribute is used with parameter “employee” to protect against over-posting.To know more about over-posting visit here
Index View
This view will be displaying all the employee records present in the database. Additionally, we will also be providing action methods Edit, Details and Delete on each record.
Open Index.cshtml and put following code in it
- @model IEnumerable<MVCDemoApp.Models.Employee>
- @{
- ViewData["Title"] = "Index";
- }
- <h2>Index</h2>
- <p>
- <a asp-action="Create">Create New</a>
- </p>
- <table class="table">
- <thead>
- <tr>
- <th>
- @Html.DisplayNameFor(model => model.Name)
- </th>
- <th>
- @Html.DisplayNameFor(model => model.Gender)
- </th>
- <th>
- @Html.DisplayNameFor(model => model.Department)
- </th>
- <th>
- @Html.DisplayNameFor(model => model.City)
- </th>
- <th></th>
- </tr>
- </thead>
- <tbody>
- @foreach (var item in Model)
- {
- <tr>
- <td>
- @Html.DisplayFor(modelItem => item.Name)
- </td>
- <td>
- @Html.DisplayFor(modelItem => item.Gender)
- </td>
- <td>
- @Html.DisplayFor(modelItem => item.Department)
- </td>
- <td>
- @Html.DisplayFor(modelItem => item.City)
- </td>
- <td>
- <a asp-action="Edit" asp-route-id="@item.ID">Edit</a> |
- <a asp-action="Details" asp-route-id="@item.ID">Details</a> |
- <a asp-action="Delete" asp-route-id="@item.ID">Delete</a>
- </td>
- </tr>
- }
- </tbody>
- </table>
To handle the business logic of Index view, open EmployeeController.cs and add following code in Index method.
- public IActionResult Index()
- {
- List<Employee> lstEmployee = new List<Employee>();
- lstEmployee = objemployee.GetAllEmployees().ToList();
- return View(lstEmployee);
- }
Edit View
This view will enable us to edit an existing employee data.
Open Edit.cshtml and put following code into it.
- @model MVCDemoApp.Models.Employee
- @{
- ViewData["Title"] = "Edit";
- }
- <h2>Edit</h2>
- <h4>Employees</h4>
- <hr />
- <div class="row">
- <div class="col-md-4">
- <form asp-action="Edit">
- <div asp-validation-summary="ModelOnly" class="text-danger"></div>
- <input type="hidden" asp-for="ID" />
- <div class="form-group">
- <label asp-for="Name" class="control-label"></label>
- <input asp-for="Name" class="form-control" />
- <span asp-validation-for="Name" class="text-danger"></span>
- </div>
- <div class="form-group">
- <label asp-for="Gender" class="control-label"></label>
- <select asp-for="Gender" class="form-control">
- <option value="">-- Select Gender --</option>
- <option value="Male">Male</option>
- <option value="Female">Female</option>
- </select>
- <span asp-validation-for="Gender" class="text-danger"></span>
- </div>
- <div class="form-group">
- <label asp-for="Department" class="control-label"></label>
- <input asp-for="Department" class="form-control" />
- <span asp-validation-for="Department" class="text-danger"></span>
- </div>
- <div class="form-group">
- <label asp-for="City" class="control-label"></label>
- <input asp-for="City" class="form-control" />
- <span asp-validation-for="City" class="text-danger"></span>
- </div>
- <div class="form-group">
- <input type="submit" value="Save" class="btn btn-default" />
- </div>
- </form>
- </div>
- </div>
- <div>
- <a asp-action="Index">Back to List</a>
- </div>
- @section Scripts {
- @{await Html.RenderPartialAsync("_ValidationScriptsPartial");}
- }
To handle the business logic of Edit view, open EmployeeController.cs and add following code to it.
- [HttpGet]
- public IActionResult Edit(int? id)
- {
- if (id == null)
- {
- return NotFound();
- }
- Employee employee = objemployee.GetEmployeeData(id);
- if (employee == null)
- {
- return NotFound();
- }
- return View(employee);
- }
- [HttpPost]
- [ValidateAntiForgeryToken]
- public IActionResult Edit(int id, [Bind]Employee employee)
- {
- if (id != employee.ID)
- {
- return NotFound();
- }
- if (ModelState.IsValid)
- {
- objemployee.UpdateEmployee(employee);
- return RedirectToAction("Index");
- }
- return View(employee);
- }
As you can observe that we have two Edit action methods, one for HttpGet and another for HttpPost.The HttpGet Edit action method will fetch the employee data and populates the fields of edit view. Once the user clicks on Save button after editing the record, a Post request will be generated which is handled by HttpPost Edit action method.
This view will display the details of a particular employee.
Open Details.cshtml and put following code into it.- @model MVCDemoApp.Models.Employee
- @{
- ViewData["Title"] = "Details";
- }
- <h2>Details</h2>
- <div>
- <h4>Employees</h4>
- <hr />
- <dl class="dl-horizontal">
- <dt>
- @Html.DisplayNameFor(model => model.Name)
- </dt>
- <dd>
- @Html.DisplayFor(model => model.Name)
- </dd>
- <dt>
- @Html.DisplayNameFor(model => model.Gender)
- </dt>
- <dd>
- @Html.DisplayFor(model => model.Gender)
- </dd>
- <dt>
- @Html.DisplayNameFor(model => model.Department)
- </dt>
- <dd>
- @Html.DisplayFor(model => model.Department)
- </dd>
- <dt>
- @Html.DisplayNameFor(model => model.City)
- </dt>
- <dd>
- @Html.DisplayFor(model => model.City)
- </dd>
- </dl>
- </div>
- <div>
- <a asp-action="Edit" asp-route-id="@Model.ID">Edit</a> |
- <a asp-action="Index">Back to List</a>
- </div>
To handle the business logic of Details view,open EmployeeController.cs and add following code to it.
- [HttpGet]
- public IActionResult Details(int? id)
- {
- if (id == null)
- {
- return NotFound();
- }
- Employee employee = objemployee.GetEmployeeData(id);
- if (employee == null)
- {
- return NotFound();
- }
- return View(employee);
- }
Delete View
This view will help us to remove employee data .
Open Delete.cshtml and put following code into it.
- @model MVCDemoApp.Models.Employee
- @{
- ViewData["Title"] = "Delete";
- }
- <h2>Delete</h2>
- <h3>Are you sure you want to delete this?</h3>
- <div>
- <h4>Employees</h4>
- <hr />
- <dl class="dl-horizontal">
- <dt>
- @Html.DisplayNameFor(model => model.Name)
- </dt>
- <dd>
- @Html.DisplayFor(model => model.Name)
- </dd>
- <dt>
- @Html.DisplayNameFor(model => model.Gender)
- </dt>
- <dd>
- @Html.DisplayFor(model => model.Gender)
- </dd>
- <dt>
- @Html.DisplayNameFor(model => model.Department)
- </dt>
- <dd>
- @Html.DisplayFor(model => model.Department)
- </dd>
- <dt>
- @Html.DisplayNameFor(model => model.City)
- </dt>
- <dd>
- @Html.DisplayFor(model => model.City)
- </dd>
- </dl>
- <form asp-action="Delete">
- <input type="hidden" asp-for="ID" />
- <input type="submit" value="Delete" class="btn btn-default" /> |
- <a asp-action="Index">Back to List</a>
- </form>
- </div>
To handle the business logic of Delete view, open EmployeeController.cs and add following code to it.
- [HttpGet]
- public IActionResult Delete(int? id)
- {
- if (id == null)
- {
- return NotFound();
- }
- Employee employee = objemployee.GetEmployeeData(id);
- if (employee == null)
- {
- return NotFound();
- }
- return View(employee);
- }
- [HttpPost, ActionName("Delete")]
- [ValidateAntiForgeryToken]
- public IActionResult DeleteConfirmed(int? id)
- {
- objemployee.DeleteEmployee(id);
- return RedirectToAction("Index");
- }
To complete Delete operation we need two Delete methods accepting same parameter (Employee Id). But two methods with same name and method signature will create a compile time error and if we rename the Delete method then routing won't be able to find it as asp.net maps URL segments to action methods by name. So, to resolve this issue we put ActionName("Delete") attribute to the DeleteConfirmed method. That attribute performs mapping for the routing system so that a URL that includes /Delete/ for a POST request will find the DeleteConfirmed method.
When we click on Delete link on the Index page, it will send a Get request and return a View of the employee using HttpGet Delete method. When we click on Delete button on this view, it will send a Post request to delete the record which is handled by the HttpPost DeleteConfirmed method. Performing a delete operation in response to a Get request (or for that matter, performing an edit operation, create operation, or any other operation that changes data) opens up a security hole. Hence, we have two separate methods.
Make sure that your route url is set like this
- app.UseMvc(routes =>
- {
- routes.MapRoute(
- name: "default",
- template: "{controller=Home}/{action=Index}/{id?}");
- });
This url pattern sets HomeController as default controller and Index method as default action method, whereas Id parameter is optional. Default and optional route parameters need not be present in the URL path for a match. If we do not append any controller name in the URL then it will take HomeController as default controller and Index method of HomeController as default action method. Similarly, if we append only Controller name in the URL, it will navigate to Index action method of that controller.
Now press F5 to launch the application and navigate to Employee controller by appending /Employee in the URL.
You can see the page as shown below.

Click on CreateNew to navigate to Create view. Add a new Employee record as shown in the image below.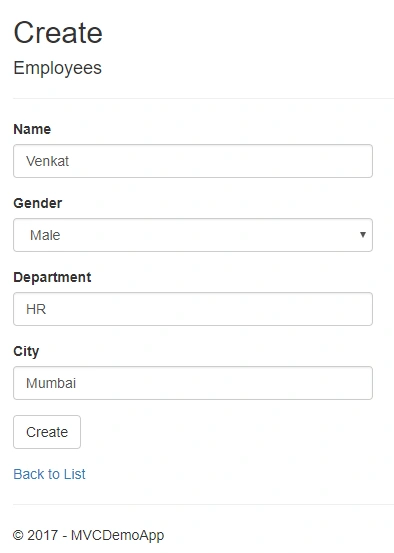

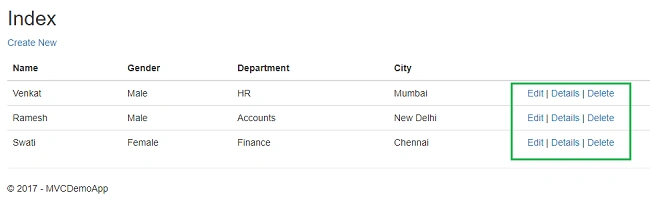

Here we have changed the Department of employee Swati from Finance to HR.Click on "Save" to return to the Index view to see the updated changes as highlighted in the image below.

If we miss any fields while editing employee records, then Edit view will also throw required field validation error message


Conclusion
We have learned about creating a sample MVC web application with ASP.Net Core 2.0 using ADO.NET and SQL server. Please refer to the attached code for better understanding.
Yusuf DokunluPosted Jun 20, 2019, 8:46 AM
Hi thanks,it is very good and simple for beginners.
Jason ChooPosted Feb 15, 2019, 1:21 AM
Hi, thanks for sharing. may i know how to add the search, sorting ,filtering and paging in the app?
Danu NihPosted Dec 5, 2018, 4:33 AM
Hi, thanks for great article. Iam new in .net, how i fill connection string?
Suraj KumarPosted Oct 28, 2018, 6:23 AM
Good article for .Net Core
Edwin Goh HaoyuPosted Jun 22, 2018, 3:43 AM
Hello can this be done for a web api as well? without using entityframeworkcore?
Karim KhanPosted May 29, 2018, 12:21 AM
Thanks a lot Sharma Sahib , I am new with this technology can you please guide me that how upload file also in database within this project , Thanks
Pritesh BondePosted Feb 11, 2018, 7:28 AM
Hi Ankit,It is a great article Explaining Aspnet core. I have one query Can we have the Connection string in Configuration file as we used do it in MVC?
Eduardo SánchezPosted Jan 17, 2018, 11:21 AM
Hi, very usefull article. Could you provide some info about using output parameters and or the return value? Thanks in advance.
Ankit SharmaPosted Jan 3, 2018, 2:39 AM
You can also create this application using Angular 5 as front-end. To know how, refer to my article http://ankitsharmablogs.com/crud-operations-asp-net-core-using-angular-5-ado-net/
Josh YatesPosted Oct 31, 2017, 1:43 PM
Very good Ankit. Thanks for sharing the article.
Vinay Kumar GuptaPosted Oct 6, 2017, 1:04 PM
Good Man nice article appreciable thanks for shared.