

In this article, we will learn how to perform CRUD (Create Read Update Delete) operations SQLite using Kotlin, the official first-class programming language for Android development. It is very easy and similar to implement like Java. We will learn SQLite implementation by building a simple TODO application.
SQLite
SQLite is an open-source database-based SQL Language. It is widely used and Android has it by default to store data locally.
Steps
I have split this article into four steps as follows.
- Step 1. Creating a new Android Project with Kotlin in Android Studio.
- Step 2. Adding User Interface in your layout file.
- Step 3 . Create a Database and tables using Kotlin.
- Step 4. Implementation of CRUD Operations in Android applications.
Step 1. Creating a new Android project with Kotlin in Android Studio
By default, Android Studio 3.0 has the checkbox for Kotlin Support for your Android Application. Create a new project in Android Studio, check the Kotlin support, and start as usual with Android Studio 3.0.
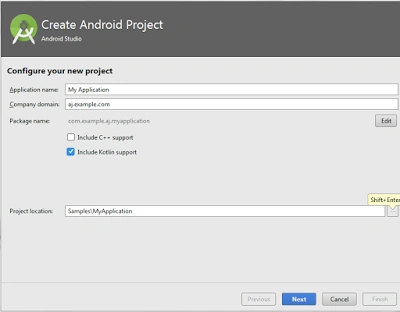
For migrating Java Android Project to Kotlin Android Project, you can do the following processes.
Configuring Kotlin
Kotlin support can be configured by selecting Tools - Kotlin - Configure Kotlin. Then, click “Sync Now”. This step is applicable to the Android Studio pre-versions of 3.0. The best way is you update your Android Studio.
In Android Studio 3.0, by default, you have Kotlin Activity. Those who have Android Studio with Version less than 3.0, can convert their Java activity into Kotlin Activity.
Open Quick Search or Click Ctrl + Shift + A for Windows Users and Search and Select “Convert Java to Kotlin” or simply Select Ctrl + Shift + Alt + K.
Step 2. Adding a user interface in your Layout file
In this step, we will add the user interfaces for the TODO application. The application has the following screens.
- Tasks List Screen
- List Item Layout for Custom Adapter
- Add Task Screen
- Update/Delete Screen
Tasks List screen
I have used RecyclerView to list the tasks saved in SQLite DB. To learn how to use RecyclerView implementation with Kotlin click here. Create a layout file named as per your wish and paste the following.
<?xml version="1.0" encoding="utf-8"?>
<android.support.constraint.ConstraintLayout xmlns:android="http://schemas.android.com/apk/res/android"
    xmlns:app="http://schemas.android.com/apk/res-auto"
    xmlns:tools="http://schemas.android.com/tools"
    android:layout_width="match_parent"
    android:layout_height="match_parent"
    app:layout_behavior="@string/appbar_scrolling_view_behavior"
    tools:context="com.androidmads.kotlinsqlite.MainActivity"
    tools:showIn="@layout/activity_main">
    <android.support.v7.widget.RecyclerView
        android:layout_width="match_parent"
        android:layout_height="match_parent"
        android:id="@+id/recycler_view"
        app:layout_constraintBottom_toBottomOf="parent"
        app:layout_constraintLeft_toLeftOf="parent"
        app:layout_constraintRight_toRightOf="parent"
        app:layout_constraintTop_toTopOf="parent"/>
</android.support.constraint.ConstraintLayout>
Then, create a list item for your RecyclerView. Create a layout file and add the following lines.
<?xml version="1.0" encoding="utf-8"?>
<LinearLayout xmlns:android="http://schemas.android.com/apk/res/android"
    xmlns:tools="http://schemas.android.com/tools"
    android:layout_width="match_parent"
    android:layout_height="wrap_content"
    android:background="@color/colorAccent"
    android:orientation="vertical">
    <LinearLayout xmlns:android="http://schemas.android.com/apk/res/android"
        android:layout_width="match_parent"
        android:layout_height="wrap_content"
        android:layout_marginLeft="5dp"
        android:background="@android:color/white"
        android:orientation="vertical">
        <TextView
            android:id="@+id/tvName"
            android:fontFamily="sans-serif-smallcaps"
            android:layout_width="match_parent"
            android:layout_height="wrap_content"
            android:paddingLeft="5dp"
            android:paddingRight="5dp"
            android:paddingTop="5dp"
            android:text="Name"
            android:textSize="16sp"
            android:textStyle="bold"
            tools:targetApi="jelly_bean" />
        <TextView
            android:id="@+id/tvDesc"
            android:fontFamily="sans-serif-smallcaps"
            android:layout_width="match_parent"
            android:layout_height="wrap_content"
            android:padding="5dp"
            android:text="Desc"
            tools:targetApi="jelly_bean" />
    </LinearLayout>
</LinearLayout>
Add or Update the screen
Here, we will design the screens for adding/updating the tasks in your TODO Application. Here, I have used the same screen for both Adding and Updating the tasks. Create a layout file and name it as you wish and add the following files.
<?xml version="1.0" encoding="utf-8"?>
<LinearLayout xmlns:android="http://schemas.android.com/apk/res/android"
    xmlns:tools="http://schemas.android.com/tools"
    android:layout_width="match_parent"
    android:layout_height="match_parent"
    android:orientation="vertical"
    android:padding="10dp">
    <android.support.design.widget.TextInputLayout
        android:layout_width="match_parent"
        android:layout_height="wrap_content"
        android:fontFamily="sans-serif-smallcaps"
        tools:targetApi="jelly_bean">
        <EditText
            android:id="@+id/input_name"
            android:layout_width="match_parent"
            android:layout_height="wrap_content"
            android:hint="Task Name"
            android:fontFamily="sans-serif-smallcaps"
            android:inputType="text"
            tools:ignore="TextFields"
            tools:targetApi="jelly_bean" />
    </android.support.design.widget.TextInputLayout>
    <android.support.design.widget.TextInputLayout
        android:layout_width="match_parent"
        android:layout_height="wrap_content"
        android:fontFamily="sans-serif-smallcaps"
        tools:targetApi="jelly_bean">
        <EditText
            android:id="@+id/input_desc"
            android:layout_width="match_parent"
            android:layout_height="wrap_content"
            android:hint="Task Description"
            android:fontFamily="sans-serif-smallcaps"
            android:inputType="text"
            tools:targetApi="jelly_bean"
            tools:ignore="TextFields" />
    </android.support.design.widget.TextInputLayout>
    <android.support.v7.widget.SwitchCompat
        android:id="@+id/swt_completed"
        android:layout_width="wrap_content"
        android:layout_height="wrap_content"
        android:text="Completed  "
        android:textSize="16sp"
        android:textColor="@android:color/darker_gray"
        android:fontFamily="sans-serif-smallcaps"
        tools:targetApi="jelly_bean" />
    <android.support.v7.widget.AppCompatButton
        android:id="@+id/btn_save"
        android:layout_width="fill_parent"
        android:layout_height="wrap_content"
        android:padding="12dp"
        android:text="Save"
        android:fontFamily="sans-serif-smallcaps"
        tools:targetApi="jelly_bean" />
    <android.support.v7.widget.AppCompatButton
        android:id="@+id/btn_delete"
        android:layout_width="fill_parent"
        android:layout_height="wrap_content"
        android:padding="12dp"
        android:text="Delete"
        android:fontFamily="sans-serif-smallcaps"
        tools:targetApi="jelly_bean" />
</LinearLayout>
In the next step, we will see how to create a Database and tables in SQLite.
Step 3. Creating a Database and tables using Kotlin
Create a Model class and name it as per your wish and in my case, I have created Tasks.kt class file. Add the following lines.
public class Tasks {
    var id: Int = 0
    var name: String = ""
    var desc: String = ""
    var completed: String = "N"
}
Database handler
Create a Kotlin class and name it as DatabaseHandler.kt and inherit with SQLiteOpenHelper. SQLiteOpenHelper is used to create and upgrade the database and tables of your application. The DB is created as in the following and add the following lines to DatabaseHandler.kt.
class DatabaseHandler(context: Context) : SQLiteOpenHelper(context, DatabaseHandler.DB_NAME, null, DatabaseHandler.DB_VERSION) {
    override fun onCreate(db: SQLiteDatabase) {
        val CREATE_TABLE = "CREATE TABLE $TABLE_NAME (" +
                "$ID INTEGER PRIMARY KEY," +
                "$NAME TEXT," +
                "$DESC TEXT," +
                "$COMPLETED TEXT);"
        db.execSQL(CREATE_TABLE)
    }
    override fun onUpgrade(db: SQLiteDatabase, oldVersion: Int, newVersion: Int) {
        val DROP_TABLE = "DROP TABLE IF EXISTS $TABLE_NAME"
        db.execSQL(DROP_TABLE)
        onCreate(db)
    }
    companion object {
        private const val DB_VERSION = 1
        private const val DB_NAME = "MyTasks"
        private const val TABLE_NAME = "Tasks"
        private const val ID = "Id"
        private const val NAME = "Name"
        private const val DESC = "Desc"
        private const val COMPLETED = "Completed"
    }
}
Here, I have created a table “Tasks” as shown in the code above and this will create and upgrade the Database of your application.
In the next step, we will see how to perform CRUD operations on Android using Kotlin.
Step 4. Implementation of CRUD operations in Android
We will see the implementation of CRUD one by one. Just open your DatabaseHandler.kt and the following.
- CREATE, UPDATE, DELETE: Should have written permission.
- READ: Should have readable permission and the cursor is used to read data from SQLite.
CREATE/INSERT Data
fun addTask(tasks: Tasks): Boolean {
    val db = this.writableDatabase
    val values = ContentValues()
    values.put(NAME, tasks.name)
    values.put(DESC, tasks.desc)
    values.put(COMPLETED, tasks.completed)
    val success = db.insert(TABLE_NAME, null, values)
    db.close()
    return (Integer.parseInt("$success") != -1)
}
Here, the DB returns the ID of the last inserted data as the output of inserting data.
READ ALL/ONE Data
A cursor is used to read the SQLite database in Android.
fun getTask(_id: Int): Tasks {
    val tasks = Tasks()
    val db = writableDatabase
    val selectQuery = "SELECT * FROM $TABLE_NAME WHERE $ID = $_id"
    val cursor = db.rawQuery(selectQuery, null)
    if (cursor != null) {
        if (cursor.moveToFirst()) {
            tasks.id = Integer.parseInt(cursor.getString(cursor.getColumnIndex(ID)))
            tasks.name = cursor.getString(cursor.getColumnIndex(NAME))
            tasks.desc = cursor.getString(cursor.getColumnIndex(DESC))
            tasks.completed = cursor.getString(cursor.getColumnIndex(COMPLETED))
        }
        cursor.close()
    }
    return tasks
}
Here, the DB returns the data respective to the ID.
val task: List<Tasks>
    get() {
        val taskList = ArrayList<Tasks>()
        val db = writableDatabase
        val selectQuery = "SELECT * FROM $TABLE_NAME"
        val cursor = db.rawQuery(selectQuery, null)
        if (cursor != null) {
            if (cursor.moveToFirst()) {
                do {
                    val tasks = Tasks()
                    tasks.id = Integer.parseInt(cursor.getString(cursor.getColumnIndex(ID)))
                    tasks.name = cursor.getString(cursor.getColumnIndex(NAME))
                    tasks.desc = cursor.getString(cursor.getColumnIndex(DESC))
                    tasks.completed = cursor.getString(cursor.getColumnIndex(COMPLETED))
                    taskList.add(tasks)
                } while (cursor.moveToNext())
            }
            cursor.close()
        }
        return taskList
    }
Here, the DB returns all the data. The cursor is used to retrieve the data from SQLite.
UPDATE Data
fun updateTask(tasks: Tasks): Boolean {
    val db = this.writableDatabase
    val values = ContentValues()
    values.put(NAME, tasks.name)
    values.put(DESC, tasks.desc)
    values.put(COMPLETED, tasks.completed)
    val success = db.update(TABLE_NAME, values, "$ID=?", arrayOf(tasks.id.toString())).toLong()
    db.close()
    return Integer.parseInt("$success") != -1
}
Here, the DB returns the ID of the last updated data as the output of the update method.
DELETE Data
fun deleteTask(_id: Int): Boolean {
    val db = this.writableDatabase
    val success = db.delete(TABLE_NAME, "$ID=?", arrayOf(_id.toString())).toLong()
    db.close()
    return Integer.parseInt("$success") != -1
}
Here, the DB returns the ID of the last deleted data as the output of the delete method.
Full Code of DatabaseHandler
class DatabaseHandler(context: Context) : SQLiteOpenHelper(context, DB_NAME, null, DB_VERSION) {

    override fun onCreate(db: SQLiteDatabase) {
        val CREATE_TABLE = "CREATE TABLE $TABLE_NAME (" +
                "$ID INTEGER PRIMARY KEY," +
                "$NAME TEXT," +
                "$DESC TEXT," +
                "$COMPLETED TEXT);"
        db.execSQL(CREATE_TABLE)
    }
    override fun onUpgrade(db: SQLiteDatabase, oldVersion: Int, newVersion: Int) {
        val DROP_TABLE = "DROP TABLE IF EXISTS $TABLE_NAME"
        db.execSQL(DROP_TABLE)
        onCreate(db)
    }
    fun addTask(tasks: Tasks): Boolean {
        val db = this.writableDatabase
        val values = ContentValues()
        values.put(NAME, tasks.name)
        values.put(DESC, tasks.desc)
        values.put(COMPLETED, tasks.completed)
        val success = db.insert(TABLE_NAME, null, values)
        db.close()
        return Integer.parseInt("$success") != -1
    }
    fun getTask(_id: Int): Tasks {
        val tasks = Tasks()
        val db = writableDatabase
        val selectQuery = "SELECT * FROM $TABLE_NAME WHERE $ID = $_id"
        val cursor = db.rawQuery(selectQuery, null)
        if (cursor != null) {
            if (cursor.moveToFirst()) {
                do {
                    tasks.id = Integer.parseInt(cursor.getString(cursor.getColumnIndex(ID)))
                    tasks.name = cursor.getString(cursor.getColumnIndex(NAME))
                    tasks.desc = cursor.getString(cursor.getColumnIndex(DESC))
                    tasks.completed = cursor.getString(cursor.getColumnIndex(COMPLETED))
                } while (cursor.moveToNext())
            }
            cursor.close()
        }
        return tasks
    }
    val task: List<Tasks>
        get() {
            val taskList = ArrayList<Tasks>()
            val db = writableDatabase
            val selectQuery = "SELECT * FROM $TABLE_NAME"
            val cursor = db.rawQuery(selectQuery, null)
            if (cursor != null) {
                if (cursor.moveToFirst()) {
                    do {
                        val tasks = Tasks()
                        tasks.id = Integer.parseInt(cursor.getString(cursor.getColumnIndex(ID)))
                        tasks.name = cursor.getString(cursor.getColumnIndex(NAME))
                        tasks.desc = cursor.getString(cursor.getColumnIndex(DESC))
                        tasks.completed = cursor.getString(cursor.getColumnIndex(COMPLETED))
                        taskList.add(tasks)
                    } while (cursor.moveToNext())
                }
                cursor.close()
            }
            return taskList
        }
    fun updateTask(tasks: Tasks): Boolean {
        val db = this.writableDatabase
        val values = ContentValues()
        values.put(NAME, tasks.name)
        values.put(DESC, tasks.desc)
        values.put(COMPLETED, tasks.completed)
        val success = db.update(TABLE_NAME, values, "$ID=?", arrayOf(tasks.id.toString())).toLong()
        db.close()
        return Integer.parseInt("$success") != -1
    }
    fun deleteTask(_id: Int): Boolean {
        val db = this.writableDatabase
        val success = db.delete(TABLE_NAME, "$ID=?", arrayOf(_id.toString())).toLong()
        db.close()
        return Integer.parseInt("$success") != -1
    }
    companion object {
        private const val DB_VERSION = 1
        private const val DB_NAME = "MyTasks"
        private const val TABLE_NAME = "Tasks"
        private const val ID = "Id"
        private const val NAME = "Name"
        private const val DESC = "Desc"
        private const val COMPLETED = "Completed"
    }
}
Executing the Operations
The DB and table are automatically created, when we are calling/initializing the DatabaseHandler class, like below.
DatabaseHandler dbHandler = DatabaseHandler(this)
Full Code
You can find the full code of the activities here.
Download code
You can download the example code from GitHub for SQLite using Kotlin. If this article is useful to you, do like & star the repo on GitHub. Keep on commenting, if you have any doubts.
Join the conversation! Your thoughts help the community grow.