

Introduction
A Web API is used to provide data connectivity between the database and the front-end application. On the UI side, I will use bootstrap to create a rich, interactive, device-independent user experience and for building a beautiful UI
I'm using Visual Studio Code as a tool to build my application. If you don't have Visual Studio Code in your system, then first, you have to download and install it. Here is the Visual Studio Code download link: Download Visual Studio Code Editor
Prerequisites
- Visual Studio
- SQL Server
- JS version > 10
- React
- React Axios
- Visual Studio Code
- Bootstrap
Step1. Create a database and table
Open SQL Server and create a new database and table. As you can see from the following query, I have created a database table called UserDetails.
UserDetails
- CREATE TABLE [dbo].[UserDetails](
- [UserId] [int] IDENTITY(1,1) NOT NULL,
- [FirstName] [varchar](50) NULL,
- [LastName] [varchar](50) NULL,
- [EmailId] [varchar](100) NULL,
- [MobileNo] [varchar](50) NULL,
- [Address] [varchar](500) NULL,
- [PinCode] [char](10) NULL,
- CONSTRAINT [PK_UserDetails] PRIMARY KEY CLUSTERED
- (
- [UserId] ASC
- )WITH (PAD_INDEX = OFF, STATISTICS_NORECOMPUTE = OFF, IGNORE_DUP_KEY = OFF, ALLOW_ROW_LOCKS = ON, ALLOW_PAGE_LOCKS = ON) ON [PRIMARY]
- ) ON [PRIMARY]
- GO
Note
You can choose the size of the columns according to your requirement.
You can choose the size of the columns according to your requirement.
Step 2. Create a Web API Project
Now, we will create a Web API with the functionality of binding records from a database. Go to Visual Studio >> File >> New >> Project, and select Web Application. after that, click OK and you will see the templates. Select the Web API template.
Now, we will create a Web API with the functionality of binding records from a database. Go to Visual Studio >> File >> New >> Project, and select Web Application. after that, click OK and you will see the templates. Select the Web API template.
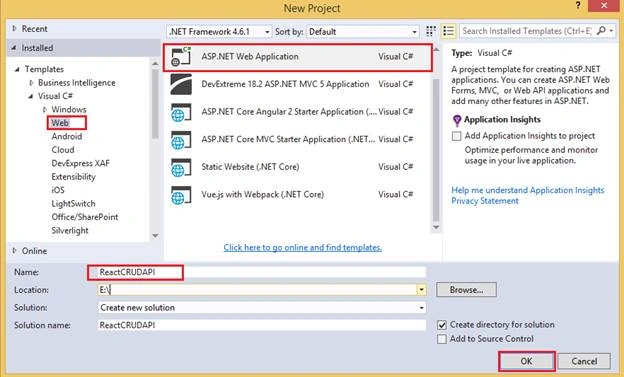
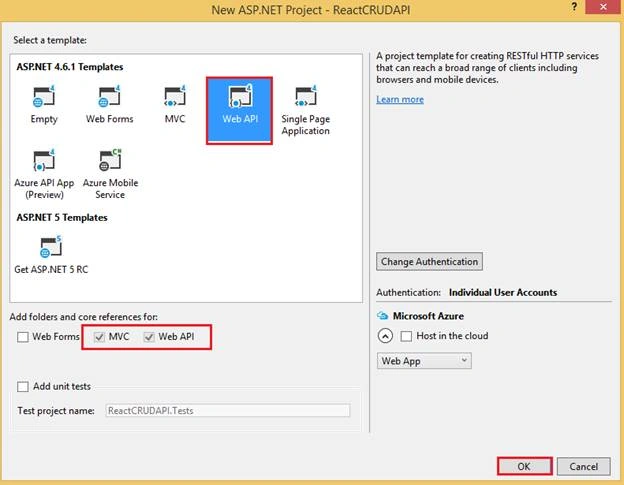
Click OK.
Step 3. Add ADO.NET Entity Data Model
Now, select the Models folder >> Right-click >> Add >> New Item >> select Data in left panel >> ADO.NET Entity Data Model,
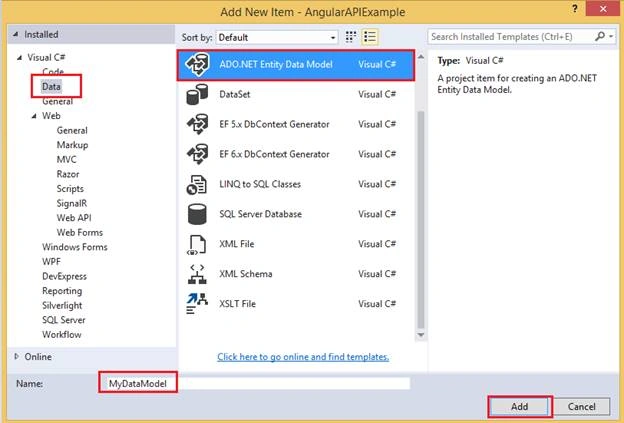
Click "Add".
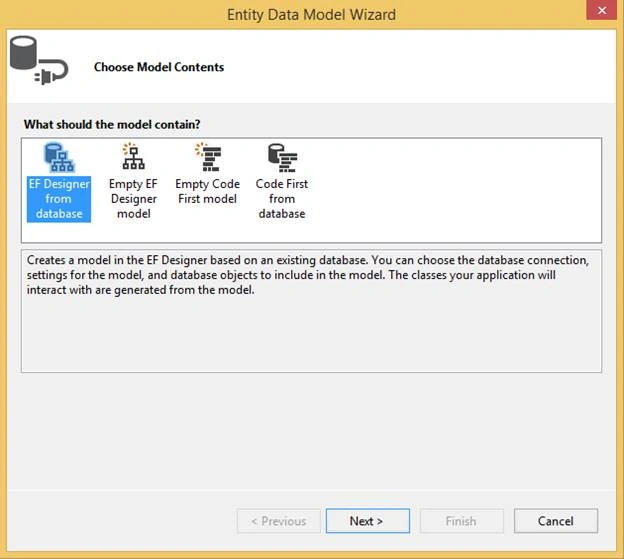
Click the "Next" button.
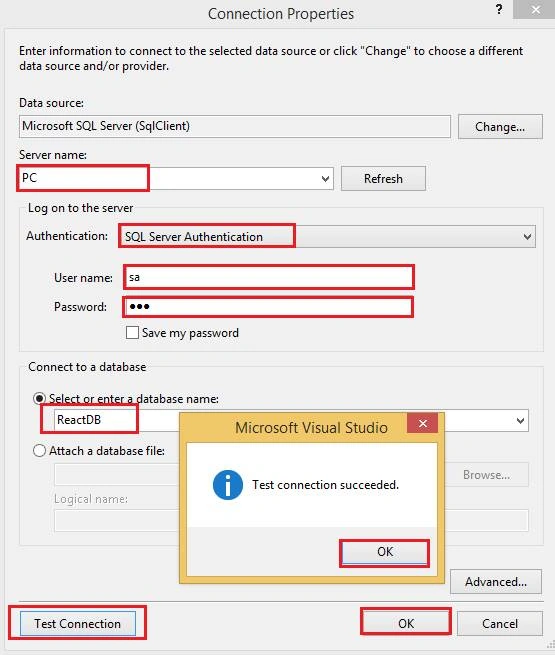
Give the server name of your SQL Server and its credentials then select the database and test connection. Click the OK button.
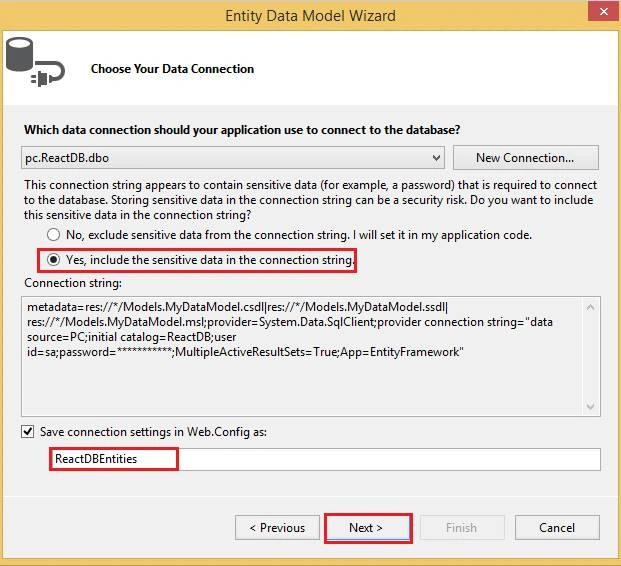
Click the "Next" button.
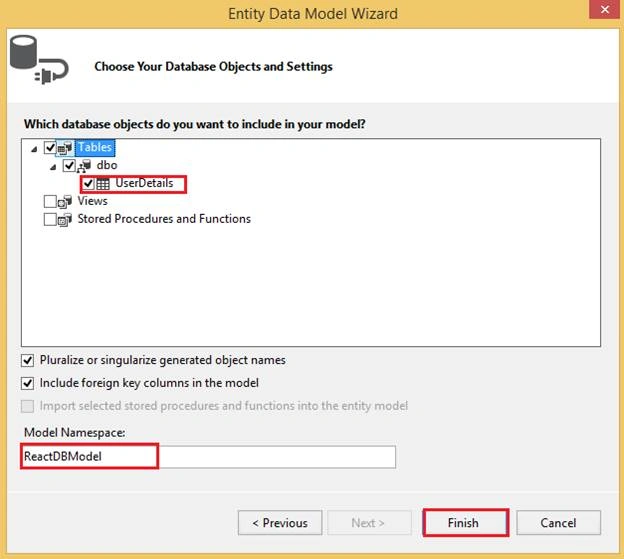
Select tables and click the "Finish" button.
Step 4. Add API controller logic
Go to the Controller folder in our API Application and right-click >> Add >> Controller >> Select Web API 2 Controller-Empty.
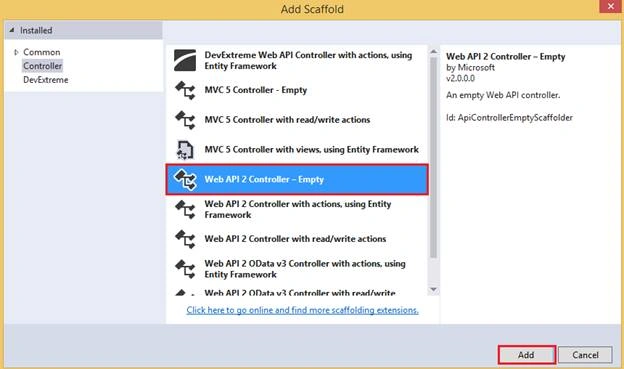
Click the "Add" button.
Now, we will write the logic for performing the CRUD operation. We will go to the Controller class and set the routing to make it more user-friendly by writing the below code.
- using System;
- using System.Linq;
- using System.Web.Http;
- using ReactCRUDApi.Models;
- namespace ReactCRUDApi.Controllers
- {
- [RoutePrefix("Api/User")]
- public class UserController : ApiController
- {
- ReactDBEntities objEntity = new ReactDBEntities();
- [HttpGet]
- [Route("GetUserDetails")]
- public IQueryable<UserDetail> GetEmaployee()
- {
- try
- {
- return objEntity.UserDetails;
- }
- catch (Exception)
- {
- throw;
- }
- }
- [HttpGet]
- [Route("GetUserDetailsById/{userId}")]
- public IHttpActionResult GetUserById(string userId)
- {
- UserDetail objUser = new UserDetail();
- int ID = Convert.ToInt32(userId);
- try
- {
- objUser = objEntity.UserDetails.Find(ID);
- if (objUser == null)
- {
- return NotFound();
- }
- }
- catch (Exception)
- {
- throw;
- }
- return Ok(objUser);
- }
- [HttpPost]
- [Route("InsertUserDetails")]
- public IHttpActionResult PostUser(UserDetail data)
- {
- string message = "";
- if (data != null)
- {
- try
- {
- objEntity.UserDetails.Add(data);
- int result= objEntity.SaveChanges();
- if(result > 0)
- {
- message = "User has been sussfully added";
- }
- else
- {
- message = "faild";
- }
- }
- catch (Exception)
- {
- throw;
- }
- }
- return Ok(message);
- }
- [HttpPut]
- [Route("UpdateEmployeeDetails")]
- public IHttpActionResult PutUserMaster(UserDetail user)
- {
- string message = "";
- if (!ModelState.IsValid)
- {
- return BadRequest(ModelState);
- }
- try
- {
- UserDetail objUser = new UserDetail();
- objUser = objEntity.UserDetails.Find(user.UserId);
- if (objUser != null)
- {
- objUser.FirstName = user.FirstName;
- objUser.LastName = user.LastName;
- objUser.EmailId = user.EmailId;
- objUser.MobileNo = user.MobileNo;
- objUser.Address = user.Address;
- objUser.PinCode = user.PinCode;
- }
- int result = objEntity.SaveChanges();
- if (result > 0)
- {
- message = "User has been sussfully updated";
- }
- else
- {
- message = "faild";
- }
- }
- catch (Exception)
- {
- throw;
- }
- return Ok(message);
- }
- [HttpDelete]
- [Route("DeleteUserDetails/{id}")]
- public IHttpActionResult DeleteUserDelete(int id)
- {
- string message = "";
- UserDetail user = objEntity.UserDetails.Find(id);
- if (user == null)
- {
- return NotFound();
- }
- objEntity.UserDetails.Remove(user);
- int result = objEntity.SaveChanges();
- if (result > 0)
- {
- message = "User has been sussfully deleted";
- }
- else
- {
- message = "faild";
- }
- return Ok(message);
- }
- }
- }
Now, our API has been completed and as you may see from the above code, it has the functionality to add, replace, update, and delete records to the table.
Step 5.Create and Install React js
Now, we will create a React project through the below command. But before that, just check if Node and NPM are installed or not. And also, we are using Visual Studio Code for writing the React code for UI application so first, make sure if it's installed or not. If you have not installed it, then go to this link for download.
Let's create a React project to open a new terminal. Run the following command to install and create a React project.
npx create-react-app crud-app
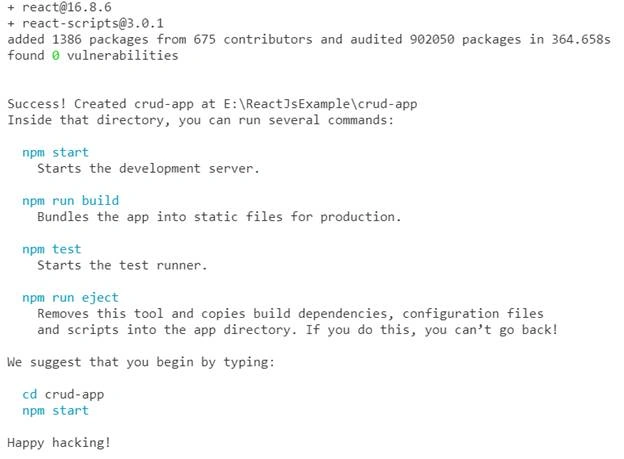
React project has been created.
Step 6. Set Visual Studio Code for React code
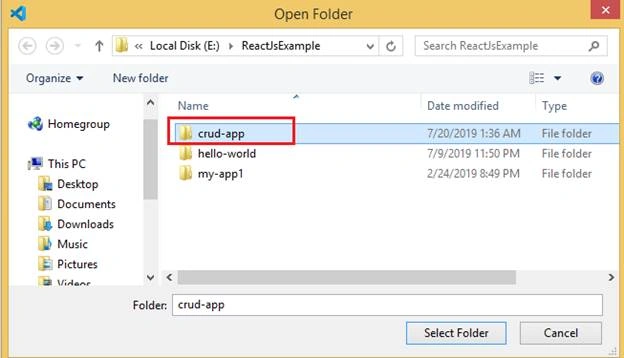
Open Visual Studio Code and go inside the folder and open the project inside the Visual Studio Code.
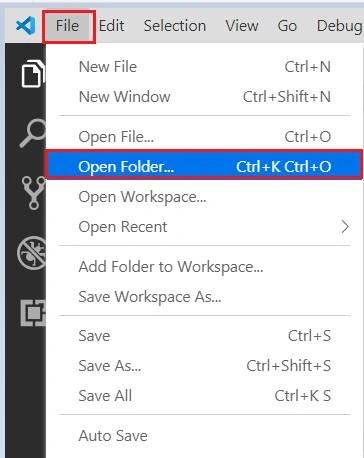
Select folder,
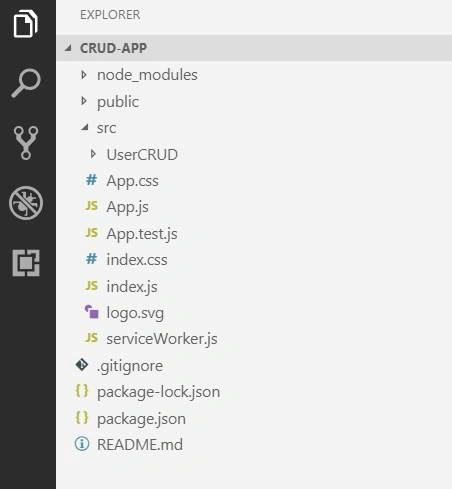
Step 7. Check react dependency
Go to the package.json file and check the React dependency.
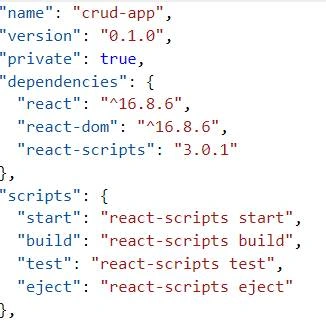
Step 8. Generate React Component
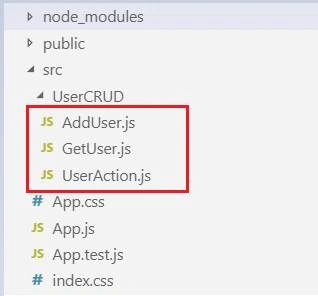
Go inside the src folder and create a new folder. Here, I created a UserCRUD folder and created 3 files.
AddUser.js
GetUser.js
UserActions.js
Step 9. Install bootstrap
Now, we will install bootstrap to build a beautiful UI of our react application.
npm install bootstrap --save
Or
npm install react-bootstrap bootstrap

Step 10. Install Axios library
Axios is a modern and promise-based JavaScript HTTP client library which works asynchronously and allows us to make HTTP calls and consume REST API.
Now, let's install Axios in our React project using the following command.
npm install --save axios

Step 11. Write code in js file to perform our operation
Now we will write our logic for performing the crud operation. First, we will write code to get user details.
Go inside the UserCRUD folder and open GetUser.js file and first import necessary library and then write the below code.
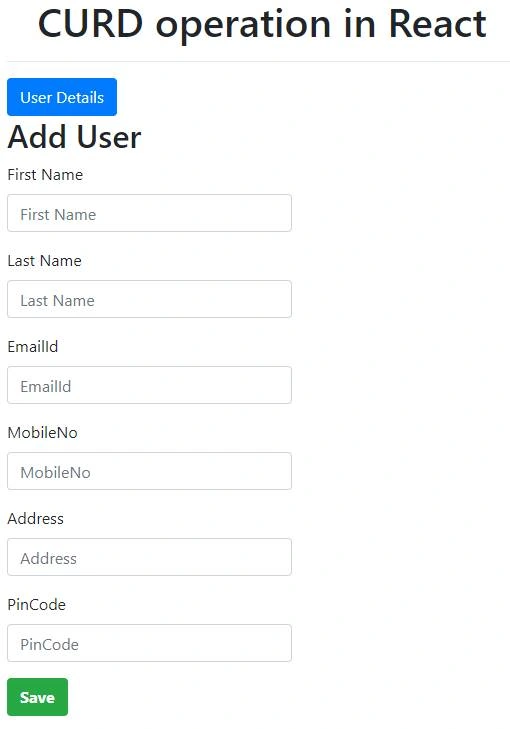

Unam XhegoPosted May 24, 2023, 12:39 AM
The application runs but quickly disappear and show Network error.
Ashvin RamphulPosted Nov 11, 2022, 2:11 PM
Access to XMLHttpRequest at 'http://localhost/webapis/api/users' from origin 'http://localhost:3000' has been blocked by CORS policy: Response to preflight request doesn't pass access control check: The 'Access-Control-Allow-Origin' header contains multiple values '*, *', but only one is allowed.
Jaybert ApuyaPosted May 10, 2021, 4:48 AM
I have an error says: "Error:Network Error"
Ela EPosted Dec 2, 2020, 12:09 AM
Hi Mithilesh, Could you please share few points how do we integrate it with Azure AD, thanks..
Ela EPosted Nov 18, 2020, 11:04 AM
Excellent article....Great... If possible, please include the steps to publish into the azure web app service as well ....
Krishna JyotulaPosted Oct 20, 2020, 9:29 PM
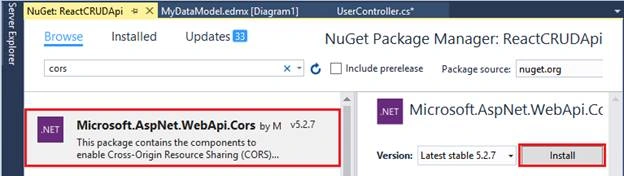
Hi i am visual studio for web api where to enable cors idont have web api file
Mario AlmeidaPosted Oct 6, 2020, 8:04 PM
Hello! i just followed every step... but when i run the npm start i just get a message that is saved in the app.js and i was wondering how to edit the app.js to make it show me the actual crud
Sandeep PradhanPosted Jul 7, 2020, 2:07 AM
In the solution I see that you have not used any models , you have just used a controller class. Are the model classes not required?
Sandeep PradhanPosted Jul 7, 2020, 1:37 AM
Has anyone tried it does it work?
Sandeep PradhanPosted Jul 7, 2020, 1:37 AM
In the end should nt the component be called in app.js instead of index.js
Sandeep PradhanPosted Jul 7, 2020, 12:27 AM
Shouldn't the api in the route prefix be api/user instead of API/user as in the web config the route is given api/controller name
shahul hameedPosted Jul 4, 2020, 6:25 AM
Thanks for your valuable explanation sir.
Raechel AishwariyaPosted Apr 27, 2020, 2:21 AM
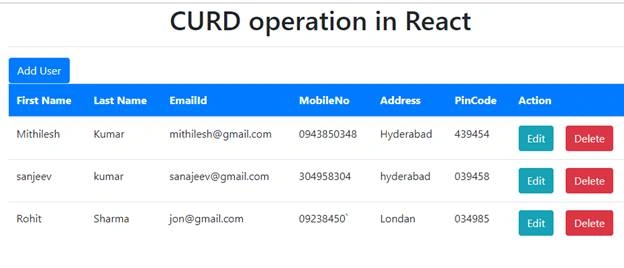
Hii I followed the steps which you have described but I am getting only table header. I am not able to get the table data in the frontend .I don't know what the issue is.can you help me to fix it
Ravi PatelPosted Mar 20, 2020, 10:11 AM
Nice explanation thanks for sharing.
abc abcPosted Jan 31, 2020, 4:30 AM
Bingo... Thank a bundle
Rani GuptaPosted Jan 30, 2020, 11:05 AM
Very nice explanation its help me alot thank you sir (Rani)
Tk MahantaPosted Aug 2, 2019, 12:57 AM
Very good Explanation and Programming
Amit MohantyPosted Aug 1, 2019, 7:38 AM
Nice article