

Introduction
In this step-by-step article we will discuss all about Create, Read, Update, Delete (CRUD) operations with the Web API using the Repository pattern and using the most popular ORM, FluentNHibernate. In this article we will not go into depth about how to consume WEB APIs.
I recommend reading following article to learn more if you want to use the Web API from a third-party as a client:
Why Web API
While preparing this whitepaper I asked myself the question "Why Web API?". In simple and shorter words there are numerous things why we are doing with the Web API and not with WebServices, WCF or REST WCF.
I categorized these as follows:
- Features
- Functionalities
- Resources
- Behavioral
Although we will not dig deely into the preceding, that is beyond our main topic, but I would like to recommend reading the following to understand these terms better:
- Difference between WCF and Web API and WCF REST and Web Service
- What is ReST?
- REST WCF vs. WebAPI (throughput performance)
Pre-requisites
To work with the source code and taste the flavor of ASP.NET WEB API, you should have:
- Basic knowledge of ASP.NET MVC
- Basic knowledge of ReST services
- Basic knowledge of FluentNHibernate
- Required Visual Studio 2012 or later with ASP.NET WEB API support
Step 1: Create ASP.NET WEB API Project
To start we are using the following simple ASP.Net project:
- Start Visual Studio and select "File" -> "New" -> "Project..." (or enter Ctrl + Shift + N).
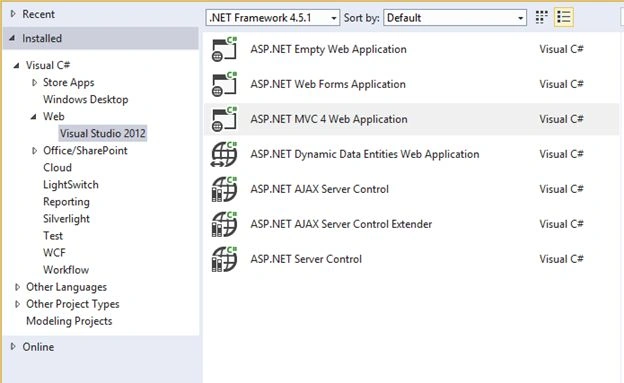
- From the available dialog choose Web Templates -> ASP.Net MVC 4 Web Application
- I named it "CRUDWithWebAPI", you can choose your favorite one.
- Select Empty Web API using Razor View Engine.
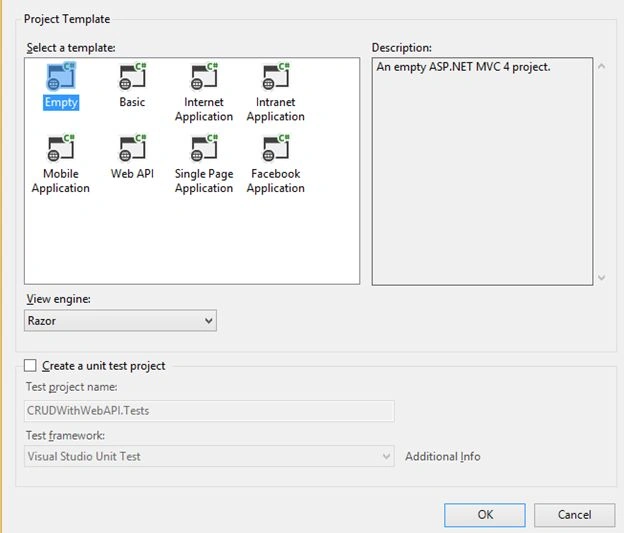
(P.S.: Alternatively you can Select Create a unit test project, we are not discussing this topic here.)
Step 2: Visiting Folder Structure
After the preceding step, we will see that our project template is ready and the following is the default folder structure provided by the template:
- App_Data
- App_Start: contain config classes required to initiate the app (eg. route collection and so on.)
- Controllers: controller of web API
- Models: Contain model/classes
- Scripts: all scripts and CSS
- Views
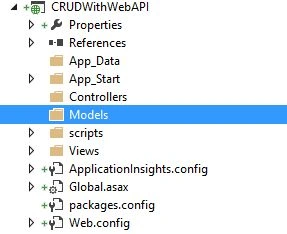
(P.S.: We are not going into more of an explanation of each and every folder shown above, since it is beyond the scope of this article.)
Step 3: Installing FluentNHibernate Support
To install FluentNHibernate support to the project:
- Open "Package Manager Console" using View-> Other Windows
- Now type "Install-Package FluentNHibenrate" and hit Enter
Wait until FluentNHibernate is installed.
Step 4: Working on Models, Mappings and Repository Pattern
In this step, we will create the Model and its mapping and will add a repository.
Adding Models and their Mappings
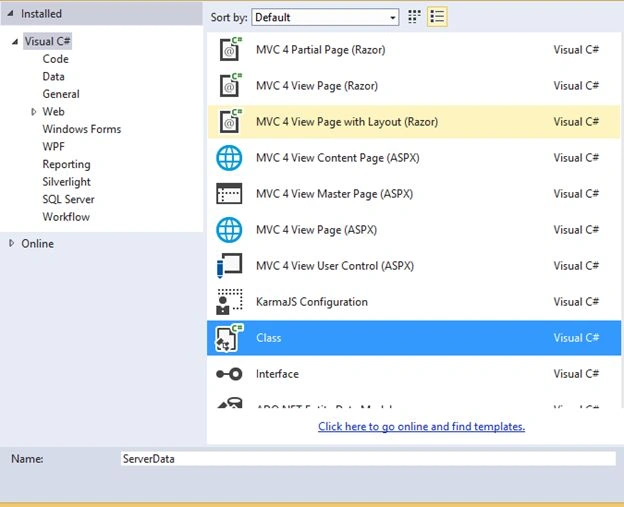
- To add the model, right-click on the Models folder from the Solution Explorer and choose the class name "ServerData".
- public class ServerData
- {
- public virtual int Id { get; set; }
- public virtual DateTime InitialDate { get; set; }
- public virtual DateTime EndDate { get; set; }
- public virtual int OrderNumber { get; set; }
- public virtual bool IsDirty { get; set; }
- public virtual string IP { get; set; }
- public virtual int Type { get; set; }
- public virtual int RecordIdentifier { get; set; }
- }
Adding Model Mappings
- To add its mapping class, right-click on the Models folder from the Solution Explorer and choose the class name "ServerDataMap".
- public class ServerDataMap : ClassMap<ServerData>
- {
- public ServerDataMap()
- {
- Table("ServerData");
- Id(x => x.Id, "Id").GeneratedBy.Identity().UnsavedValue(0);
- Map(x => x.InitialDate);
- Map(x => x.EndDate);
- Map(x => x.OrderNumber);
- Map(x => x.IsDirty);
- Map(x => x.IP).Length(11);
- Map(x => x.Type).Length(1);
- Map(x => x.RecordIdentifier);
- }
- }
- Do not forget to add the following namespace:
- using FluentNHibernate.Mapping;
Adding Fluent NHibernate support to the project
- Add a new folder and name it "Helper"
- Add a new class beneath the "Helper" folder and name it "NHibernateHelper"
In this class we need to configure NHibernate and build all sessionfactory, so our application will interact with the database:
- private static void CreateSessionFactory()
- {
- _sessionFactory = Fluently.Configure()
- .Database(MsSqlConfiguration.MsSql2008.ConnectionString(connectionString).ShowSql)
- .Mappings(m => m.FluentMappings.AddFromAssemblyOf<ServerData>())
- .ExposeConfiguration(cfg => new SchemaExport(cfg).Create(false, false))
- .BuildSessionFactory();
- }
We are not going to discuss all that stuff in details since they are beyond the scope of this article.
- Create a new folder beneath "Models" and name it "Persistance"
- Add one Interface "IServerDataRepository" under "Persistance"
- public interface IServerDataRepository
- {
- ServerData Get(int id);
- IEnumerable<ServerData> GetAll();
- ServerData Add(ServerData serverData);
- void Delete(int id);
- bool Update(ServerData serverData);
- }
- Add one class "ServerDataRepository" under "Persistance" and implement "IServerDataRepository"
- public class ServerDataRepository : IServerDataRepository
- {
- //method implementation goes here
- }
We arw now ready to start playing with our Repository.
P.S.: refer to the msdn for more details of the Repository Pattern.
Step 5: Add WEB API Controller
In this step, we will add an API controller and will add all the necessary resources.
- Right-click on the folder "Controllers" and add a new controller; name it "ServerDataController" (select an empty controller)
- It will look like:
- public class ServerDataController : ApiController
- {
- }
- Add the following line of code (it will initiate our repository).
static readonly IServerDataRepository serverDataRepository = new ServerDataRepository();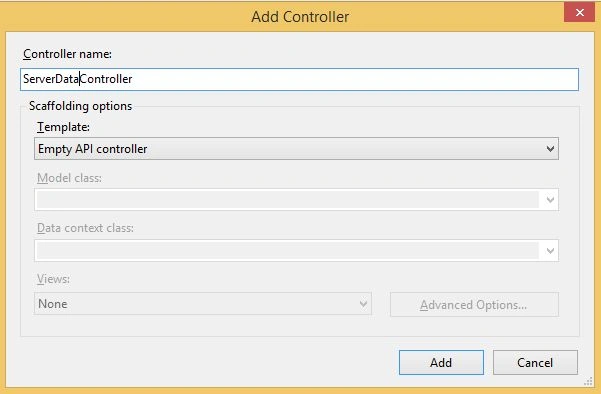
P.S.: Please note that in this article/demo we are not going to implement any DI pattern or Inversion of Control (IOC) framework.
We are all set to go now:
- public IEnumerable<ServerData> GetServerData()
- {
- return serverDataRepository.GetAll();
- }
In the preceding defined method, why we addd the "Get" suffix. It is a good practice to add "Get" with your method name, by convention it maps to a GET request.
This method has no parameter, so you can say this maps to a URI without an "id" parameter.
- Add the following method to get the ServerData by id. This is an optional parameter as defined in our route and the ASP.Net Web API framework automatically converts its type to int.
- It will throw a "HttpResponseException" expception if it is not valid (in the following method we converted the exception to a 404 NOT Found exception).
- public ServerData GetServerDataById(int id)
- {
- var serverData = serverDataRepository.Get(id);
- if (serverData == null)
- throw new HttpResponseException(HttpStatusCode.NotFound);
- return serverData;
- }
- The following method gets the ServerData by its type:
- public IEnumerable<ServerData> GetServerDataByType(int type)
- {
- return serverDataRepository.GetAll().Where(d => d.Type == type);
- }
- To invoke the preceding method we need to define new routes in "WebApiConfig.cs" as follows:
- config.Routes.MapHttpRoute
- (
- name: "ProductByType",
- routeTemplate: "api/{controller}/type/{type}"
- );
- Similarly for:
- public IEnumerable<ServerData> GetServerDataByIP(string ip)
- {
- return serverDataRepository.GetAll().Where(d => d.IP.ToLower() == ip.ToLower());
- }
- config.Routes.MapHttpRoute
- (
- name: "ProductByIP",
- routeTemplate: "api/{controller}/ip/{ip}"
- );
- Here we will delete serverdata using this method:
- public void DeletServerData(int id)
- {
- var serverData = serverDataRepository.Get(id);
- if (serverData == null)
- throw new HttpResponseException(HttpStatusCode.NotFound);
- serverDataRepository.Delete(id);
- }
- Let's add a new method to our controller to add a new record of ServerData:
- public ServerData PostServerData(ServerData serverData)
- {
- return serverDataRepository.Add(serverData);
- }
Will the preceding method work? Of course, it works but it's not an ideal or say it's not quite complete, why?
- In the preceding suffix is "Post" that sounds it sends Http POST request
- Also its noticeable parameter is of type "ServerData".
- Complex type parameters are deserialized from the requested body when we use the Web API. We can also say we expect serialized input from the client, like either in XML or JSON.
In the preceding method, we missed the following from the HTTP response:
- Response code: by default it is 200 (Ok) but as per HTTP1.1 protocol, the server should reply 201 (created), whereas POST request resuts in the creation of a resource.
- Location: the server should include the URI of the new resource in the location header of the response, whenever it creates a resource.
- So, we can implement this as defined in the following methods:
- public HttpResponseMessage PostServerData(ServerData serverData)
- {
- serverData = serverDataRepository.Add(serverData);
- var response = Request.CreateResponse<ServerData> (HttpStatusCode.Created, serverData);
- var uri = Url.Link("DefaultApi", new { id = serverData.Id });
- response.Headers.Location = new Uri(uri);
- return response;
- }
- Finally, we need to add an update method, it's straight forward:
- public void PutServerData(int id, ServerData serverData)
- {
- serverData.Id = id;
- if (!serverDataRepository.Update(serverData))
- throw new HttpResponseException(HttpStatusCode.NotFound);
- }
From the preceding, we can understand that the WEB API matches this method to a PUT request. The preceding has two parameter ids and serverdata. So, it is taken from the URI path and the serverdata is deserialized from the request body.
P.S.: By default the Web API framework takes simple parameter types from the route and complex types from the request body.
Step 6: Set default result output type
We need the result in JSON by default, let's add the following line either in the Global.asx.cs file or in the file where you are registering routes.
- //return JSON response by default
- config.Formatters.JsonFormatter.SupportedMediaTypes.Add(new MediaTypeHeaderValue("text/html"));
Step 7: Testing WEB API
Here I used the "Poster for Firefox" plugin to test the output. You can directly download this plugin from the Plugin directory of Firefox: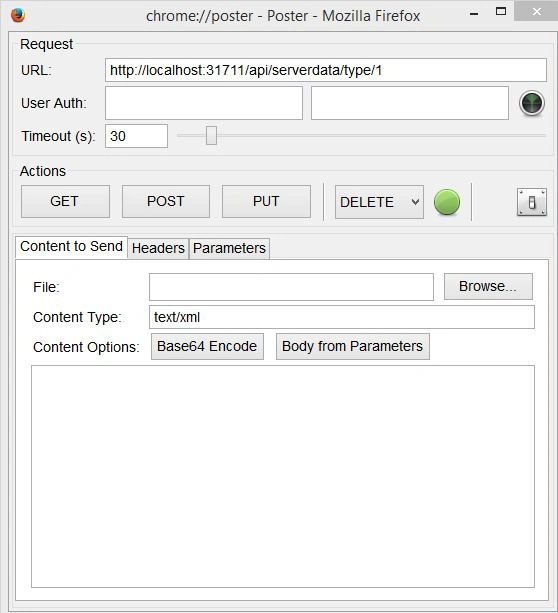
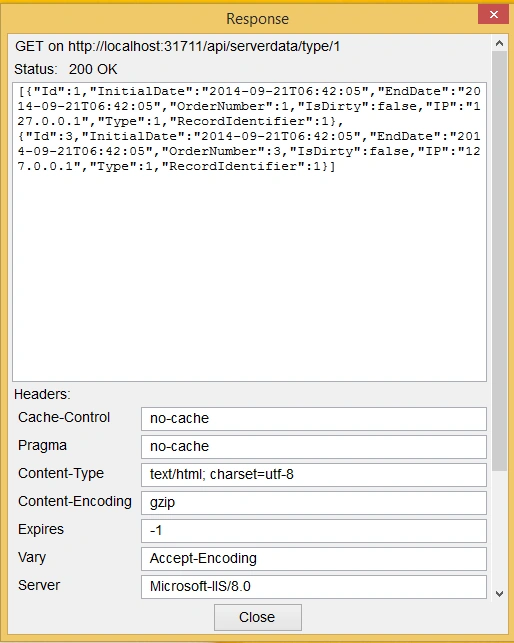
Just enter the URI and press GET or whatever you want to play, you will get the output accordingly.
Conclusion
I hope you enjoyed this article. I tried to make this as simple as I can. If you like this article, please rate it and share it to share the knowledge.
- Do try to extend this application with more complex data
- In future articles we will see how to consume the Web API using various REST clients such as RestSharp, ASP.Net and so on.
- You can download the complete code from GitHub.
You can find a demo here: Demo-webapi
Santhakumar MunuswamyPosted Apr 11, 2015, 1:26 PM
Thanks for nice article
Gaurav Kumar AroraPosted Mar 26, 2015, 8:51 AM
Ganesh Saraf - thanks a lot!
Ganesh SarafPosted Mar 24, 2015, 3:07 PM
nice.
Shuby AroraPosted Mar 19, 2015, 5:39 AM
Good contents. Great work
Gaurav Kumar AroraPosted Mar 18, 2015, 4:50 AM
Gowtham Rajamanickam - Thanks a ton! I liked the way you expressed your comments.
Md. Raskinur RashidPosted Mar 18, 2015, 4:28 AM
Really Helpful..
Gowtham RajamanickamPosted Mar 17, 2015, 5:15 AM
nice article..
Gowtham RajamanickamPosted Mar 17, 2015, 5:15 AM
nice article..
Gowtham RajamanickamPosted Mar 17, 2015, 5:14 AM
nice article..
Gaurav Kumar AroraPosted Mar 16, 2015, 3:38 AM
Thanks Tom Mohan
Tom MohanPosted Mar 15, 2015, 6:59 AM
good one
Rahul Kumar SaxenaPosted Mar 15, 2015, 6:42 AM
Good Show..
Gaurav Kumar AroraPosted Mar 14, 2015, 10:04 AM
Jitendra Kumar thanks for kind words
Jitendra KumarPosted Mar 14, 2015, 9:14 AM
Nice article..
Gaurav Kumar AroraPosted Mar 14, 2015, 3:47 AM
Gowtham Rajamanickam - thanks for nice words
Gowtham RajamanickamPosted Mar 14, 2015, 3:37 AM
informative...
Gaurav Kumar AroraPosted Mar 14, 2015, 2:22 AM
usha mor - thanks, glad to read, it is beneficial for you.
Gaurav Kumar AroraPosted Mar 14, 2015, 2:22 AM
ROHAN PANDEY - thanks
Usha MorPosted Mar 14, 2015, 1:12 AM
it is really vary helpful...
ROHAN PANDEYPosted Mar 14, 2015, 12:16 AM
Super article sir