

Introduction
This article provides an explanation about how you can use and set up a basic cursor in SQL Server. Many developers/programmers/people who work with Microsoft SQL Server will have at least heard talk about the cursors. Even if any developers/programmers/people know on a basic level what SQL Server cursors do, they are not always certain when to use cursors and how to write the code to use cursors.

So, in this article, I am going to show you how to use cursors, the lifecycle of the cursor, when to use a cursor, how to declare a cursor, the limitations of the cursor in SQL Server and also provide a basic example so you can understand this concept clearly.
Table of Contents
- What is a cursor in SQL Server?
- The use of the cursors.
- The lifecycle of the cursor.
- Example of cursor
Requirement of Example
- Create a Temporary table for students.
- Insert some dummy records into the created table for demonstrations.
- Generate/Update student enrollment number based on the branch, year, and student roll no using the cursor.
What is a cursor in SQL Server?
A Cursor is a SQL Server database object that is used to manipulate data in a result set on a row-by-row basis. It acts as a loop just like the looping mechanism found in any other programming language like C#, VB.Net, C, C++, Java and etc. We can use cursors when we want to do data manipulation operations like update, delete and etc on a SQL Server database table in a singleton fashion in other words row by row.
Use of the cursors
You know that in relational databases, operations are made on a set of rows called as a result sets. Let's take an example. In SQL Server database SELECT statement returns a set of rows called as a result set. Sometimes the application logic needs to work in singleton fashion in shorts row by row basis with one row at a time rather than the entire result set at once. This can be done using cursors in SQL Server.
In any programming language, we use a loop like FOREACH, FOR, WHILE, DO WHILE to iterate through one item at a time, the cursor follows the same approach, hence it might be preferred because it follows the same logic as the looping mechanism in the programming language.
Lifecycle of the cursor
Here we will split the life cycle of the cursor into the following 5 different sections.
Declare Cursor
Before using a cursor, you first must declare the cursor. So, in this section, we will declare variables and restore an arrangement of values.
Open
This is the second section of the life cycle and Once a cursor has been declared, you can open it and fetch from it
Fetch
This is the third section of the life cycle and this is used to recover the information push by push from a cursor. In short, you can fetch row by row and make multiple operations like insert, update, delete and etc on the currently active row in the cursor.
Close
This is the fourth section of the lifecycle. When you have finished working with a cursor, you should close the cursor. This leaves some portion of the cursor and used to close a cursor.
Deallocate
This is the fifth and final section of the life cycle and in this section, we erase the cursor definition and discharge all the resources related to the cursor.
Implementation of Example
So, let's start to implement an example of the cursor in SQL server, as per our requirement we will consider an example of a student database where we need to generate the enrollment no of the student based on his/her branch, year roll number of student.
Before starting with the cursor I will show you the syntax of the cursor in SQL server and how you can declare a cursor in SQL server.
Syntex of Cursor
- DECLARE @YourVariables nvarchar(50) -- Declare All Required Variables
- DECLARE MyCursor_Name CURSOR --- Declare The Name of Your Cursor
- [LOCAL | GLOBAL]--- Define Scope of Your Cursor
- [FORWARD_ONLY | SCROLL] --Define Movement Direction of Your Cursor
- [ KEYSET | DYNAMIC |STATIC | FAST_FORWARD]--Define The Basic Type of Your Cursor
- [ SCROLL_LOCKS | OPTIMISTIC |READ_ONLY ]--Define Locks for Your Cursor
- OPEN MyCursor_Name --Open Your Cursor
- FETCH NEXT FROM MyCursor_Name --Fetch data From Your Cursor
- -- Application Logic, Implement SQL QUery Insert, Update, Delete etc.
- CLOSE MyCursor_Name --Close Your Cursor
- DEALLOCATE MyCursor_Name
Now, we will start our example for demonstration. So, let's create a table for students and insert some dummy records in the student table as per our requirement.
Create Table
- DECLARE @Students AS TABLE
- (
- Id INT ,
- RollNo INT ,
- EnrollmentNo NVARCHAR(15) ,
- Name NVARCHAR(50) ,
- Branch NVARCHAR(50) ,
- University NVARCHAR(50)
- )
Insert Records on Tabel
- INSERT INTO @Students
- ( Id, RollNo, EnrollmentNo, Name, Branch, University )
- VALUES ( 1, 1, N'', N'Nikunj Satasiya', N'CE', N'RK University' ),
- ( 2, 2, N'', N'Hiren Dobariya', N'CE', N'RK University' ),
- ( 3, 3, N'', N'Sapna Patel', N'IT', N'RK University' ),
- ( 4, 4, N'', N'Vivek Ghadiya', N'CE', N'RK University' ),
- ( 5, 5, N'', N'Pritesh Dudhat', N'CE', N'RK University' ),
- ( 5, 5, N'', N'Hardik Goriya', N'EC', N'RK University' ),
- ( 6, 6, N'', N'Sneh Patel', N'ME', N'RK University' )
Create/ Declare Cursor
- DECLARE @Id INT ,
- @RollNo INT,
- @Branch NVARCHAR(50) ,
- @Year AS INT
- SET @Year = RIGHT(YEAR(GETDATE()), 2)
- DECLARE MY_data CURSOR
- FOR
- SELECT Id ,
- Branch,
- RollNo,
- @Year
- FROM @Students
- OPEN MY_data
- FETCH NEXT FROM MY_data INTO @Id, @Branch, @RollNo,@Year
- WHILE @@FETCH_STATUS = 0
- BEGIN
- DECLARE @EnrollmentNo NVARCHAR(15)
- SET @EnrollmentNo = 'SOE' + CAST(@Year AS VARCHAR(2)) + CAST(@Branch AS NVARCHAR(50)) + '000' + CAST(@RollNo AS NVARCHAR(10))
- UPDATE @Students SET EnrollmentNo = @EnrollmentNo WHERE Id = @Id
- FETCH NEXT FROM MY_data INTO @Id, @Branch, @RollNo,@Year
- END
- CLOSE MY_data
- DEALLOCATE MY_data
Fetch Records from Database
- SELECT * FROM @Students
Explanation
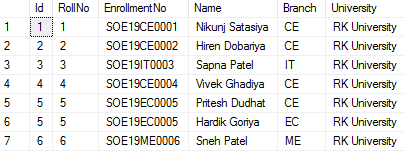
If you analyzed the above example then first I have created a temporary table with the name @Students and insert some dummy records in the table for performing data manipulation operations on data. Now if you retrieve the result set using a SELECT statement then you can see there is in the table the column with the name "EnrollmentNo" has a blank value.

Now, as per our requirement, I have declared a cursor to update/generate the enrollment no of students one by one. Here I generated "EnrollmentNo" using the last two digits of the current year, "Branch" of a student, and roll no of the student.
First, I declared the required variables @Id to retrieve the unique identity of record to perform the update operation, @RollNo, @Branch to get RollNo and Branch Name of Student to Generate "EnrollmentNo",
Now after variable declaration I simply declared a cursor with the name "MY_data" and fetch the data row by row from @Students table and create/ generate "EnrollmentNo" where "SOE" Indicates "School of Engineering", 19 Indicates Last Two Digits of Current Year and Last Digits of EnrollmentNo Indicates the RollNo of Student and finally update the column "EnrollmentNo" in table @Students with New Generated EnrollmentNo based on unique Identity column @Id for each and every student in the table.
After Update/Complete all the students "EnrollmentNo" finally I closed the created cursor and then deallocated it to release all the resources related to the cursor.
Summary
This article provides an explanation about cursors in SQL servers such as when and how you can use the cursor, how to perform data manipulation operations on data of tables such as Insert, update, delete and etc.
Reference Link - Codingvila - Cursor in SQL Server With Syntax and Example
Join the conversation! Your thoughts help the community grow.