

In this article, we learn how to create a Custom Toast.
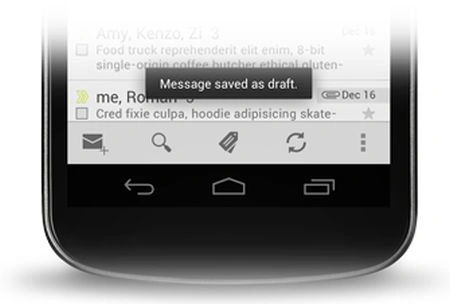
A Toast provides simple feedback in a small popup about an operation. It only fills the amount of space required for the message and the current activity remains visible and interactive.
 The need for Custom Toast
But what if you want to display your custom view in a Toast? Such as shown in the image above, only text is displayed, no other views are attached to it. It displayed at the bottom of the screen, but what if I want to display it in
the center or the top of the screen?
Each of the preceding questions has an answer. Let's have a look.
Tutorial: Custom Toast
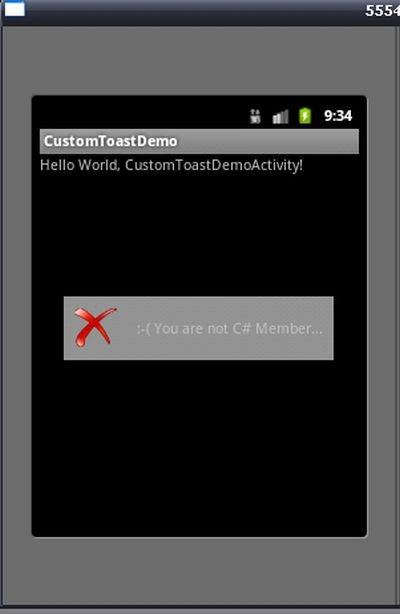
In this tutorial, we will learn how to create and how to use a custom toast in our application. We will create an application that displays a toast message such as "Success" and "Failure" messages.
Step 1
Create a new Android project called "CustomToastDemo" with the following properties:
Project Build Target: Android 2.2 or higher
The need for Custom Toast
But what if you want to display your custom view in a Toast? Such as shown in the image above, only text is displayed, no other views are attached to it. It displayed at the bottom of the screen, but what if I want to display it in
the center or the top of the screen?
Each of the preceding questions has an answer. Let's have a look.
Tutorial: Custom Toast
In this tutorial, we will learn how to create and how to use a custom toast in our application. We will create an application that displays a toast message such as "Success" and "Failure" messages.
Step 1
Create a new Android project called "CustomToastDemo" with the following properties:
Project Build Target: Android 2.2 or higher
Toast
Package Name: com.test
Activity Name: CustomToastDemoActivity
Step 2
Now, we need to create a custom toast layout file. So create one layout file and name it "custom_toast.xml" and paste the following code into it:
- <?xml version="1.0" encoding="utf-8"?>
- <LinearLayout xmlns:android="http://schemas.android.com/apk/res/android"
- android:orientation="horizontal"
- android:layout_width="match_parent"
- android:background="#DDAAAAAA"
- android:layout_height="match_parent"
- android:padding="10dp"
- android:gravity="center_vertical">
- <ImageView
- android:id="@+id/imgCustomToast" android:layout_width="wrap_content"
- android:layout_height="match_parent"
- android:src="@drawable/success"
- android:layout_marginRight="20dp" />
- <TextView
- android:id="@+id/txtCustomToast" android:layout_width="wrap_content"
- android:layout_height="match_parent"
- android:text="C# Corner"
- android:gravity="center_vertical" />
- </LinearLayout>
But this code will give you an error at "drawable/success". So what you need to do is to download 2 files shown here.
Failure Icon:  Success Icon:
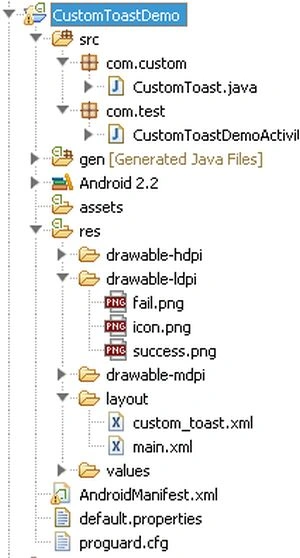
  Download them and put then in the "drawable" directory as shown in the following figure:
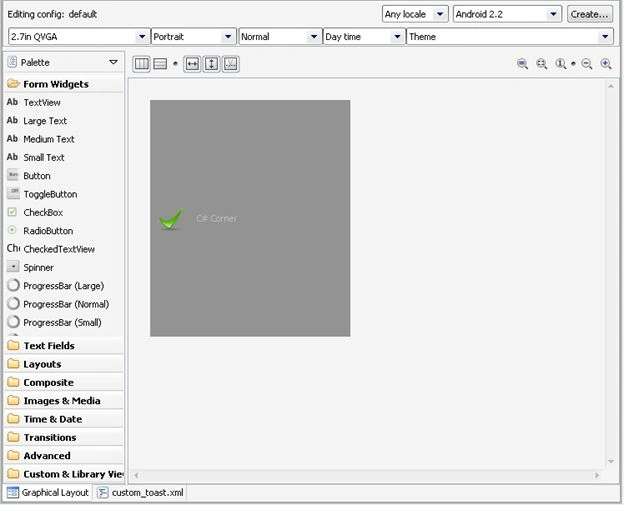
 If you see the graphical output of the current layout then it will look as in the following:
 Step 3
Create a package called "com.custom" in your "src" directory.
Create a Java file called "CustomToast" in the "com.custom" package.
After completing the process above, paste the following code into the "CustomToast.java" file:
Step 3
Create a package called "com.custom" in your "src" directory.
Create a Java file called "CustomToast" in the "com.custom" package.
After completing the process above, paste the following code into the "CustomToast.java" file:
- package com.custom;
- import android.app.Activity;
- import android.content.Context;
- import android.view.Gravity;
- import android.view.LayoutInflater;
- import android.view.View;
- import android.widget.ImageView;
- import android.widget.TextView;
- import android.widget.Toast;
- import com.test.R;
- /**
- * Custom Toast class extends Toast class to customize it
- *
- * @author R
- *
- */
- public class CustomToast extends Toast {
- public CustomToast(Context context) {
- super(context);
- }
- /**
- * Custom Toast Cuontructor
- *
- * @param context
- * : Required to pass to super constructor
- * @param activity
- * : Require to create custom layout inflater and to inflat
- * layout
- * @param message
- * : Message to be shown in Toast
- * @param flag
- * : <br>
- * True : Success Image<br>
- * False: Failure ImageF
- */
- public CustomToast(Context context, Activity activity, String message,
- boolean flag) {
- super(context);
- /**
- * Create a LayoutInflater to inflate layout, here activity is useful
- */
- LayoutInflater inflater = activity.getLayoutInflater();
- /**
- * Create a view of layout which is used to show as toast
- */
- View view = inflater.inflate(R.layout.custom_toast, null);
- /**
- * get id of image view which is defined in layout file
- */
- ImageView img = (ImageView) view.findViewById(R.id.imgCustomToast);
- /**
- * get id of text view which is defined in layout file
- */
- TextView txt = (TextView) view.findViewById(R.id.txtCustomToast);
- /**
- * Check whether flag is true or false and do operation
- */
- if (flag)
- img.setImageResource(R.drawable.success);
- else
- img.setImageResource(R.drawable.fail);
- /**
- * Set message to text view
- */
- txt.setText(message);
- /**
- * Set gravity of Toast, you can set as per your need. Currently set to
- * "CENTER" of the screen
- */
- setGravity(Gravity.CENTER, 0, 0);
- /**
- * Pass how long toast will shown to the screen
- */
- setDuration(Toast.LENGTH_LONG);
- /**
- * This is main code to set custom view to Toast
- */
- setView(view);
- }
- }
Step 4
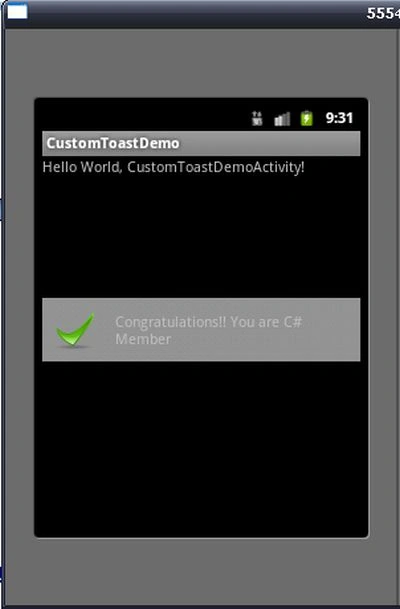
You have finished all the steps necessary to create a custom view. Now, it's time to implement that custom toast view for the real world.
You have your "CustomToastDemoActivity" file. Open it and paste the following code:
Step 5
- package com.test;
- import android.app.Activity;
- import android.os.Bundle;
- public class CustomToastDemoActivity extends Activity {
- /** Called when the activity is first created. */
- @Override
- public void onCreate(Bundle savedInstanceState) {
- super.onCreate(savedInstanceState);
- setContentView(R.layout.main);
- new com.custom.CustomToast(this, this,
- "Congratulations!! You are C# Member", true).show();
- new com.custom.CustomToast(this, this,
- ":-( You are not C# Member...", false).show();
- }
- }
Comments
Join the conversation! Your thoughts help the community grow.