

Overview
In this article you will learn the basic concept of simple data binding in Silverlight application. I have covered different types of binding modes available and how to use it declaratively and programmatically. We will also see how to use binding for collection, importance of INotifyPropertyChanged Interface method and ObservableCollection class. Finally our ultimate goal is to fetch the information form back end or from .NET object and show it in the user interface.
Please find some of my other article on Silverlight technology.
- Silverlight Introduction - http://www.c-sharpcorner.com/UploadFile/keesari_anjaiah/476/Default.aspx
- Getting started with Silverlight - http://www.c-sharpcorner.com/UploadFile/keesari_anjaiah/514/Default.aspx
Introduction to Data Binding
Data binding is the process of establishing connection between source and destination. In Silverlight application data binding, source is the CRL object and the destination is Silverlight controls (XAML Elements). Let me show you in visual.

Binding Modes
There are three types of data binding happens in Silverlight applications between source and destination.
- OneTime data binding
- OneWay data Binding
- TwoWay data binding
OneTime data binding: as per the name suggests data binding happens between source and target only once. In this binding source (CRL object) data will bind with target (XAML element) only when page executes first time, later on any changes made with source will not be reflected back to the destination. You will prefer to use this binding mode to reduce overhead if you know the source property won't change.
OneWay data binding: In this data binding source will informs about the changes immediately to the destination control. We will be using this binding only for frequently changed elements.
TwoWay data binding: this happens in bidirectional mode, whenever any changes in the backend or CRL object, it will inform to the XAML controls immediately, and vice versa.
Binding in Silverlight requires three things.
- A dependency property in FrameworkElement descendent that you are binding to. Here FrameworkElement in Silverlight is any control that is used to show the data like TextBox and dependency property is the Text property of the TextBox control.
- A standard property in .NET object.
- A binding object to handle the communications between these two.
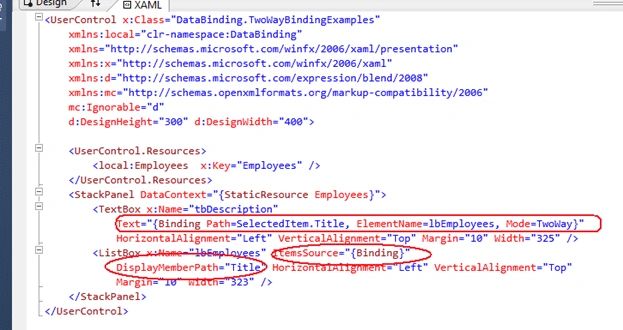
To implement the data binding in XAML code, you first need to implement a binding statement. Here is the syntax of the binding statement. Here I am using user control resources to hold the .NET object and assign that to the target control using DataContext property and in the Text property of the TextBox control you will see the Binding statement with {} bracket.
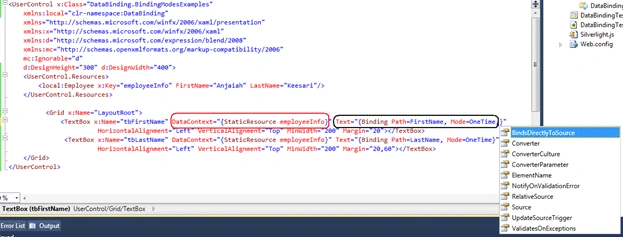
Binding statement has many properties but here is the list of frequently used properties of the Binding statement:
- Path: is the name of the source property to get the data from.
- Mode: is the connection type (OneTime,OneWay and TwoWay)between source and target.
- Source: is the standard CLR object that contains the data.
- Converter: used to specify the converter object that is called by the binding engine to modify the data as it is passed between source and destination.
- Converter Culture: specifies a parameter that can be passed to the conversion of the data.
- Conversion parameter: specifies a parameter that can be passed to the converter.
DataContext property can be set in parent control instead of repeating for each control like I have shown in the previous screen.
<Grid x:Name="LayoutRoot" DataContext="{StaticResource employeeInfo}">
<TextBox x:Name="tbFirstName" Text="{Binding Path=FirstName, Mode=OneTime,}"
HorizontalAlignment="Left"
VerticalAlignment="Top" MinWidth="200" Margin="20"></TextBox>
<TextBox x:Name="tbLastName" Text="{Binding Path=LastName, Mode=OneTime}"
HorizontalAlignment="Left"
VerticalAlignment="Top" MinWidth="200" Margin="20,60"></TextBox>
</Grid>
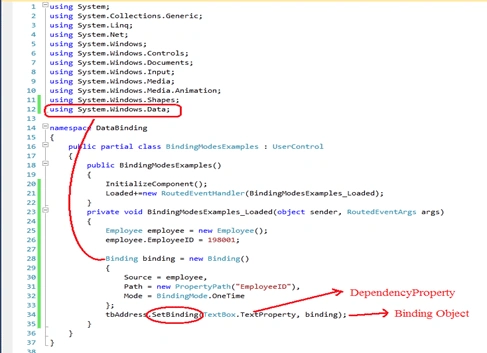
Binding can also be performed programmatically. What you need to do is just create new binding object and call SetBinding() method to perform the binding between the source and target. Here is sample code to do that.
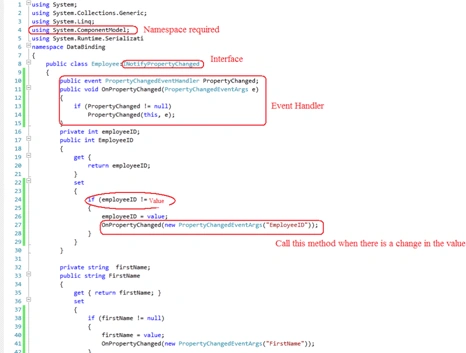
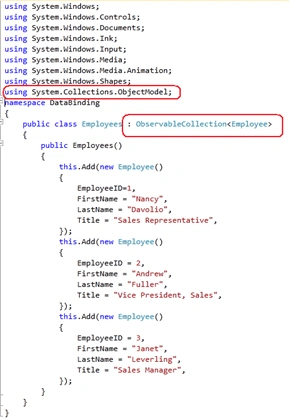
Before we proceed further, let me show you the .NET object which I am using for each example.
using System;
using System.Net;
using System.Windows;
using
System.Windows.Controls;
using
System.Windows.Documents;
using System.Windows.Ink;
using System.Windows.Input;
using System.Windows.Media;
using
System.Windows.Media.Animation;
using System.Windows.Shapes;
using System.ComponentModel;
namespace DataBinding
{
public class Employee :INotifyPropertyChanged
{
public event PropertyChangedEventHandler
PropertyChanged;
public void OnPropertyChanged(PropertyChangedEventArgs
e)
{
if
(PropertyChanged != null)
PropertyChanged(this, e);
}
private
int employeeID;
public int EmployeeID
{
get
{
return
employeeID;
}
set
{
if
(employeeID != value)
{
employeeID = value;
OnPropertyChanged(new PropertyChangedEventArgs("EmployeeID"));
}
}
}
private
string firstName;
public string FirstName
Join the conversation! Your thoughts help the community grow.