

Before writing this article I am recalling my previous experience of using Entity Framework 4.0 Code to do the first approach in a MVC 3 application. There to change or add a property in my model class I had to delete the "edm" data of the database and also add the column (the new property added into the model class) into the table. Otherwise we have to drop the database itself and recreate it by running the application.
But in a practical scenario if we run our application into the test server then we don't have to follow this previous mechanism that I mentioned because we will lose our previous data.
So in the Entity Framework 4.3 we have a technique called database migration that will help the update the database according to our model class changes. So our previous problem is solved.
Now we will create an application where we will show the useful of database migration in Entity Framework.
Step 1: Create a MVC4 internet application.
Step 2: Now we will create a model class name "Student" under the model Folder.
The model class will initially be like:
using System.ComponentModel.DataAnnotations;
namespace mvc4Multipledevice.Models
{
public class Student
{
[Key]
public int id { get; set; }
[Required]
public string StudentName { get; set; }
public int Age { get; set; }
}
}
In that we have the three properties id, Student Name and Age.
Step 3: Now we will create the POCO class for the student model using the Entity Framework CTF approach.
Create a "Db" folder under the application.
After that create a Poco class named "StudentdbContext.cs" under this folder.
The content of the class is like:
using mvc4Multipledevice.Models;
using System.Data.Entity;
namespace mvc4Multipledevice.Db
{
public class StudentdbContext : DbContext
{
public DbSet<Student> Movies { get; set; }
}
}
Step 4: Now we have to change the webconfig file for the creation of the database when we run the application.
<add name="StudentdbContext" connectionString="Data Source=.\SQLEXPRESS; Initial Catalog=mvc4MultipledeviceContext-20121005122643; Integrated Security=True;
MultipleActiveResultSets=True"
providerName="System.Data.SqlClient" />
Always Name should be same like our Poco class name (StudentdbContext).
Step 5: Now we have to create the controller class.
Right-click on the "Controller" folder add new a Controllername "StudentController" (a new form will be opened) and do it like the following image: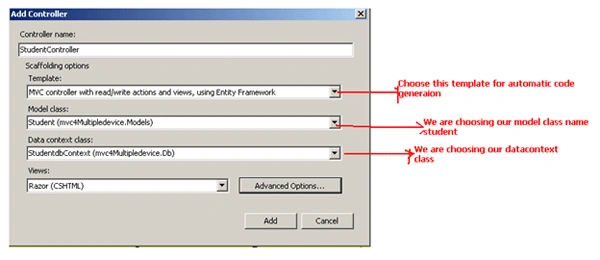
Now click on add. It will automatically create the controller class with all the action events along with our Student View folder like in the following image: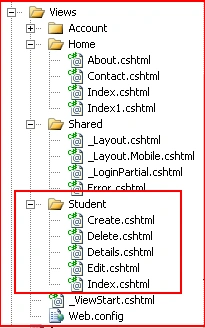
Step 6: We have to change it into our "layout.cshtml" file by adding the following code under the <ul> menu:
<li>@Html.ActionLink("Student", "Index", "Student")</li>
Now run the application and click on the "student" menu; it will look as in the following image: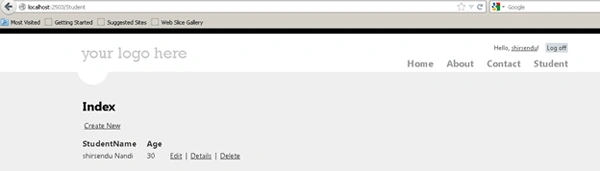
Currently we have 2 fields (Student Name and Age) displaying (Id is the primary key).
We can add edit, delete and see the details also.
Now we want to add one more field named "Address" into our application. So what will be our approach?
Step 7: First we have to change into our "Student" model class by adding one more property; see:
using System.ComponentModel.DataAnnotations;
namespace mvc4Multipledevice.Models
{
public class Student
{
[Key]
public int id { get; set; }
[Required]
public string StudentName { get; set; }
public int Age { get; set; }
public string Adress { get; set; }
}
}
After that we will change our Razore View.
First we will change our "index.cshtml"; see:
@model IEnumerable<mvc4Multipledevice.Models.Student>
@{
ViewBag.Title = "Index";
}
<h2>Index</h2>
<p>
@Html.ActionLink("Create New", "Create")
</p>
<table>
<tr>
<th>
@Html.DisplayNameFor(model => model.StudentName)
</th>
<th>
@Html.DisplayNameFor(model => model.Age)
</th>
<th>
@Html.DisplayNameFor(model => model.Adress)
</th>
<th></th>
</tr>
@foreach (var item in Model) {
<tr>
<td>
@Html.DisplayFor(modelItem => item.StudentName)
</td>
<td>
@Html.DisplayFor(modelItem => item.Age)
</td>
<td>
@Html.DisplayFor(modelItem => item.Adress)
</td>
<td>
@Html.ActionLink("Edit", "Edit", new { id=item.id }) |
@Html.ActionLink("Details", "Details", new { id=item.id }) |
@Html.ActionLink("Delete", "Delete", new { id=item.id })
</td>
</tr>
}
</table>
After that we will change our "create,edit,details,delete" cstml file by adding the following code:
<div class="editor-label">
@Html.LabelFor(model => model.Adress)
</div>
<div class="editor-field">
@Html.EditorFor(model => model.Adress)
@Html.ValidationMessageFor(model => model.Adress)
</div>
Now run the application. It will give the following error in your student controller class: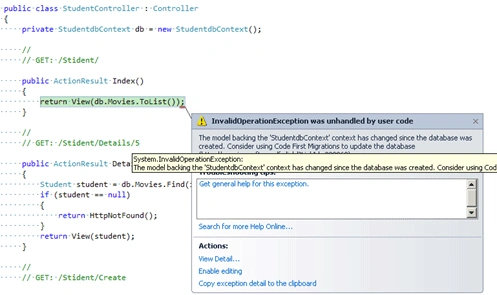
You're seeing this error because the updated Student model class in the application is now different than the schema of the Student table of the existing database. (There's no Adress column in the database table.)
There are a few approaches for resolving the error:
- Have the Entity Framework automatically drop and re-create the database based on the new model class schema. This approach is very convenient when doing active development on a test database; it allows you to quickly evolve the model and database schema together. The downside, though, is that you lose existing data in the database — so you don't want to use this approach on a production database! Using an initializer to automatically seed a database with test data is often a productive way to develop an application.
- Explicitly modify the schema of the existing database so that it matches the model classes. The advantage of this approach is that you keep your data. You can make this change either manually or by creating a database change script.
- Use Code First Migrations to update the database schema.
For this tutorial, we'll use Code First Migrations.
Step 8: Enable the "NMP" console in your Visual Studio Tools -> LibraryPackageManager -> PackageManagerConsole like in the following image: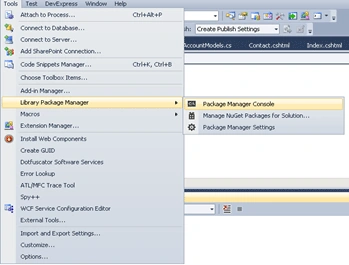
Step 9: In the npm console execute the following command:
PM> Enable-Migrations -ContextTypeName mvc4Multipledevice.Db.StudentdbContext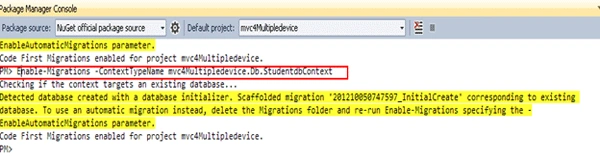
After successfully executing this command you will see a new folder named "Migrations".
Under that folder open the "Configurations.cs" file and change the following code:
public Configuration()
{
AutomaticMigrationsEnabled = true;
}
Step 10: Now we have to update the database by writing the following script in the npm console:
PM> update-database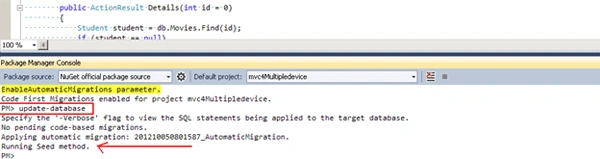
Step 11: We have added our address property in our model class. So for that we have to add this into the db also. For this in the nmp console run the following command:
PM> add-migration AddAdressMig
After that:
PM> update-database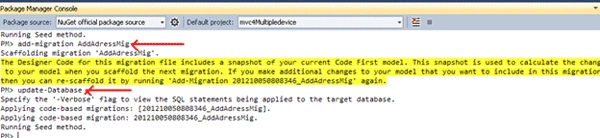
Step 12: Now run the application and click on the "student" link. See the following image: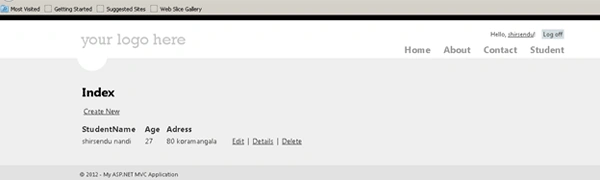
See in the above image the "Address" field exists (which we added later).
Conclusion: So in this article we have learned how to do the database migration in the Entity Framework while following the code for the first approach in MVC 4.
jegannathPosted Jun 26, 2013, 9:25 AM
Great it works! Nice and clear,very much useful to beginners.
srujana gudlaPosted Oct 22, 2012, 8:11 AM
Nice and clear,very much useful to beginners.