

First of all, Happy New Year to my fellow community . I am wishing that the new year will bring joy, love, peace, and happiness to you and your family. It's been a while since I wrote an article. (Not to mention the pandemic.) But let's keep learning.
. I am wishing that the new year will bring joy, love, peace, and happiness to you and your family. It's been a while since I wrote an article. (Not to mention the pandemic.) But let's keep learning.Today we are going to cover one of the basics of WPF. You can even say, everything else is useless if you don't get this step right. With that being said, let's jump into today's topic.
DataContext is the head of everything. It makes sure that your View is hooked up with ViewModel.
There are 3 ways to hook-up View with ViewModel.
- Within XAML
- Code-Behind
- ViewModelLocator
Our focus is how to bind DataContext so we are not going to focus on styling or data in this article.
We need 2 folders, one each for View & ViewModel.Then I have created two UserControls, LoginView and RegisterView with their respective ViewModels 1. LoginViewModel & 2. RegisterViewModel. Refer to figure 1 to understand the structure.
Note
We have to follow the standard here. Every view ends up with a term "View" such as LoginView & every viewmodel ends up with a term "ViewModel" such as LoginViewModel.
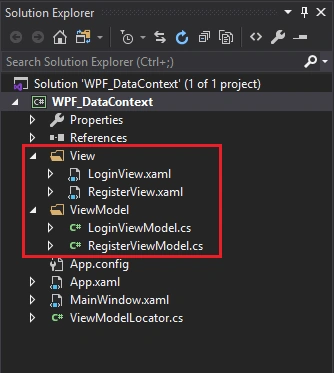
Figure 1
Binding DataContext within XAML
We are going to use LoginView for this experiment,
Step 1
Add namespace of LoginViewModel to LoginVIew.xaml.
- xmlns:local="clr-namespace:WPF_DataContext.VIewModel"
Step 2
Use UserControl's DataContext property to assign ViewModel
- <UserControl.DataContext>
- <local:LoginViewModel/>
- </UserControl.DataContext>
- <UserControl x:Class="WPF_DataContext.View.LoginView"
- xmlns="http://schemas.microsoft.com/winfx/2006/xaml/presentation"
- xmlns:x="http://schemas.microsoft.com/winfx/2006/xaml"
- xmlns:mc="http://schemas.openxmlformats.org/markup-compatibility/2006"
- xmlns:d="http://schemas.microsoft.com/expression/blend/2008"
- xmlns:local="clr-namespace:WPF_DataContext.VIewModel"
- xmlns:ViewModelWire ="clr-namespace:WPF_DataContext"
- mc:Ignorable="d"
- d:DesignHeight="450" d:DesignWidth="800"
- Height="40" Width="200">
- <UserControl.DataContext>
- <local:LoginViewModel/>
- </UserControl.DataContext>
- <Grid>
- <TextBlock Text="{Binding Message}" HorizontalAlignment="Center"/>
- </Grid>
- </UserControl>
Note that TextBlock is bound with property name Message, and for that we need to create this string type property in LoginVIewModel. Let's assign some value to Message in a constructor.
Tip
It is a bad practice to assign values or call APIs in constuctor, you should always use methods with multi-threading for calling or updating data. But since this is a small example we are going to assign values directly in the constructor.
- namespace WPF_DataContext.VIewModel
- {
- public class LoginViewModel
- {
- private string _message;
- public string Message
- {
- get { return _message; }
- set { _message = value; }
- }
- public LoginViewModel()
- {
- _message = "Login View Model is Connected..";
- }
- }
- }
- <Window x:Class="WPF_DataContext.MainWindow"
- xmlns="http://schemas.microsoft.com/winfx/2006/xaml/presentation"
- xmlns:x="http://schemas.microsoft.com/winfx/2006/xaml"
- xmlns:d="http://schemas.microsoft.com/expression/blend/2008"
- xmlns:mc="http://schemas.openxmlformats.org/markup-compatibility/2006"
- xmlns:local="clr-namespace:WPF_DataContext"
- xmlns:localView="clr-namespace:WPF_DataContext.View"
- mc:Ignorable="d"
- Title="MainWindow" Height="450" Width="800">
- <Grid>
- <localView:LoginView/>
- </Grid>
- </Window>
Now, run your project. You will be able to see output as figure 2,
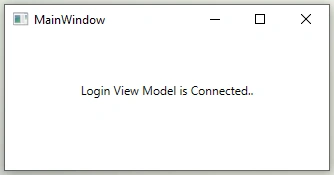
Figure 2
Assigning DataContext with Code-Behind
In this approach, we are going to use RegisterView. Open code-behind class of RegisterView, which is RegisterView.xaml.cs and set this.DataContext value.
- this.DataContext = new RegisterViewModel();
- using System.Windows.Controls;
- using WPF_DataContext.VIewModel;
- namespace WPF_DataContext.View
- {
- /// <summary>
- /// Interaction logic for RegisterView.xaml
- /// </summary>
- public partial class RegisterView : UserControl
- {
- public RegisterView()
- {
- InitializeComponent();
- this.DataContext = new RegisterViewModel();
- }
- }
- }
Now we have TextBlock on View, we have set up DataContext in code-behind and we need to assign values to that TextBlock in ViewModel.
The following RegisterView.xaml shows how TextBlock looks and follwoing code snippet shows what RegisterViewModel looks like.
RegisterView.xaml
- <UserControl x:Class="WPF_DataContext.View.RegisterView"
- xmlns="http://schemas.microsoft.com/winfx/2006/xaml/presentation"
- xmlns:x="http://schemas.microsoft.com/winfx/2006/xaml"
- xmlns:mc="http://schemas.openxmlformats.org/markup-compatibility/2006"
- xmlns:d="http://schemas.microsoft.com/expression/blend/2008"
- xmlns:local="clr-namespace:WPF_DataContext.View"
- xmlns:ViewModelWire ="clr-namespace:WPF_DataContext"
- mc:Ignorable="d"
- d:DesignHeight="450" d:DesignWidth="800">
- <Grid>
- <TextBlock Text="{Binding Message}" HorizontalAlignment="Center"/>
- </Grid>
- </UserControl>
RegisterViewModel.cs
- using System;
- using System.Collections.Generic;
- using System.Linq;
- using System.Text;
- using System.Threading.Tasks;
- namespace WPF_DataContext.VIewModel
- {
- public class RegisterViewModel
- {
- private string _message;
- public string Message
- {
- get { return _message; }
- set { _message = value; }
- }
- public RegisterViewModel()
- {
- _message = "Register View Model is Connected..";
- }
- }
- }
- <Window x:Class="WPF_DataContext.MainWindow"
- xmlns="http://schemas.microsoft.com/winfx/2006/xaml/presentation"
- xmlns:x="http://schemas.microsoft.com/winfx/2006/xaml"
- xmlns:d="http://schemas.microsoft.com/expression/blend/2008"
- xmlns:mc="http://schemas.openxmlformats.org/markup-compatibility/2006"
- xmlns:local="clr-namespace:WPF_DataContext"
- xmlns:View="clr-namespace:WPF_DataContext.View"
- mc:Ignorable="d"
- Title="MainWindow" Height="450" Width="800">
- <Grid>
- <View:RegisterView/>
- </Grid>
- </Window>
This output of this example will look like figure 3
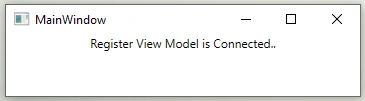
Figure 3
Auto-wire with ViewModelLocator
ViewModelLocator centralizes the code to hookup View & ViewModel. Which means it provides us loosely coupled way to bind View with ViewModel, with this approach, View does not need to hardcode the ViewModel it is getting hooked up with. So basically we automate this entire process in a five step approach,
- Step 1: Determine View, For e.g. LoginView.
- Step 2: Determine ViewModel, If we follow naming conventions correctly, then it is always ViewModel at the end View's name. For e.g. LoginViewModel.
- Step 3: Once you have a type of a ViewModel from step 2, you need to create an instance of that ViewModel type.
- Step 4: Crate an instance of ViewModel
- Step 5: Set a DataContext of a View.
Note
All these steps take place at runtime, that's why View doesn't have to worry about it's ViewModel binding at compile time.
Now that we got this logic setteled, we can simply wrap it inside a method to then reuse the same method. Next, we need to figure out how to call this method from View, and there's a simple way to do that, this can be achieved with the help of attached property.
Let's begin this process by adding a class named ViewModelLocator,
- Class ViewModelLocator will encapsulate
- One attached propery named : AutoWireViewModel
- and one event handler named : AutoWireViewModelChanged (This method will consist of 4 steps mentioed above)
Your final ViewModelLocator will look like this: Note: Check summary & comments in code to undetstand the meaning.
- using System;
- using System.Collections.Generic;
- using System.ComponentModel;
- using System.Linq;
- using System.Text;
- using System.Threading.Tasks;
- using System.Windows;
- namespace WPF_DataContext
- {
- public static class ViewModelLocator
- {
- /// <summary>
- /// Gets AutoWireViewModel attached property
- /// </summary>
- /// <param name="obj"></param>
- /// <returns></returns>
- public static bool GetAutoWireViewModel(DependencyObject obj)
- {
- return (bool)obj.GetValue(AutoWireViewModelProperty);
- }
- /// <summary>
- /// Sets AutoWireViewModel attached property
- /// </summary>
- /// <param name="obj"></param>
- /// <param name="value"></param>
- public static void SetAutoWireViewModel(DependencyObject obj, bool value)
- {
- obj.SetValue(AutoWireViewModelProperty, value);
- }
- /// <summary>
- /// AutoWireViewModel attached property
- /// </summary>
- public static readonly DependencyProperty AutoWireViewModelProperty =
- DependencyProperty.RegisterAttached("AutoWireViewModel",
- typeof(bool), typeof(ViewModelLocator),
- new PropertyMetadata(false, AutoWireViewModelChanged));
- /// <summary>
- /// Step 5 approach to hookup View with ViewModel
- /// </summary>
- /// <param name="d"></param>
- /// <param name="e"></param>
- private static void AutoWireViewModelChanged(DependencyObject d,
- DependencyPropertyChangedEventArgs e)
- {
- if (DesignerProperties.GetIsInDesignMode(d)) return;
- var viewType = d.GetType(); //Step 1: Ex- LoginView
- var viewModelTypeName = (viewType).ToString().Replace("View", "ViewModel"); //Step 2: Ex- LoginViewModelName
- var viewModelType = Type.GetType(viewModelTypeName); // step 3: Ex- get the type of LoginViewModel
- var viewModel = Activator.CreateInstance(viewModelType); // step 4: Ex- create an instance of LoginViewModel
- ((FrameworkElement)d).DataContext = viewModel; // step 5: Ex- LoginView's DataContext is set to LoginViewModel
- }
- }
- }
First, add a namespace of a LoginViewModel to your View
- xmlns:ViewModelWire ="clr-namespace:WPF_DataContext"
Second, set AutoWireViewModel to true
- ViewModelWire:ViewModelLocator.AutoWireViewModel="True"
Now comment the context that we added earlier in this view. at last, you have a LoginView.xaml which would look like this,
- <UserControl x:Class="WPF_DataContext.View.LoginView"
- xmlns="http://schemas.microsoft.com/winfx/2006/xaml/presentation"
- xmlns:x="http://schemas.microsoft.com/winfx/2006/xaml"
- xmlns:mc="http://schemas.openxmlformats.org/markup-compatibility/2006"
- xmlns:d="http://schemas.microsoft.com/expression/blend/2008"
- xmlns:local="clr-namespace:WPF_DataContext.VIewModel"
- xmlns:ViewModelWire ="clr-namespace:WPF_DataContext"
- mc:Ignorable="d"
- d:DesignHeight="450" d:DesignWidth="800"
- Height="40" Width="200"
- ViewModelWire:ViewModelLocator.AutoWireViewModel="True">
- <!--<UserControl.DataContext>
- <local:LoginViewModel/>
- </UserControl.DataContext>-->
- <Grid>
- <TextBlock Text="{Binding Message}" HorizontalAlignment="Center"/>
- </Grid>
- </UserControl>
To cofirm that it can work with multiple view at a time, let's do few changes in RegisterView as well. And don't forget to comment DataContext which we set in a code-behind of RegisterView.xaml.cs.
Final RegisterView.xaml
- <UserControl x:Class="WPF_DataContext.View.RegisterView"
- xmlns="http://schemas.microsoft.com/winfx/2006/xaml/presentation"
- xmlns:x="http://schemas.microsoft.com/winfx/2006/xaml"
- xmlns:mc="http://schemas.openxmlformats.org/markup-compatibility/2006"
- xmlns:d="http://schemas.microsoft.com/expression/blend/2008"
- xmlns:local="clr-namespace:WPF_DataContext.View"
- xmlns:ViewModelWire ="clr-namespace:WPF_DataContext"
- mc:Ignorable="d"
- d:DesignHeight="450" d:DesignWidth="800"
- ViewModelWire:ViewModelLocator.AutoWireViewModel="True">
- <Grid>
- <TextBlock Text="{Binding Message}" HorizontalAlignment="Center"/>
- </Grid>
- </UserControl>
Finally, to see this in action, add both of the Views to MainWindow.xaml
MainWindow.xaml
- <Window x:Class="WPF_DataContext.MainWindow"
- xmlns="http://schemas.microsoft.com/winfx/2006/xaml/presentation"
- xmlns:x="http://schemas.microsoft.com/winfx/2006/xaml"
- xmlns:d="http://schemas.microsoft.com/expression/blend/2008"
- xmlns:mc="http://schemas.openxmlformats.org/markup-compatibility/2006"
- xmlns:local="clr-namespace:WPF_DataContext"
- xmlns:localView="clr-namespace:WPF_DataContext.View"
- mc:Ignorable="d"
- Title="MainWindow" Height="450" Width="800">
- <Grid>
- <Grid.RowDefinitions>
- <RowDefinition/>
- <RowDefinition/>
- </Grid.RowDefinitions>
- <localView:LoginView/>
- <localView:RegisterView Grid.Row="1"/>
- </Grid>
- </Window>
Now, run the project & enjoy the work of automation.
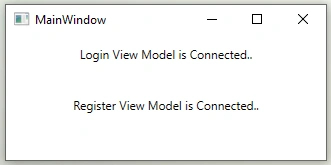
Figure 4
Perfect..Summary
Today we learned what are different ways to bind View with ViewModel, how to use it & how to automate it with AutoWire. We learned that it is always a best practice to use AutoWireLocator. I hope that this article was helpful enough for you & I hope you gained some knowledge out of this.
Keep coding, and stay healthy.
There is one big piece of news coming soon. Tune in and I will update you about it in upcoming articles.
Join the conversation! Your thoughts help the community grow.