

Azure Storage is one of the cloud computing PaaS (Platform as a Service) services provided by the Microsoft Azure team. It provides cloud storage that is highly available, secure, durable, scalable, and redundant. It is massively scalable and elastic. It can store and process hundreds of terabytes of data or you can store the small amounts of data required for a small business website.
Here, we will see how to create a Storage Account
What is Azure Storage?
A storage account is a container that has a group of Azure Storage services together (Azure Blobs, Azure Files, Azure Queues, and Azure Tables). The following illustration shows a storage account containing several data services.
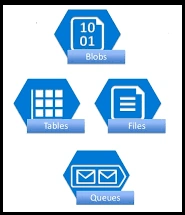
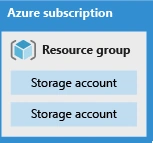
Azure Storage is a fundamental building block for all of the Azure Services. We can manage them as a group. Once you create the account, we can create any data service inside it and once you delete the account, the entire data will be deleted. A storage account can be created in Azure resources. An Azure subscription may contain multiple resource groups, where each group contains one or more storage accounts.
Create the Azure Storage Account
Prerequisites
- Microsoft Azure Account.
Follow the below steps to create an Azure Storage Account.
Step 1. Login to https://portal.azure.com/
On the dashboard, choose"Create a resource", and click "Storage". Now, choose "Storage Account".
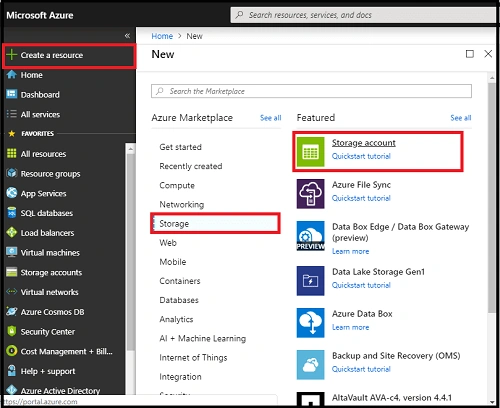
Step 2. Enter the details for fields - choose the subscription, resource group, storage name, location, performance, account type, replication, and access tier. Let's see each, one by one.
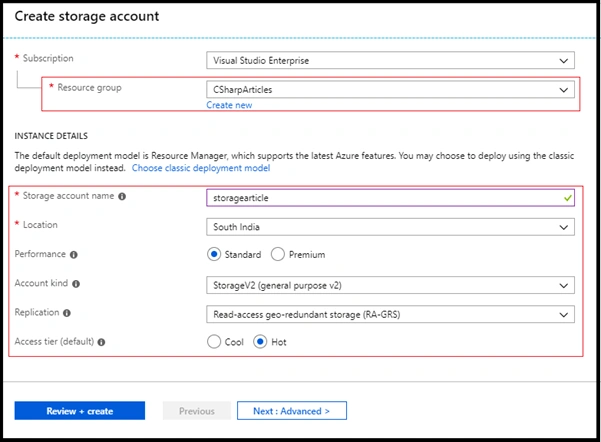
- Azure Subscription: A subscription is an agreement with Microsoft to use Microsoft cloud platforms or services. And the charges are based on either a per-user license fee or on cloud-based resource consumption. So select your appropriate subscription. It will be billed for the services in the account.
- Resource group: A resource group contains the resources required for successful deployment of your Service in Azure. It is a container that holds related resources for an Azure solution. Choose your Resource group or Create a new resource name that must be unique.
- Storage name: Here, we choose a name for our Storage. It must be unique. It must be between 3 and 24 characters in length and may contain numbers and lowercase letters only.
- Location: The data center that will store the services in the account.
- Performance: Performance determines the data services you can have in your storage account and the type of hardware disks used to store the data.
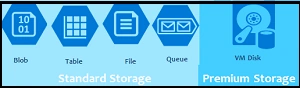
- Standard allows you to have any data service (Blob, File, Queue, Table) and uses the traditional hard disk
- Premium limits you to one specific type of blob called a page blob and stores unmanaged virtual machine disks. It uses State Drives(SSD) for faster access.
Account kind
Azure Storage offers three types of storage accounts with different features and has its own pricing model. The three types of storage accounts are as follows.
- General-purpose v2 accounts: It is the Basic storage account type. It offers all storage types like blobs, files, queues, and tables. This is recommended for most scenarios using Azure Storage.
- General-purpose v1 accounts: It’s the Legacy account type. It supports blobs, files, queues, and tables but may not support all features. Use general-purpose v2 accounts instead when possible.
- Blob storage accounts: Blob-only storage accounts. Use general-purpose v2 accounts instead when possible.
We use the General-purpose v2 option for new storage accounts.
- Replication: Data in Azure storage accounts are always replicated to ensure high availability. In order to ensure that your data is durable, Azure Storage replicates multiple copies of your data. so that it is protected from planned and unplanned events, including transient hardware failures, network or power outages, and massive natural disasters. We set up our storage account, you select a redundancy option.
Replication options for a storage account include.
- Locally-redundant storage (LRS): A simple, low-cost replication strategy that offers the least durability compared to other options. Data is replicated within a single storage scale unit. It provides at least 99.999999999% (11 nines) durability of objects over a given year.
- Zone-redundant storage (ZRS): Replication for high availability and durability. Data is replicated synchronously across three storage clusters in a single region. It provides excellent performance and low latency. It offers durability for storage objects of 99.9999999999% (12 9's) over a given year.
- Geo-redundant storage (GRS): Cross-regional replication to protect against region-wide unavailability. It maintains six copies of our data. It replicates your data to a secondary region that is hundreds of miles away from the primary region. It provides at least 99.99999999999999% (16 9's) durability of objects over a given year
- Read-access geo-redundant storage (RA-GRS): Cross-regional replication with reading access to the replica. It is almost similar to the GRS. But it provides read-only access to the data in the secondary location. If we enable read-only access to your data in the secondary region, our data is also available on a secondary endpoint, in addition to the primary endpoint for your storage account.
Access tier
Azure Storage provides different options for accessing data services based on usage patterns. This setting is used for Blob storage only.
- Hot Access Tier is used for frequently accessed data in the storage account. It's most cost-effective. By default, we chose the hot tier.
- Cool Access Tier is used for infrequently accessed data in the storage account. It's optimized for storing large amounts of data.
Step 3. Advanced Tab
Next, we click on the Advanced tab.
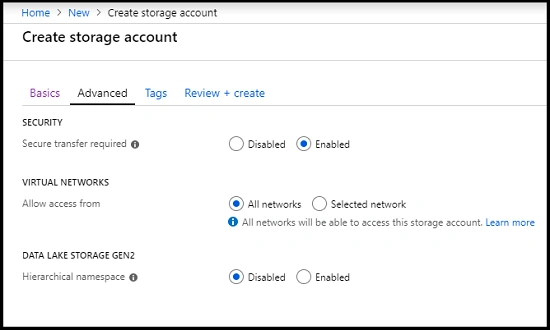
Secure transfer required
It enhances the security of your storage account. Setting this option to Enabled will force all clients to use SSL (HTTPS). Set Secure transfer required to Enabled. This option is disabled when you create a storage account with SDK by default. And it's enabled when you create a storage account in Azure Portal by default.
Virtual networks
Virtual Networks allow administrators to create network rules that allow traffic only from selected VNets or public access
Set the Virtual networks option to All networks. This option allows you to isolate the storage account on an Azure virtual network. We want to use public Internet access. Our content is public-facing and you need to allow access from public clients.
If we enable the selected network then it allows you to secure Azure Storage accounts to your virtual networks, fully removing public internet access to these resources.
Data Lake Storage Gen2
Leave the Data Lake Storage Gen2 option Disabled. It makes Azure Storage the foundation for building enterprise data lakes on Azure.
Step 4. Tag Tab
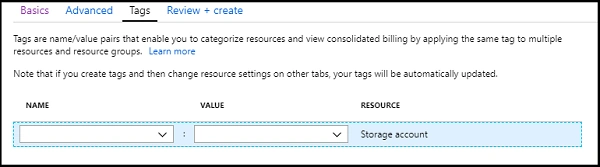
We can apply tags to your Azure resources giving metadata to logically organize them into a taxonomy. Each tag consists of a name and a value pair. After you apply tags, you can retrieve all the resources in your subscription with this tag name and value. It enables you to retrieve related resources from different resource groups. You can explore the Tags settings if you like.
Step 5. Create
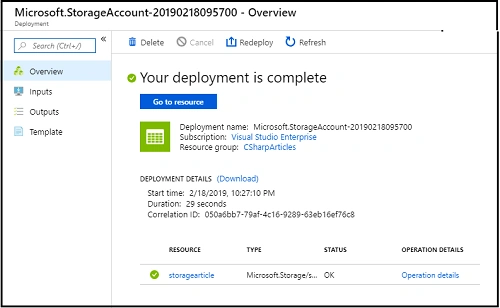
Next, Click Review + create to review our settings. It will do a quick validation of your Storage setting. It will take a few minutes to deploy the Storage account.
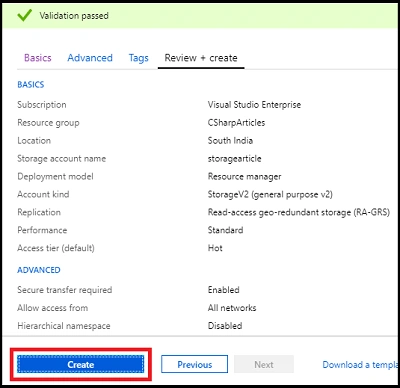
Click on Create to create the Azure Storage.
Step 6. Here is the dashboard of Azure Storage.
Summary
I hope you understand how to create an Azure Storage. In the next article, we will go deep into Blob Storage. Stay tuned for more Azure Storage.
Kapil Singh KumawatPosted Mar 19, 2019, 10:01 AM
Good article