

We are using a checkbox inside a GridView and a button. The User selects the row from the checkbox that he want to delete and on a button click it is deleted from the GridView and from the database too.
Initial chamber
Step 1
Open Visual Studio 2010 and create an Empty Website, provide a suitable name (Gridview_demo).
Step 2
In Solution Explorer you get your empty website. Add a web form and a SQL Database as in the following.
For Web Form:
Gridview_demo (your empty website) then right-click then select Add New Item -> Web Form. Name it Gridview_demo.aspx.
For SQL Server Database:
Gridview_demo (your empty website) then right-click then select Add New Item -> SQL Server Database. (Add the database inside the App_Data_folder.)
Database chamber
Step 3
In the database (Database.mdf) we will create a table, tbl_Data. Go to the database.mdf -> Table then Add New table, design your table like this:
Table -> tbl_data (Don't forget to make ID -> Identity Specification -> Yes)
Design chamber
Step 4
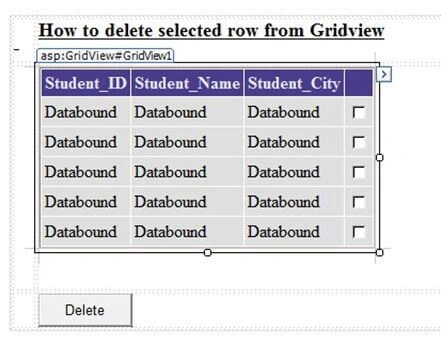
Now open your Gridview_demo.aspx file, where we create our simple design with the GridView and a button.
Gridview_demo.aspx
- <%@ Page Language="C#" AutoEventWireup="true" CodeFile="Default.aspx.cs" Inherits="_Default" %>
- <!DOCTYPE html PUBLIC "-//W3C//DTD XHTML 1.0 Transitional//EN" "http://www.w3.org/TR/xhtml1/DTD/xhtml1-transitional.dtd">
- <html xmlns="http://www.w3.org/1999/xhtml">
- <head runat="server">
- <title></title>
- </head>
- <body>
- <form id="form1" runat="server">
- <div>
- <table style="width:100%;">
- <tr>
- <td>
- </td>
- <td>
- </td>
- <td>
- </td>
- </tr>
- <tr>
- <td>
- </td>
- <td>
- <asp:GridView ID="GridView1" runat="server" AutoGenerateColumns="False"
- DataKeyNames="id">
- <Columns>
- <asp:TemplateField HeaderText="Student_ID">
- <EditItemTemplate>
- <asp:TextBox ID="TextBox1" runat="server" Text='<%# Bind("id") %>'></asp:TextBox>
- </EditItemTemplate>
- <ItemTemplate>
- <asp:Label ID="Label1" runat="server" Text='<%# Bind("id") %>'></asp:Label>
- </ItemTemplate>
- </asp:TemplateField>
- <asp:TemplateField HeaderText="Student_Name">
- <EditItemTemplate>
- <asp:TextBox ID="TextBox2" runat="server" Text='<%# Bind("name") %>'></asp:TextBox>
- </EditItemTemplate>
- <ItemTemplate>
- <asp:Label ID="Label2" runat="server" Text='<%# Bind("name") %>'></asp:Label>
- </ItemTemplate>
- </asp:TemplateField>
- <asp:TemplateField HeaderText="Student_City">
- <EditItemTemplate>
- <asp:TextBox ID="TextBox3" runat="server" Text='<%# Bind("city") %>'></asp:TextBox>
- </EditItemTemplate>
- <ItemTemplate>
- <asp:Label ID="Label3" runat="server" Text='<%# Bind("city") %>'></asp:Label>
- </ItemTemplate>
- </asp:TemplateField>
- <asp:TemplateField>
- <EditItemTemplate>
- <asp:CheckBox ID="CheckBox1" runat="server" />
- </EditItemTemplate>
- <ItemTemplate>
- <asp:CheckBox ID="CheckBox1" runat="server" />
- </ItemTemplate>
- </asp:TemplateField>
- </Columns>
- </asp:GridView>
- </td>
- <td>
- </td>
- </tr>
- <tr>
- <td>
- </td>
- <td>
- <asp:Button ID="Button1" runat="server" onclick="Button1_Click" Text="Button" />
- </td>
- <td>
- </td>
- </tr>
- </table>
- </div>
- </form>
- </body>
- </html>

Here is what the design looks like:
Code chamber
Step 5
Open your Gridview_demo.aspx.cs and write some code so that the application works.
Gridview_demo.cs
- using System;
- using System.Collections.Generic;
- using System.Linq;
- using System.Web;
- using System.Web.UI;
- using System.Web.UI.WebControls;
- using System.Data;
- using System.Data.SqlClient;
- public partial class _Default : System.Web.UI.Page
- {
- SqlConnection con = new SqlConnection(@"Data Source=.\SQLEXPRESS;AttachDbFilename=|DataDirectory|\Database.mdf;Integrated Security=True;User Instance=True");
- protected void Page_Load(object sender, EventArgs e)
- {
- if (!Page.IsPostBack)
- {
- refreshdata();
- }
- }
- public void refreshdata()
- {
- SqlCommand cmd = new SqlCommand("select * from tbl_data", con);
- SqlDataAdapter sda = new SqlDataAdapter(cmd);
- DataTable dt = new DataTable();
- sda.Fill(dt);
- GridView1.DataSource = dt;
- GridView1.DataBind();
- }
- protected void Button1_Click(object sender, EventArgs e)
- {
- foreach (GridViewRow gvrow in GridView1.Rows)
- {
- CheckBox chck = gvrow.FindControl("CheckBox1") as CheckBox;
- if (chck.Checked)
- {
- var Label = gvrow.FindControl("Label1") as Label;
- SqlCommand cmd = new SqlCommand("delete from tbl_data where id=@id",con);
- cmd.Parameters.AddWithValue("id", int.Parse(Label.Text));
- con.Open();
- int id = cmd.ExecuteNonQuery();
- con.Close();
- refreshdata();
- }
- }
- }
- }
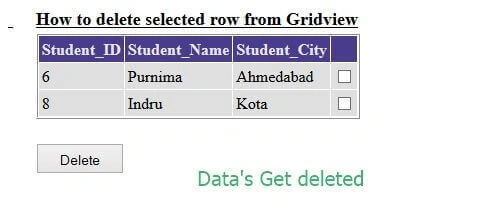
Output chamber

Don't worry about the Id's that start from 4—8 since I used 1-4 Ids for testing.
I hope you like it . Thank you for reading. Have a good day.
Fernando ChachaPosted Mar 8, 2017, 1:51 AM
Thanks for sharing
Sofique UddinPosted Jan 3, 2017, 2:14 AM
It is very nice Give More article
Arul RPosted Oct 28, 2015, 5:33 AM
Good one !!!
Sibeesh VenuPosted Aug 19, 2015, 6:55 AM
Nice Share
Yashwanth MuthineniPosted Aug 19, 2015, 6:05 AM
Nice Share
RakeshPosted Aug 19, 2015, 3:46 AM
Nice one
Karthikeyan KPosted Aug 18, 2015, 11:12 PM
Good one sir...Thanks for sharing
Gowtham KPosted Aug 18, 2015, 9:17 PM
Good one
Rahul PrajapatPosted Aug 18, 2015, 8:18 PM
Nice article
Gopi ChandPosted Aug 18, 2015, 2:43 PM
Nice work
Santhakumar MunuswamyPosted Aug 18, 2015, 2:25 PM
Good one
Rajeesh MenothPosted Aug 18, 2015, 2:04 PM
Good One Nilesh Jadav