

When I first became interested in .Net Core + Angular, despite my knowledge in C#, Javascript, and Web Apps, I got a little bit lost. The technology is quite new and there is not always enough documentation to grasp the whole picture.
So, I went with templates included or downloaded from Visual Studio but was not satisfied with it. As I knew from experience, those ready-to-use solutions are great to give you an overview and some examples. But when you are looking for a specific solution, they just won’t do. Usually, when you need to customize things, they will fall apart.
Notes- It will not exactly be from the ground up, as you will use some basic templates. But it will give you the opportunity to build your app brick by brick and to fully understand what you are doing.
- This is not a tutorial about .Net Core, Angular, or C#. These already exist and are well made:
- This app will cover two fronts actually: one for the public made with Angular, the other one is the administration area built with NET Core MVC
- For each step, I’ll try to give the click by click procedure and the dotnet commands as there are pros & cons with both.
My needs are very common:
- An MVC architecture
- An admin area
- Scalability: Having several projects in a solution makes it easier when you want to spread it across different hosts
- A database
To spoil the surprise, this is what I did:
- Class Library for the Model
- Angular project for the View
- RESTFul Web app project for the Controller
- NET Core MVC project for the Administration area (basic CRUD interface)
By having separate processes, you will also build way faster! Starting an Angular front takes more than 10 seconds, so if you are working on your API and haven’t touched the front, you will waste time on every debug.
Every time you want to add a service, you just have to create a new project. Imagine you want to add sign-ins to Google, Facebook, Github … You make a new .Net Core “Class Library” project called “Connexions” and put all the related configs and wrappers in it.
This modular architecture will allow you to manage big projects in the long run. If one day, you realize that the admin part could be done completely differently, you just unplug it and create a new project.
This is the structure with Visual Studio’s template types:
Model (Class Library)
- Models: classes representing tables in the database
- DbContext: The hub for DbSets, repos, database configuration.
View (Website)
The Angular project
Controller (Web API)
- ViewModels
Classes used to format data when sending and receiving with Angular. Very useful with forms, you will put some validation rules here. - Controllers
Controllers exchanging data with Angular (RESTFul format)
Admin (Web App MVC)
- Views
The cshtml files used for the admin area - Controllers
MVC Controllers for CRUD actions
What you need:
- Visual Studio 2017 to use the GUI (Community version is free)
- Or Visual Studio Code or any IDE if you want to use the CLI
- .Net Core >= 2
- js with npm
Source Code is here https://github.com/Wanchai/NetCore_Angular5_Template
For the sake of KISS, we will use an SQLite database, so you don’t have to install anything for that.
Open a command prompt in the folder of your choice:
- mkdir Project
- cd Project
- dotnet new sln -n Project
Or
- File > New > Project
- In the left pane, Installed > Other Project Types > Visual Studio Solutions
- In the middle pane, select Blank Solution.
- Set the Name (here I’ll call it Project) and Location values for your solution, then click OK.
Here, you SHOULD use dotnet CLI as it creates a project with SQLite by default and it’s very convenient.
Commands
- dotnet new mvc -n Project.Admin -au Individual
- dotnet sln add Project.Admin/Project.Admin.csproj
Or
- Right-click on the solution in the solution explorer, then Add > Project.
- In Visual C# > .NET Core, select NET Core Web Application and set the name (Project.Admin).
- A pop-up will open. Select Web Application MVC and Change Authentication to Individual User Accounts (more here) then click Ok.

- Change json to "DefaultConnection": "DataSource=..\\app.db"
- In Startup.cs, replace options.UseSqlServer by options.UseSqlite
At that point, you can press F5 and test your app. If you try to register, you will probably end up with this:

It’s because you changed the DB’s path, so it can’t find it. Just follow the instructions and refresh. It’s going to use the files in Data/Migrations to setup your DB. (command is: dotnet ef database update)
Because it’s a back-office, you want to protect it with a login:
- Register to your app if it’s not done yet
- Add [Authorize] just before your HomeController class declaration
- [Authorize]
- public class HomeController : Controller
With this, you won’t be able to access the home page without being logged in.
Create the DAL -> Project.DALIn the main folder (Project) type,
- dotnet new classlib -n Project.DAL
- dotnet sln add Project.DAL/Project.DAL.csproj
/!\ If your solution is opened in VS 2017, you need to close the solution before and reopen it to see the changes.
Or
- Right-click on the solution in the solution explorer, then Add > Project
- In Visual C# > .NET Core, select Class Library, then Ok
Create a folder Models
Create a public class Product.cs in it
Add those properties.
- public Guid Id { get; set; }
- public string Name { get; set; }
- public string Description { get; set; }
In the root folder, create the DbContext like so:
- using Microsoft.EntityFrameworkCore;
- using Project.DAL.Models;
- namespace Project.DAL
- {
- class ProjectDbContext : DbContext
- {
- public ProjectDbContext(DbContextOptions<ProjectDbContext> options) : base(options)
- {
- }
- public DbSet<Product> Product { get; set; }
- }
- }
Add the EntityFramework reference to your Project.DAL.csproj file
- <ItemGroup>
- <PackageReference Include="Microsoft.AspNetCore.Identity.EntityFrameworkCore" Version="2.0.1" />
- </ItemGroup>
Scaffold the controller in the admin project to manage the table
- In Admin, right-click on the Controllers folder then Add > Controller …
- Choose MVC Controller with views, using Entity Framework then click Add

- Set the options like this:
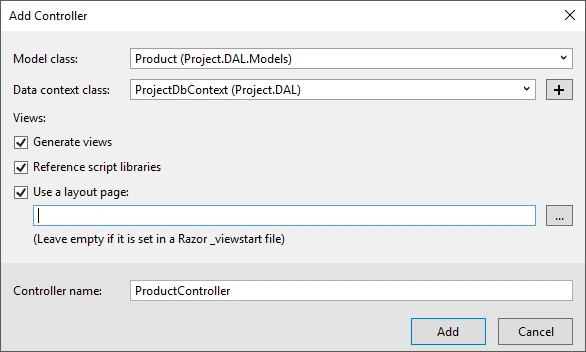
Or in the Project.Admin folder,
- dotnet aspnet-codegenerator controller -name ProductController -m Project.DAL.Models.Product -dc ApplicationDbContext --relativeFolderPath Controllers --useDefaultLayout --referenceScriptLibraries
- dotnet ef migrations add AddProductTable
- dotnet ef database update
Create a few products as we are going to need them later.

In the main folder (Project) type
- dotnet new webapi -n Project.API --use-launch-settings
- dotnet sln add Project.API/Project.API.csproj
Or
- Right-click on the solution in the solution explorer, then Add > Project
- In Visual C# > .NET Core, select NET Core Web Application and set the name (Project.API)
- A pop-up will open. Select Web API then click Ok
In Project.API.csproj add those lines to their related places.
- <PackageReference Include="Microsoft.VisualStudio.Web.CodeGeneration.Design" Version="2.0.0" />
- <DotNetCliToolReference Include="Microsoft.EntityFrameworkCore.Tools.DotNet" Version="2.0.1" />
Then dotnet restore to install them.
Add a reference to your DAL:
- dotnet add reference ..\Project.DAL\Project.DAL.csproj
Or
- Right-Click on API / Dependencies > Add References
- Check DAL then OK
Add the connection string to the appsettings.json
- {
- "ConnectionStrings": {
- "DefaultConnection": "DataSource=..\\app.db"
- },
- "Logging": {
- "IncludeScopes": false,
- "LogLevel": {
- "Default": "Warning"
- }
- }
- }
And in Startup.cs, add the DbContext
- public void ConfigureServices(IServiceCollection services)
- {
- services.AddDbContext<ProjectDbContext>(options =>
- options.UseSqlite(Configuration.GetConnectionString("DefaultConnection")));
- services.AddCors();
- services.AddMvc();
- }
- We also added the Cors so Angular can access your API
Scaffold the API controller
- In API, right-click on the Controllers folder then Add > Controller …
- Choose API Controller with actions, using Entity Framework then Add

- Set the options like this:

Or in the Project.API folder
dotnet aspnet-codegenerator controller -api -name ProductController -m Project.DAL.Models.Product -dc Project.DAL.ProjectDbContext --relativeFolderPath Controllers --useDefaultLayout --referenceScriptLibraries
Build your app and go to /api/product - You should see something like this:

Create the front: Project.Angular
To install Angular, make sure the CLI is installed
- npm install -g @angular/cli
Then create the project in your Project folder and test it:
- ng new Project.Angular
- cd Project.Angular
- ng serve -o
Your browser should open http://localhost:4200 and show your Angular app.
Add it to your solution.
/!\ Attention: There is a bug in VS 2017 (see here)
- Right-click on the solution, then Add > Existing Website
- Select the folder Angular > Ok
If it’s not working, the only solution is to add it manually to the .sln file (I know: ugly!)
- Project("{E24C65DC-7377-472B-9ABA-BC803B73C61A}") = "Project.Angular", "Project.Angular\", "{19A933CF-623B-4F15-AC94-74F308C4B148}"
- EndProject
You should now have something like this:
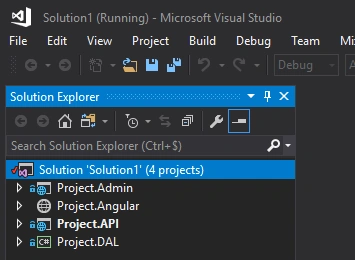
Now, create a product class and a product component:
- Create the Model -> src/app/models/product.ts with this in it,
- export class Product {
- id: string;
- name: string;
- description: string;
- }
You can use this wonderful tool (QuickType) to transform your JSON result directly to TypeScript.
- Create the component with:
ng generate component components/product
- Create the service like this:Change the URL to suit your needs! It should point to your API URL.
- import { Injectable } from '@angular/core';
- import { Observable } from 'rxjs/Observable';
- import { of } from 'rxjs/observable/of';
- import { Product } from './../models/product';
- import { HttpClient, HttpHeaders } from '@angular/common/http';
- const httpOptions = {
- headers: new HttpHeaders({ 'Content-Type': 'application/json' })
- };
- @Injectable()
- export class ProductService {
- private productUrl = 'http://localhost:31977/api/product';
- constructor(private http: HttpClient) { }
- getProducts(): Observable<Product[]> {
- return this.http.get<Product[]>(this.productUrl);
- }
- }
- Register the service in app/components/product/product.component.ts
- import { Component, OnInit } from '@angular/core';
- import { Product } from '../../models/Product';
- import { ProductService } from '../../services/product.service';
- @Component({
- selector: 'app-product',
- templateUrl: './product.component.html',
- styleUrls: ['./product.component.css']
- })
- export class ProductComponent implements OnInit {
- products: Product[];
- constructor(
- private productService: ProductService
- ) { }
- ngOnInit() {
- this.getProducts();
- }
- getProducts(): void {
- this.productService.getProducts().subscribe(result => this.products = result);
- }
- }
- Change the component.html to display your products
- <table>
- <tr *ngFor="let product of products">
- <td>{{product.id}}</td>
- <td>{{product.name}}</td>
- <td>{{product.description}}</td>
- </tr>
- </table>
- Register everything in app/app.module.ts
- import { BrowserModule } from '@angular/platform-browser';
- import { NgModule } from '@angular/core';
- import { AppComponent } from './app.component';
- import { ProductComponent } from './components/product/product.component';
- import { ProductService } from './services/product.service';
- import { HttpClientModule } from '@angular/common/http';
- @NgModule({
- declarations: [
- AppComponent,
- ProductComponent,
- ],
- imports: [
- BrowserModule,
- HttpClientModule,
- ],
- providers: [
- ProductService,
- ],
- bootstrap: [AppComponent]
- })
- export class AppModule { }
- Add your component to the app/app.component.html to display it,
- <app-product></app-product>
- Run the API and go to its URL
- Test Angular with ng serve -o
Install Webpack in the Admin project: All your admin assets will be located in wwwroot. And you will have to manage them yourself in the bundleconfig.json file. If you want to work on the UI, it can become tiresome.
Use the Design-time DbContext
Make a config service for Angular to put all the routes to the API. I think it’s better to have them all in a single place.
Projects ideas/examples- Commons
A Class Library with snippets, extensions, helpers … shared across C# projects - Connexions
A Class Library holding communications to external APIs. - Chat
A Class Library and wrapper for SignalR. Or you can make it standalone ready and give it its own database and DAL (Scalability!) - Tests
Testing other projects with UnitTests
Join the conversation! Your thoughts help the community grow.