


Introduction
Welcome to our newest blog post, where we explore the vibrant realm of app development with .NET MAUI! In this detailed guide, we dive into the intricacies of the "DataGrid Control for .NET MAUI," an outstanding free plugin crafted to simplify your data management process. Uncover how this plugin enables developers to effortlessly sort, filter, and present data, elevating user experiences across cross-platform applications.
Telerik, SyncFusion, and DevExpress offer paid licenses, often accompanied by trial versions or community licenses under specific terms. However, DevExpress stands out by providing a set of controls that you can use absolutely free! As the demand for seamless data visualization and interaction grows, this free plugin emerges as a game-changer for .NET MAUI enthusiasts.
How can I obtain a free license for DevExpress?
- Visit the following link FREE Xamarin UI Controls.
- Click the "GET IT FREE" button on the screen, which will redirect you to another page.
- On this page, you need to enter your details and valid email ID.
- After the successful submission, the DevExpress team will send the Nuget API link to the entered email ID.
Table of Content
- Project Setup
- Install Plugin
- Implementation
- Demo
- Full Code
- Download Code
Project Setup
- Launch Visual Studio 2022, and in the start window, click Create a new project to create a new project.
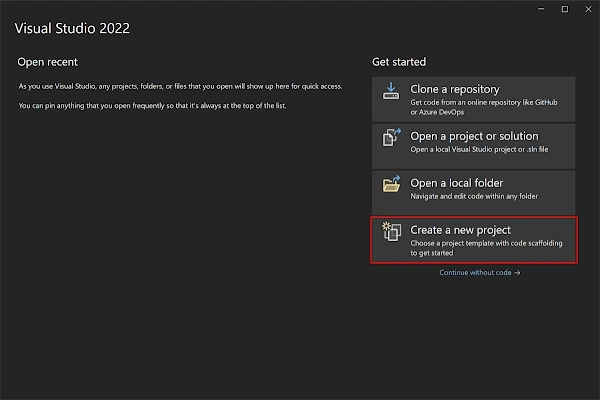
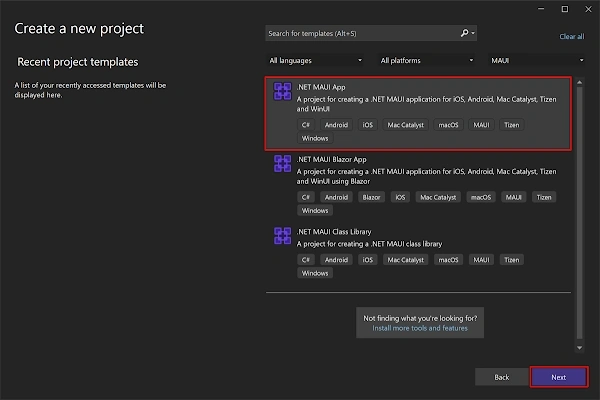
- In the Create a new project window, select MAUI in the All project types drop-down, select the .NET MAUI App template, and click the Next button.
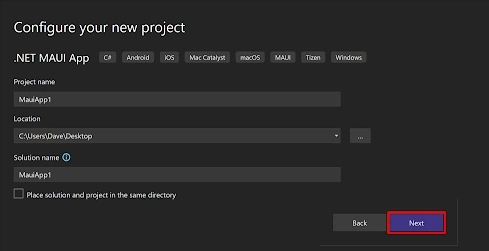
- In the configure your new project window, name your project, choose a suitable location for it, and click the Next button.
:
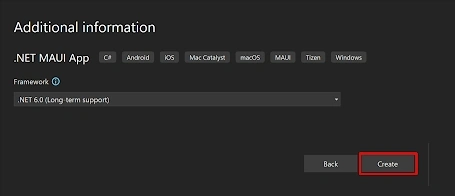
- In the Additional Information window, click the Create button.
- Once the project is created, we can able to see the Android, iOS, Windows, and other running options in the toolbar. Press the emulator or run button to build and run the app.

Install Plugin
In these steps, we will see the steps to install "DevExpress Grid" in Visual Studio 2022.

- Access NuGet Package Manager: In Visual Studio, right-click on your .NET MAUI project in the Solution Explorer. From the context menu, select "Manage NuGet Packages."
- Search for "DevExpress.XamarinForms.DataGrid": In the NuGet Package Manager, click on the "Browse" tab. In the search bar, type "DevExpress.XamarinForms.DataGrid" and hit Enter. The package should appear in the search results.
- Select and Install the Package: Once you find "DevExpress.XamarinForms.DataGrid" in the search results, click on it to select it. Ensure you choose the appropriate version compatible with your .NET MAUI project. Click on the "Install" button to begin the installation process.
- Accept License Agreement: During the installation, you may be prompted to accept the license agreement. Review the terms and conditions and click on the "Accept" button to proceed.
- Wait for Installation to Complete: Visual Studio will download and install the package along with its dependencies. This process may take a few moments, depending on your internet connection speed.
- Verify Installation: After the installation is complete, verify that there are no error messages in the Output window. This indicates a successful installation of the package.
Implementation of Data Grid Control For .NET MAUI
Open the MauiProgram.cs file, and add ".UseDevExpress()" in the builder like below.
var builder = MauiApp.CreateBuilder();
builder
.UseMauiApp<App>()
.UseDevExpress()
.ConfigureFonts(fonts =>
{
fonts.AddFont("OpenSans-Regular.ttf", "OpenSansRegular");
fonts.AddFont("OpenSans-Semibold.ttf", "OpenSansSemibold");
});
Add Namespace in XAML
In your .NET MAUI XAML files where you intend to use the Dev Express - DataGrid, make sure to add the appropriate XML namespace.
Example
xmlns:dxg="clr-namespace:DevExpress.Maui.DataGrid;assembly=DevExpress.Maui.DataGrid"
xmlns:dxe="clr-namespace:DevExpress.Maui.Editors;assembly=DevExpress.Maui.Editors"
xmlns:dxc="clr-namespace:DevExpress.Maui.Controls;assembly=DevExpress.Maui.Controls"
Adjust the namespace and assembly name based on the specifics of the DataGrid component you installed.
Implement DataGrid in Your XAML
You can now implement the DataGrid control in your XAML files using the namespace you added.
Example
<dg:DataGrid RefreshingEnabled="True"
             BackgroundColor="White"
                     IsRefreshing="{Binding Refreshing}"
                     PullToRefreshCommand="{Binding OnDataGridRefreshCommand}"
                     SelectionEnabled="True"
                     SelectedItem="{Binding SelectedItem}"
                     RowHeight="70"
                     HeaderHeight="70"
                     ItemsSource="{Binding Items}"
                     HeaderBackground="Red">

    <dg:DataGrid.NoDataView>
        <Label Text="Nothing to see here" HorizontalOptions="Center" VerticalOptions="Center" />
    </dg:DataGrid.NoDataView>
    <dg:DataGrid.Columns>
        <dg:DataGridColumn Title="Image" PropertyName="Image" Width="150" SortingEnabled="False">
            <dg:DataGridColumn.CellTemplate>
                <DataTemplate>
                    <Image Source="{Binding}" HorizontalOptions="Center" VerticalOptions="Center"
                           Aspect="AspectFit" HeightRequest="60" />
                </DataTemplate>
            </dg:DataGridColumn.CellTemplate>
        </dg:DataGridColumn>
        <dg:DataGridColumn Title="Name" PropertyName="Name" Width="100"/>
        <dg:DataGridColumn Title="Location" PropertyName="Location"  Width="100"/>
        <dg:DataGridColumn Title="Population" PropertyName="Population"  Width="100"/>
        <dg:DataGridColumn Title="Latitude" PropertyName="Latitude"  Width="100"/>
        <dg:DataGridColumn Title="Longitude" PropertyName="Longitude"  Width="100"/>
    </dg:DataGrid.Columns>
    <dg:DataGrid.RowsBackgroundColorPalette>
        <dg:PaletteCollection>
            <Color>#e1e1e1</Color>
            <Color>#ffffff</Color>
        </dg:PaletteCollection>
    </dg:DataGrid.RowsBackgroundColorPalette>
</dg:DataGrid>
Join the conversation! Your thoughts help the community grow.