
Introduction
Microsoft Visual Studio LightSwitch 2012 is a new streamlined development environment for designing data-centric business applications and helps you to build data-centric applications quickly, through visual means.
LightSwitch business applications are multi-tiered, featuring a client application and a combination of LINQ, WCF RIA Services and the Entity Framework to implement the application services tier.
Benefits of using LightSwitch?
There are many benefits of using LightSwitch as shown in the following list:
- You can create an application with just a few clicks and no code or coding only in the data models or substantial code within all parts of the application.
- Based on permission, LightSwitch supports distinct audiences of end-users (View & Edit Data), administrative (maintain certain master data) and Super-users (granted access to most or all of the data and functionality) .
- Support for built-in Business Types are included (like Email, PhoneNumber, money,..etc), and partners can create new Business Types.
- Enable Debug mode, and allows the screen to be edited interactively while the application is running.
- Enable adding custom business rules to any field in the screen.
- You can create custom controls and embed sophisticated behaviors there.
- LightSwitch produces desktop applications or pulls down and executed implicitly by navigating to a URL.
- Enables you to deploy your LightSwitch on Cloud and Azure as simple as running a wizard.
Start building the App
Now let's start building our application, I am going to list everything in details starting from opening Visual Studio 2012 until running the application. We will go throw the following steps.
Step 1 : Creating the Application
Creating new LightSwitch application is very simple , if you're familiar with any old version of Visual Studio as follows:
Open VS 2012 -> New project -> Select LightSwitch from project Template list -> Select LightSwitch application (C#),
and finally we will write the project name LighSwitchsubscriptionApp -> press Ok
Step 2 : Creating & Defining Data tables and relationships
The first thing to do for a LightSwitch application is to create a Data Table and you can do this in one of four ways:
- Click the Create new table link in the start up project page "Start with data" which is called [your project name] Designer
- Go to the Visual Studio menu bar Select Project -> Add table
- Right-click Project Name in the Solution Explorer then select Add table
- Connect to an existing data source (published on a Database, SharePoint, OData Services or WCF RIA Service) as mentioned in step 2 and 3, but select Add data source instead of the Add Table option.
Now I will create a Subscriber table as shown in the following figure:
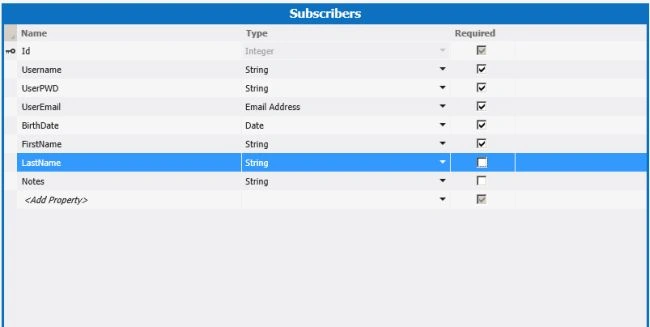
Let's take a look at the above picture, it contains a Useremail field with Data type Email, this is one of the new features of LightSwitch, that you can create a new field with new Business Types (like Email, Money, Phone, web address).
In addition, you can add a new static list field by selecting the choicelist link from the right side properties of any string field, for example, we will create choicelist for Gender (male, female).
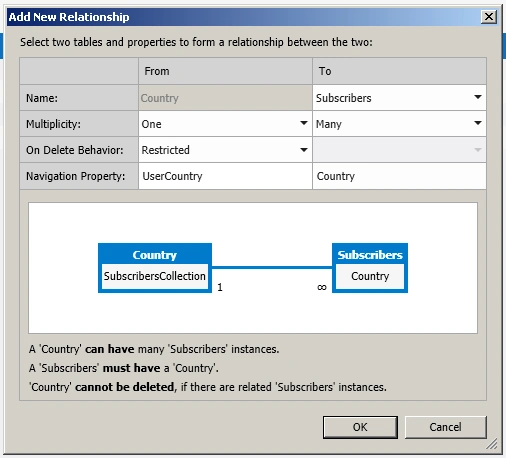
Usually any registration module needs a dropdown list of country field, but using LightSwitch makes the difference for you, we are not going to create a new control and write code to bind this control from the database, we are going to create a new table of countries and link it to our Subscriber table and link these two tables...Wowooooo.... by using the following steps:
- Create a new table called Country with one column (contryDesc).
- Then click Relationship… button in the toolbar.
- Finally build the relation between the subscriber and country tables as shown below:
Step 3 : Building Screens & Running the Application
Now, we are getting ready to Build the screens corresponding to Entities, you simply click the Screen button from the toolbar on the subscriber & Countries Table Design forms, this will open an Add "New screen" Dialog; then select the highlighted option as shown in the figure below, and finally press the Ok button.
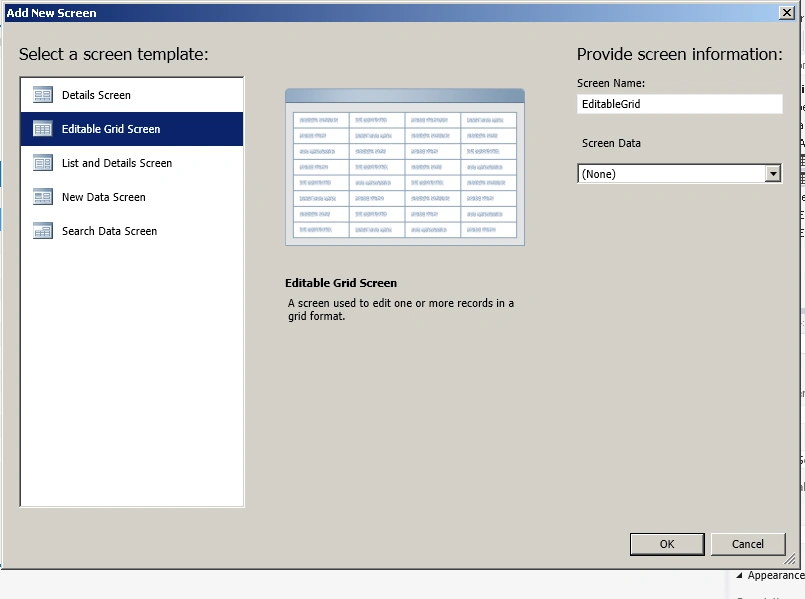
Repeat the same process above for country entity.
Finally, we can run the application by pressing the F5 key, then we will see the screen as shown in the figure below:
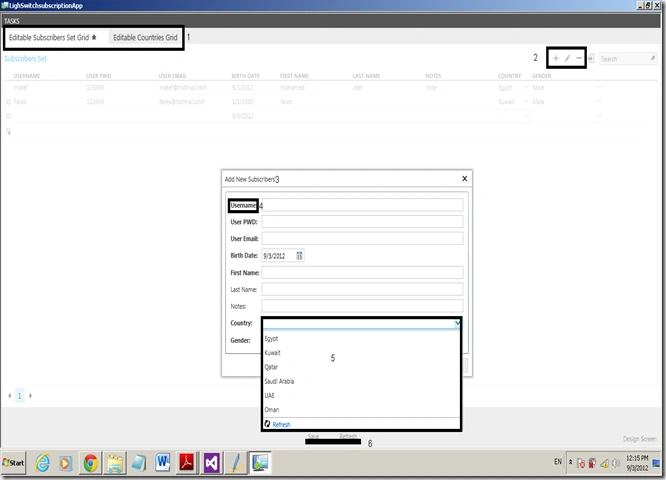
Now, let's go ahead and review the above screen as listed below:
- Box 1, represents two tabs for all entity screens we have created.
- Box 2, represents all actions available for this gridview Add, Delete, Edit, Search.
- Box 3, represents the Dialog screen that opens when you select the Add button.
- Box 4, shows the required fields marked as Bold.
- Box 5, shows the Country List that I have entered in the country entity.
- Box 6, includes the main actions for this screen (Save, Refresh).
There is another very important feature here, as you can see on the right bottom of the screen link [Design Screen], this link allows you to edit the screen Design on the execution mode, if and only if, you have run the application in Debug mode.
Eventually, we did not finish all features of LightSwitch, but I hope I can share other new features of LightSwitch 2012.
Conclusion
In this article, I have summarized the main points of Lightswtich, and I have went throw an example of the subscription Form using this amazing Microsoft tool, and finally we have built the application and used it with Zero Lines of code.
Join the conversation! Your thoughts help the community grow.