

Before reading this article, please go through the following articles-
- Developing Windows Store Apps: Introduction And Requirement Specification
- Plans For Designing Metro Style Apps (Windows Store Apps)
- Windows Store Application Life-Cycle
- Guidelines to Pass Windows Store App Certification
- Navigation Patterns to Develop Windows Store Application
- Templates to Develop Windows Store Apps
Introduction
In this article, we will start developing our first "hello world" program for the Windows Store.
After reading the articles listed above I hope it is not necessary to explain what Windows Store apps are. In this article, we will take a step-by-step look at the development of our first "hello world" Windows Store application. To develop a Windows Store app, as I mentioned in my first article, I hope you are ready with the software and hardware required to develop a Windows Store app. So let's start developing our first Windows Store app.
Step 1
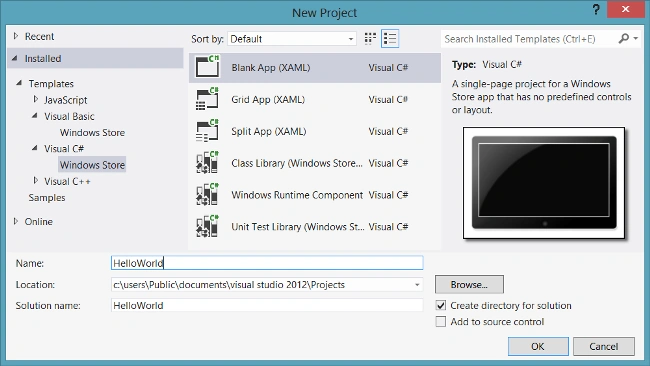
First, fire up your Visual Studio 2012 and then go to File -> New Project. Then the "New Project" dialog will open. In the "New Project" dialog in the left pane expand Installed-> Templates-> choose your language (Here I'm selecting Visual C#) -> Windows Store. After selecting Windows Store app on the left pane then look at the middle pane which shows the available Application Templates to develop a Windows Store application. For this demo, I'm selecting the "Blank App" template. After selecting the template to provide a name for the application in the name textbox as shown in the following image.
 Step 2
Once the new project has been created using the Blank App template, go to Solution Explorer and see what Visual Studio has done for us. It is a blank app but some default files have added which are required to develop basic Windows Store applications. See the following image to get an idea of what kind of file has been added by Visual Studio in your application.
Step 2
Once the new project has been created using the Blank App template, go to Solution Explorer and see what Visual Studio has done for us. It is a blank app but some default files have added which are required to develop basic Windows Store applications. See the following image to get an idea of what kind of file has been added by Visual Studio in your application.
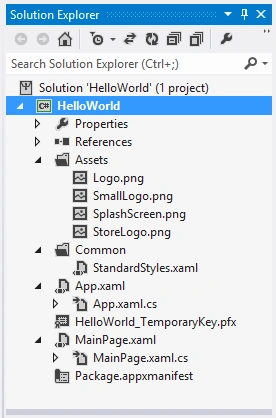 In the above image, you can see Visual Studio has added some default files when you created the new project. We will see what those files are and how to use them.
This is the folder in your Windows Store application project which contains some default images in it. This folder contains the Logo.png, SmallLogo.png, SplashScreen.png, and StoreLogo.png image files which each have one unique purpose; they are:
In the above image, you can see Visual Studio has added some default files when you created the new project. We will see what those files are and how to use them.
This is the folder in your Windows Store application project which contains some default images in it. This folder contains the Logo.png, SmallLogo.png, SplashScreen.png, and StoreLogo.png image files which each have one unique purpose; they are:
Assets
- Logo.png To define a default logo for our Windows Store application.
- SmallLogo.png- Small logo for our Windows Store application.
- SplashScreen.png- The default application Splash-Screen which first opens when we launch our app.
- StoreLogo.png- To denote our application in the Windows Store.
Common
App.xaml & App.xaml.cs
MainPage.xaml & MainPage.xaml.cs
Package.appxmanifest
<x:String x:Key="AppName">Hello, World!</x:String>

Krishna GaradPosted Nov 29, 2012, 5:37 AM
Thanks anil, Will post new one soon.
Anil KumarPosted Nov 29, 2012, 5:18 AM
Good one and waiting for next one...