

Introduction
Azure IoT Hub is a managed service of Azure cloud which acts as a central bi-directional message hub to exchange between IoT applications and devices. Azure IoT hub allows you to create reliable and secure communication between IoT devices and the Cloud app. The devices can be virtual. It supports bi-directional communication i.e. from the device to the cloud and from the cloud to the device. In this article, I will explain how can you send the message from Cloud to Device and Device to Cloud.
Prerequisites
- Azure account
- Visual Studio
- Port 8883 is open in your firewall as MQTT protocol communicates over port 8883
- Azure IoT service SDK
In my previous article, I explained how you can create IoT Hub and Devices. In this article, I will explain how can we do devices to cloud communication and vice versa using the IoT Hub. Here, you will learn how to send telemetry from simulated device applications to IoT Hub, and how can you read messages send by IoT Hub. I will explain C2D (cloud to device) and D2C (device to cloud) communication using the .NET app.
IoT hub connection string
You can connect to the IoT Hub using a connection string. You can get the connection string from "Shared access policies". You can view and modify the IoT hub shared access policies by clicking on the "Shared access policy" from the left panel under the setting section. There are some pre-defined shared access policies that are defined. You can add your custom shared access policy. Basically, it contains the permission of IoT hub access. Under the "Shared access keys" section (right side), you find connection strings.

Send a cloud to device (C2D) message
In the earlier section, you learned about how can you get a connection string to connect with IoT Hub. The IoT hub access right is associated with every shared access policy. To connect with IoT hub as a device, the policy must contain "Service Connect" access.
The next step is to install "Microsoft.Azure.Devices" package using Nuget package manager. You can install the required package by going to "Tools >> Nuget Package Manager >> Manage Nuget Packages for solution".
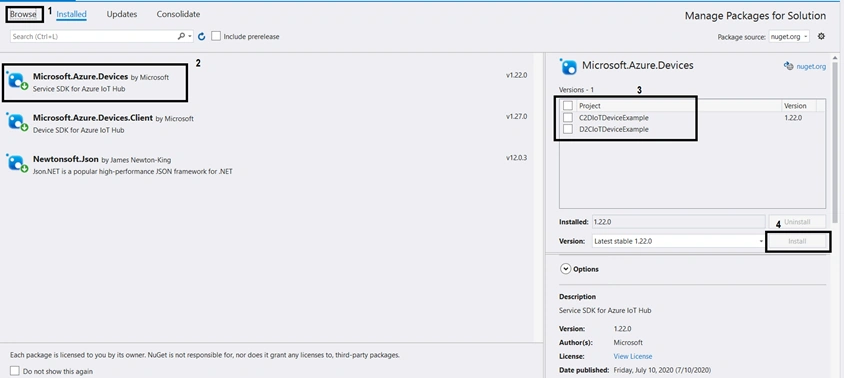
The "Microsoft.Azure.Devices" namespace contains the ServiceClient class. This class contains methods that useful in sending a message to the device.
To create a ServiceClient class instance, you can use "ServiceClient.CreateFromConnectionString" method. This method creates a class instance from the connection string. The method "SendAsync" of this class is used to send messages to the device. This method accepts the device ID and message as a mandatory parameter. Following is an example code to send the message:
- static ServiceClient serviceClient;
- static string connectionString = "{Connection string ";
- static string deviceName = "Device name";
- static void Main(string[] args)
- {
- Console.WriteLine("=== Creating ServiceClient object using Connection string! ===");
- serviceClient = ServiceClient.CreateFromConnectionString(connectionString);
- Console.WriteLine("Press any key to send data to IOT Hub!");
- //Waiting for press any key
- Console.ReadLine();
- //Send message to IoT Hub and wait until the message sent
- SendMessageToCloud().Wait();
- Console.ReadLine();
- }
- private static async Task SendMessageToCloud()
- {
- MyData data = new MyData { Id = "123", Name = "Jignesh Trivedi" };
- var serializeData = JsonConvert.SerializeObject(data);
- var commandMessage = new Message(Encoding.ASCII.GetBytes(serializeData));
- Console.WriteLine("Send Message: {0}", serializeData);
- await serviceClient.SendAsync(deviceName, commandMessage);
- }
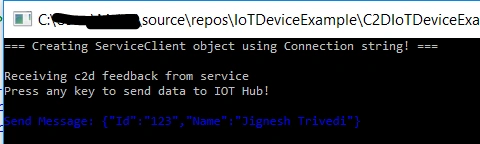
Receive delivery feedback
It is also possible to request delivery acknowledgment or expiration from the IoT hub for each C2D message. This is very useful in callback mechanism where you can easily write retry logic.
You can get a delivery feedback receiver object using GetFeedbackReceiver method of ServiceClient. Using method "FeedbackBatch.ReceiveAsync", acknowledgment message can be received. By default, ReceiveAsync method is considered a default time out but you can also specify timeout with this method.
- static void Main(string[] args)
- {
- ...
- ...
- serviceClient = ServiceClient.CreateFromConnectionString(connectionString);
- //Create Feedback receiver that continuous monitor for feedback
- ReceiveFeedbackAsync();
- ...
- }




Join the conversation! Your thoughts help the community grow.