

Introduction
While creating a SPFx web part in a SharePoint site, we need to send email to any user for notification. We have a couple of options. In this article, we will see different options to send emails. We will also see the pros and cons of each of them. We are going to cover 3 ways to send an email notification, using PNP Js, Power Automate, and using MS Graph API.
For this, I created a react based web part. Which do have one textbox and three buttons As shown in the images, there is one textbox for entering Email ID. One button for sending an email using "Pnp js", one for Power Automate and one for MS Graph.
For this example, I am not going to cover basic operations like creating a SPFx web part using the Yeoman generation and deploying it in the SharePoint site. For that, you can check how to get started from MSDN.
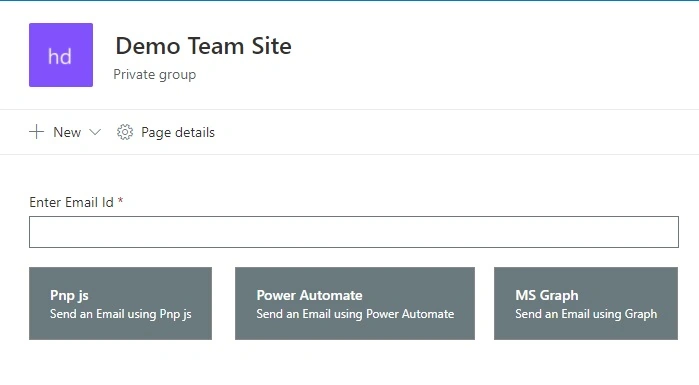
Here is the code for creating UI in "SendEmailWebPart.ts"
As shown in the code below, the first set state for initial values and set up for PNP js operation. Then in render method added Message bar for notification, one Textfield, and 3 Compound Button for each operation.
- export default class SendEmail extends React.Component<ISendEmailProps, ISendEmailState, {}> {
- constructor(props: ISendEmailProps, state: ISendEmailState) {
- super(props);
- //Set initial value for state
- this.state = ({
- emailId: "",
- statusMessage: {
- isShowMessage: false,
- message: "",
- messageType: 90000
- }
- });
- //Set UP for PNP Operation
- sp.setup({
- spfxContext : this.props.wpContext
- });
- }
- public render(): React.ReactElement<ISendEmailProps> {
- return (
- <div className={styles.sendEmail}>
- {/* Show Message bar for Notification*/}
- {this.state.statusMessage.isShowMessage ?
- <MessageBar
- messageBarType={this.state.statusMessage.messageType}
- isMultiline={false}
- dismissButtonAriaLabel="Close"
- >{this.state.statusMessage.message}</MessageBar>
- : ''}
- {/* Text field for entering Email id*/}
- <TextField required label="Enter Email Id" value={this.state.emailId} onChange={(e) => this.OnChangeTextBox(e)} /><br />
- {/* Button for Send Email using PNP Js*/}
- <CompoundButton onClick={() => this.SendAnEmilUsingPnpJs()} primary secondaryText="Send an Email using Pnp js" >
- Pnp js
- </CompoundButton>
- {/* Button for Send Email using Power Automate*/}
- <CompoundButton onClick={() => this.SendAnEmilUsingPowerAutomate()} primary secondaryText="Send an Email using Power Automate" >
- Power Automate
- </CompoundButton>
- {/* Button for Send Email using Graph API*/}
- <CompoundButton onClick={() => this.SendAnEmilUsingMSGraph()} primary secondaryText="Send an Email using Graph" >
- MS Graph
- </CompoundButton>
- </div>
- );
- }
- }
- import { WebPartContext } from "@microsoft/sp-webpart-base";
- export interface ISendEmailProps {
- description: string;
- wpContext:WebPartContext;
- msGraphClientFactory : any;
- }
- export interface ISendEmailState {
- emailId: string;
- statusMessage:IMessage;
- }
- export interface IMessage{
- isShowMessage:boolean;
- messageType:number;
- message:string;
- }
- private OnChangeTextBox(e): void {
- this.setState({
- emailId: e.target.value
- });
- }
Send Email using PNP Js
In this method, the mail is sent using "sp.utility" class of PNP js. This is the easiest method out of 3. However, this comes with its limitations as well. We can not add attachment and mail can not be sent out of the organization. You can read the documentation here.
Here is the implementation method:
- //Send Mail using PNP Js
- private SendAnEmilUsingPnpJs(): void {
- //Check if TextField value is empty or not
- if (this.state.emailId) {
- //Send Email using SP Utility
- sp.utility.sendEmail({
- //Body of Email
- Body: "This Email is sent using <b>PNP Js</b>",
- //Subject of Email
- Subject: "Mail Sent using PNP js",
- //Array of string for To of Email
- To: [this.state.emailId],
- }).then((i) => {
- //Set Success Message Bar after sending Email
- this.setState({
- statusMessage: { isShowMessage: true, message: "Email Sent using PNP Js", messageType: 4 }
- });
- }).catch((i) => {
- //Set Error Message Bar for any error
- this.setState({
- statusMessage: { isShowMessage: true, message: "Error", messageType: 1 }
- });
- });
- }
- else {
- this.setState({
- statusMessage: { isShowMessage: true, message: "Please Enter Email ID", messageType: 1 }
- });
- }
- }
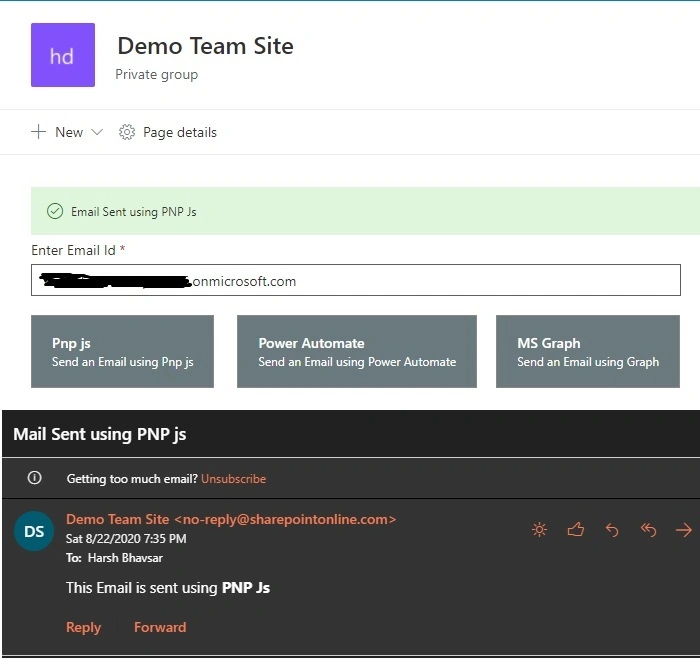
Sending Email to Internal user - With this method, we can only send email to users that are in our organization. As shown in the below image, mail is received from [email protected]
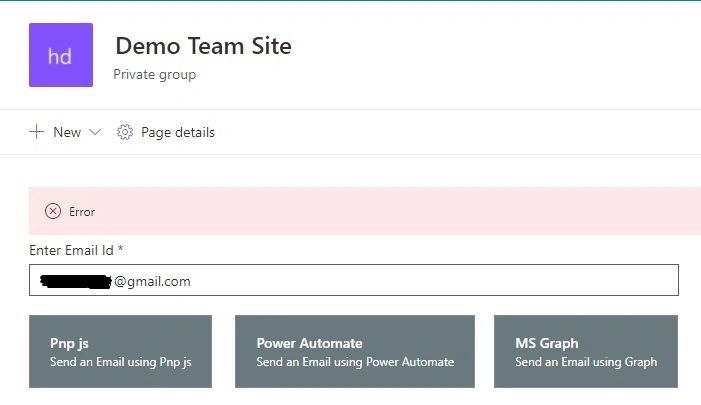
Sending Email to External user - Using this method, we can not send emails to external users like gmail.com or live.com users. This will give an error if we try to do so. As shown in the image below, I am trying to send an email to the Gmail account and it's giving an error.
From Address - As per documentation, we can set From address as a parameter. However, this will only change the title of from address. An email address will be always [email protected]
| Pros | Cons |
|
|
Send Email using Power Automate
In this method, mail is sent using power automate. For that, first, create one flow from the Instant template from the Power automate dashboard.
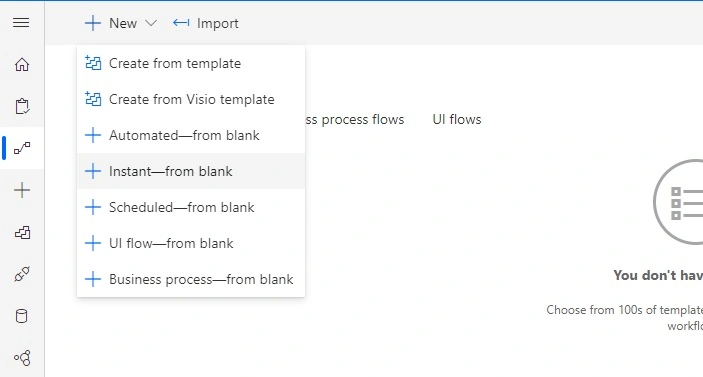
Now, add "When an HTTP request is received" from available activities and configure one variable toEmailId in JSON schema and another activity "Send an email (V2)" as shown in the image below.
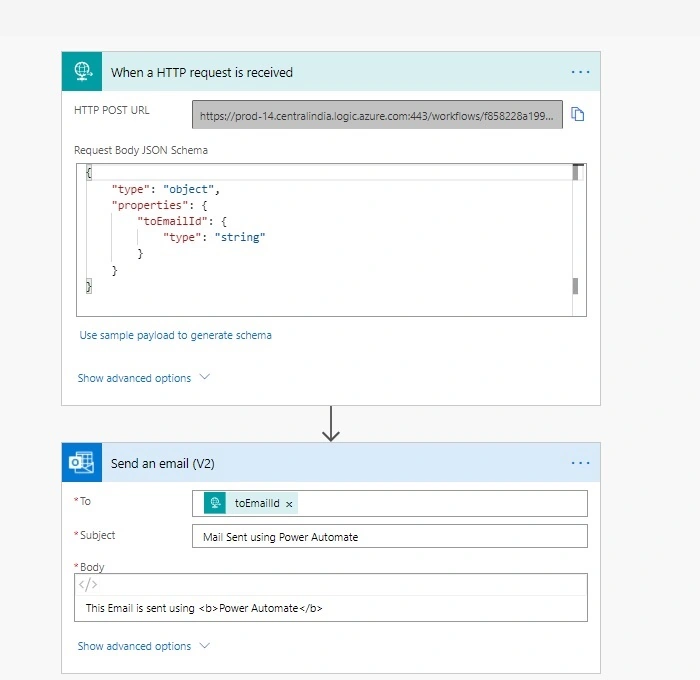
Note - "When an HTTP request is received" this connector is now premium connector. So, check the pricing structure first in tenant that you are using it before implementing this.
Copy "HTTP POST URL" from the first activity and paste this URL in code below as sendEmailUrl variable.
- private SendAnEmilUsingPowerAutomate(): void {
- //Check if TextField value is empty or not
- if (this.state.emailId) {
- //HTTP POST URL
- const sendEmailUrl = "URL";
- //Set Header
- const requestHeaders: Headers = new Headers();
- requestHeaders.append("Content-type", "application/json");
- //Rest API call to trigger flow
- this.props.wpContext.httpClient.post(sendEmailUrl, HttpClient.configurations.v1, {
- headers: requestHeaders,
- body: `{ toEmailId: '${this.state.emailId}'}`
- }).then((response: HttpClientResponse) => {
- //Set Success Message Bar after calling flow
- if (response.ok) {
- this.setState({
- statusMessage: { isShowMessage: true, message: "Email Sent using Power Automate", messageType: 4 }
- });
- }
- //Set Error Message Bar for any error
- else {
- this.setState({
- statusMessage: { isShowMessage: true, message: 'Error', messageType: 1 }
- });
- }
- }).catch((response: any) => {
- this.setState({
- statusMessage: { isShowMessage: true, message: 'Error', messageType: 1 }
- });
- });
- }
- else {
- this.setState({
- statusMessage: { isShowMessage: true, message: "Please Enter Email ID", messageType: 1 }
- });
- }
- }
Send Email to any user - Using this method, we can send email to any user either from organization or outside from organization
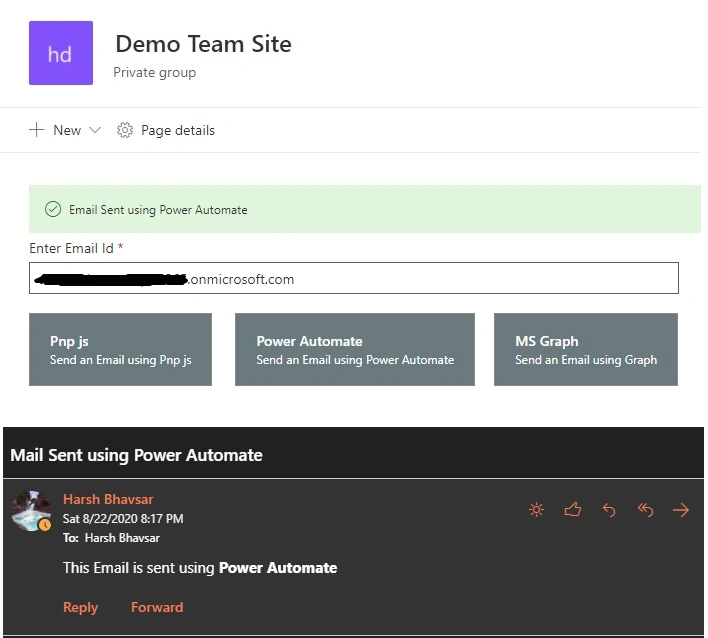
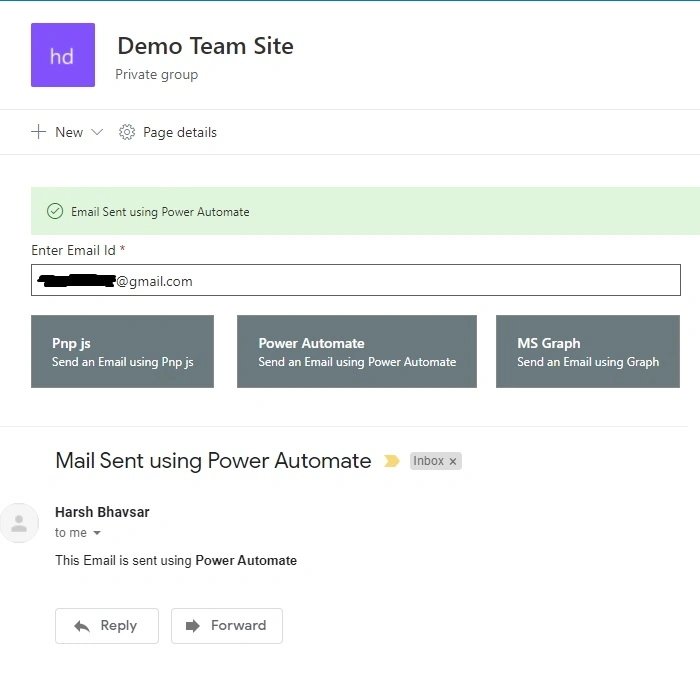
As shown in the images above, we can send emails to users from the organization and personal email as well like Gmail.
From Address - Email is sent from the address by which connection is established for "Send an email (V2)" activity.
As in this method, we are just calling flow from URL, we can not get any response from flow back to the web part. In response, we can only get if the flow is called or not. So, if any error occurred in flow, we can not handle that in the web part.
As in this method, we are just calling flow from URL, we can not get any response from flow back to the web part. In response, we can only get if the flow is called or not. So, if any error occurred in flow, we can not handle that in the web part.
| Pros | Cons |
|
|
Send Email using MS Graph
In this way. mail is being sent using Graph API. You can read the full documentation for Graph API to send an email here
You need to install npm package "@microsoft/microsoft-graph-types" and add necessary permission in "package-solution.json" file.
Install npm package "@microsoft/microsoft-graph-types" using below command in CMD
- npm install @microsoft/microsoft-graph-types --save-dev
- "webApiPermissionRequests": [
- {
- "resource": "Microsoft Graph",
- "scope": "User.ReadBasic.All"
- },
- {
- "resource": "Microsoft Graph",
- "scope": "Mail.Send"
- }
- ]
Here is the implementation method for the same.
- private SendAnEmilUsingMSGraph(): void {
- //Check if TextField value is empty or not
- if (this.state.emailId) {
- //Create Body fpr Email
- let emailPostBody: any = {
- "message": {
- "subject": "Mail Sent using MS Graph",
- "body": {
- "contentType": "HTML",
- "content": "This Email is sent using <b>MS Graph</b>"
- },
- "toRecipients": [
- {
- "emailAddress": {
- "address": this.state.emailId
- }
- }
- ],
- }
- };
- //Send Email uisng MS Graph
- this.props.msGraphClientFactory
- .getClient()
- .then((client: MSGraphClient): void => {
- client
- .api('/me/sendMail')
- .post(emailPostBody, (error, response: any, rawResponse?: any) => {
- //Set Error Message Bar for any error
- if (error) {
- this.setState({
- statusMessage: { isShowMessage: true, message: error.message, messageType: 1 }
- });
- }
- //Set Success Message Bar after Sending Email
- else {
- this.setState({
- statusMessage: { isShowMessage: true, message: "Email Sent using MS Graph", messageType: 4 }
- });
- }
- });
- });
- }
- else {
- this.setState({
- statusMessage: { isShowMessage: true, message: "Please Enter Email ID", messageType: 1 }
- });
- }
- }
- }
Send Email to any user - Using this method, we can send email to any user either from organization or outside from organization
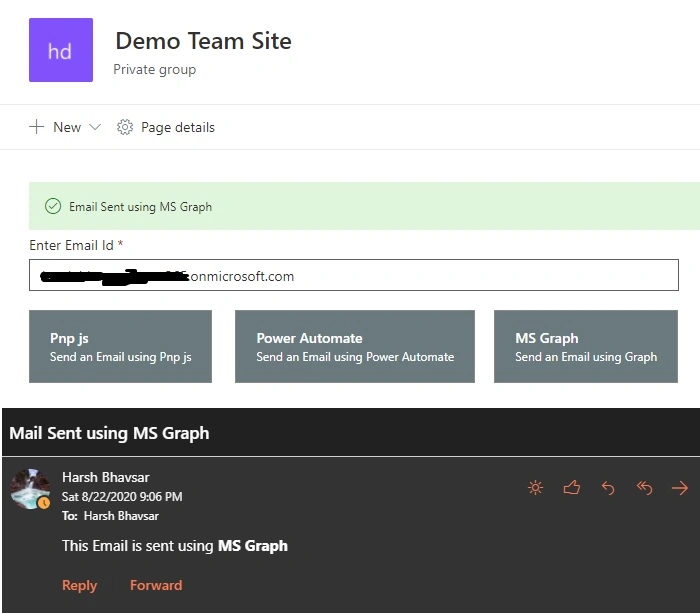
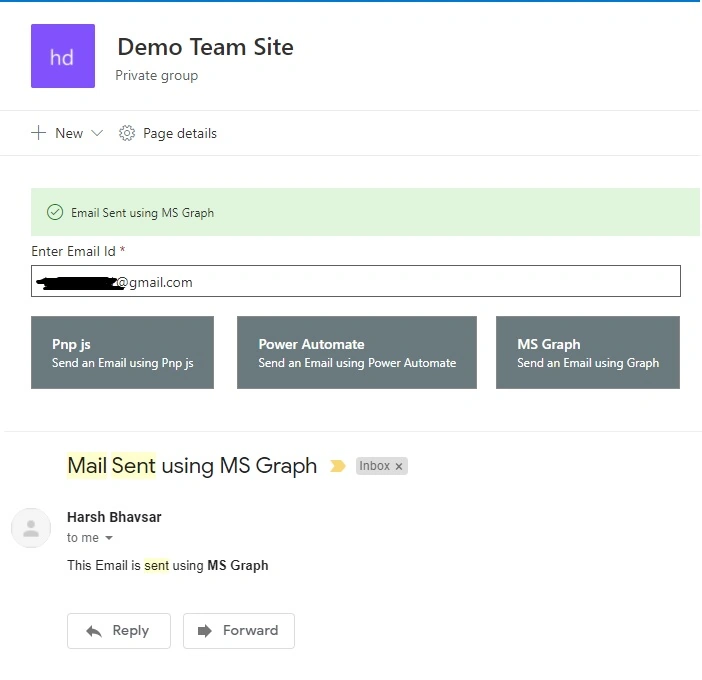
As shown in the images above, we can send emails to users from the organization and personal email as well such as Gmail.
From Address - By default, email is sent using the current user's email address. However, we can also send email from shared-mailbox.
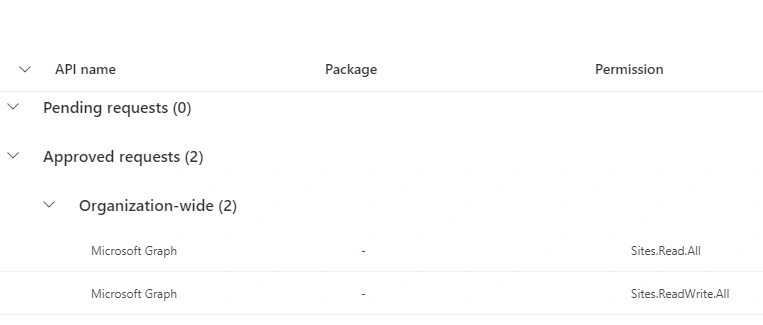
As we set permission explicitly, the admin must approve the mentioned API access from the admin center. For that open SharePoint admin center (https://[Tenat]-admin.sharepoint.com/), go to API access under Advanced from the left navigation, and approve pending requests. After approving it will be under Approved Requests.
| Pros | Cons |
|
|
Conclusion
So, based on the requirements, you can pick any method which suits you best. If, you need to send an email notification to only users from the organization and also attachment is not required, then PNP js is a good option. However, if email notification should be sent outside of the organization or you need the attachment, then Send Email using power automate or using MS Graph is appropriate.
Join the conversation! Your thoughts help the community grow.