

Some custom requirements of clients are that cells or rows that are colored in red are pending, and those in green are completed. This helps them to know which one is pending and which one is completed. If you are new to MVC and don’t have knowledge about grids then have a look at the following articles:
- Creating-simple-webgrid-in-mvc-4-using-simple-model-and-data
- Filter-WebGrid-with-cascading-dropdown list-along-with-paging
- Load-on-demand-data-in-WebGrid-on-scroll-using-Asp-Net-MVC
Creating Application
Open Visual Studio IDE
From Visual Studio IDE Menus select File, New, then Project.
A New Project dialog will pop up from that. In the left panel select Templates and inside that select Visual C#, then Web. After that in Center Panel you will see List of ASP.NET Templates from that we are going to select “ASP.NET MVC 4 Web Application.” After selecting, just name your Project as “DEMO_WEBGRID” and finally click on the OK button to create project.
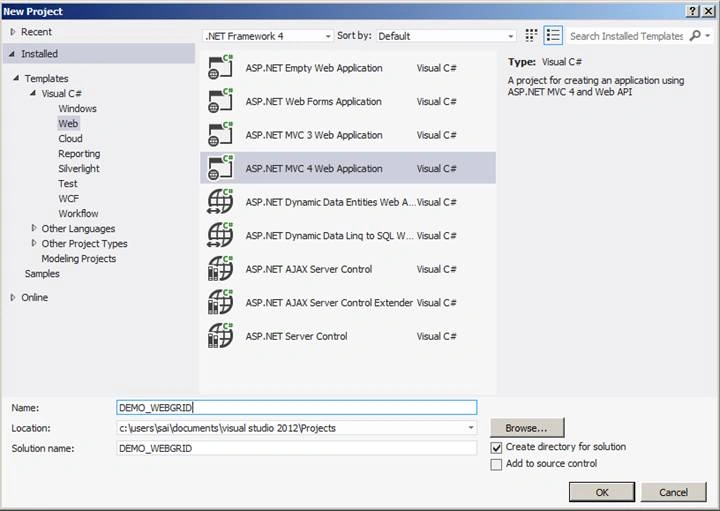
Figure 1: Selecting Template
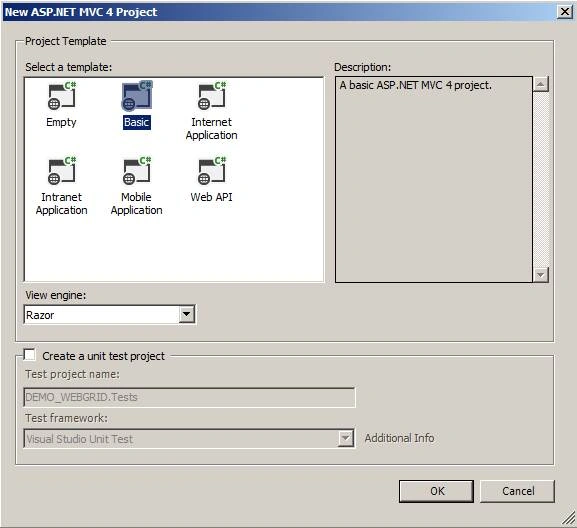
Figure 2: Selecting MVC 4 Project
After selecting all options as told above now click the OK button and your project will be created.
Project structure after adding.
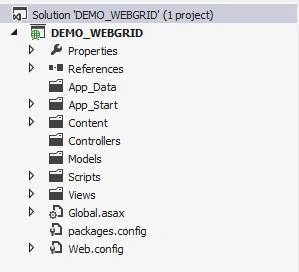
Figure 3: Project structure
After creating project now let’s add a simple model.
Adding Model (OrderModel)
For adding model in solution explore, just right click on Model folder and select Add then inside that select Class and then Name class as OrderModel and finally click on Add button to create Model.
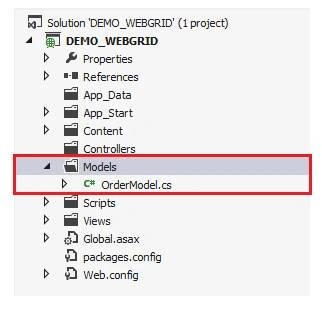
Figure 4: Adding OrderModel
Adding Property to (OrderModel) Model, After adding model lets us add property to this model.
- using System;
- using System.Collections.Generic;
- using System.Linq;
- using System.Web;
- namespace MvcApplication6.Models
- {
- public class OrderModel
- {
- public int OrderID
- {
- get;
- set;
- }
- public string OrderName
- {
- get;
- set;
- }
- public string OrderType
- {
- get;
- set;
- }
- public int OrderPrice
- {
- get;
- set;
- }
- public string PaymentStatus
- {
- get;
- set;
- }
- }
- }
To add controller just right click on Controllers folder then select Add from list and inside that select controller.
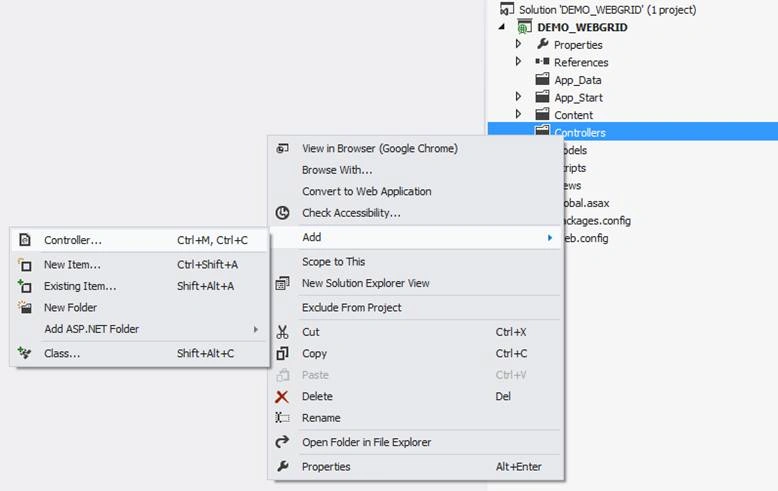
Figure 5: Adding Controller (Home Controller)
After selecting controller, a new dialog will pop up with the name Add Controller.
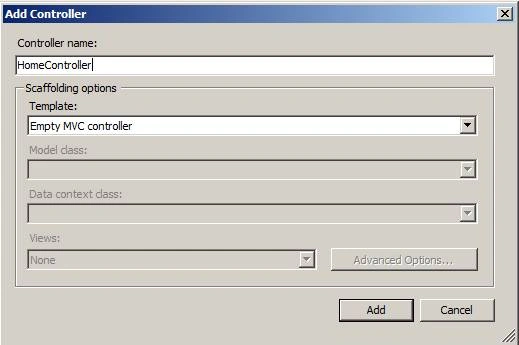
In the template we are going to select Empty MVC controller. Finally click on Add button to create HomeController.
After adding HomeController you will see Index Action Method created by default.
I am going to rename Index action Method to DisplayGrid.
Inside DisplayGrid action method I am going to create a List of (List<OrderModel>) and then going to add OrderModel. In this List we are going to display this data on grid. If you want you can replace this entire list and get data from the database and display in grid.
HomeController code snippet
Code snippet of HomeController with DisplayGrid Action Method.
- using DEMO_WEBGRID.Models;
- using System;
- using System.Collections.Generic;
- using System.Linq;
- using System.Web;
- using System.Web.Mvc;
- namespace DEMO_WEBGRID.Controllers
- {
- public class HomeController: Controller
- {
- public ActionResult DisplayGrid()
- {
- List < OrderModel > LW = new List < OrderModel > ()
- {
- new OrderModel
- {
- OrderID = 1,
- OrderName = "Rice Plate Full",
- OrderPrice = 500,
- OrderType = "Hotel",
- PaymentStatus = "Done"
- },
- new OrderModel
- {
- OrderID = 2,
- OrderName = "Masala dosa",
- OrderPrice = 300,
- OrderType = "Online",
- PaymentStatus = "Pending"
- },
- new OrderModel
- {
- OrderID = 3,
- OrderName = "Pav bhaji masala",
- OrderPrice = 300,
- OrderType = "Online",
- PaymentStatus = "Done"
- },
- new OrderModel
- {
- OrderID = 4,
- OrderName = "Straw Berry shake",
- OrderPrice = 200,
- OrderType = "Online",
- PaymentStatus = "Pending"
- }
- };
- return View(LW);
- }
- }
- }
Adding View for DisplayGrid Action Method
For adding View just right click inside Action Method and then select Add View from List that pop ups.
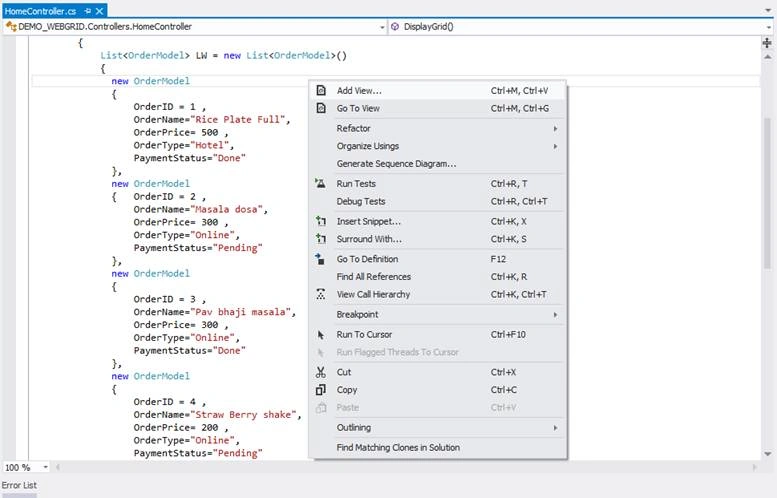
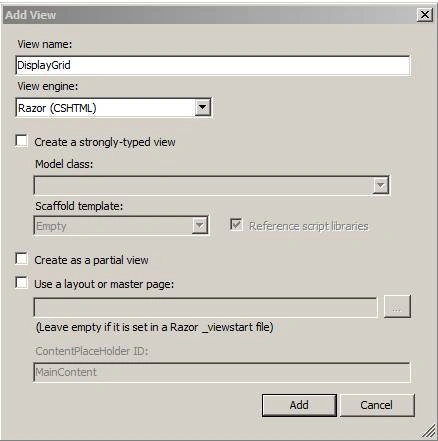
Figure 6: Adding DisplayGrid View
In this dialog of Add view we are not going on to select any Model because we are going to manually add it. After creating View the name of View will be the same as that of Action Method. After doing the required things now let’s click on add to Add a View.
This view will be added inthe Views folder; inside that there will be a folder with the name of your Controller and all views related to that controller will be kept inside that.
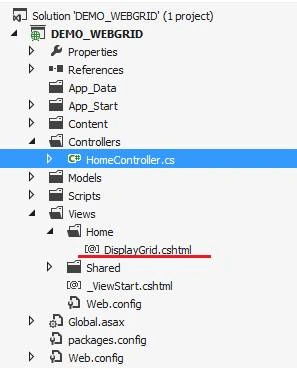
Figure 7: After adding DisplayGrid View
Now we havea simple layout with some html tags.
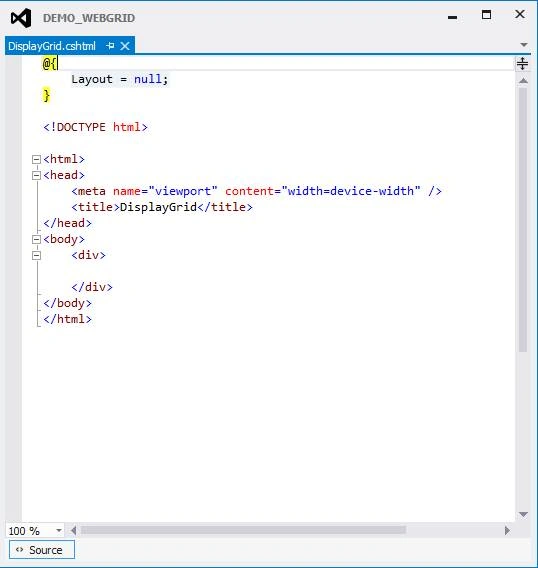
Now let’s add Model to this View.
Adding OrderModel to DisplayGrid View
We are going to add List of Order Model to View because we are going to display all this data in WebGrid.
@model List<DEMO_WEBGRID.Models.OrderModel>
After adding Model reference to View now we are going to add a WebGrid to this view to display data.
I have used a simple web grid and added a column which I want to display. And also I have given Id to this grid with the name “gridMapping”.
Code snippet of WebGrid
- @ {
- var grid = new WebGrid(Model, canPage: true, rowsPerPage: 5);
- grid.Pager(WebGridPagerModes.All);
- }
- @grid.GetHtml(
- htmlAttributes: new
- {
- id = "gridMapping"
- },
- tableStyle: "table table-bordered",
- headerStyle: "info",
- footerStyle: "webgrid-footer",
- alternatingRowStyle: "webgrid-alternating-row",
- selectedRowStyle: "webgrid-selected-row",
- rowStyle: "gridrow",
- columns: grid.Columns(
- grid.Column("OrderID", "OrderID"),
- grid.Column("OrderName", "Order Name"),
- grid.Column("OrderType", "Type"),
- grid.Column("OrderPrice", "Price"),
- grid.Column("PaymentStatus", "Payment Status")
- )
- )
Code snippet of complete DisplayGrid view
- @model List < DEMO_WEBGRID.Models.OrderModel >
- @ {
- Layout = null;
- } < !DOCTYPE html >
- < html >
- < head >
- < meta name = "viewport"
- content = "width=device-width" / >
- < title > DisplayGrid < /title> < /head> < body >
- < div >
- @ {
- var grid = new WebGrid(Model, canPage: true, rowsPerPage: 5);
- grid.Pager(WebGridPagerModes.All);
- }
- @grid.GetHtml(
- htmlAttributes: new
- {
- id = "gridMapping"
- },
- tableStyle: "table table-bordered",
- headerStyle: "info",
- footerStyle: "webgrid-footer",
- alternatingRowStyle: "webgrid-alternating-row",
- selectedRowStyle: "webgrid-selected-row",
- rowStyle: "gridrow",
- columns: grid.Columns(
- grid.Column("OrderID", "OrderID"),
- grid.Column("OrderName", "Order Name"),
- grid.Column("OrderType", "Type"),
- grid.Column("OrderPrice", "Price"),
- grid.Column("PaymentStatus", "Payment Status")
- )
- ) < /div> < /body> < /html>
Now save your application and run.
To Access this View enter URL.
e.g. #### is your Port number on which IIS is running.
Some Error of WebGrid if it is not Added or Reference
After running some people may finda compile time error.
Compiler Error Message: CS0246: The type or namespace name 'WebGrid' could not be found. (Are you missing a using directive or an assembly reference?)
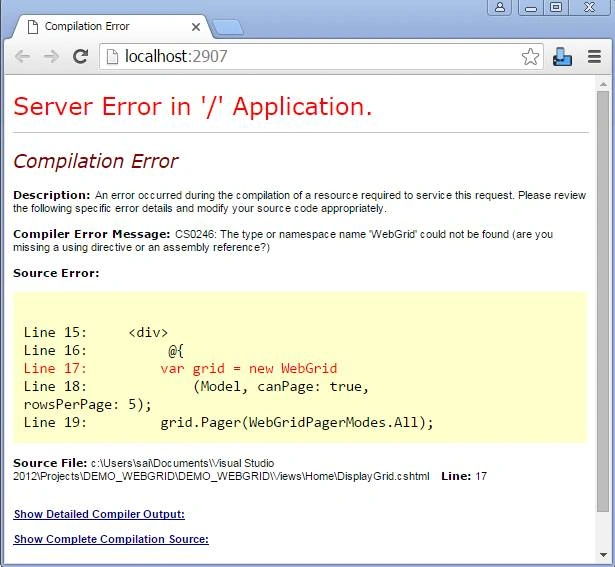
Figure 8: Compile time error.
To resolve this error just Add Reference of [System.Web.Helpers.dll, v2.0.0.0] to your project.
Adding Reference of Web Helpers 2.0 to Project
To add Reference just right click on Reference tab in project and select Add Reference from list.
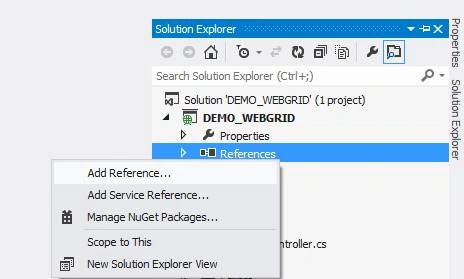
Figure 9: Add Reference.
After that a new dialog of Reference Manager will pop up from that, just select Extensions Menu from left panel.
And then find [System.Web.Helpers.dll, v2.0.0.0] i the list and check it and click on OK button.
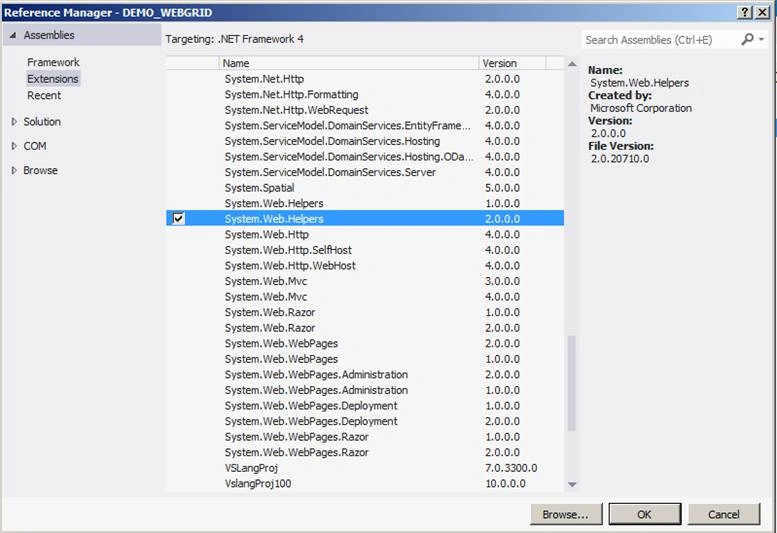
Still some people might get an error. To resolve this you need to right click on [System.Web.Helpers] in reference tab and then Select Properties from the list, and in Properties there is an option named Copy Local. Just change it from False to True.
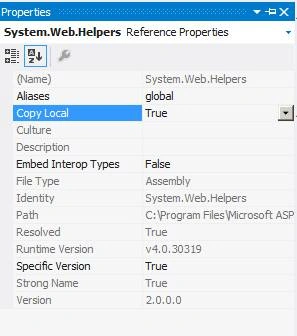
Save and Run Application to see changes
After doing these changes now save your application and run project.
And access URL.
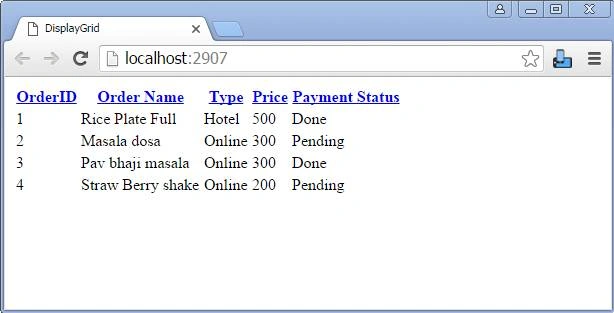
Figure 10: Simple DisplayGrid View.
Downloading and adding script and css of Bootstrap to project.
A simple WebGrid is displayed.
Now we have a question that it's a simple grid without any css; for adding .css we are going to use Bootstrap.
I have downloaded Bootstrap files from the site (http://getbootstrap.com/ ) and added a folder to your project.
Link to download Bootstrap.
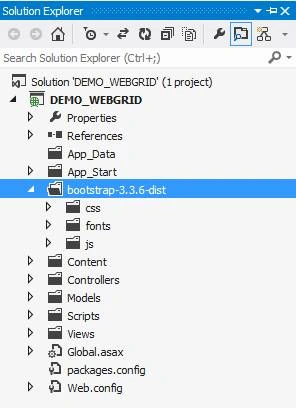
Figure 11: After adding Bootstrap folder.
Adding Script and .css Reference to DisplayGrid View.
After adding Bootstrap now I am going to add .css and scripts of Bootstrap to format WebGrid.
- <link href="~/bootstrap-3.3.6-dist/css/bootstrap.min.css" rel="stylesheet" />
- <script src="~/Scripts/jquery-1.9.1.js"></script>
- <script src="~/bootstrap-3.3.6-dist/js/bootstrap.js"></script>
- <style type="text/css">
- .mainpanel
- {
- margin-left: 230px;
- min-height: 636px;
- padding: 20px;
- padding-top: 20px;
- padding-right: 20px;
- padding-bottom: 20px;
- padding-left: 20px;
- }
- .info th
- {
- background: #E0E0E0 !important;
- }
- .info th a
- {
- color: #000000;
- font-weight: normal;
- }
- </style>
Save and Run Application to see changes
And access URL.
Grid is looking better than before.
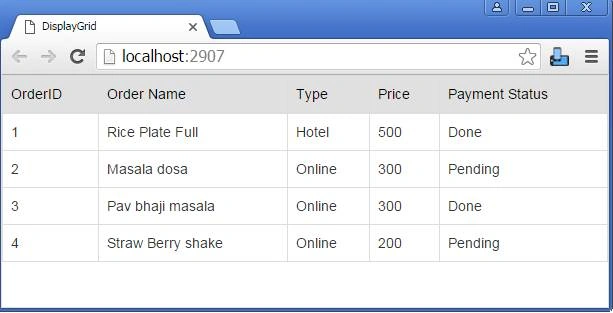
Figure 12: After adding bootstrap .css to WebGrid.
After formatting I have a condition that in a column where I have Payment Status, according to its payment status, I want to display the color in the grid column.
e.g.
- if(text == “Done”)
- {
- Color = ”green”;
- }
- else
- {
- Color = ”Red”;
- }
In the following script onthe loading of the page I am going to check what the current value is inthe 5th column of the grid and according to that I will apply color to that column. If it is [Done], then Green and if [Pending], then it will be Red.
Displaying Column colored on base of condition
- <script type="text/javascript">
- $(document).ready(function()
- {
- $('#gridMapping > tbody > tr').each(function(index)
- {
- if ($(this).children('td:nth-child(5)').text() == "Done")
- {
- $(this).children('td:nth-child(5)').css("background-color", "#33CC99");
- } else
- {
- $(this).children('td:nth-child(5)').css("background-color", "#FFCC99");
- }
- });
- });
- </script>
After adding the above script to DisplayGrid View just save your application and run project.
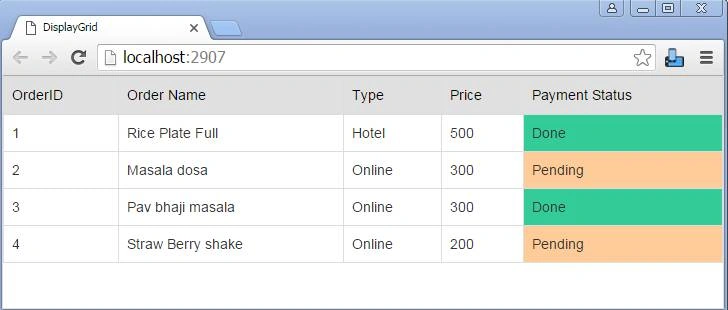
Figure 13: After adding color to column in WebGrid.
Final view after applying color to column in Grid; if you want color on the basis of some other parameter then you do it.
After coloring this column, if some other requirement -- such as the user wants the entire row to be colore -- then see the following script.
Displaying entire row colored on base of condition
- <script type="text/javascript">
- $(document).ready(function()
- {
- $('#gridMapping > tbody > tr').each(function(index)
- {
- if ($(this).children('td:nth-child(5)').text() == "Done")
- {
- $(this).children('td').css("background-color", "#33CC99");
- } else
- {
- $(this).children('td').css("background-color", "#FFCC99");
- }
- });
- });
- </script>
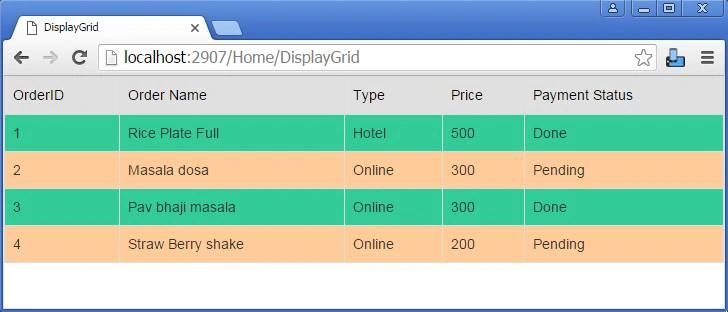
Figure 14: After adding color to Entire Row in WebGrid.
Displaying the entire row color change on mouse hover. Add simple css in page header and simply do mouse over and have fun.
- <style type="text/css">
- #gridMapping tr:hover
- {
- background-color: #F5DEB3;
- }
- </style>
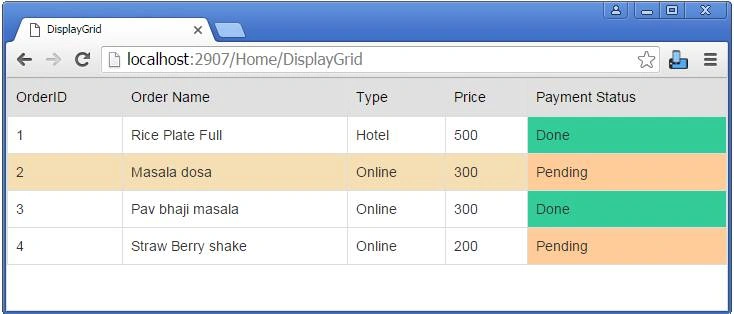
Figure 15: Displaying color on mouse hover on Row WebGrid.
Code snippet of DisplayGrid View
- @model List < DEMO_WEBGRID.Models.OrderModel >
- @ {
- Layout = null;
- } < !DOCTYPE html >
- < html >
- < head >
- < meta name = "viewport"
- content = "width=device-width" / >
- < title > DisplayGrid < /title>
- < link href = "~/bootstrap-3.3.6-dist/css/bootstrap.min.css"
- rel = "stylesheet" / >
- < script src = "~/Scripts/jquery-1.9.1.js" > < /script> < script src = "~/bootstrap-3.3.6-dist/js/bootstrap.js" > < /script>
- < style type = "text/css" >
- .mainpanel
- {
- margin - left: 230 px;
- min - height: 636 px;
- padding: 20 px;
- padding - top: 20 px;
- padding - right: 20 px;
- padding - bottom: 20 px;
- padding - left: 20 px;
- }
- .info th
- {
- background: #E0E0E0!important;
- }
- .info th a
- {
- color: #000000;
- font-weight: normal;
- }
- </style>
- <script type= "text/javascript" > /* coloring only single Cell*/
- $(document).ready(function() {
- debugger;
- $('#gridMapping > tbody > tr').each(function(index) {
- if ($(this).children('td:nth-child(5)').text() == "Done")
- {
- $(this).children('td:nth-child(5)').css("background-color", "#33CC99");
- } else
- {
- $(this).children('td:nth-child(5)').css("background-color", "#FFCC99");
- }
- });
- }); < /script>
- < script type = "text/javascript" > /* coloring entire Row */
- $(document).ready(function()
- {
- debugger;
- $('#gridMapping > tbody > tr').each(function(index)
- {
- if ($(this).children('td:nth-child(5)').text() == "Done")
- {
- $(this).children('td').css("background-color", "#33CC99");
- } else
- {
- $(this).children('td').css("background-color", "#FFCC99");
- }
- });
- }); < /script>
- < style type = "text/css" >
- /*Mouse hover*/
- #gridMapping tr: hover
- {
- background - color: #F5DEB3;
- } < /style>
- < /head> < body >
- < div >
- @ {
- var grid = new WebGrid(Model, canPage: true, rowsPerPage: 5);
- grid.Pager(WebGridPagerModes.All);
- }
- @grid.GetHtml(
- htmlAttributes: new
- {
- id = "gridMapping"
- },
- tableStyle: "table table-bordered",
- headerStyle: "info",
- footerStyle: "webgrid-footer",
- alternatingRowStyle: "webgrid-alternating-row",
- selectedRowStyle: "webgrid-selected-row",
- rowStyle: "gridrow",
- columns: grid.Columns(
- grid.Column("OrderID", "OrderID"),
- grid.Column("OrderName", "Order Name"),
- grid.Column("OrderType", "Type"),
- grid.Column("OrderPrice", "Price"),
- grid.Column("PaymentStatus", "Payment Status")
- )
- ) < /div> < /body> < /html>
I hope you have liked my tutorial.
William OniszkoPosted Jun 29, 2021, 8:59 PM
How can i get the entire row to highlight green based on done?
Manish Kumar BurraPosted Sep 6, 2018, 10:20 AM
Good one nice post
Saillesh PawarPosted Jan 19, 2016, 10:16 AM
Good 1 Sai sir.
Gowtham KPosted Jan 18, 2016, 11:03 AM
Good One
Mohammed IbrahimPosted Jan 18, 2016, 8:57 AM
nice
Raja TPosted Jan 18, 2016, 7:03 AM
Nice,Thanks for sharing
Humayun Kabir MamunPosted Jan 18, 2016, 3:36 AM
Nice...
Ajay GandhiPosted Jan 18, 2016, 3:28 AM
Nice and very helpful
Ujjval ShuklaPosted Jan 18, 2016, 2:03 AM
Nice Share.