
Here, you will find the steps:
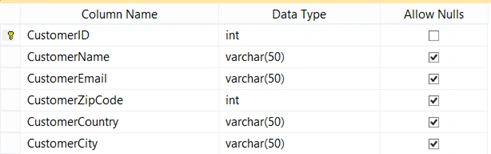
Step 1: Here, you will find the table that I used in the Application:
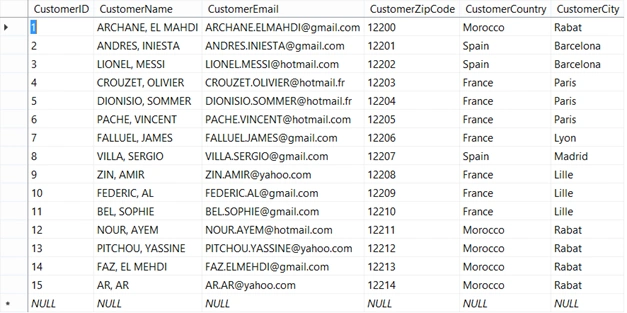
After creating the table, you need to fill it, as shown below:
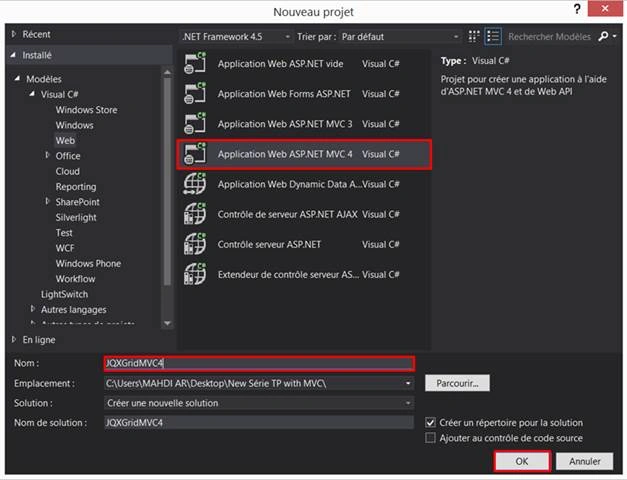
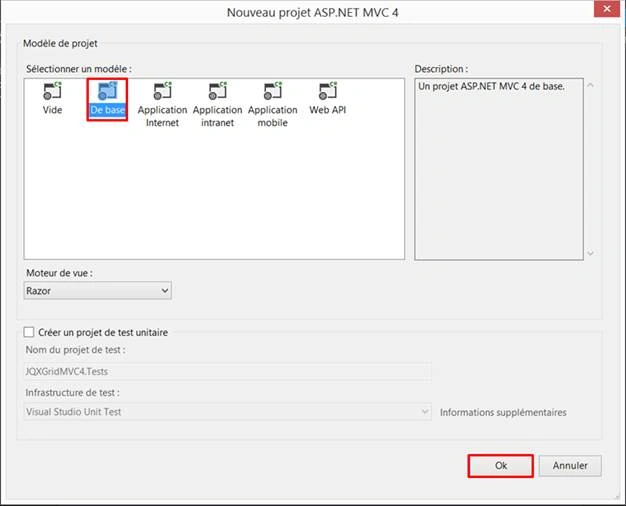
Step 2: Open Visual Studio and add New Project:
Step 3: Configuring Entity Data Model
Here, we need to follow the steps, as described below to configure EDM.
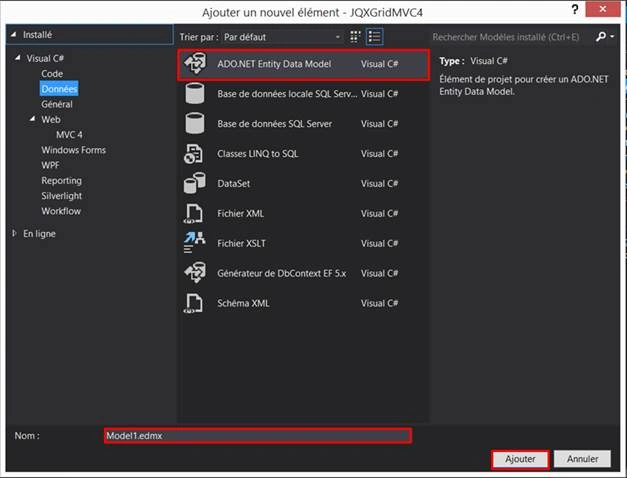
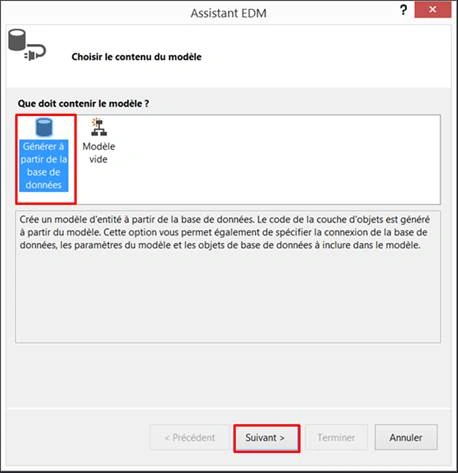
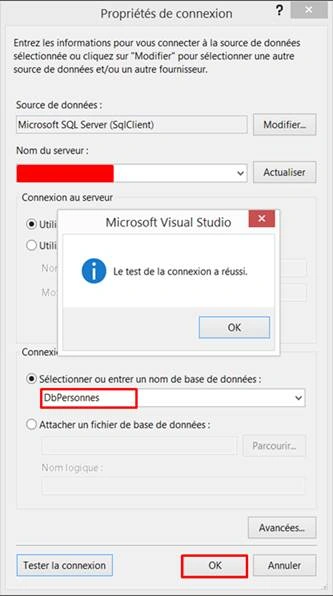
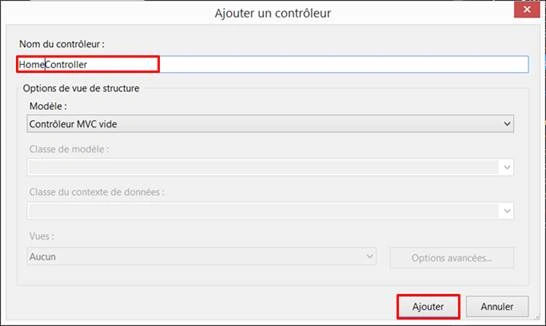
Step 4: Add new controller
Right click on the controllers folder > Add > Controller > Enter controller name (‘Home’) > Add.
HomeController.cs
- using System;
- using System.Collections.Generic;
- using System.Linq;
- using System.Web;
- using System.Web.Mvc;
- namespace JQXGridMVC.Controllers
- {
- public class HomeController : Controller
- {
- // DbContext
- DbPersonnesEntities db = new DbPersonnesEntities();
- //
- // GET: /Home/
- public ActionResult DisplayData()
- {
- return View();
- }
- public JsonResult GetCustomers()
- {
- // Retrieve all data customers from database (DbPersonnes)
- var result = db.Customers.ToList();
- return Json(result, JsonRequestBehavior.AllowGet);
- }
- }
- }
- @model IEnumerable<JQXGridMVC.Customers>
- @{
- ViewBag.Title = "Data Customers";
- }
- <h2> Data Customers</h2>
- <div id="gridCustomers" style="margin:20px auto;"></div>
- @section scripts {
- <script type="text/javascript" src="http://jqwidgets.com/jquery-widgets-demo/scripts/jquery-1.11.1.min.js"></script>
- <script type="text/javascript" src="http://jqwidgets.com/jquery-widgets-demo/jqwidgets/jqx-all.js"></script>
- <link rel="stylesheet" type="text/css" href="http://jqwidgets.com/jquery-widgets-demo/jqwidgets/styles/jqx.base.css" />
- <script type="text/javascript">
- $(document).ready(function () {
- // In this part, you need to prepare your data
- var source =
- {
- datatype: "json",
- // Here you will declare all fields that must be used in the grid
- datafields: [
- { name: 'CustomerID', type: 'number' },
- { name: 'CustomerName', type: 'string' },
- { name: 'CustomerEmail', type: 'string' },
- { name: 'CustomerZipCode', type: 'number' },
- { name: 'CustomerCountry', type: 'string' },
- { name: 'CustomerCity', type: 'string' }
- ],
- // call the action which retrieve data customers in json format
- url: 'Home/GetCustomers'
- };
- var dataAdapter = new $.jqx.dataAdapter(source);
- // displaying data in the grid with jqxGrid
- $("#gridCustomers").jqxGrid(
- {
- width: 800,
- source: dataAdapter,
- pageable: true,
- sortable: true,
- columns: [
- { text: "Customer ID", datafield: "CustomerID" },
- { text: "Customer Name", datafield: "CustomerName" },
- { text: "Customer Email", datafield: "CustomerEmail" },
- { text: "Customer ZipCode", datafield: "CustomerZipCode" },
- { text: "Customer Country", datafield: "CustomerCountry" },
- { text: "Customer City", datafield: "CustomerCity" }
- ]
- });
- });
- </script>
- }
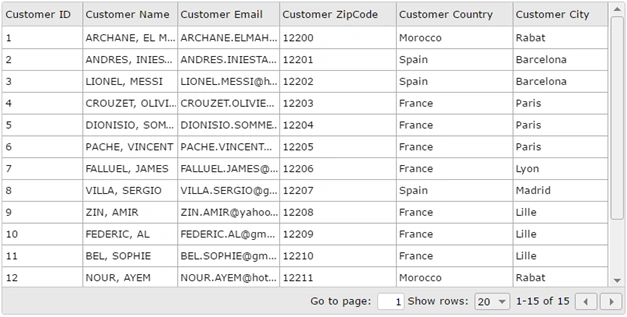
satyesh soniPosted Oct 10, 2018, 5:51 AM
Function is not calling in my case...my code as below..
satyesh soniPosted Oct 10, 2018, 12:56 AM
This code is not working in my website...i used same code as above. please check it and give me a positive answer.<div id="gridCustomers" style="margin:20px auto;"></div><script type="text/javascript" src="http://jqwidgets.com/jquery-widgets-demo/scripts/jquery-1.11.1.min.js"></script> <script type="text/javascript" src="http://jqwidgets.com/jquery-widgets-demo/jqwidgets/jqx-all.js"></script> <link rel="stylesheet" type="text/css" href="http://jqwidgets.com/jquery-widgets-demo/jqwidgets/styles/jqx.base.css" /> <script src="~/Scripts/jquery-1.10.2.min.js"></script> <script type="text/javascript"> $(document).ready(function () { // In this part, you need to prepare your data var source = { datatype: "json", // Here you will declare all fields that must be used in the grid datafields: [ { name: 'ddate', type: 'string' }, { name: 'exptype', type: 'string' }, { name: 'Expenses', type: 'string' }, { name: 'dname', type: 'string' }, { name: 'contact', type: 'string' }, { name: 'vehicleno', type: 'string' } ], url: 'ExpenseReport/GetCustomers' }; var dataAdapter = new $.jqx.dataAdapter(source); // displaying data in the grid with jqxGrid $("#gridCustomers").jqxGrid( { width: 800, source: dataAdapter, pageable: true, sortable: true, columns: [ { text: "DepartureDate", datafield: "string" }, { text: "ExpenseType", datafield: "exptype" }, { text: "Expenses", datafield: "Expenses" }, { text: "Driver", datafield: "dname" }, { text: "Contact", datafield: "contact" }, { text: "VehicleNo", datafield: "vehicleno" } ] }); }); </script>
Bhavik PatelPosted Jul 14, 2016, 12:36 PM
Good one
Ravi KandelPosted Jul 14, 2016, 11:58 AM
Thanks for sharing.
Vignesh ManiPosted Jul 13, 2016, 5:40 PM
Nice
kalu singh raoPosted Jul 13, 2016, 3:58 PM
Nice...