

My previous article explained XML, XSLT and CSS. To learn more XSL and the syntax refer to here.
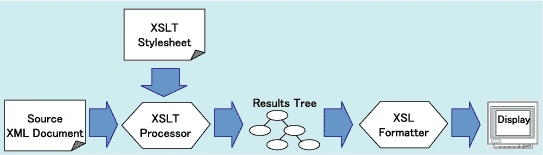
Step 1
In this step we will add a XML file (XMLFile1.xml) and design it.
Go to your project, Add New Item and click on Data section. Then select XML file.

Figure 2: Adding XML document in project
- <?xml version="1.0" encoding="iso-8859-1"?>
- <!-- Edited by XMLSpy® -->
- <breakfast_menu>
- <food>
- <name>Biriyani</name>
- <price>$5.95</price>
- <description>Rice with chicken</description>
- <calories>650</calories>
- </food>
- <food>
- <name>Juice</name>
- <price>$1.95</price>
- <description>Fruit juices like mango, banana, apple</description>
- <calories>200</calories>
- </food>
- </breakfast_menu>
In this step we need to add a XSLT file (XSLTFile1.xslt) and design it.
Use the following preceding, Step 1, to add the XSLT file. After adding the XSLT file we need to design it.
Code
- <?xml version="1.0" encoding="iso-8859-1"?>
- <!-- Edited by XMLSpy® -->
- <html xsl:version="1.0" xmlns:xsl="http://www.w3.org/1999/XSL/Transform" xmlns="http://www.w3.org/1999/xhtml">
- <body style="font-family:Arial;font-size:12pt;background-color:#EEEEEE">
- <xsl:for-each select="breakfast_menu/food">
- <div style="background-color:teal;color:white;padding:4px">
- <span style="font-weight:bold">
- <xsl:value-of select="name"/>
- </span>
- - <xsl:value-of select="price"/>
- </div>
- <div style="margin-left:20px;margin-bottom:1em;font-size:10pt">
- <xsl:value-of select="description"/>
- <span style="font-style:italic">
- <xsl:value-of select="calories"/> (calories per serving)
- </span>
- </div>
- </xsl:for-each>
- </body>
- </html>
In the preceding XSLT file, we are using a for-each element that will match XML nodes (breakfast_menu/food). It will collect all the nodes in XML data that match depending on the defined pattern(breakfast_menu/food) and loop over it. The value-of element displays the XML data. Lastly a div and span are added to make the display the ofdata in the design format with inline styles.
Step 3
Now we are ready with the XML and XSLT file. Next we need to write code for loading the XML data then transform and display it.
- With XML Control
- XslCompiledTransform class Without XML control
1. With XML Control
ASP.NET has a XML control present in the Toolbox and using that control we can do the XSL transformation.
First it loads the XML content in a variable using File.ReaAllText(). Then it assigns XML content to the XML control using the DocumentContent property. Lastly it assigns a XSLT file to the XML control using the TransformSource property. Then the XML control loads XML content, transforms it into HTML content and renders it in the browser.
Please refer to the following code:
- protected void Button1_Click(object sender, EventArgs e)
- {
- // This is being read from the same folder as this page is in.(only for demo purpose)
- // In real applications this xml might be coming from some external source or database.
- string xmlString = File.ReadAllText(Server.MapPath("XMLFile1.xml"));
- // Define the contents of the XML control
- Xml1.DocumentContent = xmlString;
- // Specify the XSL file to be used for transformation.
- Xml1.TransformSource = Server.MapPath("XSLTFile1.xslt");
- }
2. XslCompiledTransform class Without XML control
In the .NET Framework a class XslCompiledTransform is present in the System.Xml.Xsl namespace that can be used to do the transformation. Then the XslCompiledTransform object calls the Load() method to load the XSLT file content into the object. Next it calls the Transform() method to create a HTML string and write data into the TextReader object.
Here I added a Label control to display the generated HTML content that is generated from XML data. The following code can be used to transform XML data from an XML file (tutorial.xml) using the XSLT file(tutorial.xslt).
Add the following namespaces:
- using System.Xml;
- using System.Xml.Xsl;
- using System.IO;
- using System.Text;
- protected void Button2_Click(object sender, EventArgs e)
- {
- Xml1.Visible = false;
- ltlTutorial.Visible = true;
- // Getting file path
- string strXSLTFile = Server.MapPath("XSLTFile1.xslt");
- string strXMLFile = Server.MapPath("XMLFile1.xml");
- // Creating XSLCompiled object
- XslCompiledTransform objXSLTransform = new XslCompiledTransform();
- objXSLTransform.Load(strXSLTFile);
- // Creating StringBuilder object to hold html data and creates TextWriter object to hold data from XslCompiled.Transform method
- StringBuilder htmlOutput = new StringBuilder();
- TextWriter htmlWriter = new StringWriter(htmlOutput);
- // Creating XmlReader object to read XML content
- XmlReader reader = XmlReader.Create(strXMLFile);
- // Call Transform() method to create html string and write in TextWriter object.
- objXSLTransform.Transform(reader, null, htmlWriter);
- ltlTutorial.Text = htmlOutput.ToString();
- // Closing xmlreader object
- reader.Close();
- }
Browse the aspx file and you can see output as in Figure 3.

Figure 3: Output of XSL Transformation in ASP.NET
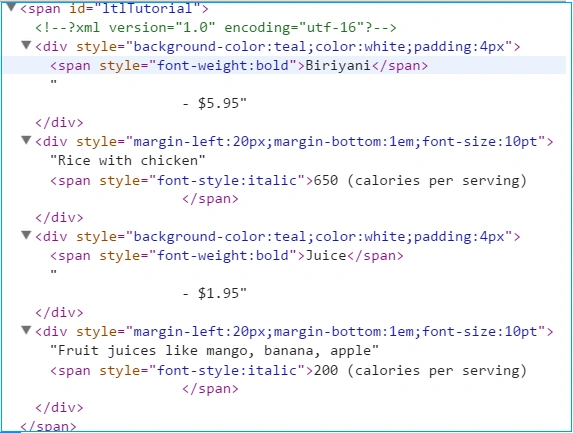
Please see Figure 4 showing how the XSL transformation generates HTML output depending on the defined XSLT rules.
Fabio SabbionPosted Jul 8, 2019, 4:09 AM
In step 3, first code, why Xml1 object is not declared?
aarti chakravartiPosted Aug 22, 2018, 9:35 AM
Nice article
Bhuvanesh MohankumarPosted May 4, 2016, 2:45 PM
Good one...
Chervine BhiwooPosted Aug 8, 2015, 2:19 AM
Good article.
Santhakumar MunuswamyPosted Aug 8, 2015, 2:00 AM
Good article. Thanks for sharing
RakeshPosted Aug 7, 2015, 1:20 PM
Good one
Pankaj Kumar ChoudharyPosted Aug 7, 2015, 12:56 PM
Nice Explain Sir...
Nilesh JadavPosted Aug 7, 2015, 9:45 AM
Great post sir :)
Sibeesh VenuPosted Aug 7, 2015, 8:21 AM
Nice Share!.
Neeraj KumarPosted Aug 7, 2015, 7:21 AM
Nice
Van LaiPosted Aug 7, 2015, 4:59 AM
Thank you very much for sharing.
Rajeesh MenothPosted Aug 7, 2015, 4:20 AM
Nice One