

What is a Container?
Container is a good way to create a package of applications along with all its dependencies so the application can be transferred between environments and also, it should run without any changes. Container is basically the process of isolating the application from other applications or from the outer world. Docker provides us a set of tools to use the Container. In this article, we will try to understand how to install and run a Docker container on a local machine.
What is Docker?
Docker is a platform for developers to develop, deploy, and run applications with containers. We can easily set up the environment, install the required software, and then run our application. There is a lot of time required to set up the environment before starting the application.
Containers and virtual machines
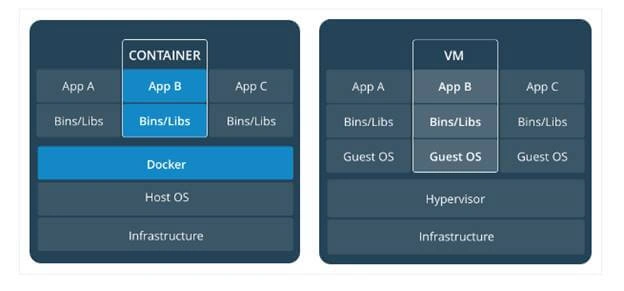
Containers are very lightweight virtual machines but some differences are there. Please find them explained below.
|
Container
|
Virtual Machine
|
|
Container is running on Linux and also sharing the kernel of the host machine
|
VM or Virtual Machine is running on a different OS that hosts machine
|
|
To run a container needs fewer resources
|
To run a VM needs fewer resources
|
|
Very lightweight
|
Large resources get utilized while running VM
|
Environment Setup
Now, we can get to the actual implementation, so for this purpose we need to install docker on our local machine. First, we need to check if docker is available on your local machine and if not, then please follow the steps to download and install docker on your local machine. You will get docker installer as per your operating system. Actually, docker is a Linux based system so it is very easy to install on Linux based systems.
So, please visit the link and follow the steps to install docker here.
Docker Commands
After the installation gets completed now we can start exploring the docker commands. So, the docker commands can be run from the command prompt. So first, open a command prompt or terminal.
docker version
First, open the terminal and run command docker version.
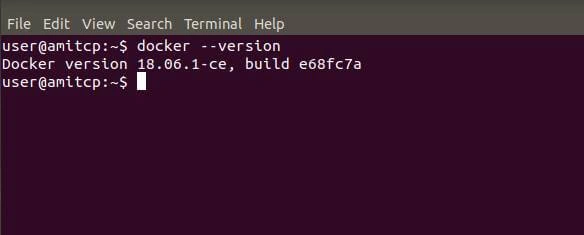
This command gives the docker installed version
docker info
Now, run the command docker info
- Containers: 2
- Running: 0
- Paused: 0
- Stopped: 2
- Images: 8
- Server Version: 18.06.1-ce
- Storage Driver: overlay2
- Backing Filesystem: extfs
- Supports d_type: true
- Native Overlay Diff: true
- Logging Driver: json-file
- Cgroup Driver: cgroupfs
- Plugins:
- Volume: local
- Network: bridge host macvlan null overlay
- Log: awslogs fluentd gcplogs gelf journald json-file logentries splunk syslog
- Swarm: inactive
- Runtimes: runc
- Default Runtime: runc
- Init Binary: docker-init
- containerd version: (expected: 468a545b9edcd5932818eb9de8e72413e616e86e)
- runc version: N/A (expected: 69663f0bd4b60df09991c08812a60108003fa340)
- init version: v0.18.0 (expected: fec3683b971d9c3ef73f284f176672c44b448662)
- Security Options:
- apparmor
- seccomp
- Profile: default
- Kernel Version: 4.15.0-43-generic
- Operating System: Ubuntu 18.04.1 LTS
- OSType: linux
- Architecture: x86_64
- CPUs: 4
- Total Memory: 3.709GiB
- Name: amitcp
- ID: NLDX:GMLU:3E64:KSBK:6ZXP:YGBF:37Y2:SYK6:QNXO:YHQS:HDOC:M3TD
- Docker Root Dir: /var/lib/docker
- Debug Mode (client): false
- Debug Mode (server): false
- Registry: https://index.docker.io/v1/
- Labels:
- Experimental: false
- Insecure Registries:
- 127.0.0.0/8
- Live Restore Enabled: false
After running basic commands of docker (docker version and docker info) we can start to explore more on docker.
docker image ls
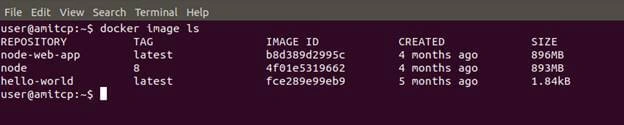
This command will list down images available on your local machine. Docker image includes system libraries, other files and dependencies for the executable code. Docker image can reuse static image layers for different projects. We can download the image as per our requirement.
docker pull
Pull an image or a repository from a registry. Most of your images will be created on top of a base image from the registry here. Docker Hub contains many pre-built images that you can pull and use to build our application on top of that.
docker pull nodejs
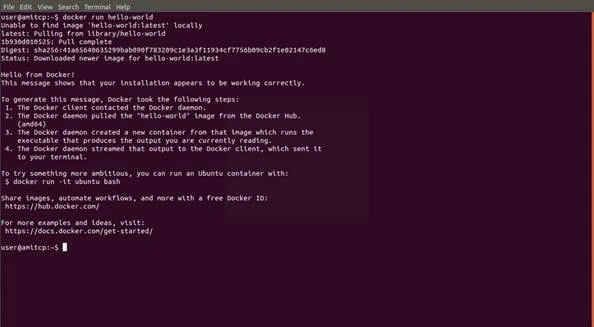
docker run hello-world
This will run the hello-world image. This is the most lightweight image. This is available after installation of docker on local machine. So using docker run command we can run docker image locally.
docker container ls --all

This command will give you some more details like commands available in that docker, last executed. An instance of an image is called a container. Running form of image means container. You can have many running containers of the same image. You can see all your images with docker images whereas you can see your running containers with docker ps (and you can see all containers with docker ps -a). So a running instance of an image is a container.
Recap and cheat sheet
- ## List Docker CLI commands
- docker
- docker container --help
- ## Display Docker version and info
- docker --version
- docker version
- docker info
- ## Execute Docker image
- docker run hello-world
- ## List Docker images
- docker image ls
- ## List Docker containers (running, all, all in quiet mode)
- docker container ls
- docker container ls --all
- docker container ls -aq
After understanding the commands docker uses and the way to execute these commands we will move ahead.
Develop app in docker environment
Now we will develop one javascript based application using docker.
Create one sample folder first
Create file : package.json
And paste the below code,
- {
- "name": "docker_web_app",
- "version": "1.0.0",
- "description": "Node.js on Docker",
- "author": "First Last <[email protected]>",
- "main": "server.js",
- "scripts": {
- "start": "node server.js"
- },
- "dependencies": {
- "express": "^4.16.1"
- }
- }
Create file : server.js
Paste the below code,
- 'use strict';
- const express = require('express');
- // Constants
- const PORT = 8080;
- const HOST = '0.0.0.0';
- // App
- const app = express();
- app.get('/', (req, res) => {
- res.send('testing node app');
- });
- app.listen(PORT, HOST);
- console.log(`Running on http://${HOST}:${PORT}`);
Create a file called Dockerfile
What is Dockerfile ?
Here we can declare or specify the software requirements or prerequisite as per my applications.
Paste the below code,
- FROM node:8
- # Create app directory
- WORKDIR /usr/src/app
- COPY package*.json ./
- # Install app dependencies
- RUN npm install
- COPY . .
- EXPOSE 8080
- CMD [ "npm", "start" ]
Create a file called .dockerignore
Paste the below code
node_modules
npm-debug.log
Building application’s docker image
Open the terminal
And run the below command
docker build -t node-web-app .
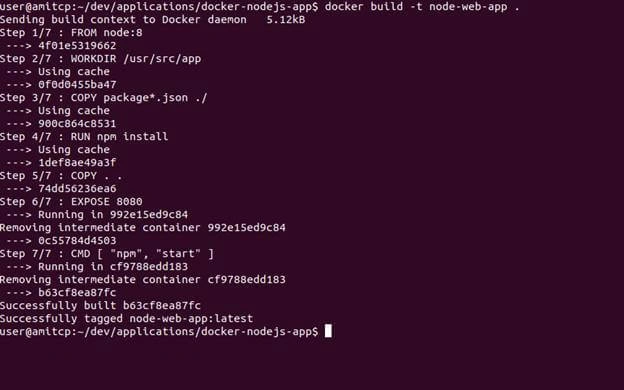
Your image will now be listed by Docker:
docker images
Run the image
docker run -p 49160:8080 -d node-web-app
Here 49160 is port number exposed by docker for the outside access.
Test the application
Finally we need to see the result so open the browser and http://localhost:49160/

Code modification and rebuild the image
- Now change your server.js file and save the changes.
- Again run the build command from terminal.
- Now remove the existing docker container
docker container rm <docker_container_id> --force
- Again run the image
Advantages of Docker
- Docker manages to reduce deployment time. Docker ensures consistent environments from development to production.
- Docker containers are configured to maintain all configurations and dependencies internally.
- Portability is one more important benefit of docker. We can run any docker image to any other operating system or any cloud like AWS or Azure or Google cloud.
- Designing Microservice based applications
Conclusion
This all about docker and integrating node api. This way we can create any application and integrate with docker. For understanding more about docker please visit here.
Join the conversation! Your thoughts help the community grow.