

Introduction
Image Optimization is essential for applications relying on images. It involves reducing file size while preserving quality, leading to faster load times and improved performance. Building an image optimizer using C# WPF offers benefits like a powerful programming language, user-friendly interfaces, native Windows compatibility, and integration with libraries. C# WPF's versatility and rich features make it ideal for creating efficient and visually appealing desktop applications.
This article explores the process of building an image optimizer using C# WPF (Windows Presentation Foundation). By leveraging the power of C# as a programming language and the rich features of WPF for user interface design, developers can create a robust and intuitive desktop application for optimizing images.
Agenda for the Article
- What is an Image Optimizer?
- Understanding Image Optimization
- Understanding With C# WPF
- Importance of a Well-Designed User Interface for an Image Optimizer
- Explore Libraries or Built-in Capabilities for Image Processing in C#
- Discuss Different Optimization Algorithms, such as Lossless and Lossy Compression Techniques
- How to Enhance the User Experience
- Implementing ImageMagick Library for Image Optimizer
What is an Image Optimizer?
An image optimizer is a tool or software designed to reduce the file size of images while maintaining an acceptable level of visual quality. It employs various techniques such as compression, resizing, and format conversion to achieve this goal. The purpose of image optimization is to improve the performance and user experience of applications and websites that heavily rely on images. By reducing file sizes, image optimizers enable faster loading times, conserve bandwidth, and optimize storage space, making them essential for efficient digital media management.
Understanding Image Optimization
Image Optimization is a crucial process that involves reducing the file size of images while maintaining an acceptable level of visual quality. Let's explore the basics of image optimization and its key components.
Compression Techniques and File Size Reduction
Image compression techniques are used to reduce the file size of images. There are two primary types of compression- Lossless and Lossy.
- Lossless Compression: This technique reduces file size without sacrificing image quality. It achieves compression by eliminating redundant data and using more efficient encoding methods. Lossless compression is suitable for images that require pixel-perfect accuracy, such as diagrams or logos.
- Lossy Compression: This technique achieves higher compression ratios by discarding some image data and reducing quality. The extent of data loss depends on the compression level chosen. Lossy compression is commonly used for photographs and images where a slight loss of quality is acceptable.
Trade-offs between Image Quality and File Size
When optimizing images, there is often a trade-off between image quality and file size. Higher compression ratios result in smaller file sizes but may lead to a visible loss in image quality. Balancing these factors is essential to achieve an optimal compromise that meets the requirements of the specific use case.
It's important to consider the target platform, intended audience, and the importance of image fidelity when determining the appropriate compression level.
Different Image Formats and Optimization Impact
Various image formats have different characteristics that affect optimization. Here are a few commonly used image formats.
- JPEG: It is a widely used format for photographs and complex images. JPEG compression is lossy and allows for adjustable quality settings. This format provides good compression ratios and is suitable for web applications.
- PNG: This format supports lossless compression, making it ideal for images with transparency or sharp edges, such as logos or icons. PNG files tend to have larger file sizes compared to JPEG.
- GIF: Primarily used for simple animations, GIF uses lossless compression but with limited color support. It is effective for small, animated graphics.
- WebP: Developed by Google, WebP is a newer image format that offers both lossless and lossy compression. It typically achieves smaller file sizes compared to JPEG or PNG while maintaining good quality.
Understanding with C# WPF
C# WPF (Windows Presentation Foundation) is a powerful framework for building desktop applications in the C# programming language. It provides a rich set of tools, controls, and capabilities that enable developers to create visually appealing and interactive user interfaces. Let's explore the advantages of C# WPF and the essential tools and resources needed to start developing a C# WPF application.
Advantages of C# WPF for Desktop Applications
- Robust and Versatile: C# is a widely-used and mature programming language offering a strong foundation for building desktop applications. It provides features like object-oriented programming, memory management, and a vast ecosystem of libraries and frameworks.
- Rich User Interfaces: WPF offers a wide range of controls, layout options, and styling capabilities, allowing developers to create aesthetically pleasing and customizable user interfaces.
- Data Binding: WPF provides powerful data binding capabilities, enabling easy synchronization between UI elements and data sources, simplifying application development and maintenance.
- MVVM Pattern: WPF promotes the Model-View-ViewModel (MVVM) architectural pattern, which enhances the separation of concerns, testability, and maintainability of the application code.
- Animation and Graphics: WPF includes support for animations, 2D and 3D graphics, and multimedia elements, enabling the creation of visually engaging user experiences.
Tools and Resources for C# WPF Development
- Integrated Development Environment (IDE): Popular IDEs for C# WPF development include Visual Studio (Community, Professional, or Enterprise editions) and JetBrains Rider. These IDEs provide advanced features like code completion, debugging, and design-time UI development tools specific to WPF.
- Frameworks and Libraries: The .NET Framework and its successor .NET Core provide the foundation for C# WPF development. Additional libraries like Prism, MahApps.Metro and MaterialDesignInXAML offer extended capabilities, UI controls, and design patterns for building WPF applications.
- Documentation: Microsoft's official documentation for WPF is a valuable resource for learning the framework and understanding its various features and concepts.
Importance of a Well-designed User Interface for an Image Optimizer
The importance of a well-designed user interface (UI) for an image optimizer cannot be overstated. Here are some key reasons why a well-designed UI is crucial for an Image Optimizer-
- User Experience (UX): A well-designed UI enhances the overall user experience. Image optimization can involve multiple steps and settings, and a well-designed UI makes it easy for users to navigate through the process, understand the options available, and achieve their desired results efficiently. It improves usability, reduces confusion, and increases user satisfaction.
- Intuitive Interaction: Image optimization can be a complex task with various parameters and settings to consider. A well-designed UI simplifies the interaction between the user and the optimizer by presenting a clear and intuitive interface. It organizes controls and features in a logical manner, making it easier for users to understand and adjust the optimization parameters according to their preferences.
- Visual Feedback: A well-designed UI provides visual feedback to users during the image optimization process. This feedback can include progress indicators, status updates, and previews of the optimized image. Visual feedback helps users understand the progress of the optimization, ensures transparency, and gives them confidence that their actions are producing the desired results.
- Error Handling: Image optimization can encounter errors or issues, such as unsupported file formats or insufficient memory. A well-designed UI includes effective error handling mechanisms that inform users about the errors and provide clear instructions or suggestions for resolution. This helps users troubleshoot problems and minimizes frustration.
- Branding and Aesthetics: A well-designed UI reflects the branding and aesthetics of the application or organization behind the image optimizer. It creates a consistent and visually pleasing experience for users, reinforcing the brand identity and professionalism. A visually appealing UI can also attract and retain users, making them more likely to use the image optimizer and recommend it to others.
Explore Libraries or Built-in Capabilities for Image Processing in C#
There are several libraries and built-in capabilities for image processing in C#. Here are a few popular ones-
- System.Drawing
- AForge.NET
- ImageMagick
- OpenCvSharp
- Emgu.CV
- SkiaSharp
These libraries offer diverse capabilities for image processing tasks and cater to different requirements. Depending on your specific needs, you can choose the library that best suits your project and integrates smoothly into your C# application.
In this Article, We are using the ImageMagick library.
ImageMagick- ImageMagick is a powerful cross-platform image processing library that supports a wide range of image formats. It provides a comprehensive set of tools for image manipulation, conversion, resizing, and applying filters. It can be accessed using the Magick.NET wrapper library for .NET.
Discuss Different optimization Algorithms, such as Lossless and Lossy Compression Techniques
Different optimization algorithms are used to reduce the file size of images while preserving acceptable visual quality. The two main categories of image compression techniques are lossless compression and lossy compression.
Lossless Compression
Lossless compression algorithms reduce the file size of an image without sacrificing any visual quality. These algorithms achieve compression by identifying and eliminating redundancies and unnecessary data within the image. The compressed image can be decompressed to its original form without any loss of information. Lossless compression is often preferred for images that require pixel-perfect accuracy, such as graphics, logos, or medical images. Popular lossless compression algorithms include-
- Run-Length Encoding (RLE): This algorithm replaces consecutive repeated data values with a count and a single instance of the value. It is effective for images with long runs of the same pixel value.
- Lempel-Ziv-Welch (LZW): LZW is a dictionary-based compression algorithm that replaces frequently occurring patterns or sequences with shorter codes. It is commonly used in file formats like GIF and TIFF.
- Deflate: Deflate combines the LZ77 algorithm and Huffman coding to achieve compression. It is widely used in file formats like PNG and ZIP.
Lossy Compression
Lossy compression algorithms achieve higher compression ratios by selectively discarding non-essential or less important image data. This results in some loss of visual quality, but the trade-off allows for a significant reduction in file size. Lossy compression is often used for photographs, images with complex details, or in situations where a slight loss of quality is acceptable. Popular lossy compression algorithms include-
- Discrete Cosine Transform (DCT): DCT is used in algorithms like JPEG compression. It transforms the image data into frequency components, allowing for the removal of high-frequency details that are less perceptually important. The degree of compression and quality trade-off can be adjusted by modifying the compression parameters.
- Wavelet Transform: Wavelet transform analyzes an image at different scales, capturing both low-frequency and high-frequency components. It allows for the selective removal of high-frequency details while preserving important visual features. Wavelet-based compression is used in formats like JPEG 2000.
- Transform Coding: Transform coding algorithms, such as Fractal Compression and Vector Quantization, represent an image as a series of transformations or approximations. They exploit the statistical properties of the image data to achieve compression. These algorithms offer higher compression ratios but may introduce more noticeable artifacts.
How to Enhance the User Experience
To enhance the user experience, you can implement progress indicators, status updates, and error handling in your application. Here's a general outline of how you can incorporate these elements-
- Progress Indicators: Use a progress bar or a percentage label to visually represent the progress of the image optimization process. Update the progress value as each image is processed. You can bind the value of the progress bar or label to a variable that keeps track of the completed images and update it accordingly.
- Status Updates: Display status updates to inform users about the current state of the optimization process. For example, you can show a label indicating the number of images processed or the current image being optimized. Update the status label within the loop or task that processes each image. Inform users about the progress and let them know which image is being processed at any given time.
- Error Handling: Implement appropriate error handling to handle exceptions and provide meaningful error messages to users. For example, if an image file is corrupt or in an unsupported format, display an error message to notify the user. Wrap the image processing code in a try-catch block and handle specific exceptions that may occur during optimization. Display the error message in a dialog box or status label and allow users to take appropriate actions, such as skipping the problematic image or aborting the entire optimization process.
- User Feedback: Provide visual feedback to indicate when the optimization process is complete. You can display a success message or play a sound to notify users about the successful completion of the process. If the process is paused or canceled, inform users with a message and offer options to resume or restart the process. Remember to update the user interface elements from the UI thread using mechanisms like Dispatcher or Application.Current.Dispatcher.Invoke when updating them from background tasks.
By implementing these elements, you can enhance the user experience by keeping users informed about the progress, status, and any errors that may occur during the image optimization process.
<Window x:Class="Image_optimizer.MainWindow"
    xmlns="http://schemas.microsoft.com/winfx/2006/xaml/presentation"
    xmlns:x="http://schemas.microsoft.com/winfx/2006/xaml"
    Title="Image Optimizer" Height="550" Width="850" WindowStartupLocation="CenterScreen">
<Grid>
    <StackPanel Margin="20">
        <Label Content="Select a directory:" Margin="0 0 0 10"/>
        <StackPanel Orientation="Horizontal">
            <TextBox x:Name="SelectedDirectoryTextBox" Width="400" Margin="0 0 10 0" />
            <Button x:Name="BrowseButton" Content="Browse" Click="BrowseButton_Click" Width="68"/>
            <Button x:Name="ClearButton" Content="Clear" Click="ClearButton_Click" Margin="10 0 0 0" Height="22" Width="64"/>
        </StackPanel>
        <Button x:Name="OptimizeButton" Content="Optimize" Click="ButtonOptimize_ClickAsync" Margin="0 20 0 0"
                Background="#FF007ACC" Foreground="White" Height="26" Width="170">
            <Button.Style>
                <Style TargetType="Button">
                    <Setter Property="Background" Value="#FF007ACC"/>
                    <Setter Property="Foreground" Value="White"/>
                    <Style.Triggers>
                        <Trigger Property="IsMouseOver" Value="True">
                            <Setter Property="Background" Value="Green"/>
                            <Setter Property="Foreground" Value="White"/>
                        </Trigger>
                    </Style.Triggers>
                </Style>
            </Button.Style>
        </Button>
        <Label x:Name="TotalImagesLabel" Margin="0 20 0 0"/>
        <ProgressBar x:Name="ProgressBar"  Margin="0 10 0 0"/>
        <Label x:Name="ProgressLabel"  Margin="0 10 0 0"/>
        <Label x:Name="ImageNameLabel"  Margin="0 10 0 0"/>
        <TextBox x:Name="ImageListTextBox" Height="153" IsReadOnly="True"
                 VerticalScrollBarVisibility="Auto" Width="756"/>
        <StackPanel x:Name="ButtonPanel" Orientation="Horizontal"  Margin="0 20 0 0" Height="29" Width="154">
            <Button x:Name="PauseButton" Content="Pause" Click="ButtonPause_Click" Width="67" Height="29"/>
            <Button x:Name="ResumeButton" Content="Resume" Click="ButtonResume_Click" Margin="10 0 0 0" Width="75" Height="29"/>
        </StackPanel>
    </StackPanel>
</Grid>
</Window>
Implementing ImageMagick Library for Image Optimizer
To implement the ImageMagick library for image optimization, you would typically follow these steps-
Set Up the Development Environment
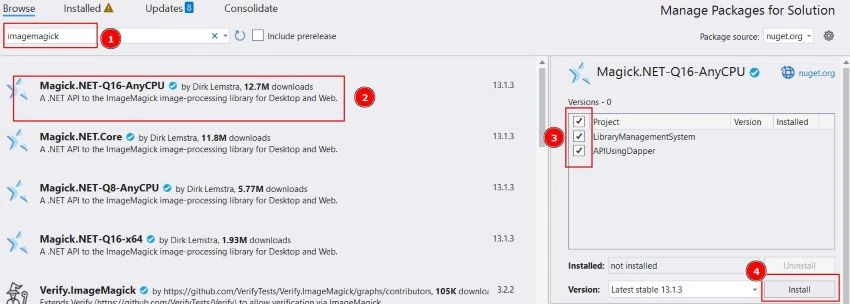
Depending on the programming language you're using, you need to set up your development environment to include the ImageMagick library.
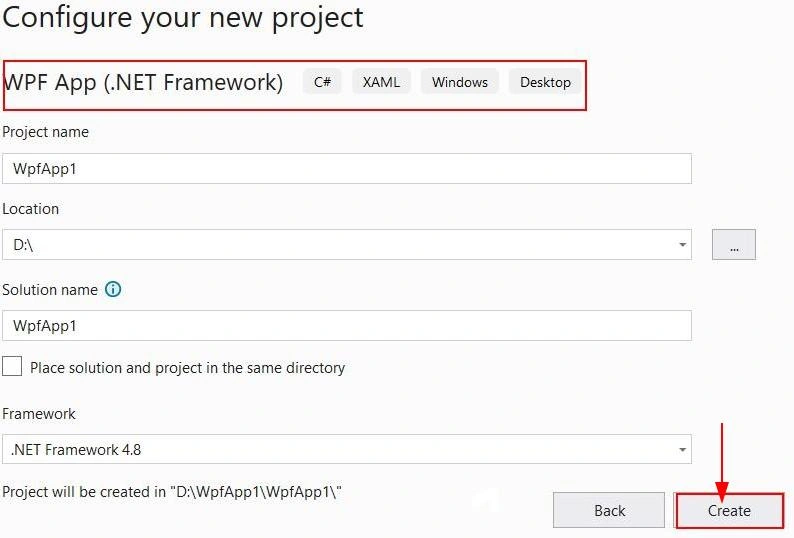
Create a New C# Project
Install ImageMagick
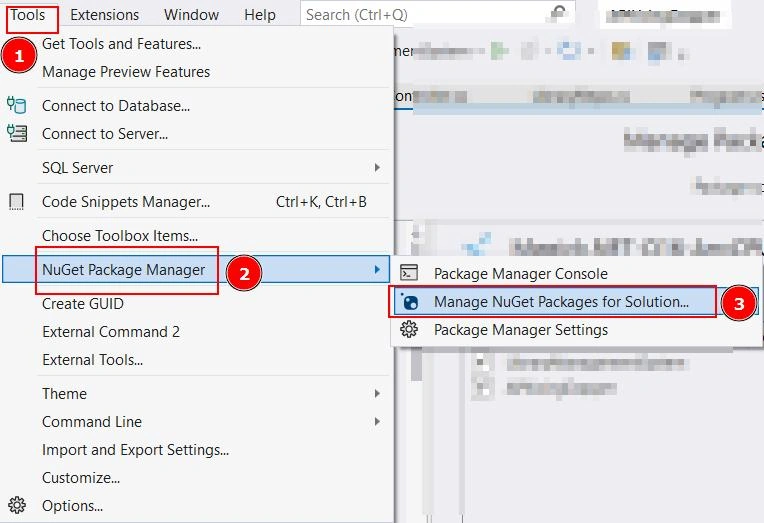
Go To Tools > NuGet Package Manager > Manage NuGet Packages
Import the ImageMagick Namespace
In your C# code files where you want to use the ImageMagick library, add the following using directive at the top-
using ImageMagick;
Load the image
Use the ImageMagick library functions or methods to load the image from a file or a data stream into memory.
Apply Optimizations
ImageMagick provides a wide range of optimization techniques to reduce image file size while preserving visual quality. These techniques include resizing, compressing, cropping, adjusting colors, removing metadata, and more. You can apply one or more optimization techniques based on your requirements.
Save the Optimized Image
Once you have applied the desired optimizations, save the optimized image back to a file or a data stream. ImageMagick provides functions or methods to perform this operation.
using System;
using System.Collections.Concurrent;
using System.Collections.Generic;
using System.IO;
using System.Linq;
using System.Threading;
using System.Threading.Tasks;
using System.Windows;
using System.Windows.Forms;
using System.Windows.Threading;
using ImageMagick;

namespace Image_optimizer {
  public partial class MainWindow: Window {
    private long totalImages;
    private long totalSizeReduction;
    private DispatcherTimer loadingTimer;
    private int ImagesPerBatch;
    private CancellationTokenSource cancellationTokenSource; // Used to cancel the optimization process
    private List < string > processedImageFiles; // To keep track of processed image files
    private double pausedProgress; // To store the progress when pausing
    private double pauselabel;

    public MainWindow() {
      InitializeComponent();
      processedImageFiles = new List < string > ();
    }
    private void BrowseButton_Click(object sender, RoutedEventArgs e) {
      using(var dialog = new FolderBrowserDialog()) {
        DialogResult result = dialog.ShowDialog();
        if (result == System.Windows.Forms.DialogResult.OK) {
          string selectedDirectory = dialog.SelectedPath;
          SelectedDirectoryTextBox.Text = selectedDirectory;
        }
      }
    }

    private async void ButtonOptimize_ClickAsync(object sender, RoutedEventArgs e) {
      string directoryPath = SelectedDirectoryTextBox.Text;
      string[] directories = Directory.GetDirectories(directoryPath, "*", SearchOption.AllDirectories);

      totalImages = directories.Sum(directory => Directory.EnumerateFiles(directory, "*.*", SearchOption.TopDirectoryOnly)
        .Count(file => file.ToLower().EndsWith(".jpg") || file.ToLower().EndsWith(".jpeg") || file.ToLower().EndsWith(".png")));

      // Process image files directly from the selected directory
      string[] filesInSelectedDirectory = Directory.EnumerateFiles(directoryPath, "*.*", SearchOption.TopDirectoryOnly)
        .Where(file => file.ToLower().EndsWith(".jpg") || file.ToLower().EndsWith(".jpeg") || file.ToLower().EndsWith(".png"))
        .ToArray();

      totalImages += filesInSelectedDirectory.Length;

      await System.Windows.Application.Current.Dispatcher.InvokeAsync(() => {
        TotalImagesLabel.Content = $ "Total Images: {totalImages}";
        TotalImagesLabel.Visibility = Visibility.Visible;
        ProgressBar.Visibility = Visibility.Visible;
        ProgressLabel.Visibility = Visibility.Visible;
        ImageNameLabel.Visibility = Visibility.Visible;
        ResumeButton.Visibility = Visibility.Visible;
        PauseButton.Visibility = Visibility.Visible;
        ImageListTextBox.Visibility = Visibility.Hidden;
      });

      int completedImages = 0;
      cancellationTokenSource = new CancellationTokenSource(); // Create a new CancellationTokenSource

      const int batchSize = 100; // Set the batch size as per your system's capability

      ConcurrentBag < string > imageFiles = new ConcurrentBag < string > ();

      // Add files from the selected directory to the imageFiles bag
      foreach(string file in filesInSelectedDirectory) {
        imageFiles.Add(file);
      }

      foreach(string directory in directories) {
        string[] files = Directory.EnumerateFiles(directory, "*.*", SearchOption.TopDirectoryOnly)
          .Where(file => file.ToLower().EndsWith(".jpg") || file.ToLower().EndsWith(".jpeg") || file.ToLower().EndsWith(".png"))
          .ToArray();

        foreach(string file in files) {
          imageFiles.Add(file);
        }
      }

      int processedCount = 0;
      int imagesInCurrentBatch = 0;
      string currentBatchImageNames = string.Empty;

      var tasks = new List < Task > ();

      while (imageFiles.TryTake(out string imageFile)) {
        // Check if the image file has already been processed
        if (processedImageFiles.Contains(imageFile))
          continue;

        tasks.Add(Task.Run(async () => {
          try {
            // Check if cancellation was requested
            cancellationTokenSource.Token.ThrowIfCancellationRequested();

            FileInfo fileInfo = new FileInfo(imageFile);
            long originalSize = fileInfo.Length;

            using(var image = new MagickImage(imageFile)) {
              // Check if the image format is valid
              if (image.Format != MagickFormat.Unknown) {
                // Perform optimization
                image.Strip();
                image.ColorSpace = ColorSpace.RGB;

                await image.WriteAsync(imageFile);

                long optimizedSize = new FileInfo(imageFile).Length;

                long sizeReduction = originalSize - optimizedSize;
                totalSizeReduction += sizeReduction;

                await System.Windows.Application.Current.Dispatcher.InvokeAsync(() => {
                  Interlocked.Increment(ref completedImages); // Increment completedImages safely

                  double reductionPercentage = (sizeReduction / (double) originalSize) * 100;

                  // Calculate the progress based on the number of completed images and the total number of images
                  double progress = (completedImages / (double) totalImages) * 100;

                  ProgressBar.Value = progress;
                  ProgressLabel.Content = $ "Progress: {progress:F2}% | Size Reduction: {reductionPercentage:F2}%";
                  ImageNameLabel.DataContext = $ "Image: {Path.GetFileName(imageFile)}";

                  // Add current image name to the batch string
                  currentBatchImageNames += $ "{System.IO.Path.GetFileName(imageFile)}\n";
                  imagesInCurrentBatch++;

                  // If the batch size is reached, append the batch string to the TextBox
                  if (imagesInCurrentBatch == ImagesPerBatch) {
                    ImageListTextBox.AppendText(currentBatchImageNames);
                    ImageListTextBox.ScrollToEnd();

                    // Reset batch variables
                    currentBatchImageNames = string.Empty;
                    imagesInCurrentBatch = 0;
                  }
                });
              } else {
                System.Windows.MessageBox.Show($"Invalid image format: {imageFile}");
              }
            }

            // Add the processed image file to the list
            lock(processedImageFiles) {
              processedImageFiles.Add(imageFile);
            }

            int currentCompleted = System.Threading.Interlocked.Increment(ref completedImages);
            processedCount++;

            if (processedCount % batchSize == 0) {
              await Task.Delay(1); // Allow other tasks to execute
            }
          } catch (OperationCanceledException) {
            // Optimization process was canceled
            throw;
          }
        }, cancellationTokenSource.Token)); // Pass the CancellationToken to the Task.Run method
      }

      // Wait for all tasks to complete or cancellation is requested
      try {
        await Task.WhenAll(tasks);
      } catch (OperationCanceledException) {
        System.Windows.MessageBox.Show("Image optimization paused.");
        return;
      }

      // Append any remaining images in the last batch to the TextBox
      if (!string.IsNullOrEmpty(currentBatchImageNames)) {
        await System.Windows.Application.Current.Dispatcher.InvokeAsync(() => {
          ImageListTextBox.AppendText(currentBatchImageNames);
          ImageListTextBox.ScrollToEnd();
        });
      }
      ImageListTextBox.Visibility = Visibility.Visible;

      System.Windows.MessageBox.Show($"Image optimization completed.\nTotal Size Reduction: {totalSizeReduction} bytes");

      // Reset visibility of elements
      await System.Windows.Application.Current.Dispatcher.InvokeAsync(() => {
        TotalImagesLabel.Visibility = Visibility.Visible;
        ProgressBar.Visibility = Visibility.Visible;
        ProgressLabel.Visibility = Visibility.Visible;
        ImageNameLabel.Visibility = Visibility.Hidden;
        ResumeButton.Visibility = Visibility.Visible;
        PauseButton.Visibility = Visibility.Visible;
        ImageListTextBox.Visibility = Visibility.Visible;
      });
    }

    private void ButtonPause_Click(object sender, RoutedEventArgs e) {
      // Store the current progress before pausing
      pausedProgress = ProgressBar.Value;

      // Cancel the optimization process
      if (cancellationTokenSource != null)
        cancellationTokenSource.Cancel();

    }

    private async void ButtonResume_Click(object sender, RoutedEventArgs e) {
      // Cancel the current optimization process if it is active
      if (cancellationTokenSource != null)
        cancellationTokenSource.Cancel();

      // Reset the completed images count
      int completedImages = processedImageFiles.Count;

      // Reset the total size reduction
      totalSizeReduction = processedImageFiles.Sum(file => new FileInfo(file).Length);

      // Start the optimization process again
      cancellationTokenSource = new CancellationTokenSource();

      // Update the UI with the paused progress value
      await System.Windows.Application.Current.Dispatcher.InvokeAsync(() => {
        ProgressBar.Value = pausedProgress;
        ProgressLabel.Content = $ "Progress: {pausedProgress:F2}% | Size Reduction: {pausedProgress:F2}%";
      });

      ButtonOptimize_ClickAsync(sender, e);
    }
    private void ProgressBar_ValueChanged(object sender, RoutedPropertyChangedEventArgs < double > e) {
    }
    private void SelectedDirectoryTextBox_TextChanged(object sender, System.Windows.Controls.TextChangedEventArgs e) {
   }
    private void ImageListTextBox_TextChanged(object sender, System.Windows.Controls.TextChangedEventArgs e) {
    }
    private void ClearButton_Click(object sender, RoutedEventArgs e) {
      SelectedDirectoryTextBox.Text = string.Empty;
      ImageListTextBox.Text = string.Empty;
      TotalImagesLabel.Content = string.Empty;
      ProgressBar.Value = 0;
      ProgressLabel.Content = string.Empty;
      ImageNameLabel.Content = string.Empty;
    }
  }
}

Output
Conclusion
This article provided a comprehensive guide on efficient image optimization using the ImageMagick library in C# WPF. It emphasized the importance of image optimization, introduced ImageMagick, and covered setting up the development environment, loading and displaying images, implementing optimization algorithms, and incorporating progress indicators and error handling. Readers are encouraged to start building their image optimizer using C# WPF, leveraging ImageMagick's capabilities.
Suggestions for future enhancements include exploring additional techniques and features like cropping and watermarking. This guide equips developers to create visually appealing applications while optimizing storage and bandwidth usage using C# WPF and ImageMagick.
Thanks for reading this article.
FAQs
Q. Is ImageMagick compatible with other programming languages besides C# for image optimization?
A. Yes, ImageMagick is a powerful image-processing library that is compatible with various programming languages, not just C#. Developers can use ImageMagick with languages like Python, Java, Ruby, and more to optimize images efficiently.
Q. Can I optimize images in real-time using the C# WPF application?
A. Yes, by implementing asynchronous image processing techniques and leveraging the multi-threading capabilities of C# WPF, you can optimize images in real-time as users interact with the application. This allows for a seamless user experience without significant delays.
Q. Are there any limitations to image optimization using the ImageMagick library?
A. While ImageMagick is a versatile tool for image optimization, it's essential to consider the trade-offs between image quality and file size reduction. In some cases, aggressive compression or resizing may result in a noticeable loss of image quality. Developers should strike a balance between optimization and maintaining an acceptable level of visual fidelity based on the specific use case and application requirements.
Join the conversation! Your thoughts help the community grow.