

Working with Word documents in Power Automate can be surprisingly tricky.
If you use the SharePoint – Get file content action on a .docx file, you don't get the actual readable text of the document. Instead, Power Automate returns the file's binary content, which is essentially the encoded representation of the Word file.
At that point, a common approach is to look for a third-party connector, a premium connector, or an AI/OCR service.
But what if you don't want to use any of those?
There is a surprisingly simple way to extract the actual text from a Word document using only the SharePoint connector.
The trick is to understand what a .docx file actually is.
The Secret: A DOCX File Is a ZIP Package
A .docx file isn't simply a text file.
Internally, it is a ZIP package containing multiple XML files, images, metadata, relationships, and other resources.
One of the most important files inside the package is:
word/document.xml
This XML file contains the actual document content.
For example, a simplified Word document might contain something like:
<w:document>
    <w:body>
        <w:p>
            <w:r>
                <w:t>Hello World</w:t>
            </w:r>
        </w:p>
    </w:body>
</w:document>
The text that the user sees in Word is therefore buried inside XML elements such as:
<w:p>
for paragraphs and:
<w:t>
for text.
So the challenge becomes:
How do we get
document.xmlout of the DOCX file using Power Automate?
The Approach
The solution uses four main steps:
Extract the
.docxfile as a ZIP package.Retrieve
word/document.xml.Use XPath to extract the paragraphs and text nodes.
Combine those values into a single plain-text output.
And the important part is that all of this can be done with the SharePoint connector and standard Power Automate expressions.
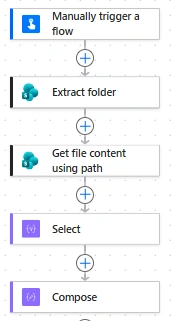
Here is the screenshot the Power Automate Flow I have build using the logic:
Step 1: Store the Word Document in SharePoint
Start with your Word document stored in SharePoint.
For example:
Shared Documents/Safely.docx
You can trigger the flow from whatever event makes sense for your scenario.
For example:
When a file is created
When a file is modified
Manually triggering a flow
From another Power Automate process
The important thing is that the input is a .docx file.
Step 2: Don't Try to Convert Get File Content Directly
This is where many Power Automate implementations go wrong.
If you use:
SharePoint → Get file content
you receive the contents of the DOCX package, not the readable document text.
A DOCX file is effectively a ZIP archive, so treating the output directly as XML will not work.
Instead, we need to extract the contents of the DOCX package.
Step 3: Use SharePoint's "Extract Folder" Action
This is the key part of the solution.
Use the SharePoint action:
Extract folder
Configure it with the Word document as the source.
For example:
Source:
 /Shared Documents/Safely.docx

Destination:
 /Shared Documents/testkj
After the action runs, Power Automate extracts the internal contents of the DOCX file into the destination folder.
You will now have a structure similar to:
testkj
│
├── word
│   ├── document.xml
│   ├── styles.xml
│   ├── settings.xml
│   └── ...
│
├── _rels
├── docProps
└── ...
The file we are interested in is:
word/document.xml
This is where the actual Word document text lives.
Step 4: Get document.xml
Next, use:
SharePoint → Get file content using path
Point it to:
/Shared Documents/testkj/word/document.xml
The important difference is that we're no longer asking SharePoint to give us the entire .docx package.
We're asking it for the XML file inside the package.
The output can now be interpreted as XML.
Step 5: Convert the Content to XML
Now we can use Power Automate's built-in expression:
xml(body('Get_file_content_using_path_1'))
This converts the content into an XML object that can be queried using XPath.
Step 6: Extract the Paragraphs
A Word document contains paragraphs represented by <w:p> elements.
We can use XPath to find those elements:
xpath(
    xml(body('Get_file_content_using_path_1')),
    '//*[local-name()="p"]'
)
The use of:
local-name()
is important.
WordprocessingML uses namespaces, so instead of having to deal with the w: namespace explicitly, local-name() allows us to find elements based on their actual element name.
This expression essentially says:
Find every paragraph element in the Word document.
Step 7: Extract the Actual Text
A paragraph can contain multiple text runs.
For example:
<w:p>
    <w:r>
        <w:t>Hello </w:t>
    </w:r>

    <w:r>
        <w:t>World</w:t>
    </w:r>
</w:p>
If we simply extract the paragraph, we don't yet have the clean text we want.
We need to extract the <w:t> elements inside each paragraph.
This can be done using a Select action.
Use:
@join(
    xpath(
        xml(string(item())),
        '//*[local-name()="t"]/text()'
    ),
    ''
)
The result is a collection of objects containing the extracted text from each paragraph.
Conceptually, it looks like:
[
    {
        "textValue": "Hello World"
    },
    {
        "textValue": "This is my second paragraph."
    },
    {
        "textValue": "This is another paragraph."
    }
]
Step 8: Convert the Result into One Plain-Text String
This is the slightly tricky part.
The output of the Select action is JSON.
We want to combine the textValue properties into one string while preserving paragraph breaks.
A direct attempt to convert the Select output into XML can result in an error such as:
The template language function 'xml' parameter is not valid.

The provided value cannot be converted to XML:
'This document already has a 'DocumentElement' node.'
The reason is that the JSON/array structure doesn't necessarily represent a single valid XML document.
So we create our own XML wrapper.
The expression used in the flow is:
@join(
    xpath(
        xml(
            json(
                concat(
                    '{"root":{"item":',
                    string(body('Select')),
                    '}}'
                )
            )
        ),
        '//root/item/textValue/text()'
    ),
    decodeUriComponent('%0A')
)
Let's break that down.
Part 1: Convert the Select output to a string
string(body('Select'))
This gives us the JSON representation of the Select output.
Part 2: Create a valid XML structure
We construct a wrapper:
{"root":{"item": ... }}
So the resulting structure becomes conceptually:
{
    "root": {
        "item": [
            {
                "textValue": "First paragraph"
            },
            {
                "textValue": "Second paragraph"
            }
        ]
    }
}
Power Automate can then convert this JSON structure into XML.
Part 3: Extract textValue
We use:
//root/item/textValue/text()
This extracts the actual text values.
Part 4: Join the paragraphs
Finally:
join(
    ...,
    decodeUriComponent('%0A')
)
adds a newline between each paragraph.
The final result becomes something like:
This is the first paragraph.

This is the second paragraph.

This is the third paragraph.
And that is the actual readable text from the Word document.
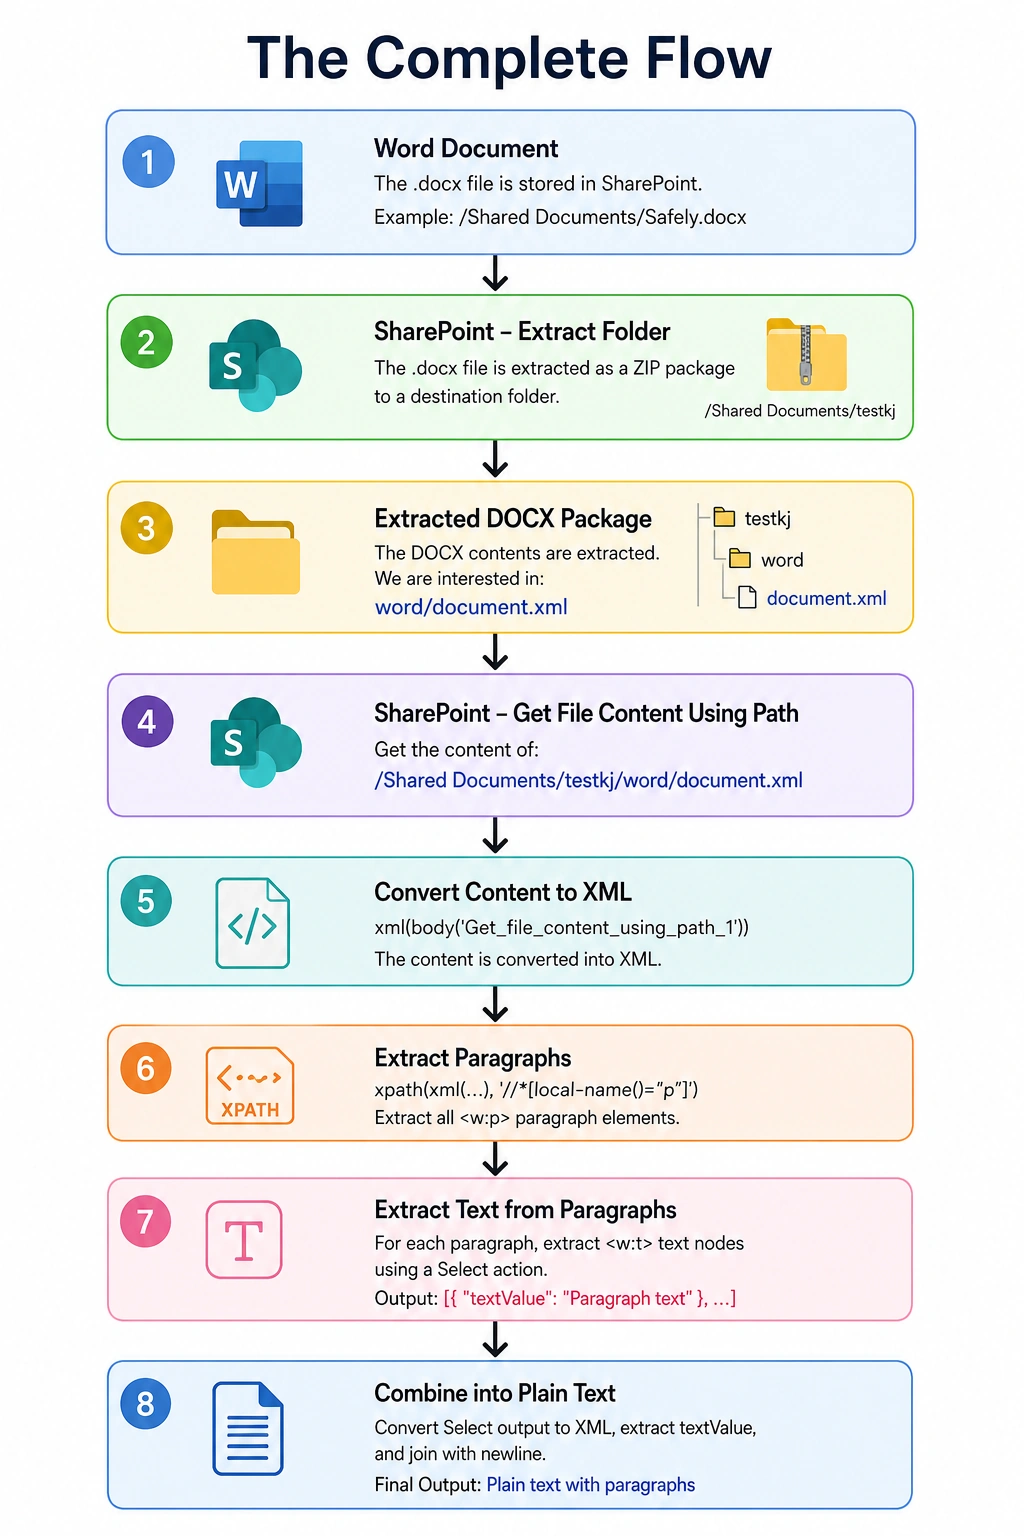
The Complete Flow
The complete Power Automate flow is therefore:
Why This Approach Is Useful
The biggest advantage is that you don't need:
Premium connectors
Third-party connectors
Encodian
Muhimbi
Plumsail
AI Builder
Azure Functions
Custom APIs
You can accomplish the extraction using Power Automate's built-in functionality together with SharePoint.
This makes the approach particularly useful when you're working in an environment where connector usage is restricted or where you want to keep the solution entirely within the Microsoft ecosystem.
Important Limitations
There is one important thing to understand.
This technique extracts the underlying text content of the DOCX file. It is not a full Word rendering engine.
For example, you should not expect it to perfectly reproduce:
Tables as they visually appear in Word
Text boxes
Headers and footers
Complex formatting
Images
Charts
SmartArt
Layout information
Comments and tracked changes
The XML contains much more information than just text, so the XPath expressions can be extended if your use case requires specific elements.
For example, tables can be handled separately by querying:
w:tbl
and table cells:
w:tc
Why Not Just Use Get File Content?
This is probably the most important conceptual point.
A .docx file is not plain text.
When you use:
Get file content
Power Automate is correctly giving you the file content.
It isn't failing.
The problem is that the content represents a ZIP package containing the document's internal XML files.
So instead of trying to decode the entire DOCX output directly, we can exploit the fact that SharePoint's Extract Folder action can unpack the package for us.
Once word/document.xml is available, the problem becomes much easier because we're working with normal XML and XPath.
The Core Expressions
Extract paragraphs
xpath(
    xml(body('Get_file_content_using_path_1')),
    '//*[local-name()="p"]'
)
Extract text from each paragraph
join(
    xpath(
        xml(string(item())),
        '//*[local-name()="t"]/text()'
    ),
    ''
)
Combine everything into plain text
join(
    xpath(
        xml(
            json(
                concat(
                    '{"root":{"item":',
                    string(body('Select')),
                    '}}'
                )
            )
        ),
        '//root/item/textValue/text()'
    ),
    decodeUriComponent('%0A')
)
Final Takeaway
If you've ever tried to extract text from a Word document in Power Automate and wondered why Get File Content only gives you binary or encoded data, the answer is that a DOCX file isn't actually a single text document.
It's a ZIP package containing XML.
Once you understand that, the solution becomes straightforward:
Extract the DOCX → access word/document.xml → parse the XML → extract <w:t> nodes → join the text.
And the best part is that this can be achieved with just the SharePoint connector and native Power Automate expressions, without relying on premium or third-party connectors.
This is a useful technique to keep in your Power Automate toolbox whenever you need to turn Word documents into text for downstream processing, AI prompts, document classification, data extraction, or automation workflows.
Working around premium actions with clever workarounds is what makes Power Automate so powerful. Hopefully, this guide helps you save both time and licensing costs on your next project. If you need help tailoring this solution to your business or want to audit your current automation setup for better efficiency, let’s talk! to get started.
Join the conversation! Your thoughts help the community grow.