

Introduction
Visual Studio Code (VSCode) is the preferable code editor for most developers. If we are developing any API using VSCode and wants to test that API, then we will use some other tools to test the API. But hereafter no need to leave from VSCode for testing the API also. I have created one VSCode extension to test the REST API called "Fetch Client". In this article, we are going to learn what is "Fetch Client" and how to use it.
What is Fetch Client?
"Don't leave from VSCode, Stay with it - For Rest API testing. 😎
Fetch Client is Visual Studio Code extension that is used to test the Rest API.
Why Fetch Client?
- Open Source
- Lightweight
- UI Customization and support VSCode Themes.
- Test Rest API request with GET, POST, PUT, PATCH, DELETE, HEAD, and OPTIONS methods.
- Various authorization mechanisms such as Basic Auth, Bearer Token, and API Key.
- Various post body which are Form, Form-Encoded, Raw (JSON, Plain Text, XML), Binary File, and GraphQL.
- Syntax highlight for Response data.
- Tree view for JSON and XML responses and HTML preview for HTML responses.
- History, Collection, and Environment Variable is supported.
- Test the API request and response data without any scripts/code.
- Generate code snippets for various languages.
- Save response and test results as File.
- Export/Import the Fecth Client's collections and environment variables.
- Add documentation/feedback for each request.
How to Install?
- Install via VSCode Extensions
- Open VSCode Extensions panel using
Ctrl+Shift+Xshortcut. - Type
Fetch Clientin Search bar. - Select
Fetch Clientand install the extension.
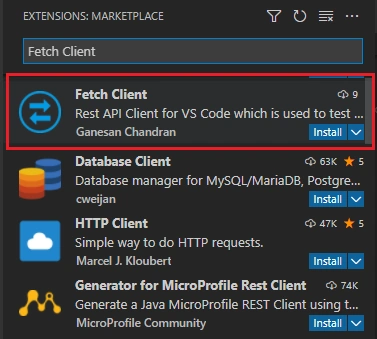
- Open VSCode Extensions panel using
How to use?


- Click the
Fetch Clienticon on the activity bar (left side of the VSCode) or use theCtl+Alt+Nshortcut. - On the Fetch Client
Quick Accessbar, click theNew Requestbutton to test the Rest API. - Select the
Http methodand enter theURLand other parameters such as query parameters, headers, auth details, request body (if required) and click theSendbutton. - The response data will be displayed in the
Responsesection. We can view the response data in the Tree view format forJSONandXMLresponses and HTML preview forHTMLresponses. - All existing requests are available in the
Historysection in the Quick Access Bar.
Features
- UI Customization
- HTTP Methods
- Query Parameter
- Authorization
- Headers
- Request Body
- Test
- Response Data
- Test Results
- Notes
- Code Snippet
- Request Cancel
- Quick Access
- History
- Collection
- Environment Variable
- Run All requests
1) UI Customization
We can customize the UI in different modes.
- Horizontal mode
- Accordian View
- Split View
- Vertical mode
- Split View
Horizontal mode - Accordian View
Horizontal mode - Split View
Vertical mode - Split View
2) Different HTTP Methods
Fetch client supports to test the Rest API request with various HTTP methods such as GET, POST, PUT, PATCH, DELETE, HEAD and OPTIONS.
3) Query Parameter
Fetch client supports to test the Rest API request with query parameter.
4) Authorization
Fetch client supports below authorization methods for Rest API testing.
- Basic Auth
- Bearer Token
- API Key
5) Headers
We can add the headers for API testing. Fetch Client gives suggestions on various headers and corresponding values in the header section.
6) Request Body
- Fetch client supports below request body.
- Form
- Form-Encoded
- Raw ( JSON, Plain Text, XML )
- Binary File
- GraphQL
Content-Typeheader will be automatically added based on binary file type.
7) Test
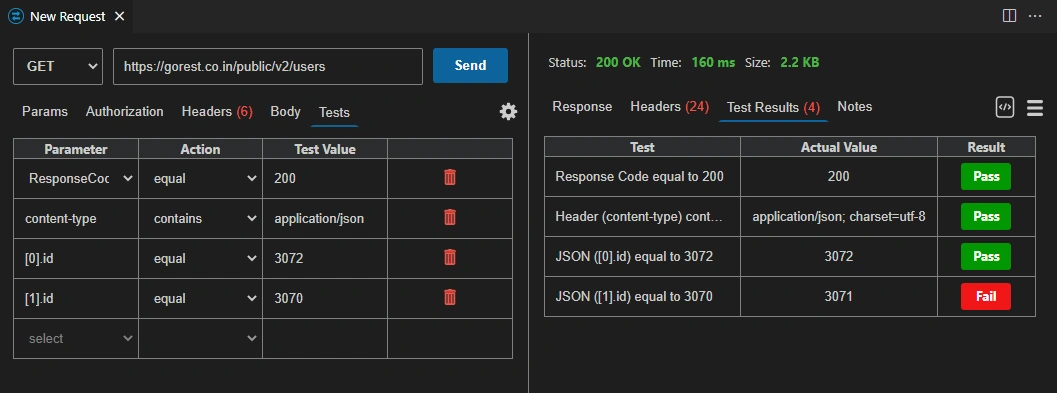
- We can test the API request and response data without any scripts/code in the Fetch client.
- It supports to test the below data,
- Response Code
- Response Body
- Response Time
- Content-Type
- Content-Length
- Content-Encoding
- Specific Response Header value
- Specific JSON property value in the JSON response
8) Response Data
- Fetch client supports Syntax highlight for Response data.
- Copy the response data using
Copybutton. - It supports Tree view for JSON and XML responses and HTML preview for HTML responses.
- Download the response data as file.
- View the status code, response time and size of the response data.
- View response headers.
9) Test Results
- Once request is processed, Fetch client executes the test cases and display the test result with expected value and actual value.
- We can download the test results as JSON file.
10) Notes
Notes section is used to add the notes or documentation regarding the request. Fetch client has simple editor to add the documentation.
11) Code Snippet
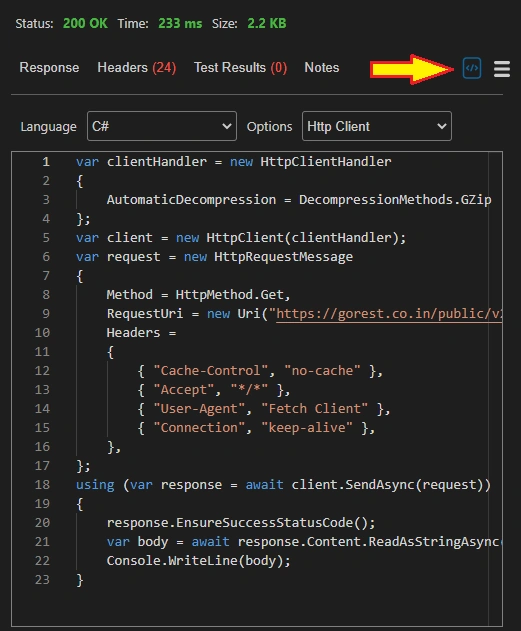
Fetch client supports code snippet generation for various languages. Generate code snippets to send request from another application. Open request view and click icon (right side of the response section) for code snippet generation. The code snippet generation is available for following languages.
- C
- C#
- Go
- Java
- JavaScript
- Node
- PHP
- Python
- Shell
11) Request Cancel
Fetch client provides the feature for cancel the request. If you want to cancel the processing request then click then "Cancel Request" button in the response section.
12) Quick Access
Fetch client provides the quick access of History, collection and Environment variables in the side bar.
-
History
- Automatic saving of requests in History.
- Save the history item to the collections.
- Delete all history items or specific history item.
-
Collection
- Save requests to a collection.
- Organize the request using the collections.
- Run all the requests in the collection using
Run Alloptions and download the results as file. - Attach the Environment variable to collections.
Exportthe collections as JSON file.Importthe Fetch Client collections from above exported JSON file. (It is used to share the collections between team members.)- Duplicate the collection items.
How to Import Collection
- Select the
Collectiontab from the sidebar - Click Menu icon and Select
Importoption. - Now select
Fetch Clientcollection file.
-
Environment Variable
- Create and set variables at multiple scopes
- Global Level
- Collection level
- Request level
- It is simple key value pair combination.
- Use environment variables in URL, Query Param, Authorization, Header, Request Body (Form and Form-Encoded), Test sections.
Exportvariables as JSON file.Importthe Fetch Client variables from above exported JSON file.- In the input, enter a variable name in the
{{variableName}}format.
How to Import Variable
- Select the
Variabletab from the sidebar - Click Menu icon and Select
Importoption. - Now select
Fetch Clientvariable file.
- Create and set variables at multiple scopes
12) Run All requests
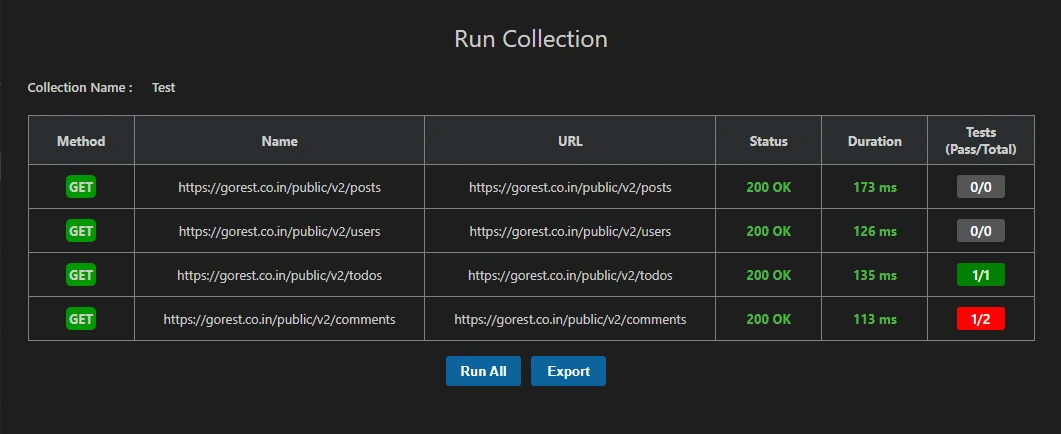
- Run all the requests in the collection using "Run All" options and download the results as file.
- Once completed the all request, export the test result as
JSONorCSV. - If you click the particular request from the table, it will open the corresponding request view.
Keyboard Shortcuts
Ctl+Shift+P: From Command Palette- Fetch Client - New Request
Ctl+Alt+N- OpenFetch ClientViewEnteron url textbox to send request
Configuration
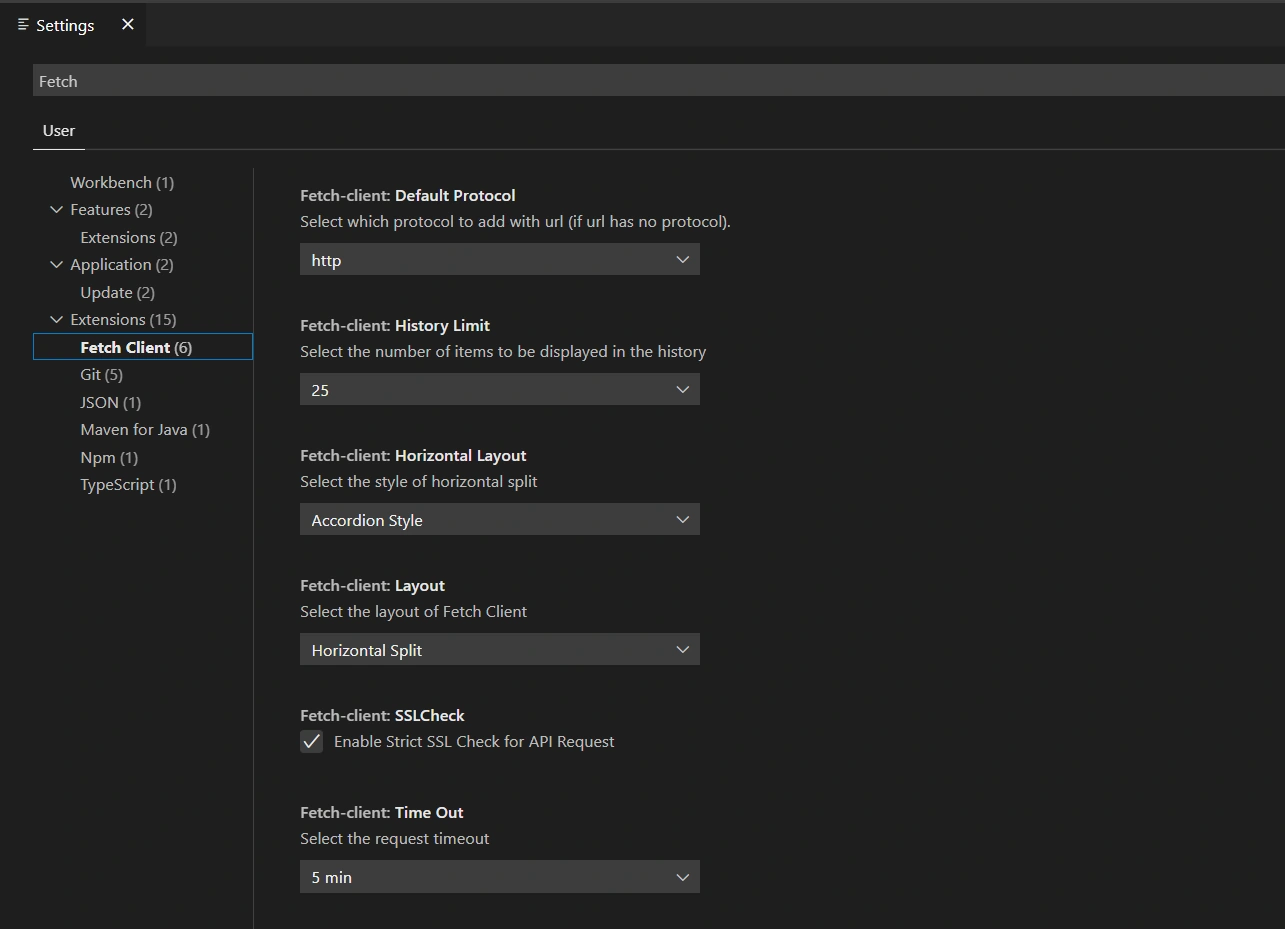
- Open VSCode settings View, then search for
Fetch Client. - Fetch Client has below configurations.
- Layout - Customize the UI layout
- SSL Check - Enable Strict SSL Check for API Request
- History Limit - Number of items to be displayed in the History
- Time Out - Set Request Timeout
- Default Protocol - Which protocol to add with URL either HTTP or HTTPS(if URL has no protocol)
Summary
In this article, you learned about how to use and test REST API using "Fetch Client" VSCode extension.
- GitHub Repo : https://github.com/Ganesan-Chandran/vscode-fetch-client
- To Raise Issue/New Features : https://github.com/Ganesan-Chandran/vscode-fetch-client/issues
- VS Code Marketplace : https://marketplace.visualstudio.com/items?itemName=GanesanChandran.fetch-client
larsen lennonPosted May 18, 2022, 5:16 PM
Hi Ganesan, do you know how to get data from Azure Monitor or Microsoft Defender for Cloud into Azure Data Explorer or Power BI ?