

In this article, I will explain some file upload insights and show how to upload single or multiples in the app.net razor pages application. I will cover the following points:
- File Upload approaches: Buffering and Streaming
- File upload security concerns
- File Upload Storage options
- Upload Single File in asp.net core razor pages
- Upload Multiple files
- Storing files in physical storage and database
File Upload Approaches: Buffering and Streaming
Generally, buffering and streaming are the two scenarios to upload files in asp.net.
Buffering upload files by reading entire file into an IFormFile. This upload option increases the demand of resources like disk, memory based on file size and numbers in simultaneous uploads. It is recommended for small size file. Note: the site may crash if we upload too many files using this buffering option.
IFromFile represents a file sent with HttpRequest.
Streaming is another option to upload file which reduces the utilization of resources like disk or memory during the uploads. In this option, the application send file via multipart request and the file is directly saved or processed which does not enhance the performance. It is generally used for large files.
Security concerns during files upload
File upload is always vulnerable if proper security is not applied to applications. File upload is an opportunity for attackers to upload viruses and malware, break the servers and networks security, run denial of service attacks.
To overcome the above issues and reduce the attacks we can take following steps
- Always validate the file types and extension
- Rename the file and use safe name, example use GUID for file name
- Keep storage location into another dedicated storage and non-system storage.
- Do not upload into app tree folder
- Validate files in both client and server side. It is easy to break client validation.
- Limit the file size while uploading. Always check the file size before upload
- Only allow the required file extension (exclude like exe)
- Do not replace or overwrite the existing file with new one
- Use a virus/Malware scanner to the file before upload
- Validate user before uploading files
- Keep proper logs during file upload
- Always grant read and write permission to the location but never execute permission.
Storage options for Uploaded File
Commonly, there are three storage choices for files: Physical, Database, Data Storage service
Physical Storage: this storage option means to store in file storage or network share. Mostly, we create a folder and store the file over there. This is quite easy to implement, however, it is always recommended to keep the logs and records in database for user access and view purposes. It is expensive compared to database storage; however, this option allows to store large files which might be restricted in database. Then again, this storage cost will be less than cloud data storage.
Database Storage: This option is quite convenience over the physical storage and is recommended for small files. This is economical compared to both physical and data storage service. It also easy for implementation as we can retrieve the file content from database directly.
Data Storage service (cloud storage service): this storage is highly scalable and recommended for large storage infrastructures. Example: Azure Blog Storage.
Now we will create an asp.net core application with Razor pages to implement file upload.
Prerequisites
- Visual studio (I will be using visual studio 2019 for this demo)
- .Net 5 (asp.net core 5.0)
Quickly, we will create a new asp.net core 5.0 razor pages project with Visual Studio 2019.
Open Visual studio >> Create a new Project as shown:
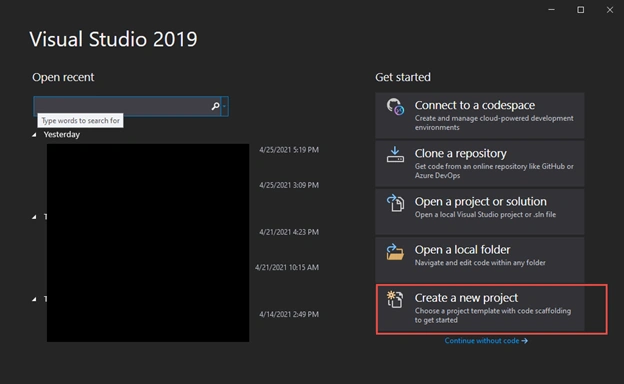
Next, Choose project template ASP.NET Core Web App.
A project template for creating an ASP.NET core application with ASP.NET Razor Pages content.
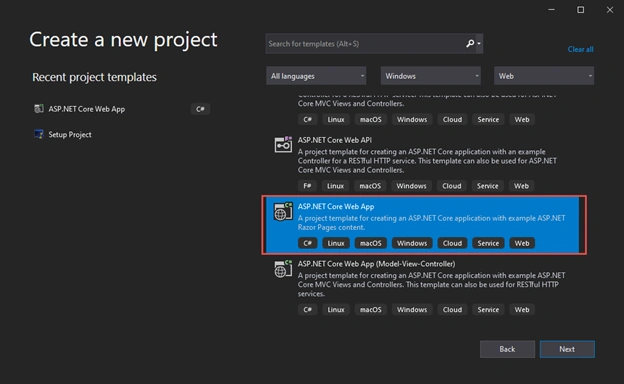
Please Note: Here I am selecting ASP.NET Core with Razor pages (not with MVC).
Next screens will give options to give the project Name, Location and solution name as shown:
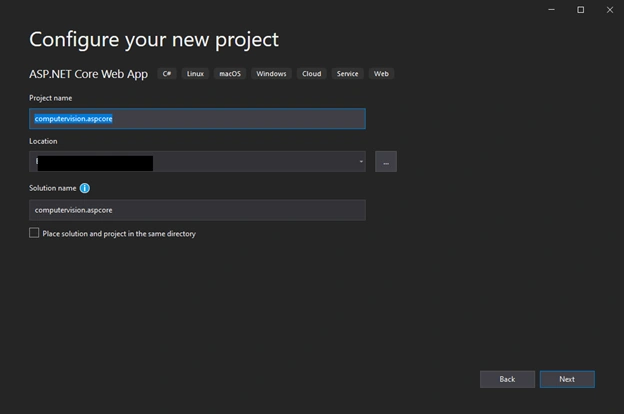
Then, we will option to select the target framework. Here, we will .NET 5.0 which is a current version.
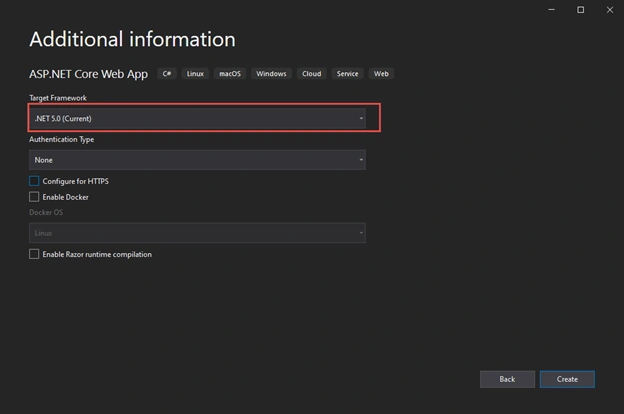
We have successfully created the ASP.NET core 5 web application with Razor pages.
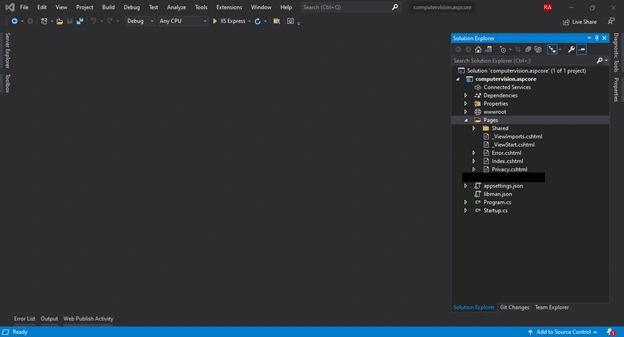
We can build and run the solution.
Now we will proceed with File upload.
Upload Single File in asp.net core razor pages
In the solution we will modify index page. Currently, we have Index.cshtml (for View) and index.cshtml.cs (For actions or c# code)
We will add a model for file upload in index.cshtml.cs for file upload as:
- public class FileUpload
- {
- [Required]
- [Display(Name = "File")]
- public IFormFile FormFile { get; set; }
- public string SuccessMessage { get; set; }
- }
We can keep this model in separate view model as well if you want to reuse the same model for other uploads as well. For simplicity, I am keeping in index page.
We will add following html in razor page i.e. index.cshtml.
- <form enctype="multipart/form-data" method="post">
- <div class="form-group">
- <label class="file">
- <input type="file" asp-for="fileUpload.FormFile" multiple aria-label="File browser example">
- <span class="file-custom"></span>
- </label>
- <input asp-page-handler="Upload" class="btn btn-primary" type="submit" value="Upload">
- </div>
- </form>
We need to bind the FileUpload model as well. Also we will add uplaod action as shown:
- [BindProperty]
- public FileUpload fileUpload { get; set; }
- //upload action as shown:
- private string fullPath = System.AppDomain.CurrentDomain.BaseDirectory.ToString() + "UploadImages";
- public IActionResult OnPostUpload(FileUpload fileUpload)
- {
- //Creating upload folder
- if (!Directory.Exists(fullPath))
- {
- Directory.CreateDirectory(fullPath);
- }
- var formFile = fileUpload.FormFile;
- if (formFile.Length > 0)
- {
- var filePath = Path.Combine(fullPath, formFile.FileName);
- using (var stream = System.IO.File.Create(filePath))
- {
- formFile.CopyToAsync(stream);
- }
- }
- // Process uploaded files
- // Don't rely on or trust the FileName property without validation.
- ViewData["SuccessMessage"] = formFile.FileName.ToString() + " files uploaded!!";
- return Page();
- }
Here, I am defining a path for file upload and creating a folder if not exist.
ViewData for showing uploaded file.
Complete index.cshtml
- @page
- @model IndexModel
- @{
- ViewData["Title"] = "Home page";
- }
- <div class="text-center">
- <h4 >Rijsat.com | Upload Single or Multiple files</h4>
- <p>Learn about <a href="https://docs.microsoft.com/aspnet/core">building Web apps with ASP.NET Core</a>.</p>
- </div>
- <form enctype="multipart/form-data" method="post">
- <div class="form-group">
- <label class="file">
- <input type="file" asp-for="fileUpload.FormFile" aria-label="File browser example">
- <span class="file-custom"></span>
- </label>
- <input asp-page-handler="Upload" class="btn btn-primary" type="submit" value="Upload">
- </div>
- @{
- if (ViewData["SuccessMessage"] != null)
- {
- <span class="badge badge-success"> @ViewData["SuccessMessage"]</span> }
- }
- </form>
Compete index.cshtml.cs
- using Microsoft.AspNetCore.Http;
- using Microsoft.AspNetCore.Mvc;
- using Microsoft.AspNetCore.Mvc.RazorPages;
- using Microsoft.Extensions.Logging;
- using System.ComponentModel.DataAnnotations;
- using System.IO;
- namespace computervision.aspcore.Pages
- {
- public class IndexModel : PageModel
- {
- private readonly ILogger<IndexModel> _logger;
- private string fullPath = System.AppDomain.CurrentDomain.BaseDirectory.ToString() + "UploadImages";
- public IndexModel(ILogger<IndexModel> logger)
- {
- _logger = logger;
- }
- [BindProperty]
- public FileUpload fileUpload { get; set; }
- public void OnGet()
- {
- ViewData["SuccessMessage"] = "";
- }
- public IActionResult OnPostUpload(FileUpload fileUpload)
- {
- //Creating upload folder
- if (!Directory.Exists(fullPath))
- {
- Directory.CreateDirectory(fullPath);
- }
- var formFile = fileUpload.FormFile;
- var filePath = Path.Combine(fullPath, formFile.FileName);
- using (var stream = System.IO.File.Create(filePath))
- {
- formFile.CopyToAsync(stream);
- }
- // Process uploaded files
- // Don't rely on or trust the FileName property without validation.
- ViewData["SuccessMessage"] = formFile.FileName.ToString() + " files uploaded!!";
- return Page();
- }
- }
- public class FileUpload
- {
- [Required]
- [Display(Name = "File")]
- public IFormFile FormFile { get; set; }
- public string SuccessMessage { get; set; }
- }
- }
Now, we will run the solution and test the upload.
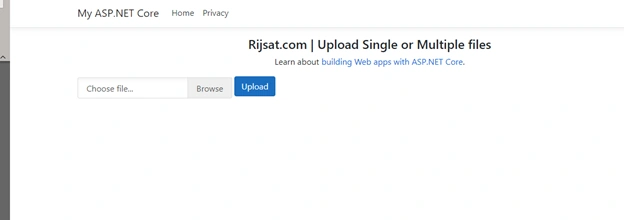
Select any file and click upload.
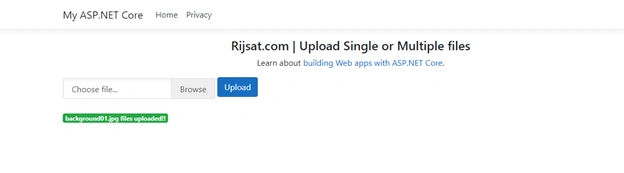
Now we can see the file uploaded successfully. Up to here, we have completed single file upload, subsequently, we will proceed for multiple files.
It quite easy to upload multiple files as well with some modifications.
Upload Multiple files
First, we need to modify the FileUpload Model as shown:
- public class FileUpload
- {
- [Required]
- [Display(Name = "File")]
- public List<IFormFile> FormFiles { get; set; } // convert to list
- public string SuccessMessage { get; set; }
- }
Update IFormFile to List<iFormFile>
Then update razor page, add multiple in file upload input type as shown:
- <input type="file" asp-for="fileUpload.FormFiles" multiple aria-label="File browser example">
Similarly, we can modify the upload functions as shown:
- public IActionResult OnPostUpload(FileUpload fileUpload)
- {
- if (!Directory.Exists(fullPath))
- {
- Directory.CreateDirectory(fullPath);
- }
- foreach (var aformFile in fileUpload.FormFiles)
- {
- var formFile = aformFile;
- if (formFile.Length > 0)
- {
- var filePath = Path.Combine(fullPath, formFile.FileName);
- using (var stream = System.IO.File.Create(filePath))
- {
- formFile.CopyToAsync(stream);
- }
- }
- }
- // Process uploaded files
- // Don't rely on or trust the FileName property without validation.
- ViewData["SuccessMessage"] = fileUpload.FormFiles.Count.ToString() + " files uploaded!!";
- return Page();
- }
For multiple files
Complete Index.cshtml page
- @page
- @model IndexModel
- @{
- ViewData["Title"] = "Home page";
- }
- <div class="text-center">
- <h4 >Rijsat.com | Upload Single or Multiple files</h4>
- <p>Learn about <a href="https://docs.microsoft.com/aspnet/core">building Web apps with ASP.NET Core</a>.</p>
- </div>
- <form enctype="multipart/form-data" method="post">
- <div class="form-group">
- <label class="file">
- <input type="file" asp-for="fileUpload.FormFiles" multiple aria-label="File browser example">
- <span class="file-custom"></span>
- </label>
- <input asp-page-handler="Upload" class="btn btn-primary" type="submit" value="Upload">
- </div>
- @{
- if (ViewData["SuccessMessage"] != null)
- {
- <span class="badge badge-success"> @ViewData["SuccessMessage"]</span>
- }
- }
- </form>
Complete Index.cshtml.cs code.
- using Microsoft.AspNetCore.Http;
- using Microsoft.AspNetCore.Mvc;
- using Microsoft.AspNetCore.Mvc.RazorPages;
- using Microsoft.Extensions.Logging;
- using System.Collections.Generic;
- using System.ComponentModel.DataAnnotations;
- using System.IO;
- namespace computervision.aspcore.Pages
- {
- public class IndexModel : PageModel
- {
- private readonly ILogger<IndexModel> _logger;
- private string fullPath = System.AppDomain.CurrentDomain.BaseDirectory.ToString() + "UploadImages";
- public IndexModel(ILogger<IndexModel> logger)
- {
- _logger = logger;
- }
- [BindProperty]
- public FileUpload fileUpload { get; set; }
- public void OnGet()
- {
- ViewData["SuccessMessage"] = "";
- }
- public IActionResult OnPostUpload(FileUpload fileUpload)
- {
- if (!Directory.Exists(fullPath))
- {
- Directory.CreateDirectory(fullPath);
- }
- foreach (var aformFile in fileUpload.FormFiles)
- {
- var formFile = aformFile;
- if (formFile.Length > 0)
- {
- var filePath = Path.Combine(fullPath, formFile.FileName);
- using (var stream = System.IO.File.Create(filePath))
- {
- formFile.CopyToAsync(stream);
- }
- }
- }
- // Process uploaded files
- // Don't rely on or trust the FileName property without validation.
- ViewData["SuccessMessage"] = fileUpload.FormFiles.Count.ToString() + " files uploaded!!";
- return Page();
- }
- }
- public class FileUpload
- {
- [Required]
- [Display(Name = "File")]
- public List<IFormFile> FormFiles { get; set; } // convert to list
- public string SuccessMessage { get; set; }
- }
- }
Now, again, we will run the solution and test it. This time, we will option to select multiple files and upload shown,
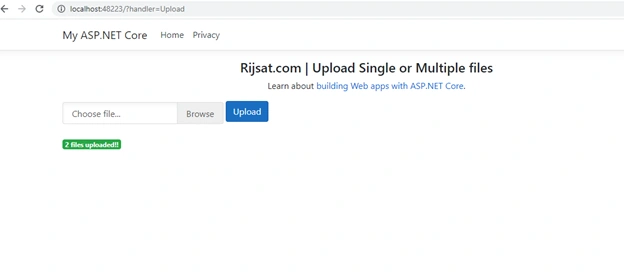
We have completed single and multiple file upload successfully.
Storing files in physical storage and database
In the above solution, I have stored the files into physical location which is define as shown:
- private string fullPath = System.AppDomain.CurrentDomain.BaseDirectory.ToString() + "UploadImages";
Additionally, if we want to save the file into SQL server, we need to create a table to save file as shown:
- /****** Object: Table [dbo].[Document] Script Date: 4/26/2021 11:33:41 PM ******/
- SET ANSI_NULLS ON
- GO
- SET QUOTED_IDENTIFIER ON
- GO
- CREATE TABLE [dbo].[Document](
- [Id] [bigint] IDENTITY(1,1) NOT NULL,
- [FileName] [nvarchar](250) NOT NULL,
- [FileType] [varchar](100) NULL,
- [FileData] [varbinary](max) NOT NULL,
- [Created] [datetime] NOT NULL,
- [Modified] [datetime] NOT NULL,
- CONSTRAINT [PK_Document] PRIMARY KEY CLUSTERED
- (
- [Id] ASC
- )WITH (PAD_INDEX = OFF, STATISTICS_NORECOMPUTE = OFF, IGNORE_DUP_KEY = OFF, ALLOW_ROW_LOCKS = ON, ALLOW_PAGE_LOCKS = ON, OPTIMIZE_FOR_SEQUENTIAL_KEY = OFF) ON [PRIMARY]
- ) ON [PRIMARY] TEXTIMAGE_ON [PRIMARY]
- GO
Then create model based on the table, then generate value accordingly.
- public class DocumentViewmodel
- {
- public int Id { get; set; }
- [MaxLength(250)]
- public string FileName { get; set; }
- [MaxLength(100)]
- public string FileType { get; set; }
- [MaxLength]
- public byte[] FileData { get; set; }
- public DateTime Created { get; set; }
- public DateTime Modified { get; set; }
- }
Then you can get the model data according as shown,
- // File upload to database
- //Get File Name
- var filename = Path.GetFileName(formFile.FileName);
- //Get file Extension
- var fileextension = Path.GetExtension(fileName);
- // concatenating File Name and File Extension
- var newfilename = String.Concat(Convert.ToString(Guid.NewGuid()), fileextension);
- var documentViewmodel = new DocumentViewmodel() {
- Id = 0,
- FileName = newfilename,
- FileType = fileExtension,
- Created = DateTime.Now,
- Modified = DateTime.Now
- };
- using(var target = new MemoryStream()) {
- formFile.CopyTo(target);
- documentViewmodel.FileData = target.ToArray();
- }
- // use this documentViewmodel to save record in database
Conclusion
In this article, I have explained file uploading option which are generally two types: buffering and streaming. I have, furthermore, elaborated about security concerns on file upload as well listed some tips to reduce the attacks from file upload. Additionally, I have shared some file storage options available for file upload with comprehensive comparison. Finally, I have also created an asp.net core 5.0 with razor pages to demonstrate file upload for single and multiple files into physical location and database.
Join the conversation! Your thoughts help the community grow.