

Introduction
In this article we will discuss file handling in Windows Phone applications. File handling is the set of operations for file manipulation like creating, writing to, reading from files and such. I hope you are already familiar with file operations in .Net web and Windows applications. Here we will learn how to implement file operations (read from and write to a file) in a Windows Phone application. It is much similar to web and Windows applications.
To start file handling operations in a Windows Phone application we must import the System.IO.IsolatedStorage namespace in our project and implement read and write operations. We will use three classes IsoFileStream class, IsoFileWriter class and IsoFileReader class. IsoFileWriter class has a method WriteLine which is used to write a string to a file and IsoFileReader class has a method ReadLine which is used to read contents from a file.
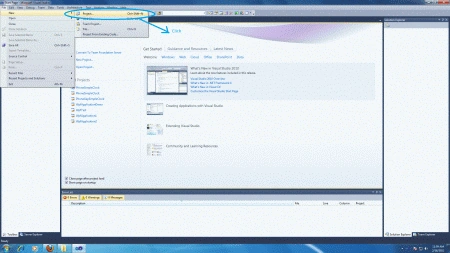
Step 1 : Open Visual Studio.
- Select new -> project
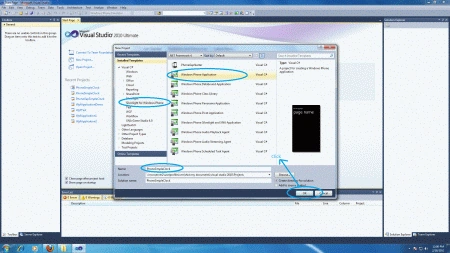
- Select your preferred language
- Select Silverlight for Windows Phone application
- Name the project
- Now name the project "WindowsPhoneApplication"
Step 2 : In the design page we will use a textbox
and two buttons to implement read and write operations.
The code
is given below for this design customization.
Code
<Grid x:Name="ContentPanel" Grid.Row="1" Margin="12,0,12,0">
<Button Content="Write" Height="72" HorizontalAlignment="Left" Margin="34,354,0,0" Name="button1" VerticalAlignment="Top" Width="160" Click="Button1_Click" Background="#00DE3939" Foreground="#FFDB2727" BorderBrush="#FFD13636" />
<Button Content="Read" Height="72" HorizontalAlignment="Left" Margin="214,354,0,0" Name="button2" VerticalAlignment="Top" Width="160" Click="Button2_Click" Foreground="#FFBE3333" BorderBrush="#FFDB2D2D" />
<TextBox Height="239" HorizontalAlignment="Left" Margin="6,46,0,0" Name="textBox1" Text="" VerticalAlignment="Top" Width="444" Background="#BF86EB21" BorderBrush="#BFE83030" />
</Grid>
<Grid.Background>
<LinearGradientBrush EndPoint="1,0.5" StartPoint="0,0.5">
<GradientStop Color="Black" Offset="0" />
<GradientStop Color="White" Offset="1" />
</LinearGradientBrush>
</Grid.Background>
Step 3 : The whole code of the MainPage.xaml page is:
Code
<phone:PhoneApplicationPage
x:Class="PhoneApp7.MainPage"
xmlns="http://schemas.microsoft.com/winfx/2006/xaml/presentation"
xmlns:x="http://schemas.microsoft.com/winfx/2006/xaml"
xmlns:phone="clr-namespace:Microsoft.Phone.Controls;assembly=Microsoft.Phone"
xmlns:shell="clr-namespace:Microsoft.Phone.Shell;assembly=Microsoft.Phone"
xmlns:d="http://schemas.microsoft.com/expression/blend/2008"
xmlns:mc="http://schemas.openxmlformats.org/markup-compatibility/2006"
mc:Ignorable="d" d:DesignWidth="480" d:DesignHeight="768"
FontFamily="{StaticResource PhoneFontFamilyNormal}"
FontSize="{StaticResource PhoneFontSizeNormal}"
Foreground="{StaticResource PhoneForegroundBrush}"
SupportedOrientations="Portrait" Orientation="Portrait"
shell:SystemTray.IsVisible="True">
<!--LayoutRoot is the root grid where all page content is placed-->
<Grid x:Name="LayoutRoot">
<Grid.RowDefinitions>
<RowDefinition Height="Auto"/>
<RowDefinition Height="*"/>
</Grid.RowDefinitions>
<!--TitlePanel contains the name of the application and page title-->
<StackPanel x:Name="TitlePanel" Grid.Row="0" Margin="12,17,0,28">
<TextBlock x:Name="ApplicationTitle" Text="MY APPLICATION" Style="{StaticResource PhoneTextNormalStyle}" Foreground="#FFC42121" />
<TextBlock x:Name="PageTitle" Text="File Handling" Margin="9,-7,0,0" Style="{StaticResource PhoneTextTitle1Style}" Foreground="#FFD14343" />
</StackPanel>
<!--ContentPanel - place additional content here-->
<Grid x:Name="ContentPanel" Grid.Row="1" Margin="12,0,12,0">
<Button Content="Write" Height="72" HorizontalAlignment="Left" Margin="34,354,0,0" Name="button1" VerticalAlignment="Top" Width="160" Click="Button1_Click" Background="#00DE3939" Foreground="#FFDB2727" BorderBrush="#FFD13636" />
<Button Content="Read" Height="72" HorizontalAlignment="Left" Margin="214,354,0,0" Name="button2" VerticalAlignment="Top" Width="160" Click="Button2_Click" Foreground="#FFBE3333" BorderBrush="#FFDB2D2D" />
<TextBox Height="239" HorizontalAlignment="Left" Margin="6,46,0,0" Name="textBox1" Text="" VerticalAlignment="Top" Width="444" Background="#BF86EB21" BorderBrush="#BFE83030" />
</Grid>
<Grid.Background>
<LinearGradientBrush EndPoint="1,0.5" StartPoint="0,0.5">
<GradientStop Color="Black" Offset="0" />
<GradientStop Color="White" Offset="1" />
</LinearGradientBrush>
</Grid.Background>
</Grid>
</phone:PhoneApplicationPage>
-
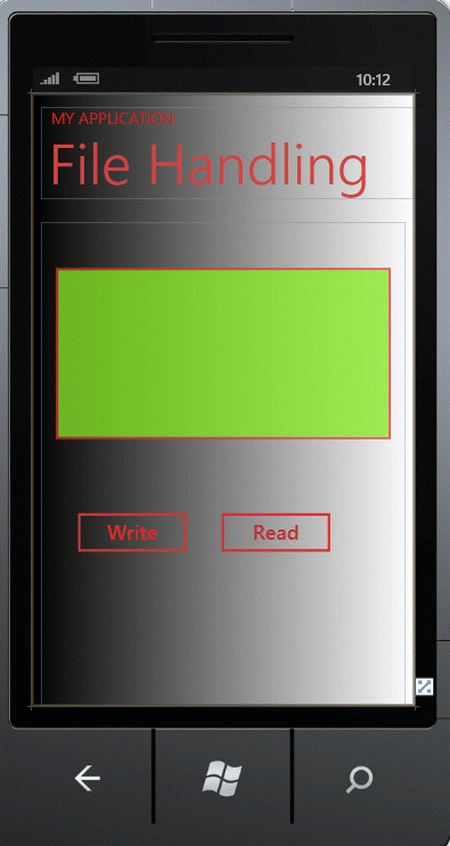
At design time the application will look like this:
Step 4 : Now we will go to the code behind file of the design page to write the code for reading and writing of the text file.
Code
private void Button1_Click(object sender, RoutedEventArgs e)
{
// Obtain the virtual store for the application.
IsolatedStorageFile myStore = IsolatedStorageFile.GetUserStoreForApplication();
// Create a new folder and call it "MyFolder".
myStore.CreateDirectory("MyFolder");
// Specify the file path and options.
using (var isoFileStream = new IsolatedStorageFileStream("MyFolder\\myFile.txt", FileMode.OpenOrCreate, FileAccess.Write, myStore))
{
//Write the data
using (var isoFileWriter = new StreamWriter(isoFileStream))
{
isoFileWriter.WriteLine(textBox1.Text);
}
textBox1.Text = "Data is saved";
}
}
private void Button2_Click(object sender, RoutedEventArgs e)
{
// Obtain a virtual store for the application.
IsolatedStorageFile myStore = IsolatedStorageFile.GetUserStoreForApplication();
try
{
// Specify the file path and options.
using (var isoFileStream = new IsolatedStorageFileStream("MyFolder\\myFile.txt", FileMode.Open, myStore))
{
// Read the data.
using (var isoFileReader = new StreamReader(isoFileStream))
{
textBox1.Text = isoFileReader.ReadLine();
}
}
}
catch
{
// Handle the case when the user attempts to click the Read button first.
textBox1.Text = "Need to create directory and the file first.";
}
}
Step 5 : The final
source code of the MainPage.xaml.cs file is:
Code
using System;
using System.Collections.Generic;
using System.Linq;
using System.Net;
using System.Windows;
using System.Windows.Controls;
using System.Windows.Documents;
using System.Windows.Input;
using System.Windows.Media;
using System.Windows.Media.Animation;
using System.Windows.Shapes;
using Microsoft.Phone.Controls;
using System.IO;
using System.IO.IsolatedStorage;
namespace PhoneApp7
{
public partial class MainPage : PhoneApplicationPage
{
// Constructor
public MainPage()
{
InitializeComponent();
}
private void Button1_Click(object sender, RoutedEventArgs e)
{
// Obtain the virtual store for the application.
IsolatedStorageFile myStore = IsolatedStorageFile.GetUserStoreForApplication();
// Create a new folder and call it "MyFolder".
myStore.CreateDirectory("MyFolder");
// Specify the file path and options.
using (var isoFileStream = new IsolatedStorageFileStream("MyFolder\\myFile.txt", FileMode.OpenOrCreate, FileAccess.Write, myStore))
{
//Write the data
using (var isoFileWriter = new StreamWriter(isoFileStream))
{
isoFileWriter.WriteLine(textBox1.Text);
}
textBox1.Text = "Data is saved";
}
}
private void Button2_Click(object sender, RoutedEventArgs e)
{
// Obtain a virtual store for the application.
IsolatedStorageFile myStore = IsolatedStorageFile.GetUserStoreForApplication();
try
{
// Specify the file path and options.
using (var isoFileStream = new IsolatedStorageFileStream("MyFolder\\myFile.txt", FileMode.Open, myStore))
{
// Read the data.
using (var isoFileReader = new StreamReader(isoFileStream))
{
textBox1.Text = isoFileReader.ReadLine();
}
}
}
catch
{
// Handle the case when the user attempts to click the Read button first.
textBox1.Text = "Need to create directory and the file first.";
}
}
}
}
Step 6 : Press F5 to run the
application.
Output
-
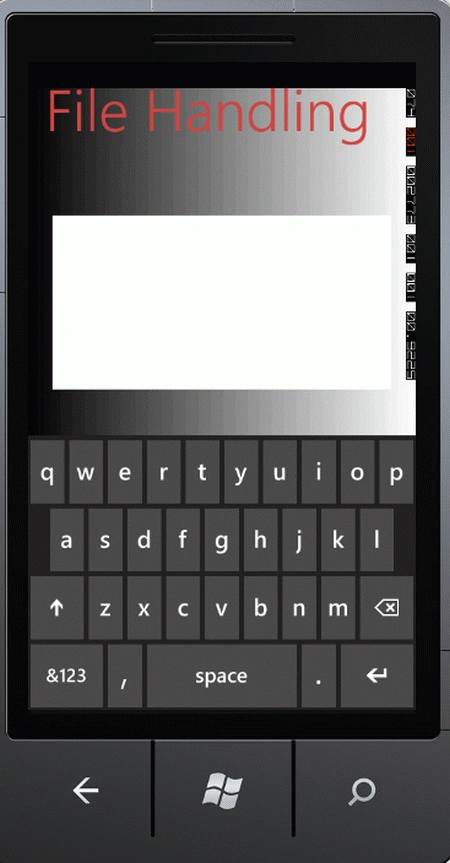
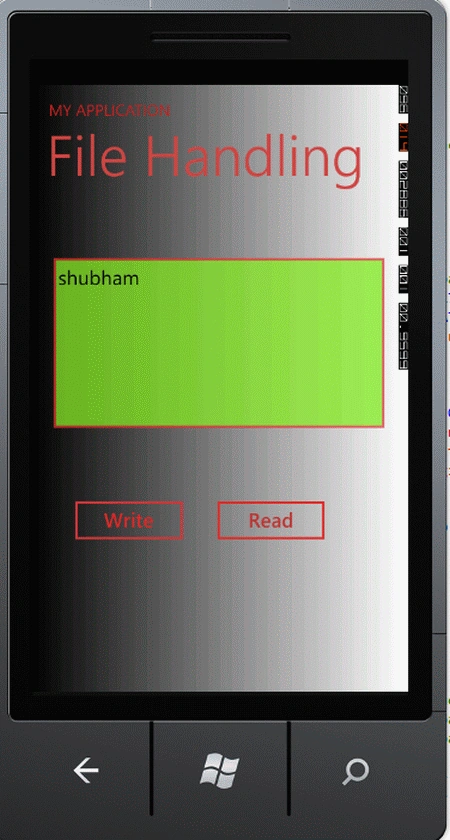
Enter the text in the text box you want to store in the text file:
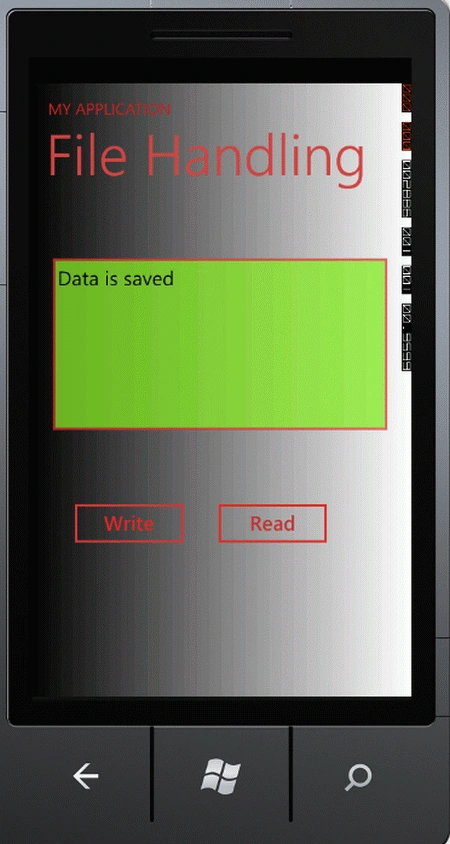
- Click on the write button:
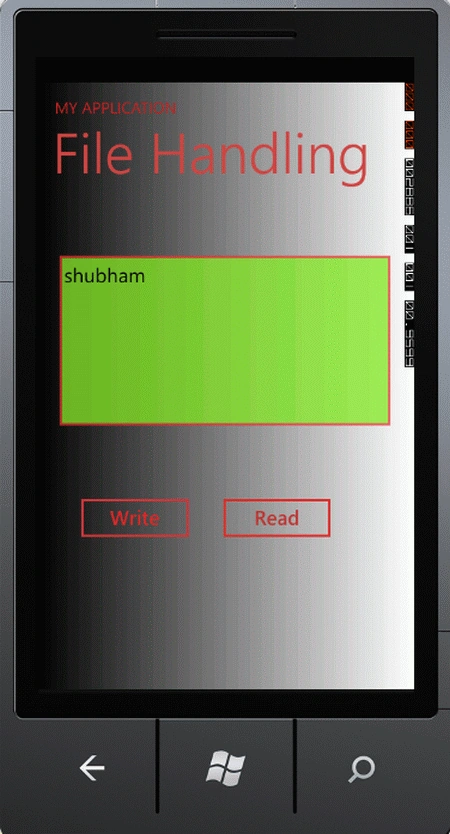
- Click on the read button; the textbox will show the stored data from the text file:
Resources
Understanding
Launchers and Choosers in Windows Phone 7
Introduction
and Prerequisities of Windows Phone 7
RichTextBox
in Windows Phone 7.1 or Mango
Starting
Window Phone 7 development with Silverlight: Hour 1
Join the conversation! Your thoughts help the community grow.