

Dynamics 365 authentication is recommended only through Azure AD (for online instances). To achieve this, first of all, we need to create an app in Azure Active Directory and the good news is that you don’t need an Azure subscription to try this out; your free trial of Dynamics 365 is enough.
- Create and configure the app in Azure Active Directory.
- Create a user in Azure AD and configure it as an application user in Dynamics 365
- Write C# code with ADAL (Active Directory Authentication Library) to generate the Access Token
- Make requests to Dynamics 365 with the above-generated Access Token
Step 1 - Create Azure AD App
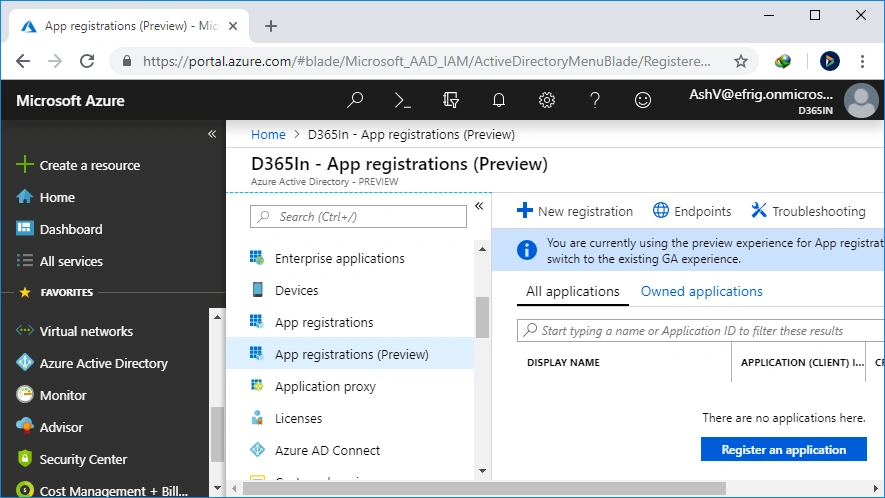
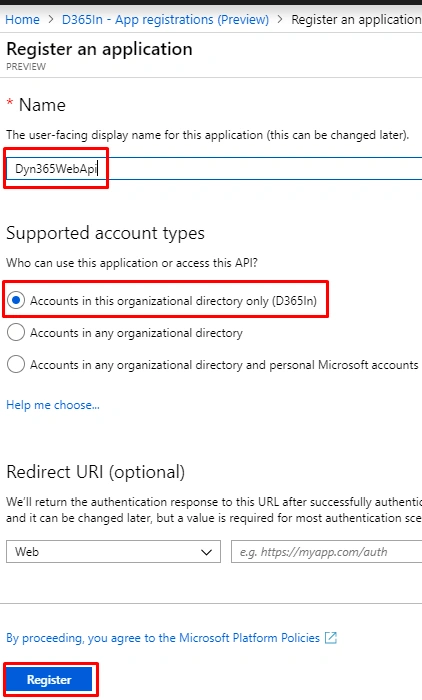
Once the app is created, click on "API permissions" to add a new permission to your app.
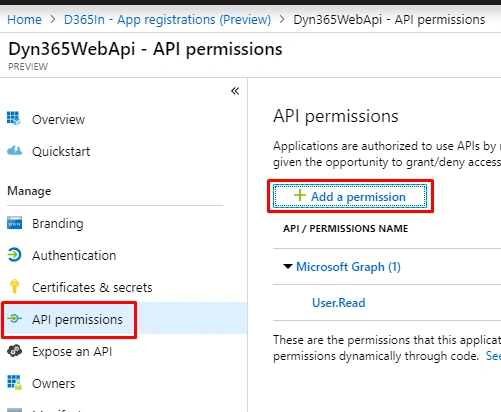
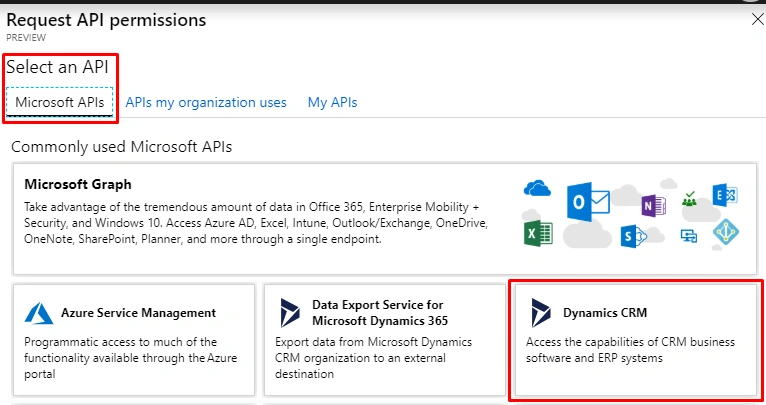
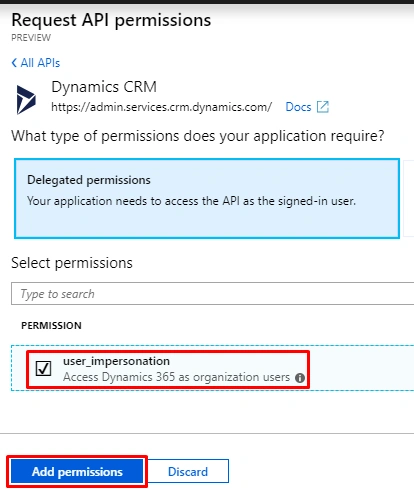
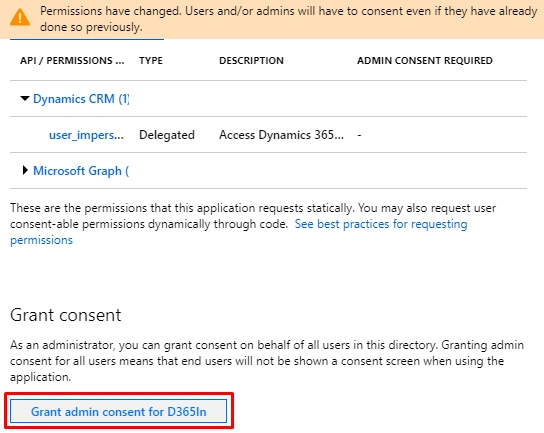
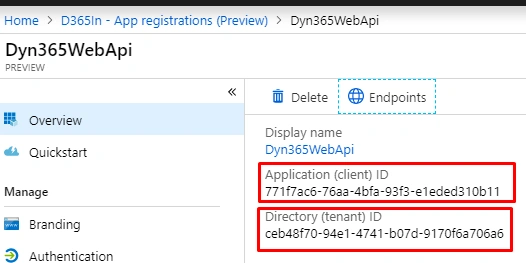
Now, your app is created. We need to use three things:
- Application Id, aka, Client Id
- Tenant Id
- Client Secret
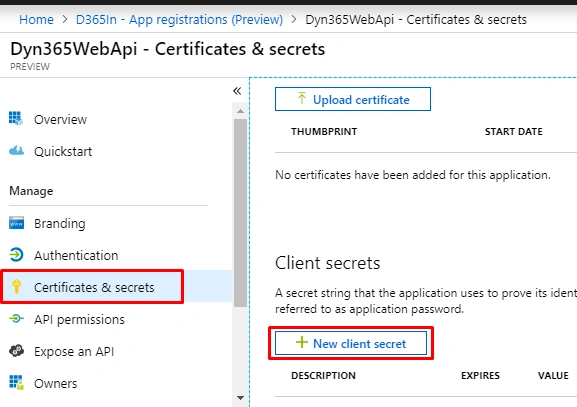
To generate the client secret, go to "Certificates & secrets" and then "+ New client secret". Give some description and select the validity of your secret. Then, click "Add".
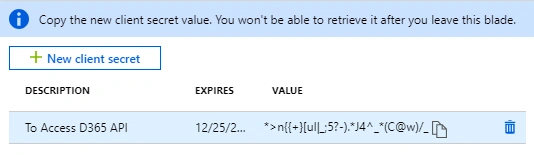
- You need to create a new user. All CRM API calls will be made on behalf of this user.
- This user does not require a Dynamics 365 license.
- This user should be created from Azure (https://portal.azure.com), not from Office Portal (https://admin.microsoft.com)
- Navigate to Azure -> Azure Active Directory -> Users and click on "+New user".
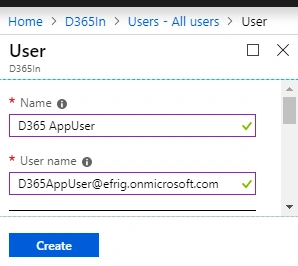
- Here, the username field must have the same domain name as your organization.
- Once this user is created, go to your Dynamics 365 instance.
- Navigate to Dynamics 365 -> Settings -> Security; click on "Users" here.
- Change the view to "Application Users" and click on "+ NEW" to create a new application user.
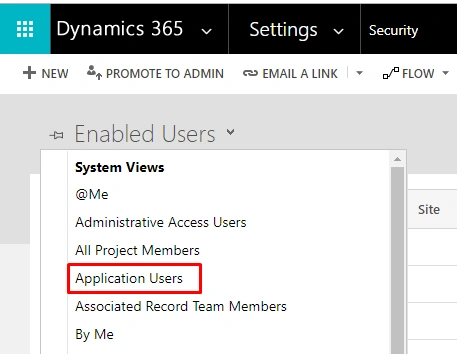
-
You may need to set the form also as an Application User if it’s not coming by default.
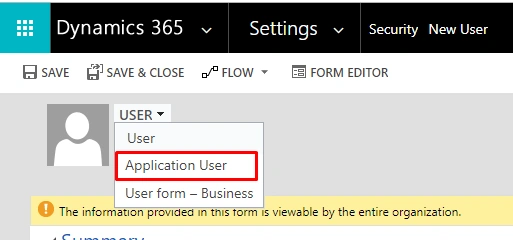
-
Here, the Application ID must be the same as Azure AD App created in the previous step. You can keep the username and email same as the one created in Azure AD. Though it’s not necessary to be the same, I have tried with the different name also. Once you save it, the Application ID URI & Azure AD Object ID will auto-populate.
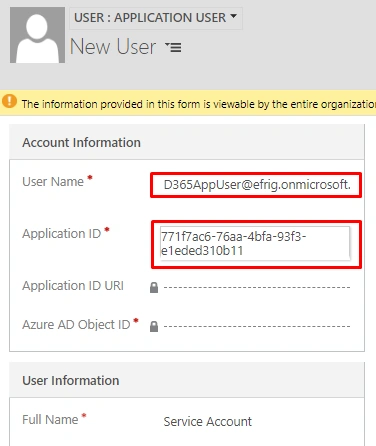
- Now, you need to assign a security role to this user to perform an operation on desired records. I’ve seen in many blogs that this user must have a custom security role; so you can copy some existing role and assign it. But when I tried with OOB security role, it was still working.
Step 3 - Get Access Token with ADAL
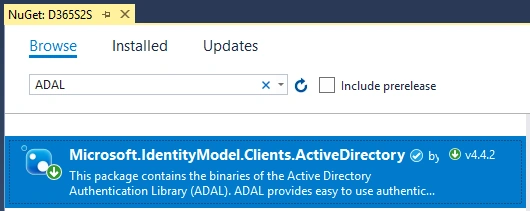
- /// Required-Namespaces
- using Microsoft.IdentityModel.Clients.ActiveDirectory;
- using System.Threading.Tasks;
- /// Method-to-generate-Access-Token
- public static async Task<string> AccessTokenGenerator()
- {
- string clientId = "Azure AD App Id";
- string clientSecret = "Client Secret Generated for App";
- string authority = "https://login.microsoftonline.com/< your app tenant guid >";
- string resourceUrl = "https://< your D365 org>.< crm instance location e.g crm, crm8 >.dynamics.com"; // Org URL
- ClientCredential credentials = new ClientCredential(clientId, clientSecret);
- var authContext = new Microsoft.IdentityModel.Clients.ActiveDirectory.AuthenticationContext(authority);
- var result = await authContext.AcquireTokenAsync(resourceUrl, credentials);
- return result.AccessToken;
- }
- public static async Task<HttpResponseMessage> CrmRequest(HttpMethod httpMethod, string requestUri, string body = null)
- {
- var accessToken = await AccessTokenGenerator();
- var client = new HttpClient();
- var msg = new HttpRequestMessage(httpMethod, requestUri);
- msg.Headers.Add("OData-MaxVersion", "4.0");
- msg.Headers.Add("OData-Version", "4.0");
- msg.Headers.Add("Prefer", "odata.include-annotations=\"*\"");
- // Passing AccessToken in Authentication header
- msg.Headers.Add("Authorization", $"Bearer {accessToken}");
- if (body != null)
- msg.Content = new StringContent(body, UnicodeEncoding.UTF8, "application/json");
- return await client.SendAsync(msg);
- }
- var contacts = CrmRequest(
- HttpMethod.Get,
- "https://efrig.api.crm8.dynamics.com/api/data/v9.1/contacts")
- .Result.Content.ReadAsStringAsync();
Full Code (Replace your Azure credentials before executing)
- using Microsoft.IdentityModel.Clients.ActiveDirectory;
- using System.Net.Http;
- using System.Text;
- using System.Threading.Tasks;
- namespace D365S2S
- {
- class Program
- {
- static void Main(string[] args)
- {
- var contacts = CrmRequest(
- HttpMethod.Get,
- "https://efrig.api.crm8.dynamics.com/api/data/v9.1/contacts")
- .Result.Content.ReadAsStringAsync();
- // Similarly you can make POST, PATCH & DELETE requests
- }
- public static async Task<string> AccessTokenGenerator()
- {
- string clientId = "13950f0e-0000-4e2f-0000-b923302c4338"; // Your Azure AD Application ID
- string clientSecret = "0^C#%0000DR7/#Z[-.m5aYO00000000$"; // Client secret generated in your App
- string authority = "https://login.microsoftonline.com/ceb48f70-0000-1111-0000-9170f6a706a6"; // Azure AD App Tenant ID
- string resourceUrl = "https://efrig.crm8.dynamics.com"; // Your Dynamics 365 Organization URL
- var credentials = new ClientCredential(clientId, clientSecret);
- var authContext = new Microsoft.IdentityModel.Clients.ActiveDirectory.AuthenticationContext(authority);
- var result = await authContext.AcquireTokenAsync(resourceUrl, credentials);
- return result.AccessToken;
- }
- public static async Task<HttpResponseMessage> CrmRequest(HttpMethod httpMethod, string requestUri, string body = null)
- {
- // Acquiring Access Token
- var accessToken = await AccessTokenGenerator();
- var client = new HttpClient();
- var message = new HttpRequestMessage(httpMethod, requestUri);
- // OData related headers
- message.Headers.Add("OData-MaxVersion", "4.0");
- message.Headers.Add("OData-Version", "4.0");
- message.Headers.Add("Prefer", "odata.include-annotations=\"*\"");
- // Passing AccessToken in Authentication header
- message.Headers.Add("Authorization", $"Bearer {accessToken}");
- // Adding body content in HTTP request
- if (body != null)
- message.Content = new StringContent(body, UnicodeEncoding.UTF8, "application/json");
- return await client.SendAsync(message);
- }
- }
- }
I hope it helps. Feel free to get in touch for any query or suggestion.
Red HodgersonPosted Jun 21, 2021, 9:50 PM
Switched out ADAL with MSAL so this will work with .NET Core. https://gist.github.com/RedsGT/1c0492a2c5c3761d4148728071316f7e
Paul JohnPosted Nov 9, 2020, 2:07 AM
When i'm trying to execute i am getting this error. The program '[5200] CRMConnection.exe' has exited with code 0 (0x0). can u please help on this. static void Main(string[] args) { var accounts = CrmRequest(HttpMethod.Get, "crm url/api/data/v9.1/accounts") .Result.Content.ReadAsStringAsync(); } /// Method-to-generate-Access-Token public static async Task<string> AccessTokenGenerator() { string clientId = "ID"; string clientSecret = "key"; string authority = "https://login.microsoftonline.com/fea858f0-512d-4649-8228-d78fd9ef3c7e/oauth2/v2.0/token"; string resourceUrl = "url"; // Org URL var credentials = new ClientCredential(clientId, clientSecret); var authContext = new Microsoft.IdentityModel.Clients.ActiveDirectory.AuthenticationContext(authority); var result = await authContext.AcquireTokenAsync(resourceUrl, credentials); return result.AccessToken; } public static async Task<HttpResponseMessage> CrmRequest(HttpMethod httpMethod, string requestUri, string body = null) { var accessToken = await AccessTokenGenerator(); var client = new HttpClient(); var msg = new HttpRequestMessage(httpMethod, requestUri); msg.Headers.Add("OData-MaxVersion", "4.0"); msg.Headers.Add("OData-Version", "4.0"); msg.Headers.Add("Prefer", "odata.include-annotations=\"*\""); // Passing AccessToken in Authentication header msg.Headers.Add("Authorization", $"Bearer {accessToken}"); if (body != null) msg.Content = new StringContent(body, UnicodeEncoding.UTF8, "application/json"); return await client.SendAsync(msg); } Note: Trying to retrive all accounts. please suggest with modified code. I am freshers and inputs highly appricated.
Monica tPosted Jul 23, 2020, 10:11 PM
How could I get access "admin's consent", from my end , it was disabled .
Carlos CasadeiPosted Jul 14, 2020, 2:11 PM
Ashish Vishwakarma, Great article!! Congrats... PS: We couldn't see the images. Please fix it.
Shweta LodhaPosted Jun 9, 2020, 3:40 PM
I couldn't see the images. Please fix it.
Raghavendra HabbuPosted May 17, 2020, 12:44 PM
Images are not rendering
Nalini TestPosted Mar 9, 2020, 5:58 PM
Looks great document. Can you please add screenshot images? I dont see those either in chrome, Firefox or IE
David ReynoldsPosted Jan 22, 2020, 4:56 PM
Very good article - just FYI in the code snippet for Step 4 the token should be "Authorization" not "Authentication"
sairam pamidiPosted Aug 1, 2019, 12:44 AM
Great Article Ashish I got Few Issues while Execution of Code ...I followed your code and Following Link to Achieve the getting the Data. https://debajmecrm.com/2018/08/16/step-by-step-guide-query-dynamics-crm-web-api-using-server-to-server-authentication-with-application-user/comment-page-1/