

Prerequisite
- SQL Server 2014
Article Flows
- How to start SQL Server.
- How to create Backup file.
- How to create Custom backup file(desired location and desired name).
- How to rename the database file and add an extension.
- How to overwrite an existing database.
- How to generate the script.
- How to generate the scritpt with the table values.
Steps to generate the database backup file in SQL Server 2014
Step 1 - (Open SQLServer)
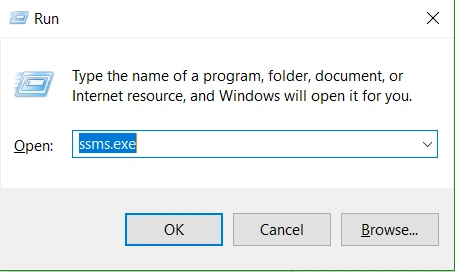
Type ssms.exe in the run prompt and click OK to open SQLServer.
Step 1 - (Open SQLServer)
Type ssms.exe in the run prompt and click OK to open SQLServer.
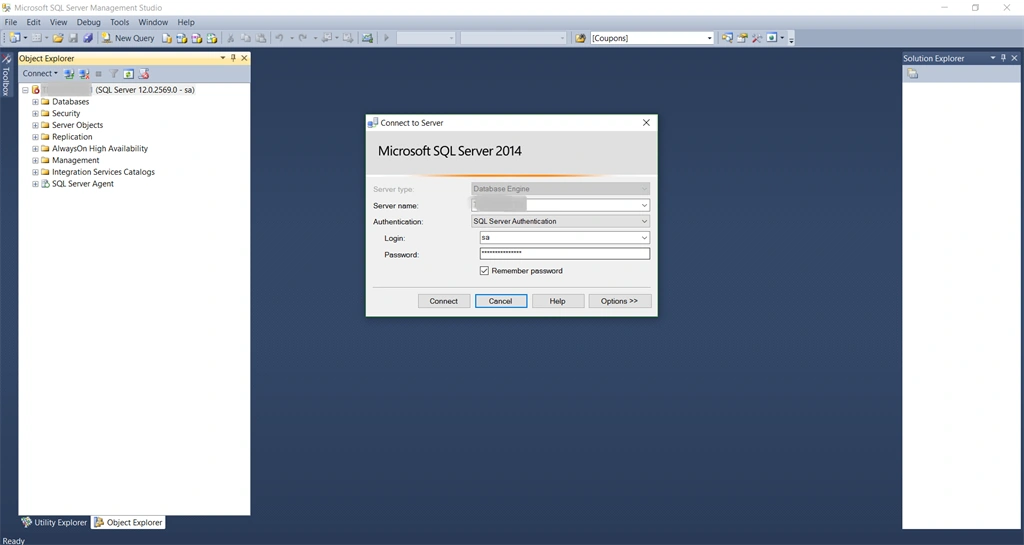
Now, SQLServer will open.
Step 2 - (Start SQLServer in Services) -You may skip this step, if your system is connected.
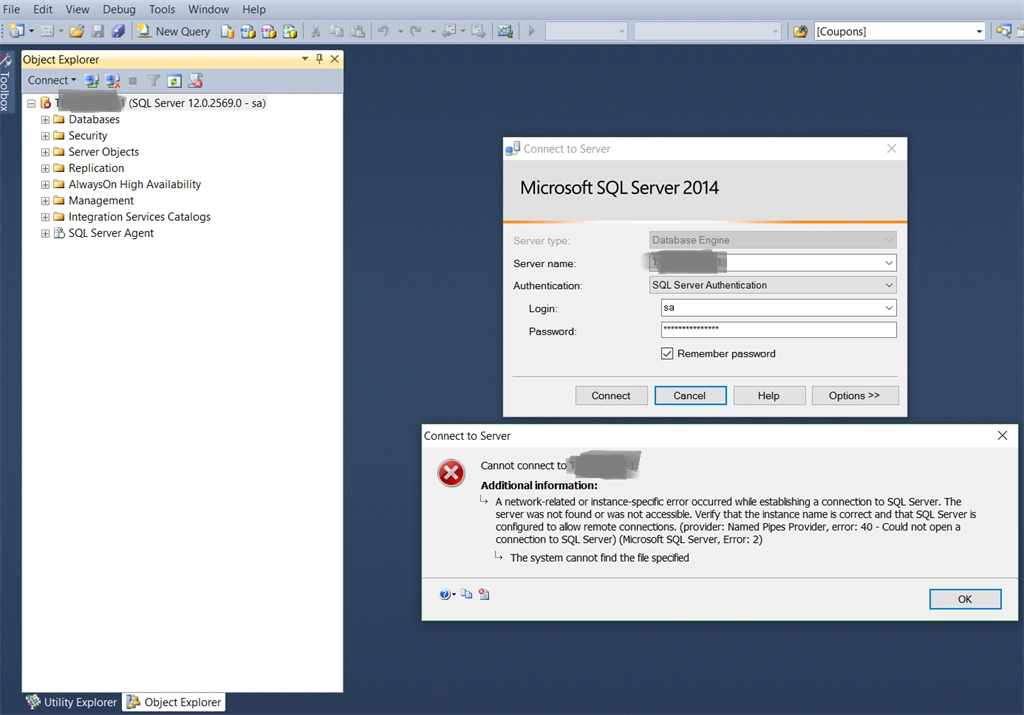
Sometimes the SQL Server Services may automatically stop, if it stops, it means that you might see the error screen given below, while you are trying to connect.
To recover this error, follow the steps given below.
Open Services
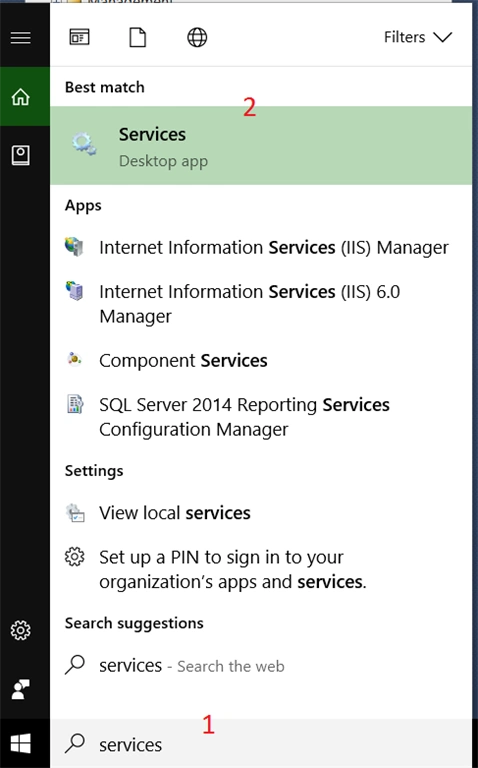
Search in Cortana as Services and select Services.
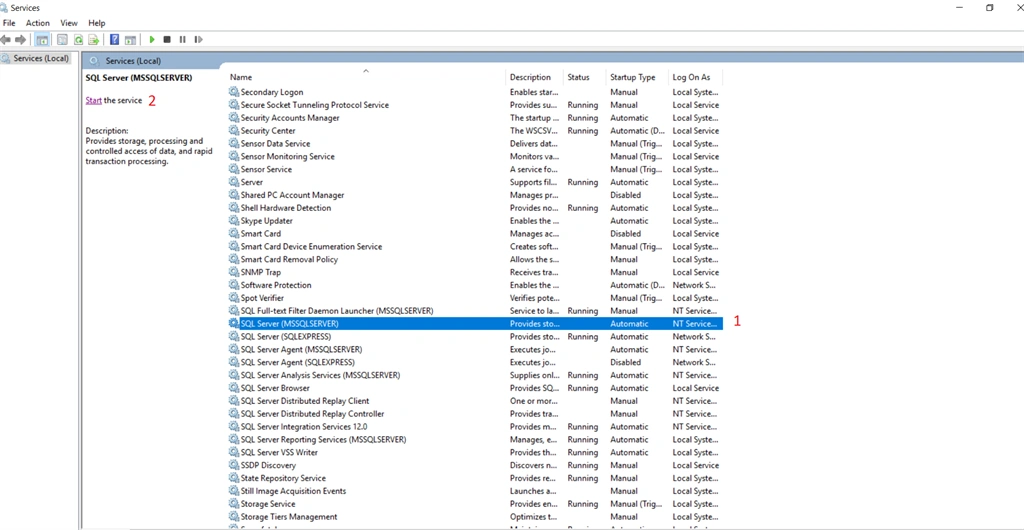
Start MSSQLSERVER
Under the Services, you can see SQL Server(MSSQLSERVER). Select that SQL Server (MSSQLSERVER) and click Start the Service.
Step 3 - Select database
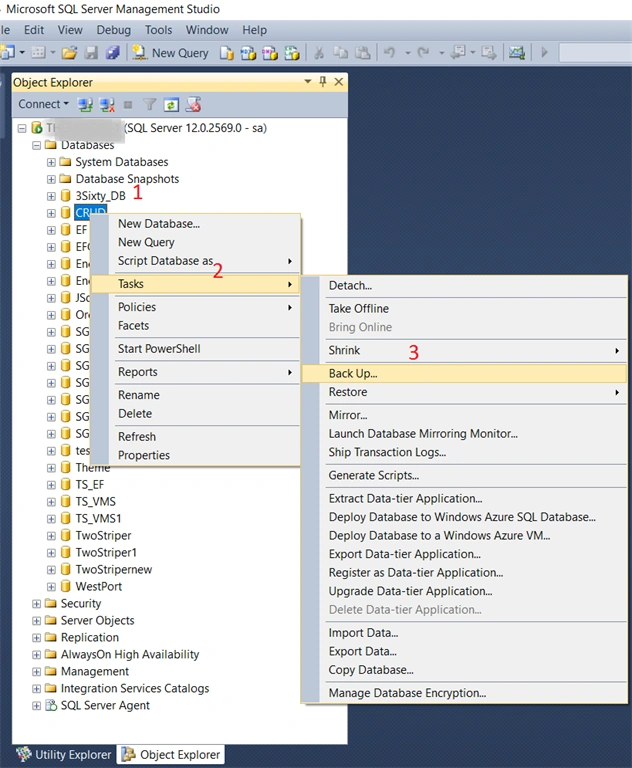
Select the respective database to generate Backup file. For this, right click the respective database, select Tasks and click Backup.
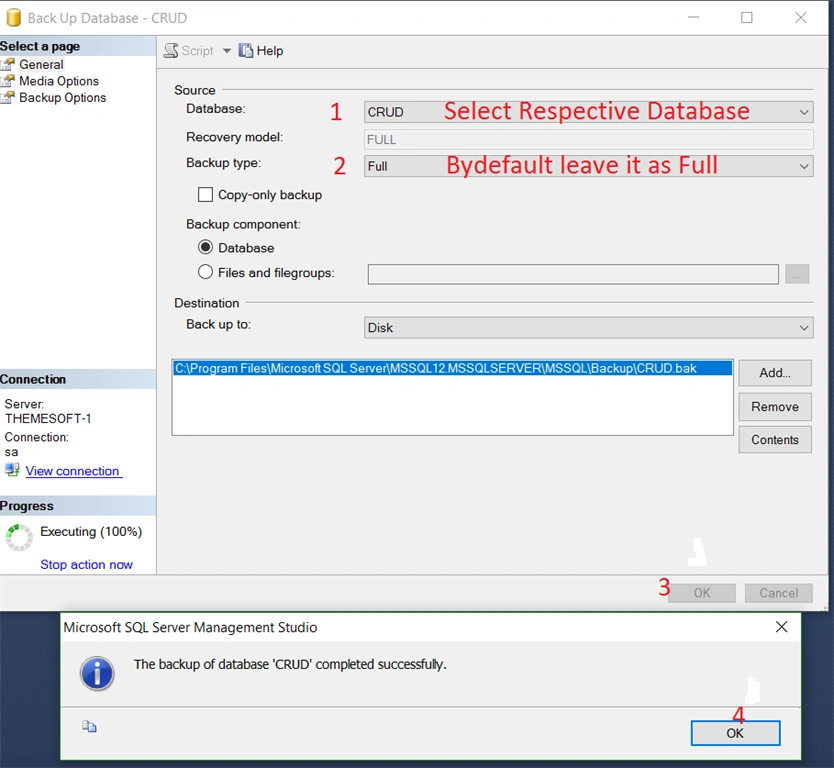
After clicking Backup, we can see the screen given below. Just validate your database name under source group and if you don't want to change the database name; it means you have to just click OK, followed by seeing the child screen as the backup of the database "Databasename" completed successfully.
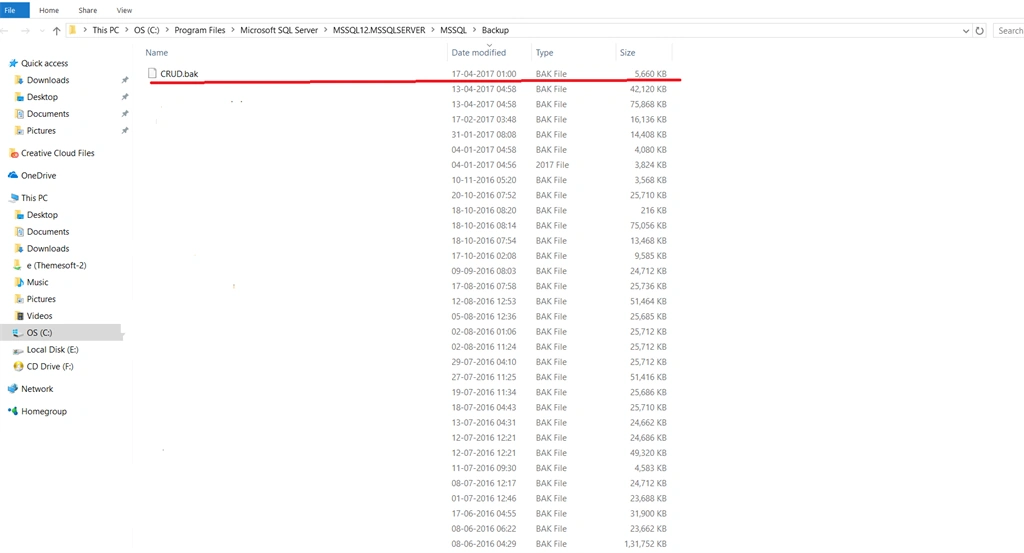
Now, you can see the backup of the database(respective) in the location given below (this location will be the default location).
C - \Program Files\Microsoft SQL Server\MSSQL12.MSSQLSERVER\MSSQL\Backup.
If you want to change the database name/file location during create back up file follow the below steps or jump to next step
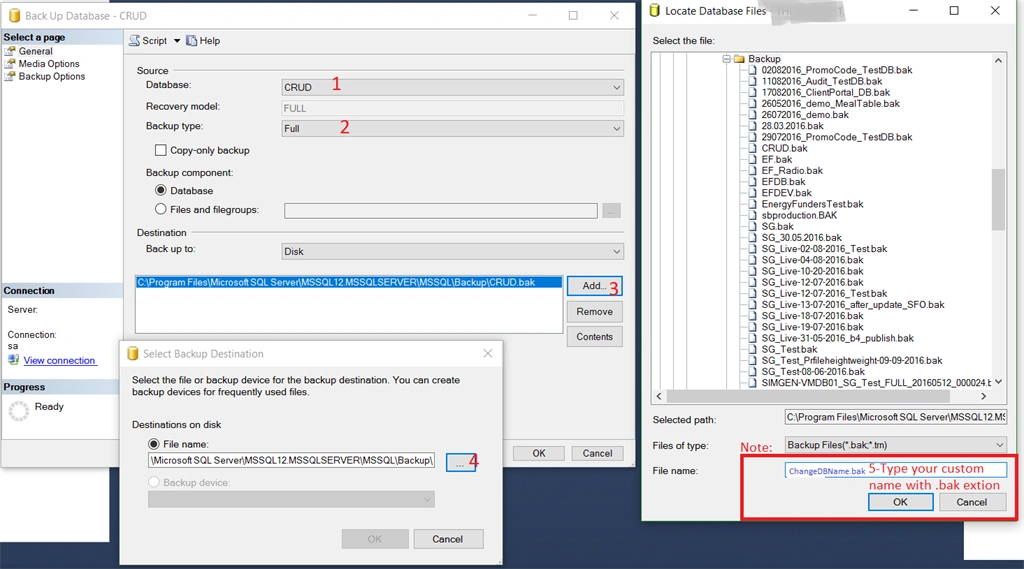
Similar to Step 3, select the respective database to generate Backup file. For this, right click on the respective database, select tasks and click Backup. After clicking backup; you will see the screen. In this screen, select respective database under source group (Mentioned 1). By default, leave the backuptype as Full(Mentioned 2), followed by clicking Add (Mentioned 3) and click browse (Mentioned 4) to select the backup location and type custom name or overwrite the existing database (if you want to overwrite an existing database, just select the respective database from the rightside dialog Window and the selected database automatically populates in the filename(5), custom name (New Database), specify the name(Mentioned 5).
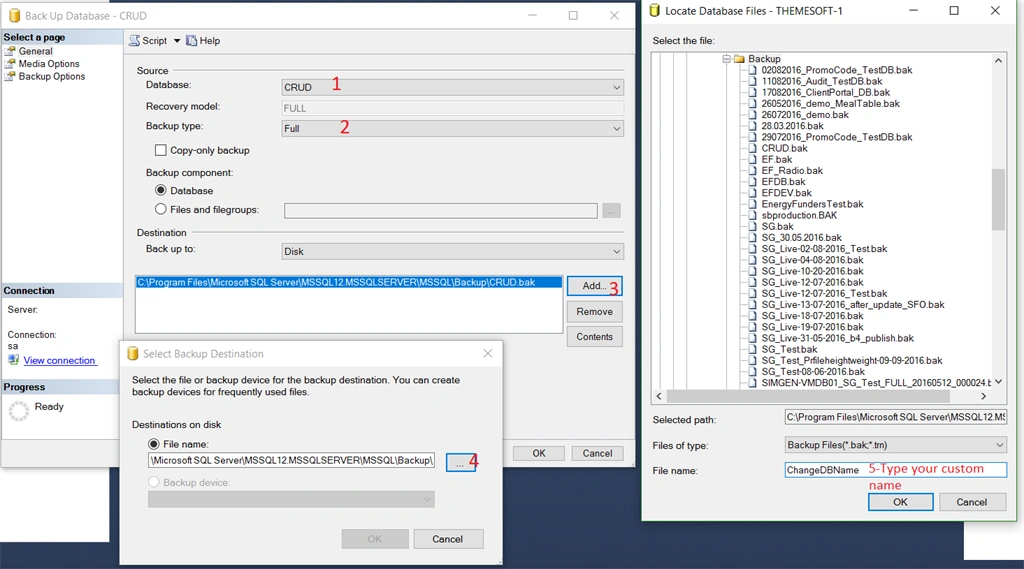
Now, click OK and you can see the custom name, as shown below.
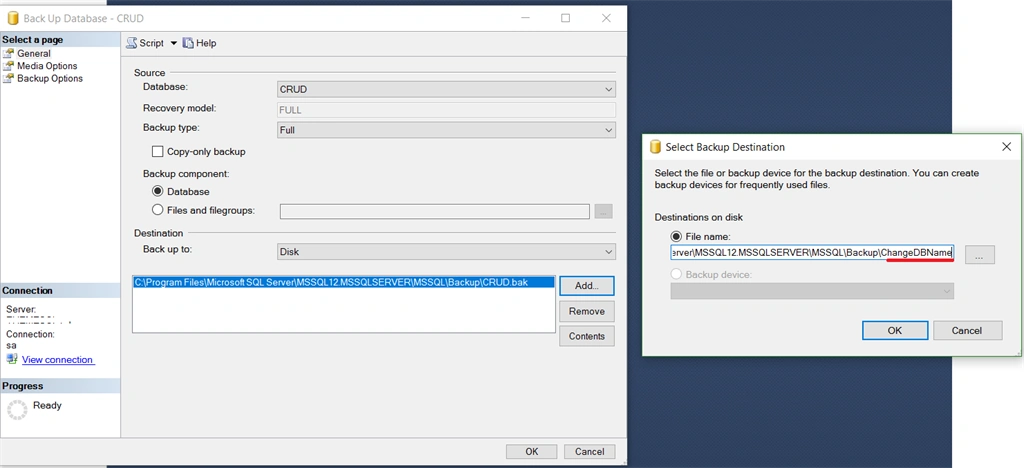
Click OK in select backup destination dialog box. Aferwards, we will see the screen given below. In the screen given below, we need to remove the default path to make custom filename in order to select default destination path(Mentioned 1) and click Remove(Mentioned 2).
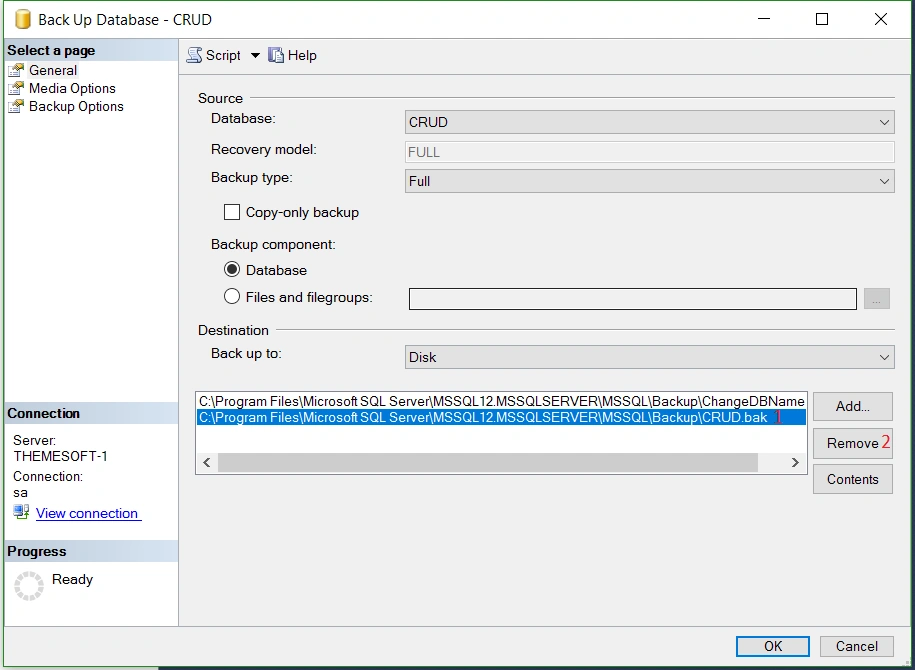
After removing the default path, the destination path with custom filename is shown below and click OK to generate DB backup with custom file name.
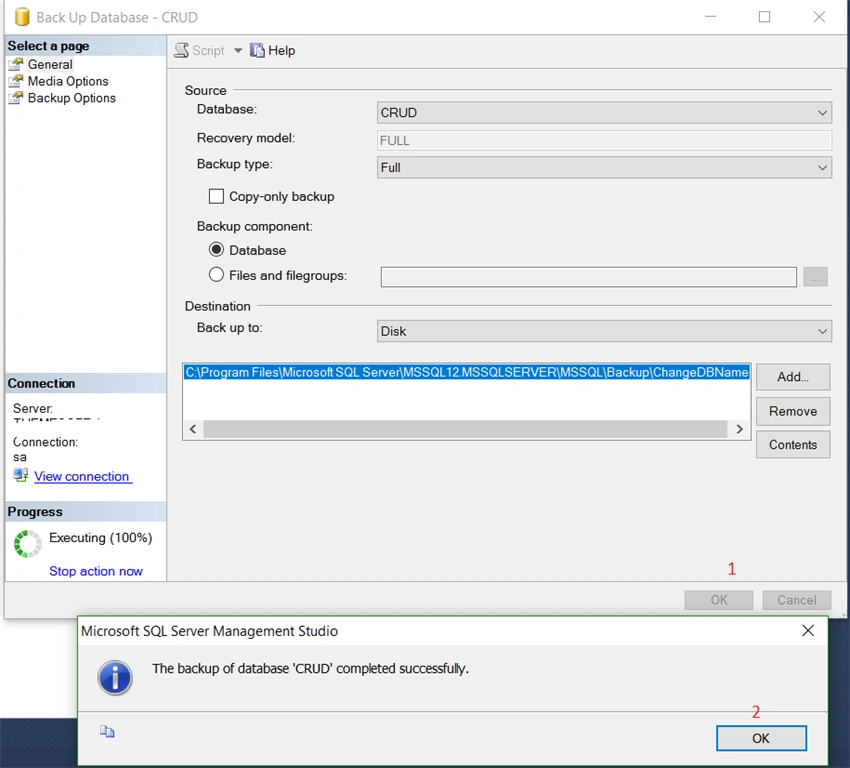
Now, you can see the generated database file in your mentioned destination path.
C - \Program Files\Microsoft SQL Server\MSSQL12.MSSQLSERVER\MSSQL\Backup
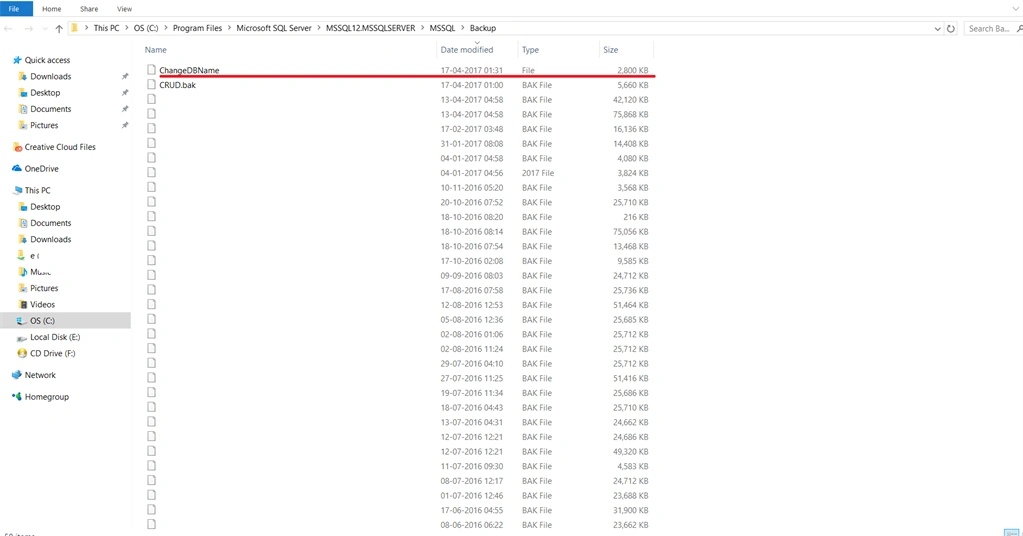
In the screen given above, ChangeDBName file type, shown as File. Here, we need to change that as BAK file.
Way 1
(Rename the file)

Way 2
Way 2
(Go to Step 3 and type your custom filename with .bak extension)
Proceed, as shown below.
Steps to generate scripts in SQL Server 2014
Step 1
Proceed, as shown below.
Steps to generate scripts in SQL Server 2014
Step 1
Generate the scripts without the table values
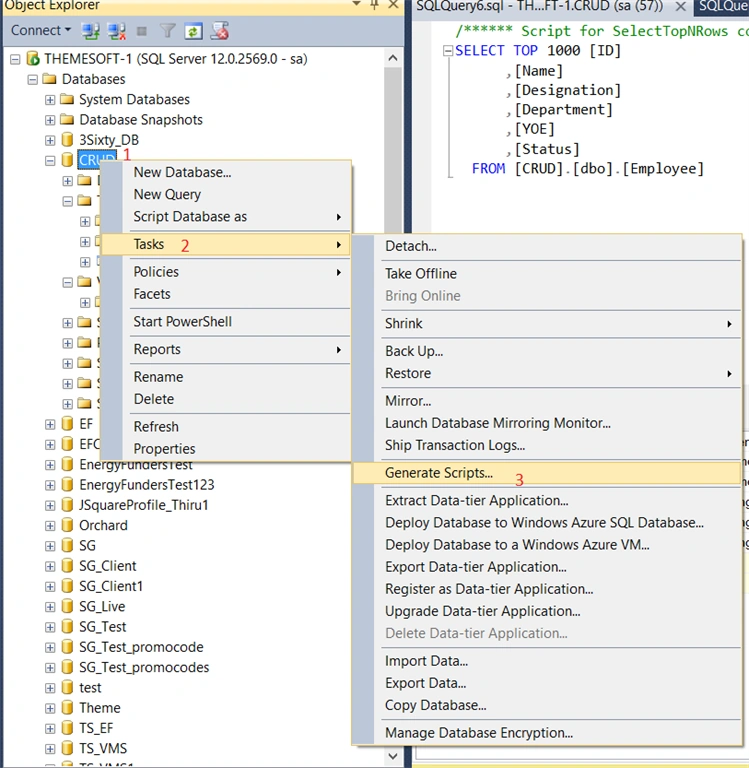
Right click on the respective database to select Tasks and and select Generate Scripts.
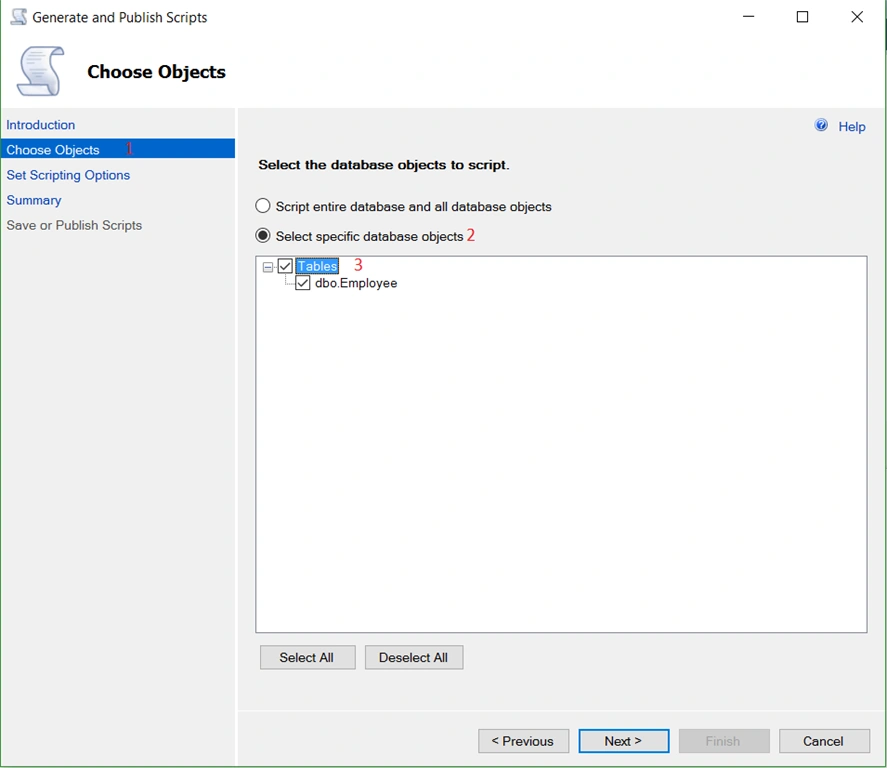
After clicking Generate Script, you will be in the position to see the screen given below. In the screen given below, click choose objects and select specific database objects (It's for single database) and check whatever table you want for the scripts. Now, click Next to proceed further.
Once you click Next, you move on to the set scripting options screen. In the screen given below, select target file location to save your scripts (Mentioned 2), if once it's done, click Advanced(Mentioned 3).
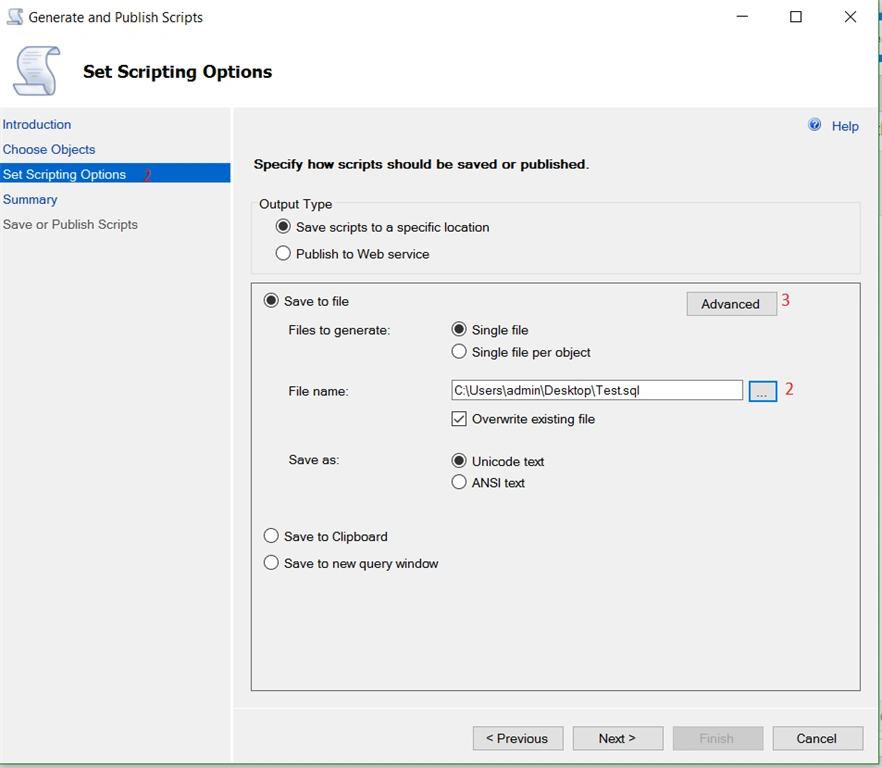
Once you click Advanced, the screen given below will appear. Here, you can see 3 types of data to script.
Right click on the respective database to select Tasks and and select Generate Scripts.
After clicking Generate Script, you will be in the position to see the screen given below. In the screen given below, click choose objects and select specific database objects (It's for single database) and check whatever table you want for the scripts. Now, click Next to proceed further.
Once you click Next, you move on to the set scripting options screen. In the screen given below, select target file location to save your scripts (Mentioned 2), if once it's done, click Advanced(Mentioned 3).
Once you click Advanced, the screen given below will appear. Here, you can see 3 types of data to script.
- Data Only - It's used to get the table values only.
- Schema and data - It's used to get the table values and table structures -scripts (create queries with constraints).
- Schema only - Table Structures only (create queries with constraints)- default type.
Based on these three types, you can choose any one, so here we moving to choose schema and data (create queries with the constraints and insert queries).
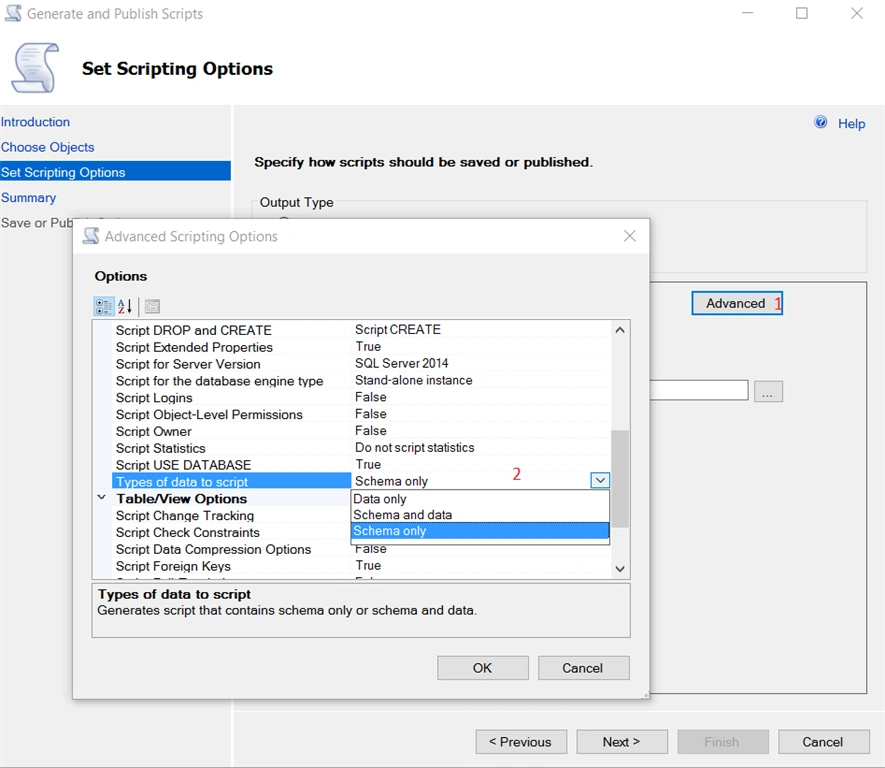
Select schema, data and proceed until the screen given below appears.
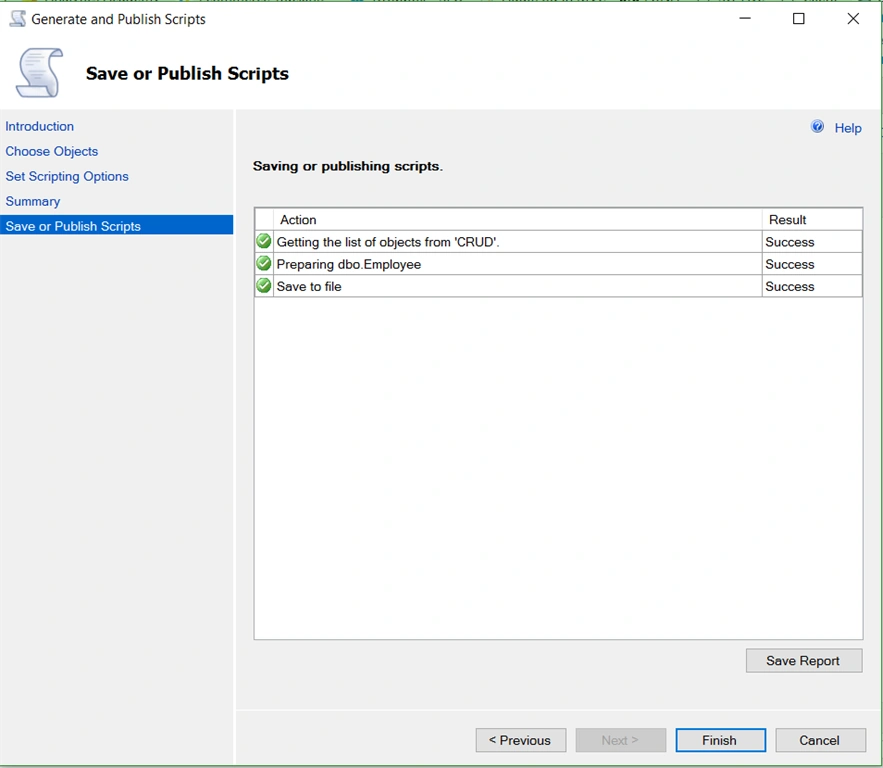
Click Finish and check in your Target Location.
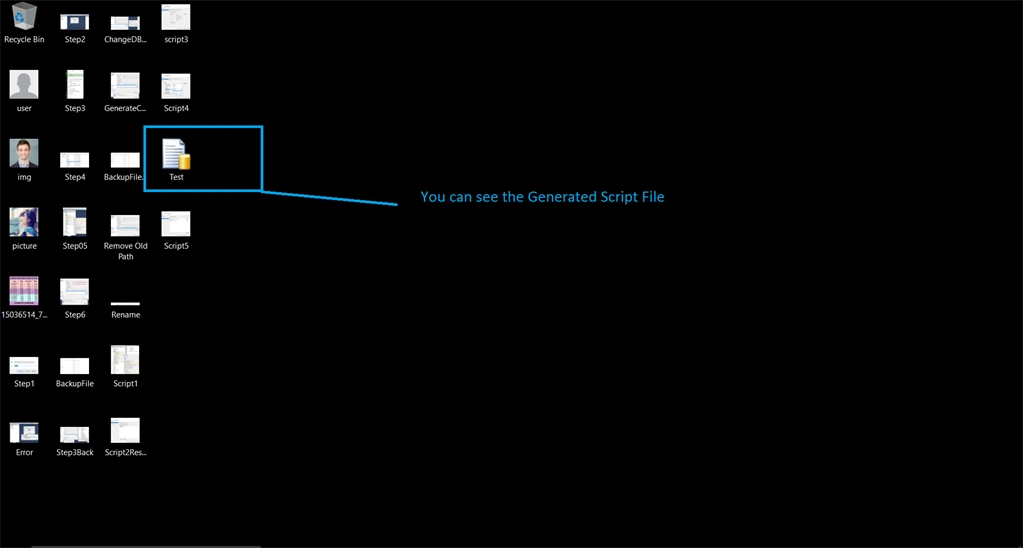
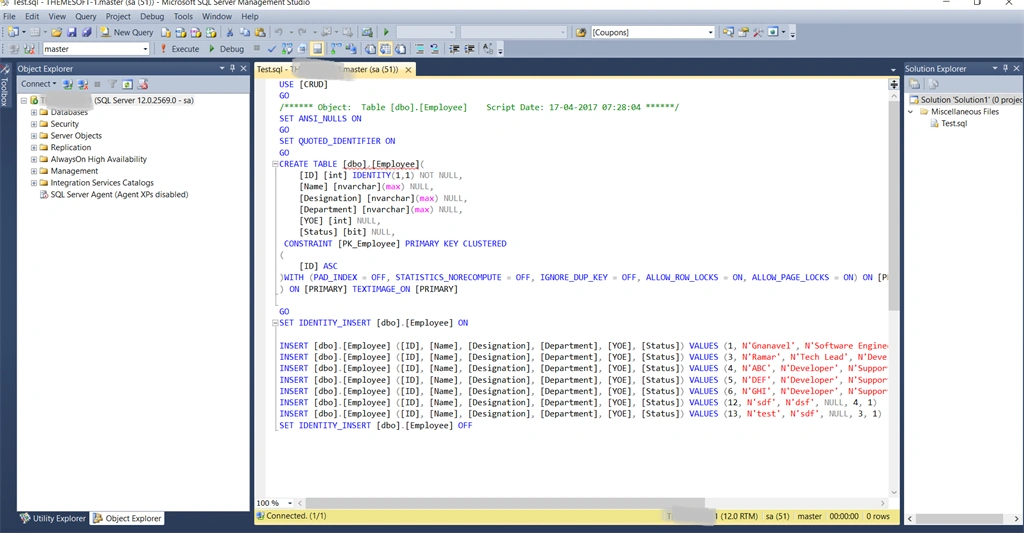
Now, open the Test script file to view the scripts and data. In the image given below, we can see create query with the constraints and insert query with the values.
Summary
In this article, you learned how to generate database backup. Create script for the table structure with and without the value in SQL Server 2014.
I hope, it's helpful.
Select schema, data and proceed until the screen given below appears.
Click Finish and check in your Target Location.
Now, open the Test script file to view the scripts and data. In the image given below, we can see create query with the constraints and insert query with the values.
Summary
In this article, you learned how to generate database backup. Create script for the table structure with and without the value in SQL Server 2014.
I hope, it's helpful.
Join the conversation! Your thoughts help the community grow.