

Introduction
This is my fourth article on Web API 2. This article explains the Web API in a HTML page. This is the most simple task to consume in HTML using JavaScript. In my previous articles we saw MVC, then Web Forms.
- Getting Started With ASP.Net Web API 2: Day 1
- Getting Started With ASP.Net Web API 2: Day 2
- Getting Started With ASP.Net Web API 2: Day 3
In this article we will learn how to create an ASP.NET Web API 2 endpoint capable of handling HTML forms. We can create a controller action that accepts a model and that model will help to get and set the form value and ASP.NET Web API to do the model binding for us.
- public class FormController : ApiController
- {
- public UserModel Post(FormDataCollection form)
- {
- //process form...
- var user = new UserModel
- {
- Email = form["Email"],
- Name = form["Name"],
- Address = form["Address"],
- Address2 = form["Address2"],
- Mobile = form["Mobile"]
- };
- return user;
- }
- }
System.Net.Http.Formatting.FormDataCollection is used to handle the form as we need.
When we submit the data form URL with the Web API it uses MediaTypeFormatter to extract data from the HttpRequestMessage and pass it to the relevant action selected to the handle the request. By default, the Web API reads the body of the request only once, so when using a model to bind to form data, that model should encapsulate all of the form fields. It is not possible to pass some of the fields as part of the request body and some in the URL and expect the framework to try to automatically reconcile them into a single model.
Prerequisites
There are the following things we need to use when developing a Web API 2 Application under the Web Form.
- Visual Studio 2013
- ASP.NET Web API
Getting Started
In this section we will follow some section and these are:
- Create ASP.NET Web Form
- Add Web API 2 Controller
Create ASP.NET Web API with MVC
There are some basic procedures to follow, when creating a Web API along with MVC using Visual Studio 2013, we need to also check the Web API button, as we are showing in the following images.
Step 1
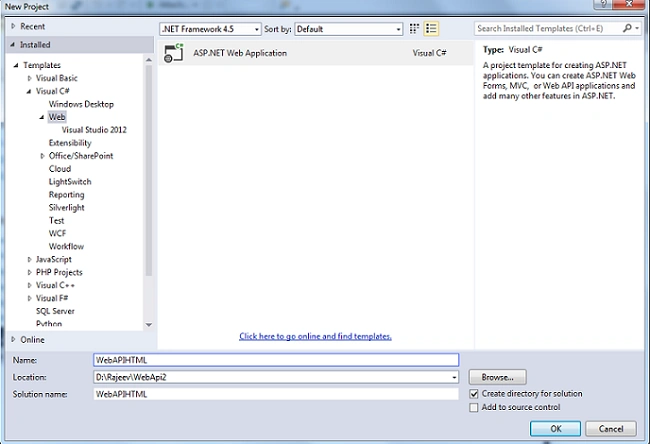
Open the Visual Studio 2013 and click New Project.
Step 2
Select the ASP.NET Web Application and provide a nice name for the project.
Step 3
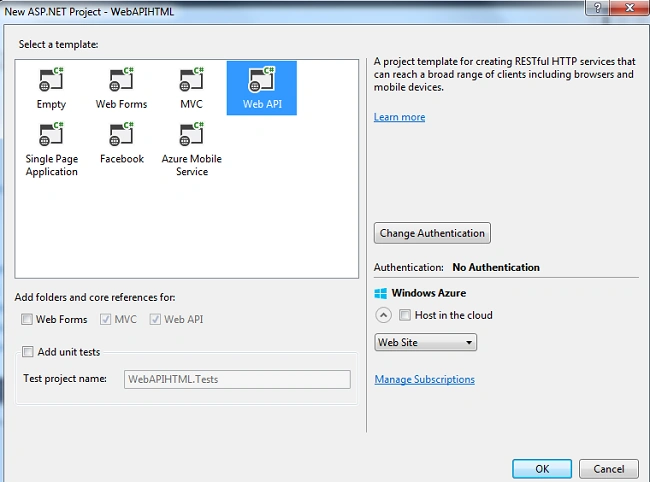
Select the Web API template and click the OK button.
Step 4
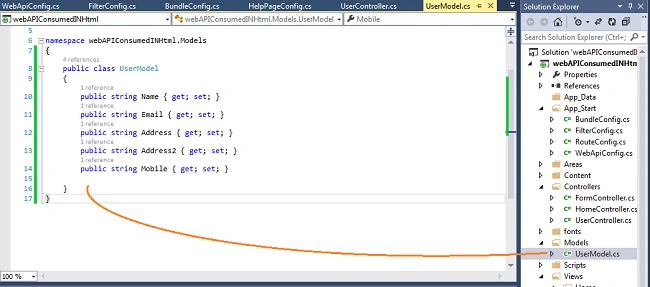
Add a UserModel class to the model where we define all the necessary fields. In the following image, I have defined some fields like name, email, Address and Mobile number.
Step 5
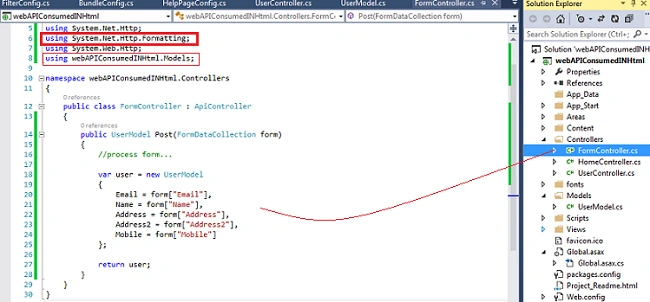
Add the Form controller. When we create the Form Controller be sure we have used a model and the System.Net.Http.Formatting namesapce.
Step 6
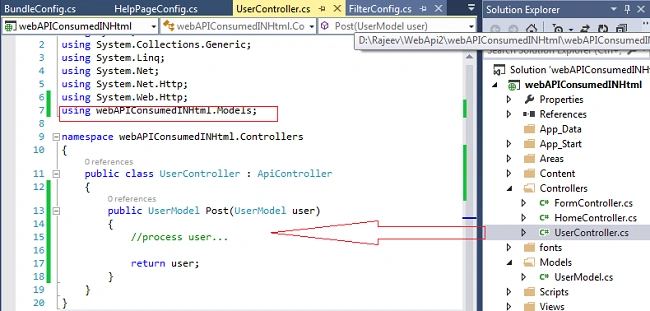
Add the User Controller.
Step 7
Now make a HTML design. Click on View and select Home folder, then we will get the default Index.Cshtml (Razaor) page.
- <div class="row">
- <div class="col-md-6">
- <h2>HTML form</h2>
- <div>
- <form role="form" method="post" action="/api/form" enctype="application/x-www-form-urlencoded">
- <div class="form-group">
- <label for="name">Name</label>
- <input type="text" class="form-control" name="name" placeholder="Enter name">
- </div>
- <div class="form-group">
- <label for="email">Email</label>
- <input type="email" class="form-control" name="email" placeholder="Enter email">
- </div>
- <div class="form-group">
- <label for="Address">Address</label>
- <input type="text" class="form-control" name="Address" placeholder="Enter street Number">
- </div>
- <div class="form-group">
- <label for="Address2">Address 2</label>
- <input type="text" class="form-control" name="Address2" placeholder="Enter the state and country Name">
- </div>
- <div class="form-group">
- <label for="Mobile">Mobile Number</label>
- <input type="text" class="form-control" name="Mobile" placeholder="Enter Mobile Number">
- </div>
- <button type="submit" class="btn btn-default">Submit</button>
- </form>
- </div>
- <div>
- <br />
- <button id="postJS" class="btn btn-default">Post Data Using JavaScript</button>
- </div>
- </div>
- </div>
@Section Script
This is the area where we use the JavaScript and ajax to post the data.
- @section scripts {
- <script type="text/javascript">
- $(function () {
- $("#postJS").on("click", function () {
- var data = {
- name: $("input[name='name']").val(),
- email: $("input[name='email']").val(),
- Address: $("input[name='Address']").val(),
- Address2: $("input[name='Address2']").val(),
- Mobile: $("input[name='Mobile']").val(),
- };
- console.log(data);
- $.ajax({
- data: data,
- datatype: "html",
- type: "POST",
- url: "/api/user"
- }).done(function (res) {
- alert(res.Email + " " + res.Name + " " + res.Address+" "+ res.Address2+" "+ res.Mobile);
- });
- });
- });
- </script>
- }
Build and press F5 to run the project.
Output As Input Screen

Output
This is the output when we hit the submit button, this will show all the submitted data since we used console.log(data) using JavaScript.

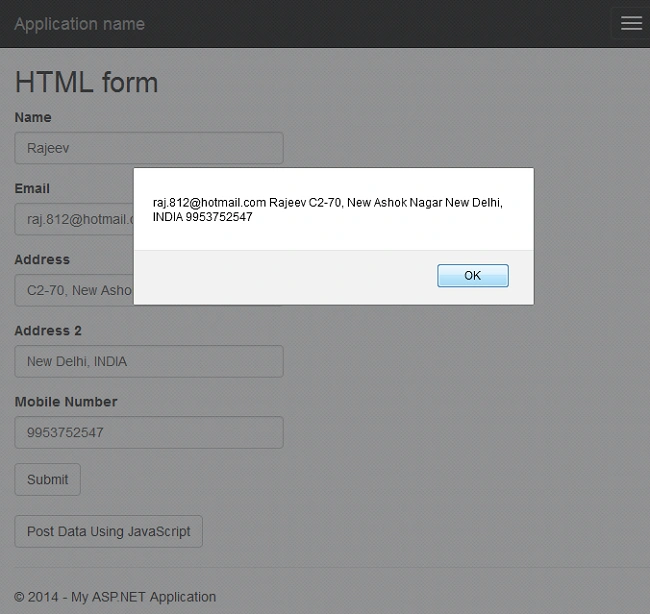
After clicking the Post Data using the JavaScript Button, we can see the data in the alert box, using JavaScript.
Summary
In this article we learned the basic procedure to consume the Web API in a HTML page. I hope the way I consumed the HTML page is the simplest way.
Further Reading
Getting Started with ASP.NET Web API 2 : Day 5
Arweb AroshanzamirPosted Feb 9, 2015, 3:45 PM
nice one.. thanks sir