

Today, we are going to get started with Kubernetes on Windows machines running Windows 10 OS. Mostly, this is for all the developers like us who have Windows 10 machines for their day to day use and want to quickly get started with Kubernetes. Later, it becomes easy too to understand and work with Azure (K)Container Service aka AKS.
The easiest way to get started with Kubernetes in the local development environment is to make use of MiniKube. MiniKube is a tool that runs a single-node Kubernetes cluster inside a VM on your local machine for users looking to try out Kubernetes or develop with it.
Prerequisites
A development computer running,
- Visual Studio 2017 (mine is v15.5.2)
- Enable Hyper-V if not done already
- [Optional] Docker for Windows. Get Docker CE for Windows (stable). After installing and starting Docker, right-click on the tray icon and select Switch to Linux containers (if already not). My current version is v17.12.0-ce-win47 (15139)
- Install kubectl, the Kubernetes command-line tool. This is needed to manage your Kubernetes cluster once it is published on Azure. It's easy to install kubectl using Google Cloud SDK for windows.
- A Docker hub account (to publish images)
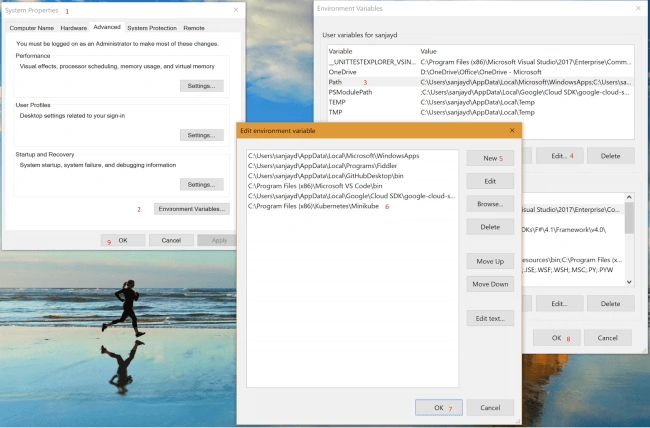
To get started, let us first download Minikube and set the PATH for it. While there are new releases quite frequently, the latest version as of now is 0.24.2 and that is available for download from here. Once you download the executable, just rename it to minikube.exe. Now, keep it at any location as per your wish. I kept it under 'C:\Program Files (x86)\Kubernetes\Minikube\minikube.exe'. Now add this folder path as part of your PATH environment variable. Open 'System Properties' by searching 'View advanced system settings' in your machine and follow the following image to update the PATH variable. This is to make sure 'minikube' command is available in your PowerShell or CMD window by default and you actually don't need to change directory to the MiniKube installer folder ('C:\Program Files (x86)\Kubernetes\Minikube') every time.
Now, quickly open up a PowerShell window and type the following command to make sure 'minikube' is installed correctly and the version is up to date.
- minikube version
- // output: minikube version: v0.24.1
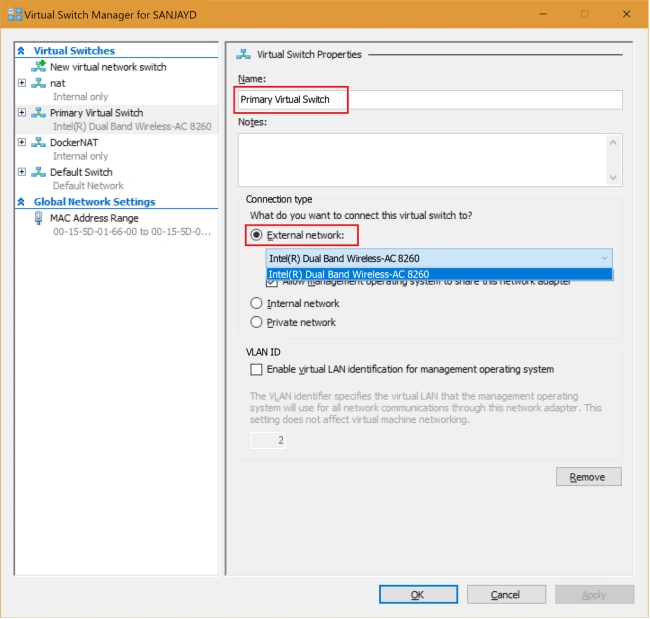
So we are good with MiniKube VM creation now i.e. can we start MiniKube? No, actually! As I said in the title we are going to use HyperV and not VirtualBox for this tutorial. It turns out that by default MiniKube uses the first HyperV virtual network it finds and for most users, it is generally an internal one. So MiniKube cannot access the internet etc. from the created Linux VM which causes further problems during our application deployment (like can not download docker images from any public registry or it simply hangs in between while creating the VM) and other issues. To overcome this we need to use/create an external network switch as described here. In this case too, I'm going to create an external network switch named 'Primary Virtual Switch'.
Important
Make sure to 'restart' your PC to get rid of any routing table caching issues after creating this virtual switch. That's all, we can now use MiniKube to its full potential.
Start MiniKube
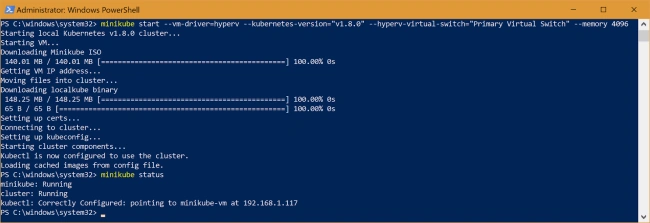
To create the MiniKube VM (Linux) in your Hyper-V environment, please execute the following command.
- minikube start --vm-driver=hyperv --kubernetes-version="v1.8.0" --hyperv-virtual-switch="Primary Virtual Switch" --memory 4096
Here we are asking MiniKube to create a VM with
- 4 GB of RAM (Found that with 2 GB of default RAM it was giving many issues like some of the default services were not coming up and giving memory issues, so had to increase)
- Hyper-V as the virtualization driver
- Install kubernetes version 1.8.0 inside it (you can get all version details by executing minikube get-k8s-versions command before minikube start)
- Use newly created external virtual switch named 'Primary Virtual Switch' as the network adapter
You should see in the PowerShell window that MiniKube is downloading an ISO image from a pre-defined location and it is starting (already created) a virtual machine. Once done, you can verify that the cluster is running mode using 'minikube status' command.
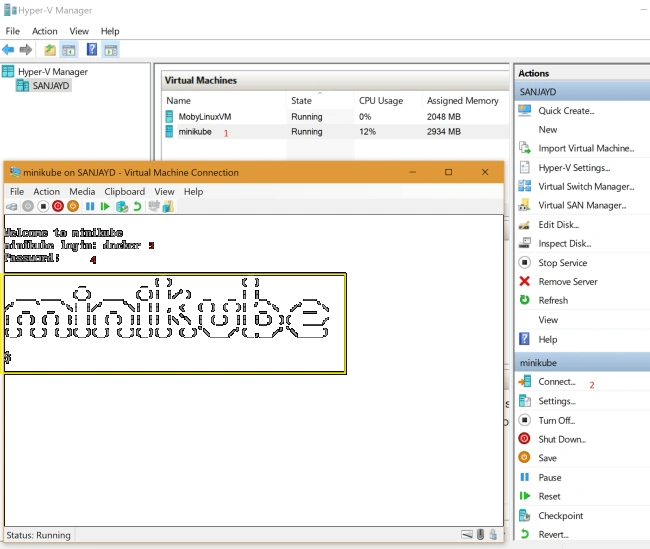
Just for fun, you can go to Hyper-V manager & connect to the newly created VM called 'minikube', the username is 'docker' and password is 'tcuser'. And voila! you have full control over the VM using bash.
Congrats! We are now running a single-node Kubernetes cluster inside the VM. As the external network, we specified was connected to my WiFi, that means my minikube VM got a new IP too and I can access services deployed inside it. You can find the details by executing the following command.
- minikube status
Output should be like
- minikube: Running
- cluster: Running
- kubectl: Correctly Configured: pointing to minikube-vm at 192.168.1.117
To double confirm use 'minikube dashboard' command, that should ideally open up the *mostly* read-only view of your deployed local Kubernetes cluster dashboard. You can find all details like the running system services, pods, deployments etc.
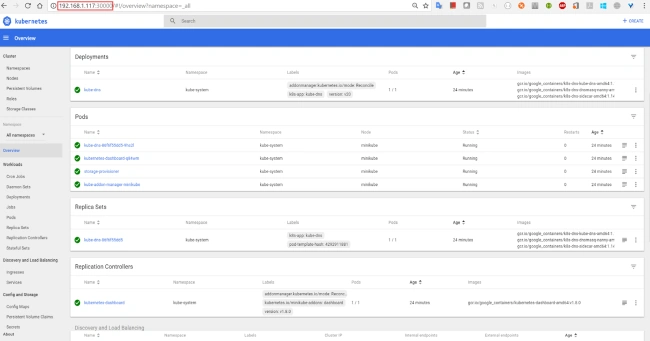
We can now make use of 'kubectl' commands whatever way we need. below are a few examples with explanations.
- // Set current kubectl config to point to/work with local minikube cluster
- kubectl config set-context minikube
- // Get minikube cluster config details
- kubectl config view minikube
- // Just to get the master node endpoint details with IP & port used
- kubectl cluster-info
- // Get the full cluster information (generally export to a file because of the output size)
- kubectl cluster-info dump
- // Get all currently running pods across all namespaces.
- kubectl get pods --all-namespaces
Except for these, you can use all other commonly-used commands to play with the cluster as listed in my previous article.
Create Docker Image & publish to Docker Hub
Follow my previous article to create a simple ASP.NET Core 2.0 web API app. There we published it to Azure Container Registry but this time lets publish to Docker Hub (if you don't have an account please create one). Execute the following commands to publish the image to docker hub once the image is created (make sure to name the image properly in docker-compose.yaml file, mine is 'dsanjay/quotesgenerator:linux').
- // Build the image locally
- docker-compose up -d --build
- // Log-into docker hub
- docker login --username sanjayd --password *******
- // Push the image to publicly accessible docker hub repository
- docker push dsanjay/quotesgenerator:linux
Deploy App to local MiniKube Cluster
Once the cluster is up and running, it's pretty simple to deploy new applications & access them. We already did that in the previous article. Below is the YAML file that we are going to provide to our MiniKube master (rather API Service) and it should take care of deploying the pods as needed (we are going to create one instance for now) and expose as a service.
- apiVersion: apps/v1beta1
- kind: Deployment
- metadata:
- name: quotes
- spec:
- replicas: 1
- strategy:
- rollingUpdate:
- maxSurge: 1
- maxUnavailable: 1
- minReadySeconds: 5
- template:
- metadata:
- labels:
- app: quotes
- spec:
- containers:
- - name: quotes
- image: dsanjay/quotesgenerator:linux
- ports:
- - containerPort: 80
- resources:
- requests:
- cpu: 250m
- limits:
- cpu: 500m
- ---
- apiVersion: v1
- kind: Service
- metadata:
- name: quotes
- spec:
- type: NodePort
- ports:
- - port: 80
- nodePort: 30663
- selector:
- app: quotes
So, let's go back to PowerShell & execute this command (make sure you have changed the directory where the YAML file is located).
- kubectl create -f quotes.yaml
While the service is being created, you can watch the status by refreshing the Kubernetes Dashboard you opened earlier. It should become green within a few seconds once the image from the Docker hub is downloaded & installed and service is started.
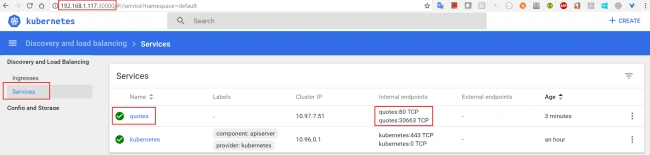
Once it's in green state, we are done 😊 Our app is running inside the Kubernetes Cluster on Windows 10 using HyperV and MiniKube. To verify it's actually working let's browse 'http://192.168.1.117:30663/api/quotes/4' (to get the IP you can use 'minikube ip' command too). This is the public IP MiniKube VM is assigned to and remember we specified in the YAML file to use port '300663'. So if all is good you should get back some random quotes with machine name appended at the end.
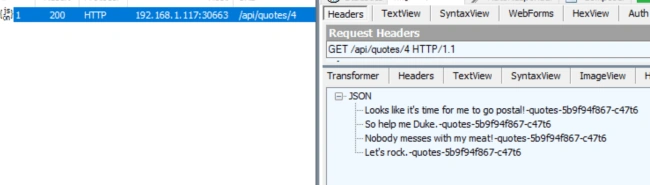
Now, you can play with the deployment like increasing the pod count etc. The details can be found here.
Before we go, to stop the MiniKube cluster execute 'minikube stop' and to completely remove the VM use 'minikube delete' commands.
Let me know if you face any issues or you have any suggestions/questions.
Anand HegdePosted May 14, 2020, 10:52 PM
Hi Sanjay, i have followed all the steps and after running yml file, it says deployment.apps/zook created, service/zook created but am not able see the pods and neither able to access the api.And when I run kubectl get pods it throws --->kubectl : Error from server (NotAcceptable): the server was unable to respond with a content type that the client supports (get pods).Could you please throw some light on this..?
Bernhard DöblerPosted Dec 26, 2018, 4:56 PM
This software lives and changes permanently. I just read "minikube get-k8s-versions is no longer a valid command" https://github.com/kubernetes/minikube/issues/3179
Obbserv HackrPosted Jul 16, 2018, 7:08 AM
I was Googling around for content Getting Started With Kubernetes On Windows 10 Using HyperV And MiniKube this morning, when I came across your excellent page.Great stuff!!I just wanted to say that your page helped me a ton. I would have never found any deep insight article on k. I specially like you add snapshot of every process,? It's funny: I recently published top online resources to learn kubernetes last month.? Here it is in case you'd like to check it out: https://hackr.io/tutorials/learn-kubernetes Also, my tutorial might make a nice addition for learning kubernetes tutorial. Either way, thanks. And have a great day!
Mani SubramaniyanPosted Feb 14, 2018, 4:38 PM
Well, I followed these instructions . All I get to is the line "Starting VM...". I do see a vm "minikube" in Hyperv, so I connected to it, logged in as 'docker/tcuser'. The command line that started minikube never comes back and seems to be waiting forever after that "starting VM" line as it is not getting any message from the cluster. Surprisingly I also found that the minikube VM's eth0 is unassigned (no IPV4 address for it! but there is an ipv6 address). Obviously it cannot talk outside in that state. UPDATE: I stopped the minikube VM and then went to settings (in HyperV manager), and added the second network interface for dockernat as well. And then rerun the minkube command line. This time, it is able to talk to the VM! So it needed the local/internal bridge as well. But still no success on the proxy front. I can't get it to go out of corporate firewall..
Naresh SinghalPosted Jan 22, 2018, 11:34 PM
Nice Information..................