

Introduction to Azure Backup Vault
One of the critical needs to run any business successfully is the BCP i.e. Business continuity plan. Wait, what is this? It is the typical management term which talks about having the backup plan for your business in order to have its continuous operation even in case of disaster.In the cloud computing world where your business infrastructure is run and managed by someone else, you as a business owner need to have the sense of confidence if there is some disaster in a data center of your cloud service provider. What will happen to your data? How will you achieve business continuity? To answer all such queries Microsoft Azure offers an entire suite of services known as Recovery Services.
Recovery services are further broadly divided into two parts,
- Site Recovery Vault
- Backup Vault
These two services are quite confusing to some (like me), the main differentiating factor in between these two services is – back up service only backs up data to azure (from on premise machines as well from azure machines) and site recovery on the other hand provides server replication, failover and failback capabilities.
This article mostly focuses on the second offering, i.e., Backup Vault.
Backup vault
If you look up the meaning of vault in English, it is a kind of treasury or a container/dome. So the English meaning of backup vault becomes “store of backups” and that is the exact usage of it.
Backup vault is an offering of recovery services within which you can store backups of your virtual machines, folders, windows servers, on premise machines etc. It is a replacement of your existing on-premise backup solution with a cloud based solution which is more reliable, secure and cost effective. We will see the pricing part in details later in the article.
Benefits of using Azure backup vault.
- Effective and automatic storage management – don’t worry about the storage, it automatically allocates the storage and follows a pay as you go model.
- Redundant storage options – your backup storage can be made either locally or geo redundant based on your needs ensuring high availability.
- Free data egress – no charge for dumping data in vault.
- Encryption – Secure transmission of data to vault using passphrase and encryption key.
- Retention – long term retention at lower cost.
- Incremental backup – Efficient backups by backing up only changes since last backup.
- Compression –reduces required storage space.
This article describes both scenarios i.e.
- Backup Azure VM / Azure Backup
- Backup Windows machines
These two scenarios are differentiated on the basis of the process by which you can back up your machines. In layman’s terms, the first process is about backing up a machine without installing any backup agent on it and the second type makes use of the backup agent and manual steps involved in configuration of the agent.
Backup Azure VM / Azure Backup
Backing up windows virtual machines which are already hosted on azure is quite a straightforward process, however there are a few pre-requisites which you have to consider before going ahead. Let’s see those one by one.
- As of today, Backup service doesn’t support VMs created though ARM deployment model i.e. IaaS V2 VMs.
- VMs in the same region as backup vault service are discoverable and can be directly registered.
- VMs need to have VM agent installed and running. If your VMs don’t have VM agent installed then you need to install it as per this documentation.
Here is how we can visualize the Azure back up process, please forgive my poor designing skills or paintbrush skills: D
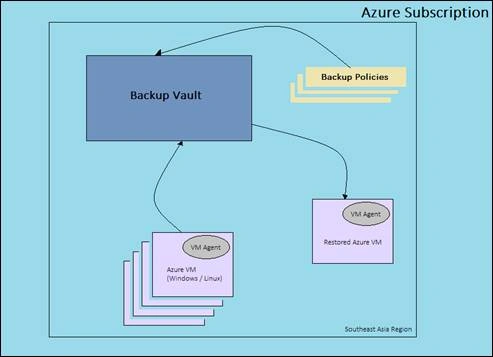
The process is quite similar to what is shown in the image above, you need to have the active azure subscription within which you will be creating Azure back up vault service and it will be used to take back up of your existing Azure VMs in a same region and later use the back up (restore points) to restore it in separate VM.
Let’s see the entire process in detail now.
Vault Creation
It all starts with the creation of a backup vault. Log in to your azure subscription and create backup vault service. We will name it as “demo-backup-vault”.
Make sure that the region in which you will create the backup vault service will be able to only discover and register virtual machines hosted in the same region.
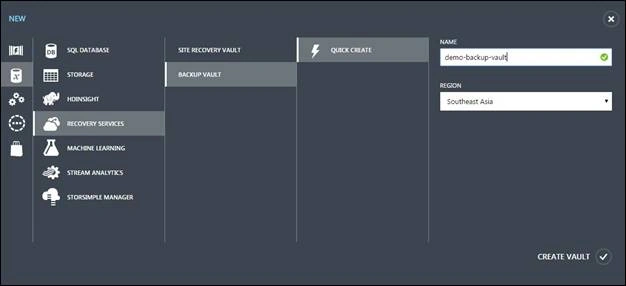
Once the vault is created, browse to it,

Storage Configuration
Next important step is the configuration of storage replication.
Storage replication is the same concept which you might have heard of in azure storage. It allows you to choose from available options of replicating contents of backup vault. You can choose either to keep it locally redundant or geo redundant.
For demo purposes I have selected the locally redundant option. Note that this is a one time only configuration procedure and you won’t be able to change these settings once you save it, so be careful before making the selection and analyze your needs.
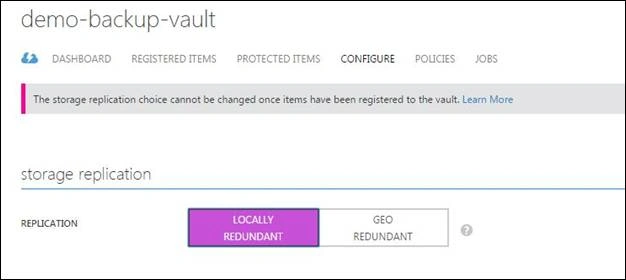
VM Registration
Next step is to register the virtual machines you want to protect.
Backup vault service has the “Discovery” feature. It scans the VMs in the same region and allows you to select machines to register from the scanned list of results.
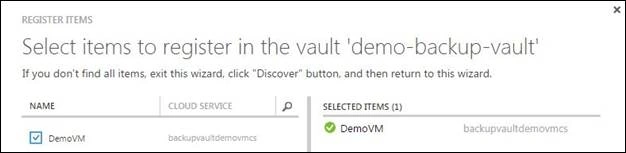
Now, I have a virtual machine named “DemoVM” hosted in Southeast Asia region (which is same region as my vault service). If I continue with this discover feature, I should be able to see my VM in the results.
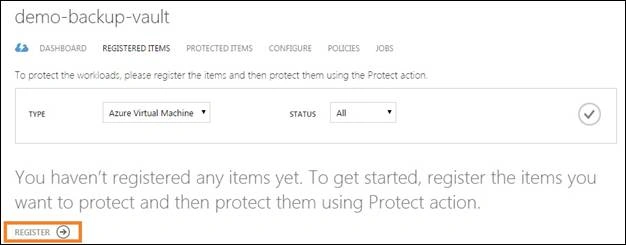
Click on Register, it takes a while to scan and comes up with results. I do see my machine listed in the result and I select it to register and click ok.
Policy Configuration
Next step is to configure the policy for the backup. Policy is nothing but the set of rules you want to enforce on the VM
backup procedure. E.g. backup frequency, retention etc.
We will create the new policy for our backup procedure, click on policy tab and select Add button.
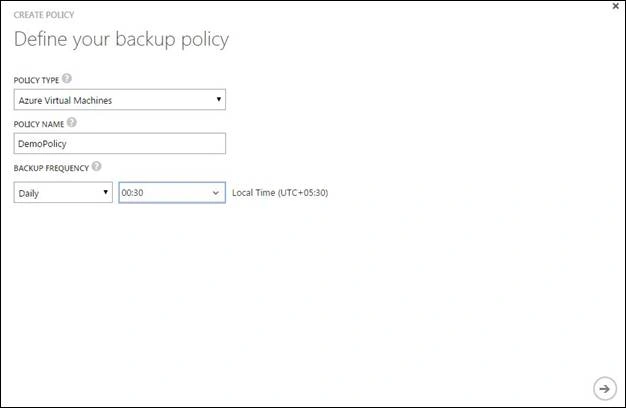
We will name our policy as DemoPolicy and set the backup frequency as daily. We want our backup to be done every day at 00:30 AM.
Click next,
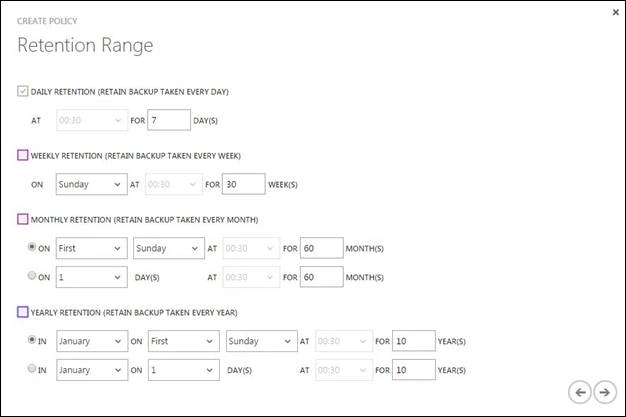
Configure your retention settings as per your need, for demo purposes we won’t be keeping backed up files older than 7 days. Since we are not taking any weekly, monthly or yearly backups we won’t set any retention policies for the same.
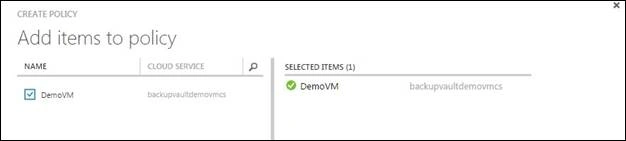
On Next screen, you are asked to choose VMs which you registered on which you want to apply this new policy. We will select our DemoVM.
Protecting VMs
Next step is to configure the protection for the VMs which you have registered. All you need to do is navigate to the protected items tab and you will be shown a list of registered VMs. Select your VM and click protect button.
Once the VM is protected, you will be able to see the protection status as Protected.
You can stop protecting your VMs by simply clicking on stop proection button.
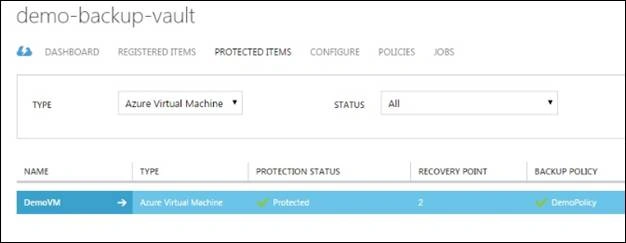
Now based on the applied policy and set backup schedule, the backup job will run and will take complete backup of the VM in its first run. Next backups will be incremental. i.e. only changes will be captured since the last full backup was taken.
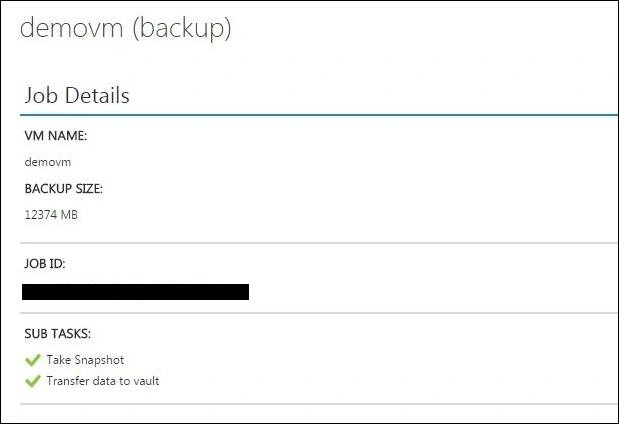
For demo purposes, we will go ahead and click on backup now button. It immediately submits a backup job to azure service. You can check the job status by clicking on it.
On completion, the job shows the backup size and status of sub tasks it was performing.
Restore
Now we have taken the backup of the entire VM so let’s try to restore it.
Note that using restore procedure, you will be able to restore the backed up VM in a new VM. You won’t be able to restore in existing VM.
On the protected items tab, the restore button enables if you have valid restore points for your VM.
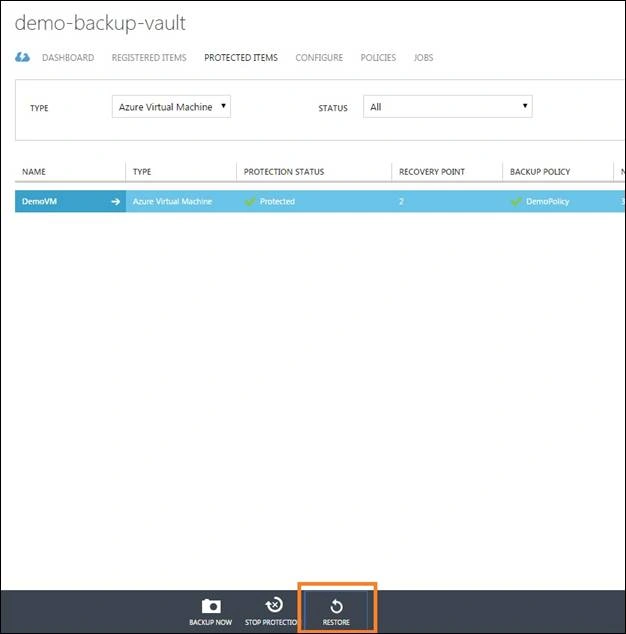
Once you click on restore button, you will be shown a two-step wizard where you have to mention certain parameters for the procedure. E.g.
Selection of a recovery point which is nothing but the backup which you want to restore,
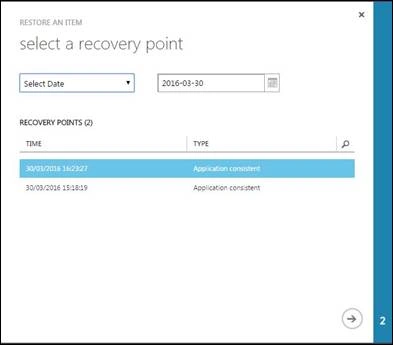
And specify VM parameters, it will create a new VM with these parameters.
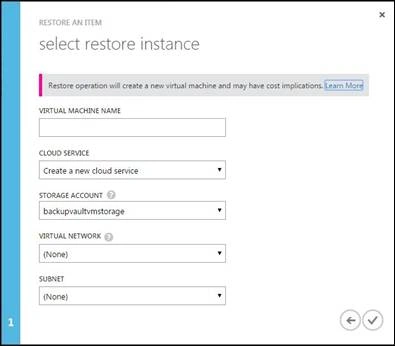
This is all about the Azure VM backup and restore procedure.
Limitations of backing up and restoring of Azure VMs using Azure Backup,
- Backing up VMs with more than 16 disks is not supported.
- VMs with reserved IPs or unpredictable endpoints are not supported.
- Restoring to existing VM is not supported. You have to create new VM to restore.
- Cross region backup is not supported.
- VMs with older OS than Windows Server 2008 R2 are not supported.
Backup Windows Machines
The backup vault service can be configured to take backup of windows on-premise machines, the process is quite simple, let’s see how we can visualize it.
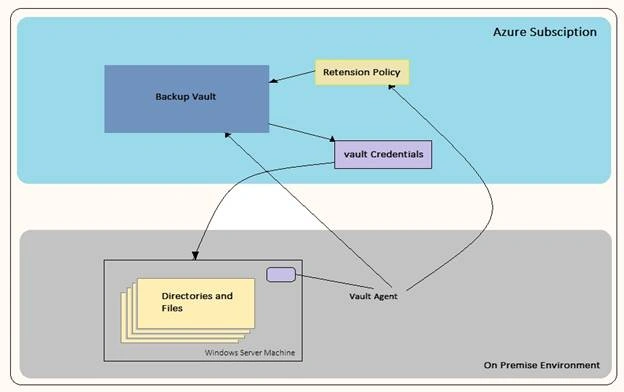
Again, I am not that good at MS Paint so please forgive the poor design, just tried to focus on the concept.
One of the important elements of this backup procedure is backup vault agent and the other is credentials file.
The agent needs to be installed on the machine which needs to be backed up or directories / files on the machine needs to be backed up.
Agent is available to download from azure portal i.e. from vault dashboard. Once it is installed, it provides you a nice self-explanatory wizard where in you configure the required settings, we will go through each setting one by one.
Another important element of the procedure is the vault credentials file. It is consumed by the agent in order to connect to your vault service.
This file can be downloaded from the azure portal, i.e. vault dashboard. It is your responsibility to store this credentials file in secure place as it contains all the information about your vault.
For Demo purpose, since I don’t have any on-premise demo machine, I am going to use the same Azure VM which we created in last section and assume it as an on premise machine. We will install the agent on it and see how we can configure it.
Once you download and install the agent on your machine the configuration wizard opens up.
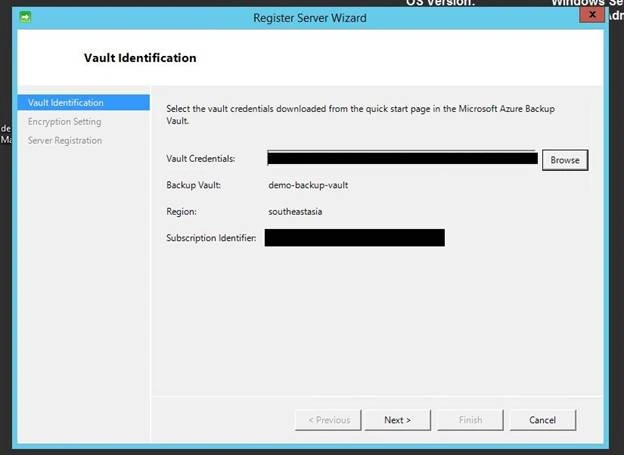
It asks for the valid credentials file, make sure you have downloaded the vault credentials and stored it on secure accessible place. Browse to the credentials file and provide path of it and click next.
(Note – If it says can’t connect to vault or invalid credentials, open up azure portal and download latest credentials file of your vault service.)
Next step is to configure the passphrase and encryption key.
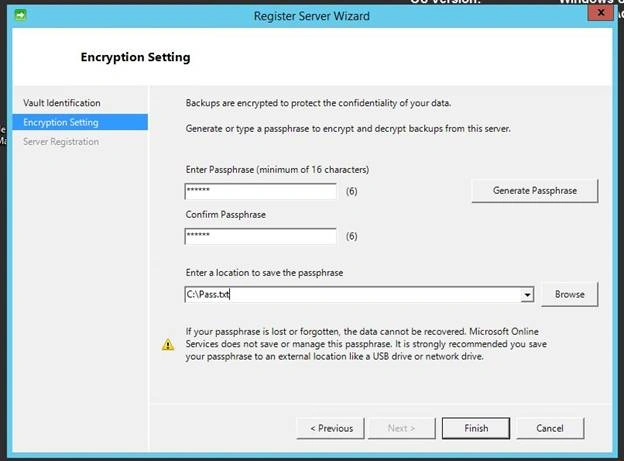
This is quite self-explanatory. Passphrase and encryption key is needed in order to establish a secure data channel to your vault. Remember to note down your passphrase.
Once this is done, your machine is ready and registered with the backup vault. You can see it in the portal.
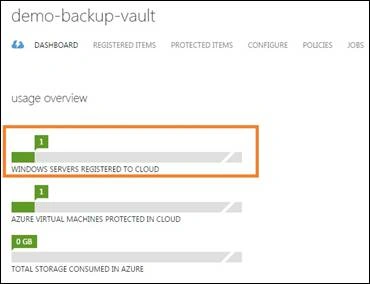
Now let’s go ahead and configure the backup schedule.
Suppose that I have a very important directory and a file which needs to be protected daily so that I always have a backup of it even if it is deleted.
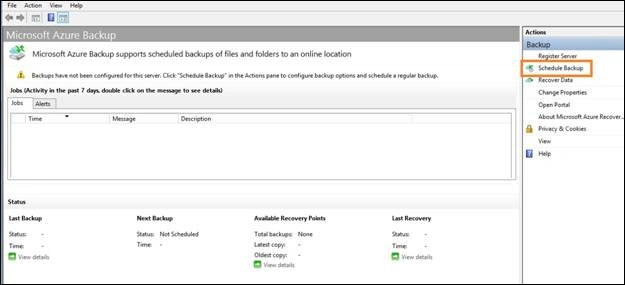
Click on schedule backup option.
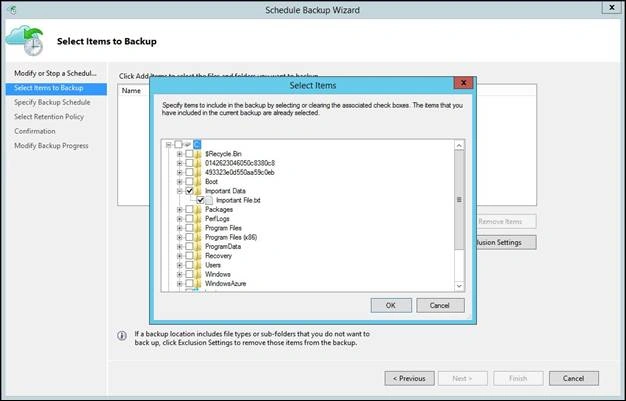
You will be asked to choose the drive, directories or files which needs to be backed up.
We will select our directory and the file.
Next steps is to set the backup schedule. Let’s schedule our backup as daily activity at 2:00 AM. Optimally you can set the weekly schedules too.
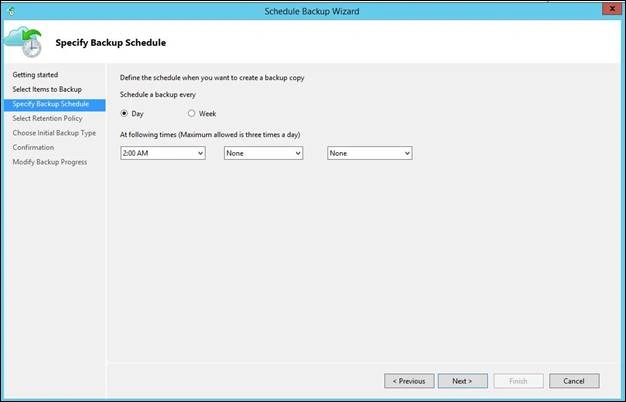
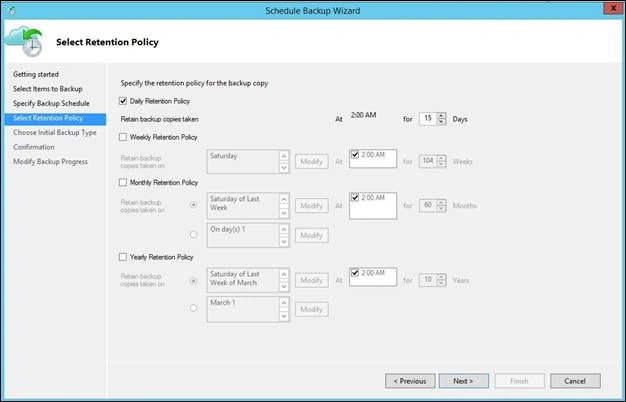
Once the schedule is set, we will need to define the retention policy.
It is almost similar to what we have seen in the last section of this article i.e. setting retention policies for Azure VM backup. All you need to do is, specify the timespan to which you’re backed up files will be retained by Azure backup vault.
We will set this duration as 15 days.
Next step is to choose the backup type.
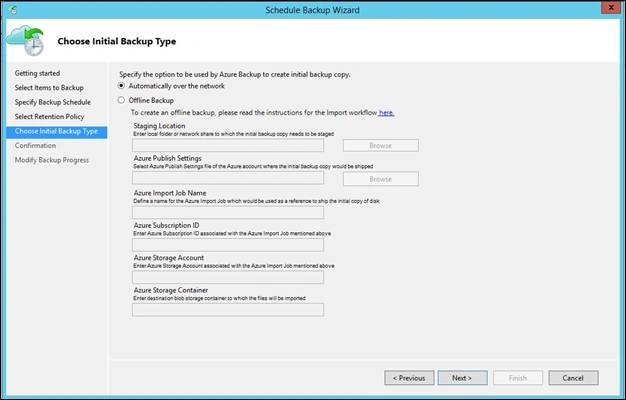
You can either choose from online backup i.e. over the network or offline backup type. To read more about offline backup – you can refer this link.
Click next and you are set. It will submit the backup job and backup will be taken.
Now let’s take a look at the restore procedure.
Suppose someone deletes our very important directory and now we want to restore it using backup vault.
Open up the agent and select recover data option.
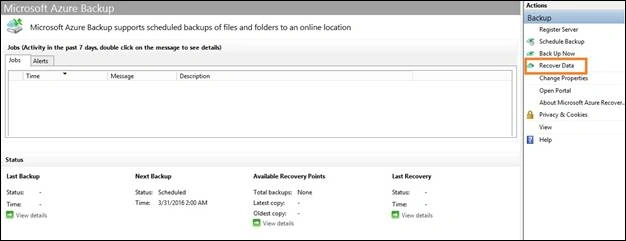
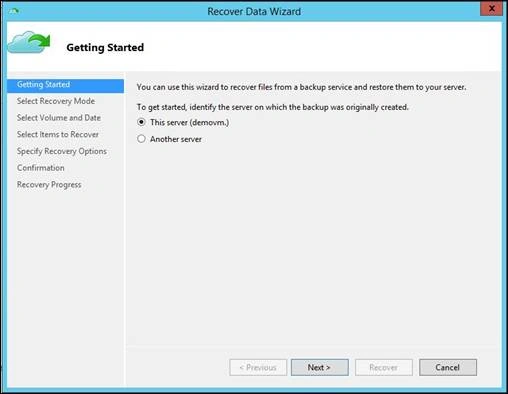
Next steps asks you about selection of the restore location i.e. whether you want to restore on the machine which is running agent or some other machine.
We will select this server option i.e. DemoVM and click next.
Next step will ask you to select the restore point i.e. available backups. Restore points can be searched based on date.
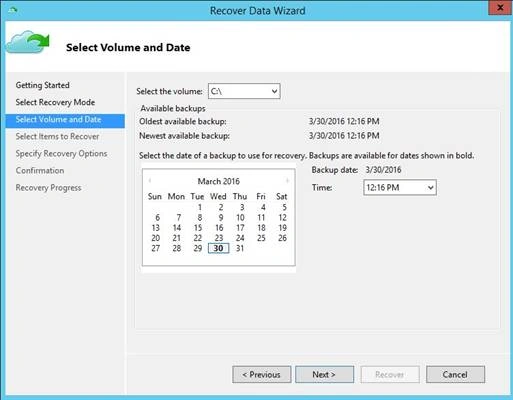
Once you select your restore point, you will be shown the data available within the selected backup.
We can see that our directory and file are ready to be restored.
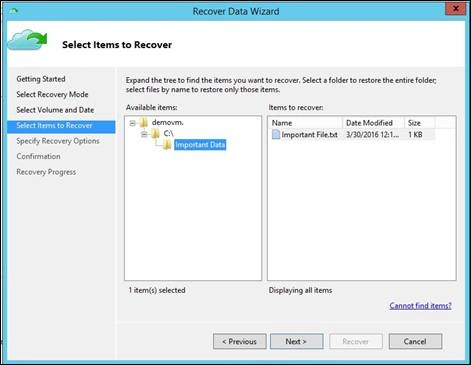
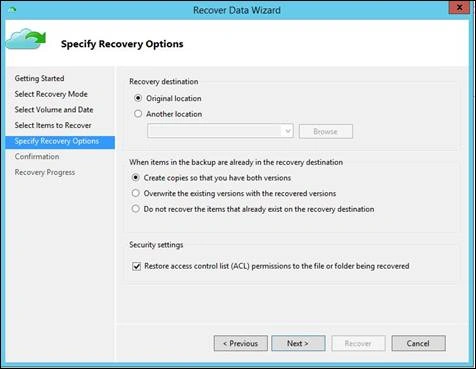
You can select recovery options e.g. whether to restore on original location or to different location, or restore should create a copy or overwrite to existing files, do not replace existing files etc.
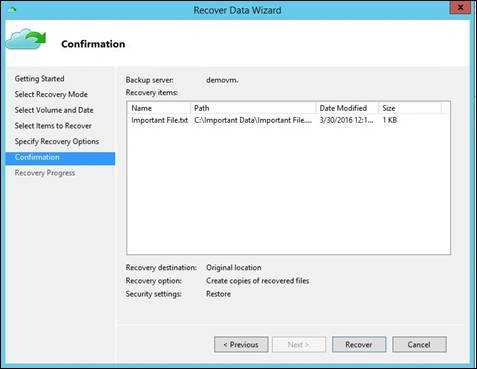
Next page shows the confirmation and then recovery procedure begins.
You can observe the status of recovery process on the next step.
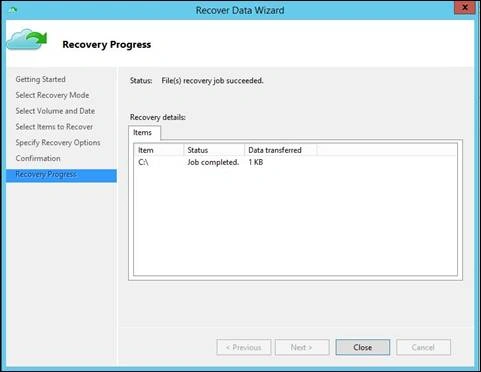
As the status is showing as completed, we will go on to restore location and check if it has really restored our files from the backup.
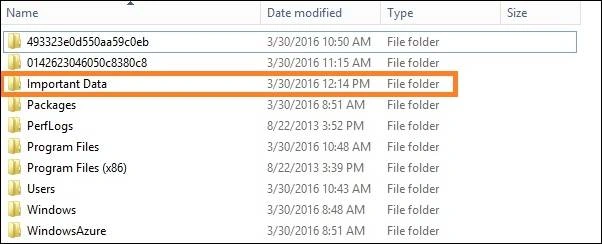
Isn’t it cool?
That’s all about backing up and restoring windows machines using Azure backup vault.
Pricing
One of the most important consideration for business owners to decide before using this is pricing.
Let’s see how much it costs to use this service
The service doesn’t cost you anything upfront and follows the same model as pay as you go, it basically consists of two components i.e.
- Size of the instance which needs to be protected
- Azure storage cost
Remember the storage configuration settings which we did as a first step after creating azure backup vault? Right, selection of LRS and GRS, it also plays an important role in the pricing.
Details of storage pricing can be found here.
Charges are applied on the basis of data stored per protected instance per month i.e.
For instances up to 50GB – you will be charged $5 per instance + storage consumption charges.
50-500 GBs – you will be charged $10 per instance + storage consumption charges and similarly
500GBs+ size instances – you will be charged in increments of $10 per 500GB + storage consumption charges.
You can refer to more details about pricing here.
So that’s all about one of the recovery service in a Microsoft Azure Recovery services.
DeepakPosted Nov 23, 2016, 7:24 AM
Can we automate it using REST API?
Prasanna MuraliPosted Jun 30, 2016, 11:31 AM
Nice one
Bhushan GawalePosted Apr 21, 2016, 12:44 AM
Thanks everyone, glad that it helped!
Rahul Kumar SaxenaPosted Apr 2, 2016, 12:19 PM
Informative...
Gowtham RajamanickamPosted Apr 2, 2016, 3:37 AM
good one...
Saillesh PawarPosted Apr 1, 2016, 2:42 PM
Nice share
Ankur MistryPosted Apr 1, 2016, 2:38 PM
Nice Share. Very interesting information