

Introduction
Have you ever wondered how to have different colors, headings or APIs call for the same app but from different environments? It is a sure thing that production APIs and test APIs are different and should be used with the greatest care. We will not change all the APIs calls and wordings manually everywhere in a project when deploying. This should not be done as it is risky.
In Angular, there is an easy way to have different configurations for different environments. This allows us to use and deploy to as many stages/environments as we need without ever changing the code. It is called environment files.
In a nutshell, we can have an environment file for production, called environment.ts, and another one for a development stage called environment.development.ts. Then, depending on where we are releasing our application, the correct environment file will be used.
Only some configurations are required, and the gain is massive.
In this article, I will show you how to get started and provide an example of having different texts and APIs.
Getting started
- Create a new app: ng new angular-environment-demo --standalone false.
- Generate environment files: ng generate environments.
Note. As from the Angular 15.1 environment files are not generated automatically.
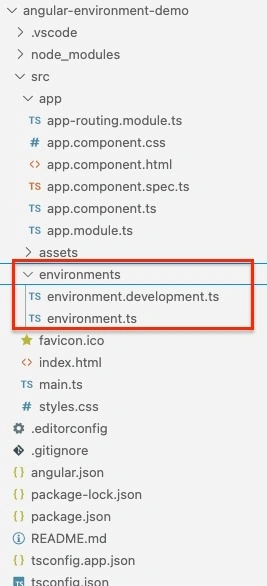
Hierarchy of environment files
Be it the environment.development.ts or the environments.ts, at the start both will contain the same object. All the configuration should be with this object and both should contain the same key.
For instance, if the environment.development.ts requires a key-value pair like: ‘weather_status’: ‘Good’ and the environment.ts will not use it, you have the following in that file: ‘weather_status’: ‘’. This is because, since you are using it in the code and your code will look for it in the environment file it will use [this will be explained later]. If your code is pointing to another environment file, it will still look for this and will not find it; causing a compilation error.
Let’s add 2 different page titles.

In the app.component.ts file, or any other ts file where you want to use the values from the environment file, you can access them like: ‘environment.<<value you want to access.>>. Below is an example of using the pageTitle in the ngOnInit of the app.component.ts.

Notice the import on line 2. For now, you can import any of the environment files.
On line 13, we are assigning the value of ‘pageTitle’ from the environment to ‘this. title’.
In the HTML file, we are using the ‘title’ as below.
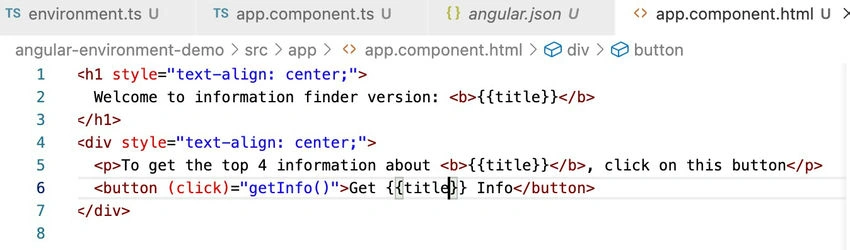
When you serve the application using: ng serve, you will be given the following screen.
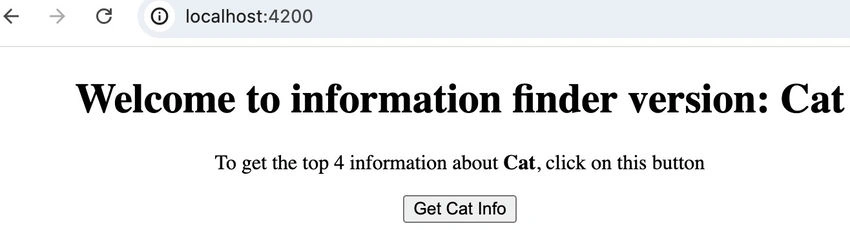
When we do only: “ng serve”, the values from the ‘environment.development.ts’ file are used.
If you want to use the configurations from the environment.ts file, you should add the following in the angular.json file.
"fileReplacements": [
  {
    "replace": "src/environments/environment.development.ts",
    "with": "src/environments/environment.ts"
  }
],
These codes should be added under "projects" -> "architect" -> "build" -> "configurations" -> "production" in the angular.json file.
Below is a full example of the angular.json file.
{
  "$schema": "./node_modules/@angular/cli/lib/config/schema.json",
  "version": 1,
  "newProjectRoot": "projects",
  "projects": {
    "angular-environment-demo": {
      "projectType": "application",
      "schematics": {
        "@schematics/angular:component": {
          "standalone": false
        },
        "@schematics/angular:directive": {
          "standalone": false
        },
        "@schematics/angular:pipe": {
          "standalone": false
        }
      },
      "root": "",
      "sourceRoot": "src",
      "prefix": "app",
      "architect": {
        "build": {
          "builder": "@angular-devkit/build-angular:application",
          "options": {
            "outputPath": "dist/angular-environment-demo",
            "index": "src/index.html",
            "browser": "src/main.ts",
            "polyfills": [
              "zone.js"
            ],
            "tsConfig": "tsconfig.app.json",
            "assets": [
              "src/favicon.ico",
              "src/assets"
            ],
            "styles": [
              "src/styles.css"
            ],
            "scripts": []
          },
          "configurations": {
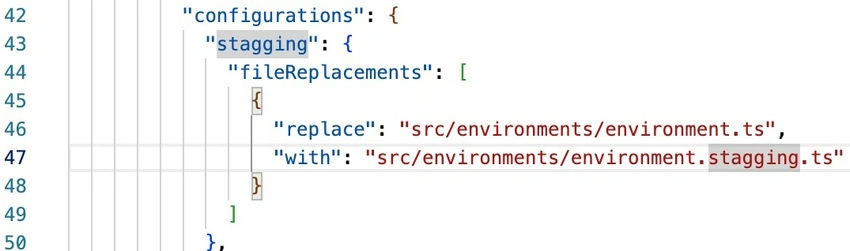
            "stagging": {
              "fileReplacements": [
                {
                  "replace": "src/environments/environment.ts",
                  "with": "src/environments/environment.stagging.ts"
                }
              ]
            },
            "production": {
              "budgets": [
                {
                  "type": "initial",
                  "maximumWarning": "500kb",
                  "maximumError": "1mb"
                },
                {
                  "type": "anyComponentStyle",
                  "maximumWarning": "2kb",
                  "maximumError": "4kb"
                }
              ],
              "fileReplacements": [
                {
                  "replace": "src/environments/environment.development.ts",
                  "with": "src/environments/environment.ts"
                }
              ],
              "outputHashing": "all"
            },
            "development": {
              "optimization": false,
              "extractLicenses": false,
              "sourceMap": true,
              "fileReplacements": [
                {
                  "replace": "src/environments/environment.ts",
                  "with": "src/environments/environment.development.ts"
                }
              ]
            }
          },
          "defaultConfiguration": "production"
        },
        "serve": {
          "builder": "@angular-devkit/build-angular:dev-server",
          "configurations": {
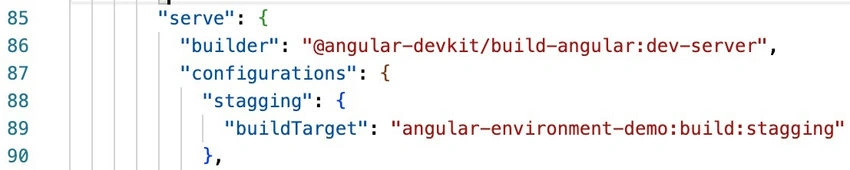
            "stagging": {
              "buildTarget": "angular-environment-demo:build:stagging"
            },
            "production": {
              "buildTarget": "angular-environment-demo:build:production"
            },
            "development": {
              "buildTarget": "angular-environment-demo:build:development"
            }
          },
          "defaultConfiguration": "development"
        },
        "extract-i18n": {
          "builder": "@angular-devkit/build-angular:extract-i18n",
          "options": {
            "buildTarget": "angular-environment-demo:build"
          }
        },
        "test": {
          "builder": "@angular-devkit/build-angular:karma",
          "options": {
            "polyfills": [
              "zone.js",
              "zone.js/testing"
            ],
            "tsConfig": "tsconfig.spec.json",
            "assets": [
              "src/favicon.ico",
              "src/assets"
            ],
            "styles": [
              "src/styles.css"
            ],
            "scripts": []
          }
        }
      }
    }
  }
}
This file is the most important one when we want to make the best use of an environment file.
To use the configuration from the environment.ts file, we need to serve the application with the following command: “ng serve --configuration=production”.
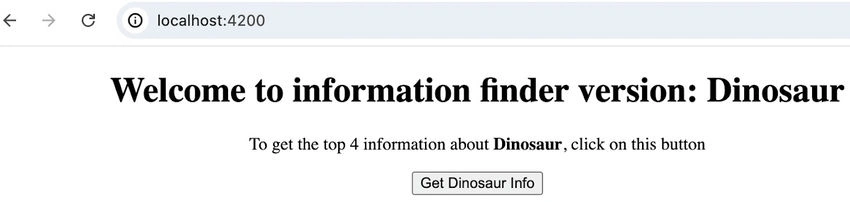
Note that you did not make any changes in the code, you have added only a new configuration and served the app using the new command.
For example, if you are serving in production, you can use this command to serve in that environment. No changes in the code are required.
It is common to have multiple environments used mostly for testing.
When you need to accommodate a new environment, there are some steps to follow.
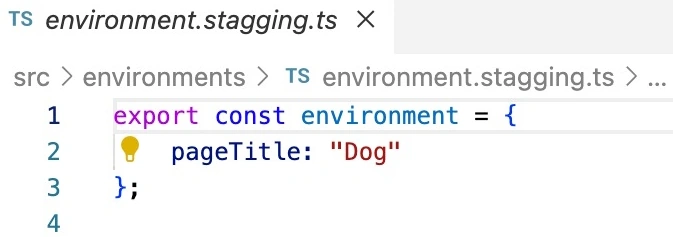
- create a new environment file in the environment folder. For example, we can add environment.staging.ts.
- Once this is created, do not forget to add values present in other environment files.
- In the angular.json file, we need to add a new configuration under configuration.
- The last part is still in the angular.json file. Now we need to add the configuration to serve the application using the respective environment file. These changes are done under "projects" -> "architect" -> "serve" -> "configurations"
- To serve the application using the configuration in the environment.stagging.ts file, we run the following command: ng serve --configuration=stagging. Once the serving is done, the loaded screen is the following.

Using environment files to use different APIs.
Another powerful application of environment files is how easily, almost seamlessly it can be used to call different APIs for different environments.
Below are the steps.
- Add the corresponding key-value pair in the environment object in all the environment files in your project, like below.
export const environment = { pageTitle: "Dinosaur", apiUrl: "https://dinosaur-facts-api.shultzlab.com/dinosaurs" }; - In your component.ts file, wherever required, you can call the web service in any method that you want.
- For this example, we will be using the fetch method in a promise.
getInfo(){ const myPromise = new Promise((resolve, reject) => { fetch(environment.apiUrl) .then((response) => response.json()) .then((data) => { resolve(data) }) .catch((error) => reject(error)) }); myPromise .then((result: any) => { const element = document.getElementById('txtResult'); if (element) { element.innerHTML = JSON.stringify(result.slice(0, 5)); } console.log(result.slice(0, 5)); }) .catch((error) => console.log(error)) .finally(() => console.log('promise done')); } - Notice that in the call, we are not passing any api. Instead, we are using the variable from the environment file.
- At this point, the function is done and can be called when a button is clicked.
- When we serve the application using: ng serve and click on the button, we get the following.
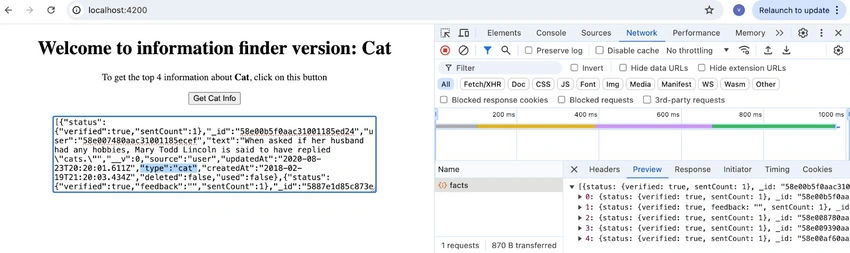
- When we serve the application using ng serve --configuration=production, below is the output:
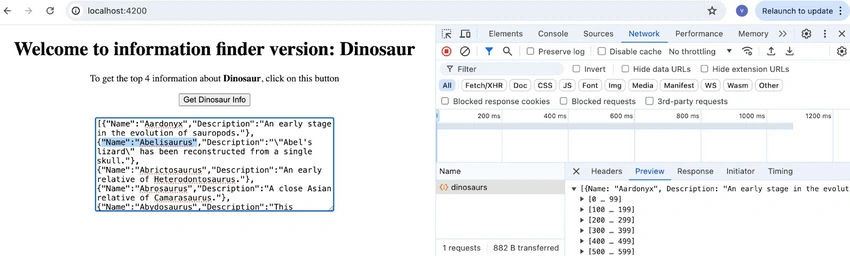
- Note that there has been NO code change. We have only served the application using different serving configurations.
- The same applies when you are deploying to an environment. Whether you are deploying your Angular app using Azure or something else, you are asked at some point the command to run the Angular application. Providing the correct serving configuration will use the required environment file and will display the corresponding information or call the desired API. No changes in code are required.
Conclusion
Environment files are very important and powerful. Maximizing their use will prevent you from doing manual changes when deploying in different stages.
Resources
- https://v17.angular.io/guide/build
- https://github.com/mervynmanilall/angular-environment [my implementation and all the codes used in this article].
Join the conversation! Your thoughts help the community grow.