


Google officially announced Kotlin as a first class language for Android development at Google I/O 2017. From Android Studio 3.0, Kotlin is included in support for Android Studio. In this post, we will learn Kotlin for the development of an Android application in Android Studio.
To get started, you have to download Android Studio 3.0 or add the Kotlin plugin with your existing Android Studio. To know the basics of Kotlin, click here.
Installing Kotlin Plugin in Android Studio versions earlier than 3.0
In higher versions of Android Studio, we simply create a new project in Android Studio, check the Kotlin support, and start as usual. But for Android Studio with a version less than 3.0, we have to install the Kotlin plugin manually from the Plugins menu.
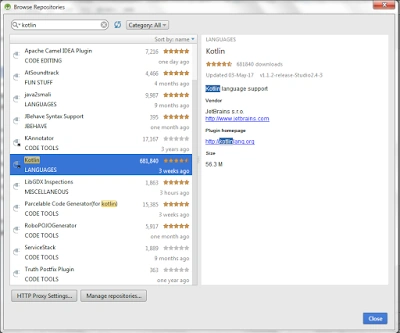
You can add this plugin by selecting File >> Settings >> Plugins. Then, select or click "Browse Repositories" button. Then, search for Kotlin Plugin in the search box and select the relevant one. Finally, click the "Install" button.
Create Android Project with Kotlin
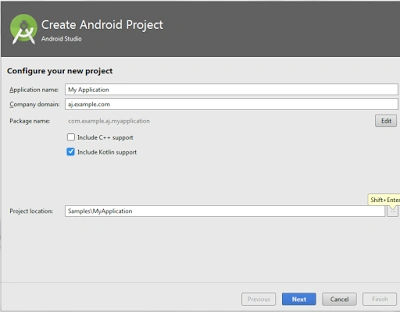
By default, Android Studio 3.0 has the checkbox for Kotlin Support for your Android Application. Create a new project in Android Studio, check the Kotlin support, and start as usual with Android Studio 3.0.
For migrating Java Android Project to Kotlin Android Project, you can follow the following process.
Configuring Kotlin
Kotlin support can be configured by selecting Tools >> Kotlin >> Configure Kotlin. Then, Click “Sync Now”. This step is applicable to the Android Studio pre-versions of 3.0. The best way is to update your Android Studio.
In Android Studio 3.0, by default, you have Kotlin Activity. For Android Studio with versions less than 3.0, you can convert their Java Activity into Kotlin Activity.
Open "Quick Search" or press Ctrl + Shift + A (for Windows users) and "Search". Select “Convert Java to Kotlin” or simply press Ctrl + Shift + Alt + K.
Coding Part
Now, your MainActivity.kt (converted from MainActivity.java) looks like the following.
- package com.androidmads.kotlinsample_helloworld
- import android.support.v7.app.AppCompatActivity
- import android.os.Bundle
- import android.widget.TextView
- import android.widget.Toast
- class MainActivity: AppCompatActivity() {
- // Declaration
- var helloTextView: TextView ? = null
- override fun onCreate(savedInstanceState: Bundle ? ) {
- super.onCreate(savedInstanceState)
- setContentView(R.layout.activity_main)
- // Initialization
- helloTextView = findViewById(R.id.helloTxtView) as TextView
- // Assigning data to TextView in runtime
- helloTextView!!.text = "Hello Kotlin!";
- // Click Listener in Kotlin
- helloTextView!!.setOnClickListener({
- Toast.makeText(applicationContext, "Hello TextView Clicked", Toast.LENGTH_LONG).show();
- })
- }
- }
Extends in Java is replaced by colon (:). To know more, click here.
Kotlin is a new programming language for Android development. Even though Kotlin is announced as a first class language for Android, Java will not be deprecated from Android development. Please tell me what you think about this tutorial. Also, do let me know your views about the future of Java in Android development.
Kishor Bikram OliPosted Feb 4, 2018, 9:17 PM
Waiting for more articles on Kotlin. Basic to advanced.