Microsoft Power Pages allows users to sign in to a website using external identity providers, including Microsoft Entra ID. In some applications, however, authenticating a user is not enough. Certain users also need administrator privileges to access specific features or manage application information.
For example, consider a Power Pages application where external users sign in using Microsoft Entra ID. The application needs to identify which users have administrative access, store their details in a custom Dataverse table, and display particular elements only to administrators.
In this article, we will explore how to use Power Automate to manage external user records in a custom admin table and how to control the visibility of admin-only elements in a Power Pages website.
Prerequisites
Before starting, make sure you have:
A Power Pages website configured for Microsoft Entra ID authentication.
Access to Microsoft Power Apps and the Dataverse environment associated with the website.
An External Identity table containing the external user information used by your implementation.
A custom Admins table to store administrator records.
Permission to create and manage Power Automate cloud flows.
Access to the Power Pages website configuration and security settings.
Step 1: Configure Microsoft Entra ID authentication
First, configure Microsoft Entra ID as an identity provider for your Power Pages website.
Open the Power Pages design studio.
Select your website and open the Security workspace.
Navigate to Identity providers.
Configure the appropriate Microsoft Entra identity provider.
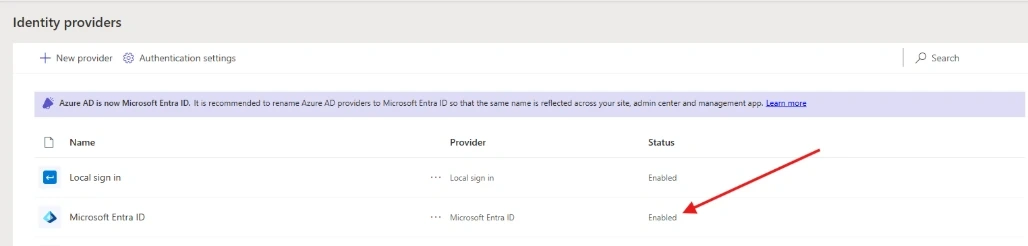
Complete the required identity provider configuration, including the application details and redirect URL.
Save the configuration and test the sign-in process.
Step 2: Create the custom admin table
The next step is to create a custom Dataverse table to store admin's details.
You can create column names like Name, Email, User (lookup to Contact table which will be useful to display elements based on logged-in user)
Step 3: Understand the External Identity table
The External Identity table is used in this implementation to identify external users and their associated identity information.
I have seen that whenever any external user is signed in their record is created in contact table afterwards it is created in external identity table. because there is lookup column related to contact table in external identity table.

Step 4: Create the Power Automate flow
Power Automate can automate the process of creating administrator records, reducing the need to add records manually.
In this implementation, the flow uses the External Identity information to create a record in the Admins table.
1 - Select dataverse trigger and add External identity table
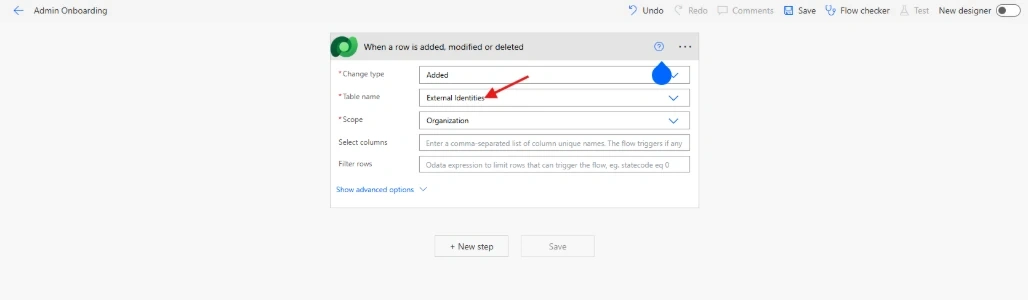
2 - Add List rows dataverse action for filter by username
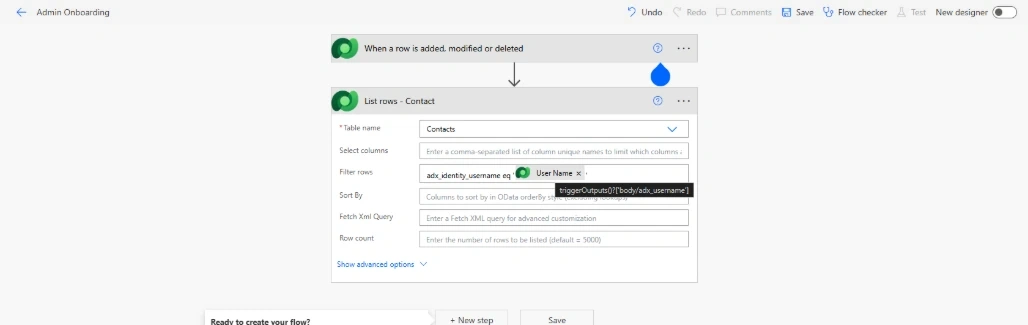
Well, you can also filter by lookup column, here i have filter by username because both user's username is same as contact table in external identity table. After this step, you can add dataverse action for adding matching records from contact table to your custom table.
* Show specific elements only to administrators
Once administrator records are available in the Admins table, the next requirement is to control which elements users can see on the Power Pages website.
For example, you may want to display an Admin Dashboard link, a management section, or an administrative button only to authorized users.
The visibility implementation depends on how the website is built. You can use a supported role-based approach or an appropriate conditional rendering approach to determine whether an admin-only element should be displayed.
Create Table Permission for Admin Table in Power Pages
Go to Power Pages Management -> Table Permissions.
Create table permission for admin table, here i have created and select access type as Contact and select contact access type by referring to lookup column in admin table that refer to Contact table.
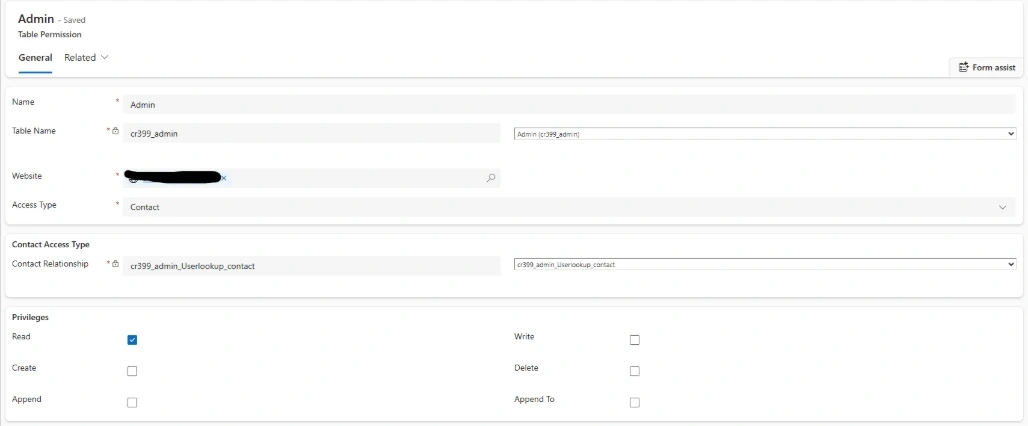
After creating table permissions, now it's time to control from code side. as i have already created page and i have written below code in html file of page that show Go to admin view button to only admins.
<div class="row sectionBlockLayout text-start" style="min-height: auto; padding: 8px;">
  <div class="container" style="display: flex; flex-wrap: wrap;">
    <!-- <div class="col-lg-12 columnBlockLayout" style="padding: 16px; margin: 60px 0px; min-height: 200px;"></div> -->
    {% if user %}
    <!-- 1. QUERY THE CUSTOM ADMIN TABLE -->
    {% fetchxml check_admin_query %}
    <fetch top="1" no-lock="true">

      <entity name="cr399_admin">

        <filter type="and">
          <condition attribute="cr399_userlookup" operator="eq" value="{{ user.id }}" />
          <condition attribute="statecode" operator="eq" value="0" />
        </filter>
      </entity>
    </fetch>
    {% endfetchxml %}

    <!-- 2. CHECK IF THE QUERY FOUND A MATCH -->
    {% if check_admin_query.results.entities.size > 0 %}
    <div id="admin-btn-container">
      <button id="admin-view-btn">Go to Admin View</button>
    </div>
    {% endif %}
    <h1>Users page</h1>
    {% else %}
    <h1>You are not authenticated.</h1>
    {% endif %}
  </div>
</div>
Code explantation:
1. {% if user %} — Checks whether a user is logged in.
2. {% fetchxml check_admin_query %} — Searches the custom Admin table (cr399_admin).
3. cr399_userlookup — Matches the admin record with the logged-in user's ID.
4. statecode = 0 — Checks that the admin record is active.
5. {% if check_admin_query.results.entities.size > 0 %} — If a matching record exists, displays the Go to Admin View button.
In simple terms: Only logged-in users who have an active record in the Admin table see the admin button.
Conclusion
Here, we have learnt that how combining Microsoft Entra ID authentication with Power Automate and a custom Dataverse admin table provides a practical way to manage administrator records in a Power Pages application.


Join the conversation! Your thoughts help the community grow.