

Azure Computer Vision services provide algorithms that process and return information of the images. You can either specify the image URL or upload an image to analyze the image. Here, we have used Computer Vision SDK and C# to analyze an image.
Creating a Visual C# Console App in Visual Studio
-
Open Visual Studio ->Create a new project.
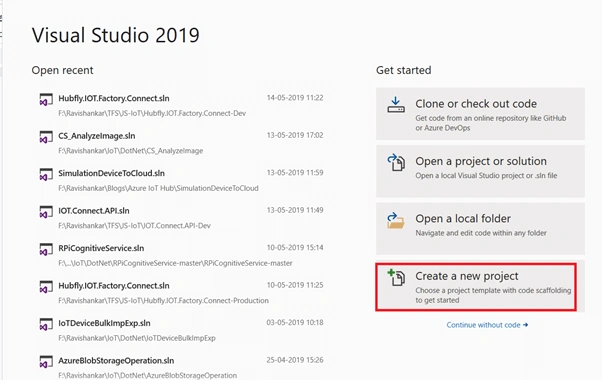
-
Select Console App (.NET Core) and click "Next".
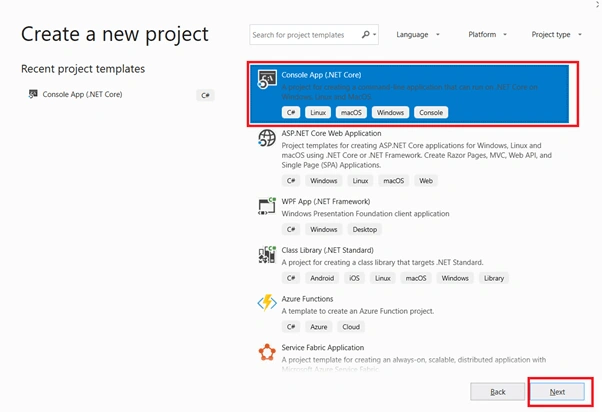
-
Enter the project name, location, and solution name.
-
Click "Create".
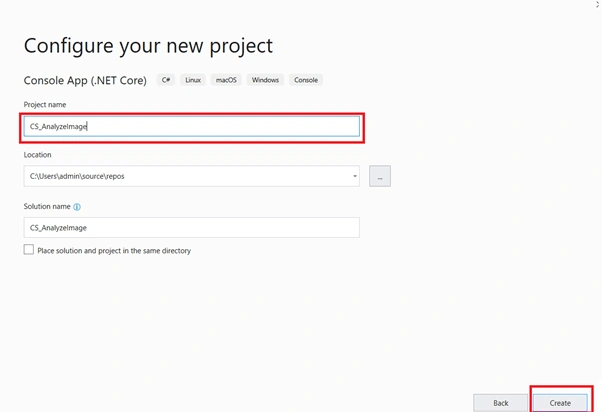
Installing Microsoft.Azure.CognitiveServices.Vision.ComputerVision SDK
-
Go to Project -> Manage NuGet Packages.
-
Click the "Browse" tab and search for Microsoft.Azure.CognitiveServices.Vision.ComputerVision.
-
You will see Microsoft.Azure.CognitiveServices.Vision.ComputerVision SDK listed in the search results; click the "Install" button.
-
Now, click the "I Accept" button to accept the license agreement.
-
It will take a few minutes to install the SDK in our project.
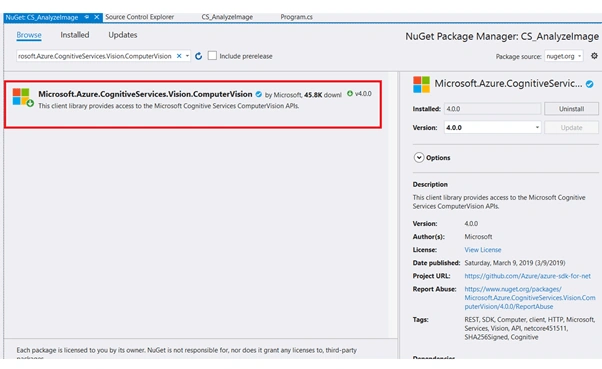
Creating Cognitive Service Account
-
To create a Cognitive Services account in the Azure portal, follow the article How To Create An Azure Cognitive Service Account Using Azure PowerShell.
Get Computer Vision Access key
-
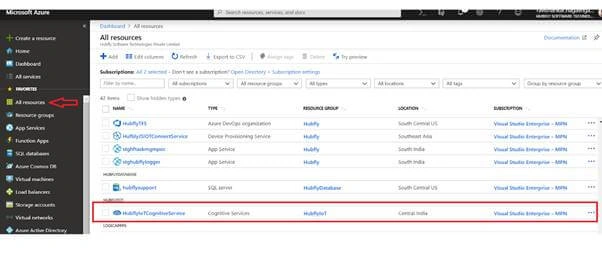
Go to Azure portal, click All Resources from the left pane. Select the type of Cognitive Service that you have created.
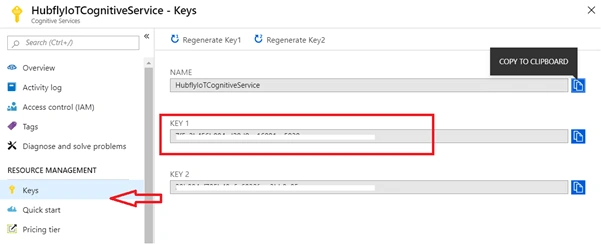
- Click "Keys" from Resource Management section and copy the access key.
-
Here, we used AnalyzeImageAsync and AnalyzeImageInStreamAsync methods which wrap the Analyze Image REST API for remote and local images respectively
- using System;
- using Microsoft.Azure.CognitiveServices.Vision.ComputerVision;
- using Microsoft.Azure.CognitiveServices.Vision.ComputerVision.Models;
- using System.Collections.Generic;
- using System.IO;
- using System.Threading.Tasks;
- namespace CS_AnalyzeImage
- {
- class Program
- {
- // subscriptionKey = "0123456789abcdef0123456789ABCDEF"
- private const string subscriptionKey = "< Enter your subscription key>";
- // localImagePath = @"C:\Documents\LocalImage.jpg"
- private const string localImagePath = @"<LocalImage>";
- private const string remoteImageUrl ="< Enter the remote image url>";
- // Specify the features to return
- private static readonly List<VisualFeatureTypes> features =
- new List<VisualFeatureTypes>()
- {
- VisualFeatureTypes.Categories, VisualFeatureTypes.Description,
- VisualFeatureTypes.Faces, VisualFeatureTypes.ImageType,
- VisualFeatureTypes.Tags
- };
- static void Main(string[] args)
- {
- ComputerVisionClient computerVision = new ComputerVisionClient(
- new ApiKeyServiceClientCredentials(subscriptionKey),
- new System.Net.Http.DelegatingHandler[] { });
- // You must use the same region as you used to get your subscription
- // keys. For example, if you got your subscription keys from westus,
- // replace "westcentralus" with "westus".
- //
- // Free trial subscription keys are generated in the "westus"
- // region. If you use a free trial subscription key, you shouldn't
- // need to change the region.
- // Specify the Azure region
- computerVision.Endpoint = "https://centralindia.api.cognitive.microsoft.com";
- Console.WriteLine("Images being analyzed ...");
- var t1 = AnalyzeRemoteAsync(computerVision, remoteImageUrl);
- var t2 = AnalyzeLocalAsync(computerVision, localImagePath);
- Task.WhenAll(t1, t2).Wait(5000);
- Console.WriteLine("Press ENTER to exit");
- Console.ReadLine();
- }
- // Analyze a remote image
- private static async Task AnalyzeRemoteAsync(
- ComputerVisionClient computerVision, string imageUrl)
- {
- if (!Uri.IsWellFormedUriString(imageUrl, UriKind.Absolute))
- {
- Console.WriteLine(
- "\nInvalid remoteImageUrl:\n{0} \n", imageUrl);
- return;
- }
- ImageAnalysis analysis =
- await computerVision.AnalyzeImageAsync(imageUrl, features);
- DisplayResults(analysis, imageUrl);
- }
- // Analyze a local image
- private static async Task AnalyzeLocalAsync(
- ComputerVisionClient computerVision, string imagePath)
- {
- if (!File.Exists(imagePath))
- {
- Console.WriteLine(
- "\nUnable to open or read localImagePath:\n{0} \n", imagePath);
- return;
- }
- using (Stream imageStream = File.OpenRead(imagePath))
- {
- ImageAnalysis analysis = await computerVision.AnalyzeImageInStreamAsync(
- imageStream, features);
- DisplayResults(analysis, imagePath);
- }
- }
- // Display the most relevant caption for the image
- private static void DisplayResults(ImageAnalysis analysis, string imageUri)
- {
- Console.WriteLine(imageUri);
- if (analysis.Description.Captions.Count != 0)
- {
- Console.WriteLine(analysis.Description.Captions[0].Text + "\n");
- }
- else
- {
- Console.WriteLine("No description generated.");
- }
- }
- }
- }
-
Replace the <Subscription key> with your valid subscription key.
-
Change the Computer.Endpoint to the Azure region associated with your subscription key.
-
Replace <Local Image> with the path and file name of the local image.
-
Optionally, set remoteImageUrl to try the different image URL.
That's it. Now, run the web application, go to Debug menu, and click on "Start without Debugging" or press F5. This will display the below result.
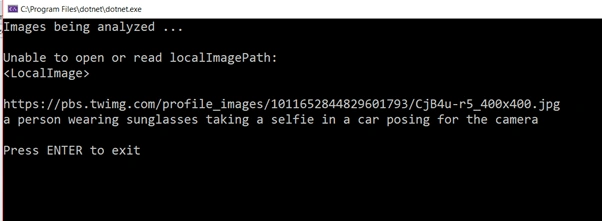
I hope you have learned how to analyze an image (local or remote) using the Computer Vision SDK and C#. Feel free to fill up the comment box below with your feedback or query.
Join the conversation! Your thoughts help the community grow.